DROPS Belle
DROPS Belle
53% Cotton, 33% Viscose, 14% Linen
from 2.20 € /50g
Get the yarn to make this pattern from 15.40€.

The yarn cost is calculated from the pattern’s smallest size and the yarn’s cheapest product type. Looking for an even better price? You might find it on the DROPS Deals!

DROPS SS24

New Land Cardigan

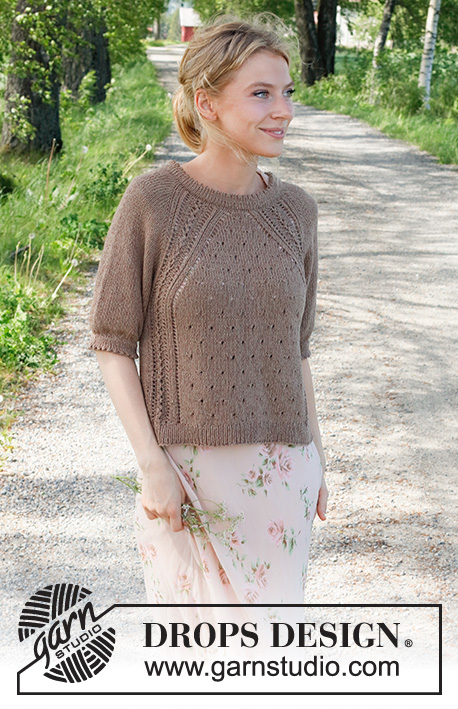
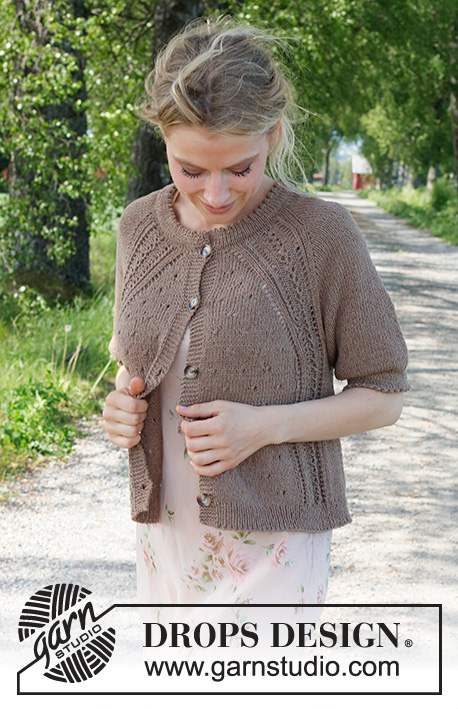
Knitted jacket in DROPS Belle. Piece is knitted top down with raglan, lace pattern, double edges and short sleeves. Size: S - XXXL

DROPS 232-10
DROPS design: Pattern vs-081
Yarn group B
----------------------------------------------------------

SIZE:
S - M - L - XL - XXL - XXXL

MATERIALS:
DROPS BELLE from Garnstudio (belongs to yarn group B)
350-400-450-500-550-600 g colour 25, forest brown

DROPS BUTTON NO 629: 5-5-6-6-6-6 pieces

NEEDLES:
DROPS CIRCULAR NEEDLE SIZE 4 mm: Length 40 and 80 cm.
DROPS CIRCULAR NEEDLE SIZE 3 mm: Length: 80 cm
DROPS DOUBLE POINTED NEEDLES SIZE 4 mm
DROPS DOUBLE POINTED NEEDLES SIZE 3 mm
The technique MAGIC LOOP can be used – you then only need circular needle of 80 cm in each size.

KNITTING TENSION:
21 stitches in width and 28 rows vertically in stocking stitch = 10 x 10 cm.
NOTE! Remember that needle size is only a suggestion. If you have too many stitches on 10 cm switch to larger needles. If you have too few stitches on 10 cm switch to smaller needles.

-------------------------------------------------------

Alternative Yarn – See how to change yarns here
Yarn Groups A to F – Use the same pattern and change the yarn here
Yarn usage using an alternative yarn – Use our yarn converter here

-------------------------------------------------------

DROPS Belle
DROPS Belle
53% Cotton, 33% Viscose, 14% Linen
from 2.20 € /50g
Get the yarn to make this pattern from 15.40€.

The yarn cost is calculated from the pattern’s smallest size and the yarn’s cheapest product type. Looking for an even better price? You might find it on the DROPS Deals!

Pattern instructions

----------------------------------------------------------

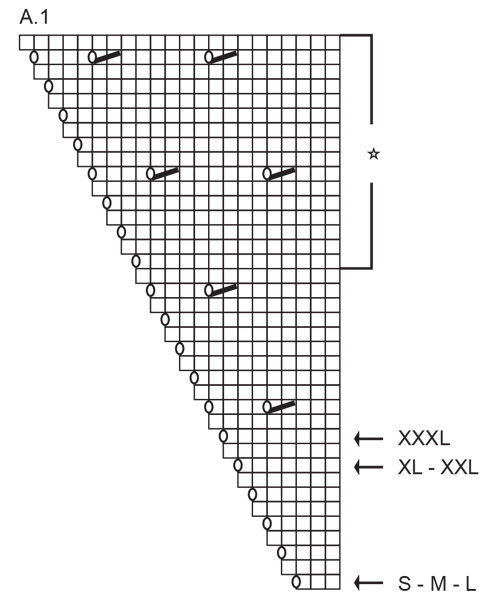
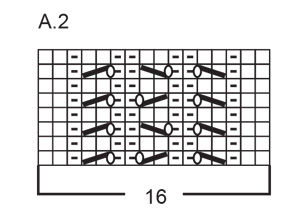
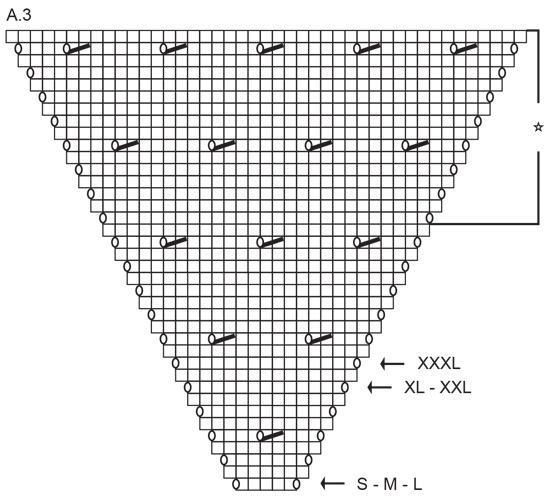
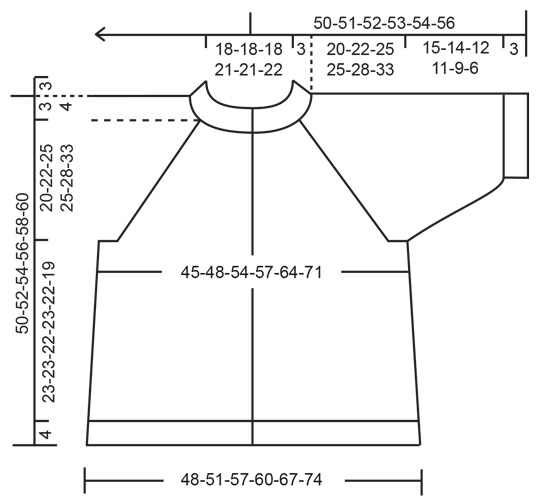
EXPLANATION FOR THE PATTERN:

----------------------------------------------------------

GARTER STITCH (back and forth):
Knit all rows.
1 ridge vertically = knit 2 rows.

PATTERN:
See diagrams A.1 to A.5. Diagrams show all rows in pattern seen from the right side.

INCREASE TIP (applies to sides of body):
Work until 2 stitches remain before marker thread, make 1 yarn over, knit 4 (marker thread is in the middle of these 4 stitches), make 1 yarn over. On next row work yarn overs twisted to avoid holes. Then work the new stitches in stocking stitch.

DECREASE TIP (applies to mid under sleeves):
Decrease 1 stitch on each side of marker thread as follows: Work until 3 stitches remain before marker thread and knit 2 together, knit 2 (marker thread is between these 2 stitches), slip 1 stitch knitwise, knit 1, pass slipped stitch over stitch worked.

BUTTONHOLES:
Decrease for buttonholes on right band (when garment is worn). Decrease from right side when 4 stitches remain on row as follows: Make 1 yarn over, knit the next 2 stitches together, knit the last 2 stitches. On next row (wrong side) knit the yarn over to make a hole.
Decrease first buttonhole when neck edge has been worked Then decrease the next 4-4-5-5-5-5 buttonholes, approx. 10-10½-9-9-9½-9½ cm apart.

----------------------------------------------------------

START THE PIECE HERE:

----------------------------------------------------------

JACKET - SHORT OVERVIEW OF THE PIECE:
Work double neck edge and yoke back and forth on circular needle from mid front, work top down. Now divide yoke for body and sleeves. Work body back and forth on circular needle. Work sleeves in the round on double pointed needles/a short circular needle.

DOUBLE NECK EDGE:
Cast on 131-131-131-159-159-165 stitches on circular needle size 3 mm with DROPS Belle.
Purl 1 row from wrong side while decreasing 20-20-20-24-24-26 stitches evenly (do not decrease over the 6 outermost stitches in each side)= 111-111-111-135-135-139 stitches. Then work in stocking stitch back and forth with 1 stitch in GARTER STITCH in each side – read explanation above.
When piece measures 3 cm, work next row as follows from right side: 1 stitch in garter stitch, * knit 2 together, make 1 yarn over *, work from *-* until 2 stitches remain, knit 1, 1 stitch in garter stitch (folding edge). Continue with stocking stitch and 1 stitch in garter stitch in each side until piece measures 3 cm from folding edge.
Insert 1 marker after the outermost 6 stitches towards mid front. Work yoke as explained below - measure yoke from this marker!

YOKE:
Switch to circular needle size 4 mm.
Work first row as follows from right side: 6 band stitches in garter stitch, A.1 (start at the arrow for your size), A.2, make 1 yarn over, 12-12-12-16-16-16 stitches in stocking stitch, make 1 yarn over, work A.2, A.3 (start at the arrow for your size), A.2, make 1 yarn over, 12-12-12-16-16-16 stitches in stocking stitch, make 1 yarn over, A.2, A.4 (start at the arrow for your size), and 6 band stitches in garter stitch – decrease for BUTTONHOLE on right band – read explanation above.
1 increase for raglan has been done, and there are 119-119-119-143-143-147 stitches on needle.
Continue the pattern like this, and increase for raglan the same way on every row from right side, i.e. on front pieces and back piece increase for raglan with yarn overs as shown in A.1, A.3 and A.4. On sleeves increase with 1 yarn over on each side of stitches in stocking stitch (purl yarn overs on sleeves twisted to avoid holes). REMEMBER THE KNITTING TENSION!

When A.1. A.3 and A.4 have been worked vertically, increases have been worked a total of 19-19-19-15-15-14 times for raglan and there are 263-263-263-255-255-251 stitches on needle.
Continue the pattern the same way (pattern is repeated as shown in A.1, A.3 and A.4), continue the increases for raglan as follows:
SIZE S - M - L - XL:
Front pieces, back piece and sleeves: Increase the same way as before 8-8-16-16 more times (27-27-35-31 times in total vertically).
SIZE XXL - XXXL:
Front pieces/back piece: Increase the same way as before 24-32 more times (39-46 times in total vertically).
Sleeve: Increase the same way as before every other row 13-14 more times, then every 4th row 6-9 times in total (34-37 times in total vertically).

After last increase for raglan there are 327-327-391-383-427-471 stitches on needle.
Then work A.5 instead of A.1, A.3 and A.4. In addition divide yoke for body and sleeves as explained under. Read PATTERN and DIVISION before continuing.

PATTERN:
Work first row as follows from right side: 6 band stitches in garter stitch, A.5A, work A.5B 2-2-3-3-4-5 times in total, A.5C, A.2, 66-66-82-78-84-90 stitches in stocking stitch, A.2, A.5D, work A.5B 5-5-7-7-9-11 times in total, A.5C, A.2, 66-66-82-78-84-90 stitches in stocking stitch, A.2, A.5D, work A.5B 2-2-3-3-4-5 times in total, A.5E, and 6 band stitches in garter stitch. Continue pattern like this.

DIVISION:
When piece measures approx. 20-22-25-25-28-33 cm from marker at the neck (increases for raglan should now be done, and 1 row pattern must have been worked as explained above), divide yoke for body and sleeves, i.e. work next row as follows: Work 52-52-60-60-68-76 stitches as before, slip the next 66-66-82-78-84-90 stitches on a thread for sleeve, cast on 4-10-6-12-12-10 new stitches on needle (in the side under sleeve), work 91-91-107-107-123-139 stitches as before, slip the next 66-66-82-78-84-90 stitches on a thread for sleeve, cast on 4-10-6-12-12-10 new stitches on needle (in the side under sleeve), and work the last 52-52-60-60-68-76 stitches as before.
Finish body and sleeves separately. Now measure the piece from here.

BODY:
= 203-215-239-251-283-311 stitches. Insert 1 marker thread 54-57-63-66-74-81 stitches in from each side (there are 95-101-113-119-135-149 stitches between marker threads on back piece - marker thread is in the middle of the new stitches under each sleeve).
Move the marker threads upwards when working - they should be used for increase.
Continue the pattern back and forth as before – work the 4-10-6-12-12-10 stitches cast on in each side in stocking stitch.
When piece measures 5 cm from division, increase 1 stitch on each side of both marker threads - read INCREASE TIP. Increase like this every 6-6-6-6-6-5 cm 3 times in total = 215-227-251-263-295-323 stitches.
Work until piece measures approx. 23-23-22-23-22-19 cm from division, but adjust to have worked at least 5 rows in stocking stitch after a row with holes.
Knit 1 row from right side while increasing 54-56-62-66-74-80 stitches evenly (do not increase over bands) = 269-283-313-329-369-403 stitches.
Switch to circular needle size 3 mm. Work next row as follows from wrong side: 6 band stitches in garter stitch, * purl 1, knit 1 *, repeat from *-* until 7 stitches remain, purl 1, and 6 band stitches in garter stitch.
Continue rib like this for 4 cm. Loosely cast off. Jacket measures approx. 50-52-54-56-58-60 cm from shoulder.

SLEEVE:
Slip the 66-66-82-78-84-90 stitches from stitch holder in one side of piece double pointed needles/a short circular needle size 4 mm– pick in addition up 1 stitch in each of the 4-10-6-12-12-10 new stitches cast on under sleeve = 70-76-88-90-96-100 stitches.
Insert 1 marker thread in the middle of the 4-10-6-12-12-10 stitches under sleeve and move the marker thread upwards when working- it is used when decreasing.
Begin round at the marker thread and work stocking stitch in the round.
When piece measures 3-3-2-2-2-2 cm from division, decrease 2 stitches mid under sleeve - read DECREASE TIP. Decrease like this every 4-4-2½-2-2-1 cm 3-3-4-4-4-4 times in total = 64-70-80-82-88-92 stitches. Work in stocking stitch until sleeve measures 15-14-12-11-9-6 cm from division. Now work a double edge the same way as in the neck.
Knit 1 round while decreasing 10-12-16-12-12-10 stitches evenly = 54-58-64-70-76-82 stitches. Switch to double pointed needles size 3 mm. Work stocking stitch in the round for 3 cm.
Work next round as follows: * Knit 2 together, 1 yarn over *, work from *-* around the sleeve (folding edge). Work in stocking stitch until piece measures 3 cm from folding edge. Switch to double pointed needles size 4 mm, and loosely cast off.
Work the other sleeve the same way.

ASSEMBLY:
Fold edge at the top of neck down on the inside of garment. Fasten edge to get a double neck edge. To avoid a tight neck edge that sticks out it is important to keep the seam elastic. Sew opening towards mid front together on bands with neat little stitches.
Fold the edge at the bottom of sleeve in towards the wrong side and fasten the same way.
Sew the buttons on to the left band.

Diagram

symbols = knit from the right side, purl from the wrong side
symbols = purl from the right side, knit from the wrong side
symbols = between 2 stitches make 1 yarn over, on next row purl yarn over to make a hole
symbols = knit 2 together
symbols = slip 1 stitch knitwise, knit 1, pass slipped stitch over stitch worked
symbols = shows 1 repetition vertically and how holes are place above each other
symbols = begin here for your size
diagram
diagram
diagram
diagram
diagram
diagram
diagram

Each of our patterns has specific tutorial videos to help you.

Do you have a question? See a list of frequently asked questions (FAQ)

Knitting tension is what determines the final measurements of your work, and is usually measured per 10 x 10 cm. It is provided like so: number of stitches in width x number of rows in height - eg: 19 stitches x 26 rows = 10 x 10 cm.

The knitting tension is very individual; some people knit/crochet loosely while others work tightly. You adjust the knitting tension with the needle size, which is why the suggested needle size is only meant as a guide! You need to adjust this (up or down) to ensure that YOUR knitting tension matches the knitting tension provided in the pattern. If you work with a different knitting tension than provided you will have a different yarn consumption, and your work will have different measurements than what the pattern suggests.

The knitting tension also determines which yarns can replace each other. As long as you achieve the same knitting tension you can replace one yarn with another.

See DROPS lesson: How to measure your tension/gauge

See DROPS video: How to make a gauge tension swatch

The required amount of yarn is provided in grams, eg: 450 g. To calculate how many balls you’ll need you first need to know how many grams are in 1 ball (25g, 50g or 100g). This information is available if you click on the individual yarn quality on our pages. Divide the amount required with the amount of each ball. For example, if each ball is 50g (the most common amount), the calculation will be as follows: 450 / 50 = 9 balls.

The important thing when changing from one yarn to another is that the knitting/crochet tension remains the same. This is so that the measurements of the finished piece will be the same as on the sketch provided. It is easier to achieve the same knitting tension using yarns from the same yarn group. It is also possible to work with multiple strands of a thinner yarn to achieve the knitting tension of a thicker one. Please try our yarn converter. We recommend you to always work a test swatch.

Please NOTE: when changing yarn the garment might have a different look and feel to the garment in the photo, due to individual properties and qualities of each yarn.

See DROPS lesson: Can I use a different yarn than the one mentioned in the pattern?

All our yarns are categorised into yarn groups (from A to F) according to thickness and knitting tension – group A contains the thinnest yarns and group F the thickest. This makes it easier for you to find alternative yarns to our patterns, should you wish to switch yarn. All yarns within the same group have a similar knitting tension and can easily replace each other. However, different yarn qualities have different structures and properties which will give the finished work a unique look and feel.

Click here for an overview of the yarns in each yarn group

At the top of all our patterns you’ll find a link to our yarn calculator, which is a helpful tool should you wish to use a different yarn than suggested. By filling in the yarn quality you wish to replace, the amount (in your size) and number of strands, the calculator will present good alternative yarns with the same knitting tension. Additionally it will tell you how much you’ll require in the new qualities and whether you’ll need to work with multiple strands. Most skeins are 50g (some are 25g or 100g).

If the pattern is worked with multiple colours, every colour will have to be calculated separately. Similarly, if the pattern is worked with several strands of different yarns (for example 1 strand Alpaca and 1 strand Kid-Silk) you will have to find alternatives for each, individually.

Click here to see our yarn calculator

Since different yarns have different qualities and textures we have chosen to keep the original yarn in our patterns. However, you can easily find options among our available qualities by using our yarn calculator, or simply pick a yarn from the same yarn group.

It is possible that some retailers still have discontinued yarns in stock, or that someone has a few skeins at home that they would like to find patterns for.

The yarn calculator will provide both alternative yarn as well as required amount in the new quality.

If you think it's hard to decide what size to make, it can be a good idea to measure a garment you own already and like the size of. Then you can pick the size by comparing those measures with the ones available in the pattern's size chart.

You'll find the size chart at the bottom of the pattern.

See DROPS lesson: How to read size chart

The needle size provided in the pattern serves only as a guide, the important thing is to follow the knitting tension. And since knitting tension is very individual, you will have to adjust the needle size to ensure that YOUR tension is the same as in the pattern – maybe you’ll have to adjust 1, or even 2 needle sizes, up or down to achieve the correct tension. For this, we recommend that you work test swatches.

Should you work with a different knitting tension than the one provided, the measurements of the finished garment might deviate from the measurement sketch.

See DROPS lesson: How to measure your tension/gauge

See DROPS video: How to make a tension/gauge swatch

Working a garment top-down provides more flexibility and room for personal adjustment. For example it is easier to try the garment on while working, as well as making adjustments to length of yoke and shoulder caps.

The instructions are carefully explaining every step, in the correct order. Diagrams are adjusted to the knitting direction and are worked as usual.

The diagram depicts all rows/rounds, and every stitch seen from the right side. It is read from bottom to top, from right to left. 1 square = 1 stitch.

When working back and forth, every other row is worked from the right side and every other row is worked from the wrong side. When working from the wrong side, the diagram will have to be worked reversed: from left to right, knit stitches are purled, purl stitches are knit etc.

When working in the round every round is worked from the right side and the diagram are worked from right to left on all rounds.

See DROPS lesson: How to read knitting diagrams

The diagram depicts all rows/rounds, and every stitch seen from the right side. It is worked from bottom to top, from right to left.

When working back and forth every other row is worked from the right side: from right to left and every other row is worked from the wrong side: from left to right.

When working in the round, every row in the diagram are worked from the right side, from right to left.

When working a circular diagram you start in the middle and work your way outwards, counter clockwise, row by row.

The rows usually start with a given number of chain stitches (equivalent to the height of the following stitch), this will either be depicted in the diagram or explained in the pattern.

See DROPS lesson: How to read crochet diagrams

Instructions for working several diagrams after each other on the same row/round, will often be written like so: “work A.1, A.2, A.3 a total of 0-0-2-3-4 times". This means you work A.1 once, then A.2 is worked once, and A.3 is repeated (in width) the number of times provided for your size – in this case like so: S = 0 times, M = 0 times, L=2 times, XL= 3 times and XXL = 4 times.

The diagrams are worked as usual: begin with the first row in A.1, then work the first row in A.2 etc.

See DROPS lesson: How to read knitting diagrams

See DROPS lesson: How to read crochet diagrams

The total width of the garment (from wrist-to-wrist) will be larger in the larger sizes, despite the actual sleeves being shorter. The larger sizes have longer sleeve caps and wider shoulders, so there will be a good fit in all sizes.

The measurement sketch/schematic drawing provides information regarding the full length of the garment. If it’s a jumper or a jacket the length is measured from the highest point on the shoulder closest to the neckline, and straight down to the bottom of the garment. It is NOT measured from the tip of shoulder. Similarly, the length of yoke is measured from the highest point on the shoulder and down to where yoke is split into body and sleeves.

On a jacket measures are never taken along bands, unless specifically stated. Always measure inside band stitches when measuring the length.

See DROPS lesson: How to read a schematic drawing

Diagrams are often repeated on the round or in height. 1 repeat is the diagram the way it appears in the pattern. If it says to work 5 repeats of A.1 in the round, then you work A.1 a total of 5 times after/next to each other in the round. If it says to work 2 repeats of A.1 vertically/in height you work the entire diagram once, then begin again at the start and work the entire diagram one more time.

Chain stitches are slightly narrower than other stitches and to avoid working the cast-on edge too tight, we simply chain more stitches to begin with. The stitch count will be adjusted on the following row to fit the pattern and measurement sketch.

The rib edge is more elastic and will contract slightly compared to, for example, stocking stitch. By increasing before the rib edge, you avoid a visible difference in width between the rib edge and the rest of the body.

It’s very easy to cast off too tightly, and by making yarn overs while casting off (and simultaneously casting these off) you avoid a too tight cast off edge.

See DROPS video: How to bind off with yarn overs (yo)

To achieve an even increase (or decrease) you can increase on, for example: every 3rd and 4th row alternately, like so: work 2 rows and increase on the 3rd row, work 3 rows and increase on the 4th. Repeat this until the increase is complete.

See DROPS lesson: Increase or decrease 1 st on every 3rd and 4th row alternately

Should you prefer to work in the round instead of back and forth, you may of course adjust the pattern. You’ll need to add steeks mid-front (usually 5 stitches), and follow the instructions. When you would normally turn and work from the wrong side, simply work across the steek and continue in the round. At the end you’ll cut the piece open, pick up stitches to work bands, and cover the cut edges.

See DROPS video: How to knit steeks and cut open

Should you prefer to work back and forth instead of in the round, you may of course adjust the pattern so you work the pieces separately and then assemble them at the end. Divide the stitches for the body in 2, add 1 edge stitch in each side (for sewing) and work the front and back pieces separately.

See DROPS lesson: Can I adapt a pattern for circular needles into straight needles?

Pattern repeats can vary slightly in the different sizes, in order to get the correct proportions. If you’re not working the exact same size as the garment in the photo, yours might deviate slightly. This has been carefully developed and adjusted so that the complete impression of the garment is the same in all sizes.

Make sure to follow instructions and diagrams for your size!

If you have found a pattern you like which is available in women’s size it’s not very difficult to convert it to men’s size. The biggest difference will be the length of sleeves and body. Start working on the women size that you think would fit across the chest. The additional length will be worked right before you cast off for the armhole/sleeve cap. If the pattern is worked top-down you can add the length right after the armhole or before the first decrease on sleeve.

Regarding additional yarn amount, this will depend on how much length you add, but it is better with a skein too many than too few.

All yarns will have excess fibres (from production) that might come off as lint or shedding. Brushed yarns (ie hairier yarns) have more of these loose, excess fibres, causing more shedding.

Shedding also depends on what is worn under or over the garment, and whether this pulls at the yarn fibres. It’s therefore not possible to guarantee that there will be no shedding

Below are some tips on how to get the best result when working with hairier yarns:

1. When the garment is finished (before you wash it) shake it vigorously so the looser hairs come off. NOTE: do NOT use a lint roller, brush or any method that pulls at the yarn.

2. Place the garment in a plastic bag and put it in your freezer - the temperature will cause the fibres to become less attached to each other, and excess fibres will come off easier.

3. Leave in the freezer for a few hours before taking it out and shaking it again.

4. Wash the garment according to the instructions on the yarn label.

Pilling is a natural process that happens to even the most exclusive of fibers. It's a natural sign of wear and tear that is hard to avoid, and that is most visible in high friction areas of your garment like a sweater's arms and cuffs.

You can make your garment look as new by removing the pilling, using a fabric comb or a pill/lint remover.

Still can't find the answer you need? Then scroll down and leave your question so one of our experts can try to help you. This will be done normally within 5 to 10 working days.
In the meantime, you can read the questions and answers that others have left to this pattern or join the DROPS Workshop on Facebook to get help from fellow knitters/crocheters!

You might also like...

Post a comment to pattern DROPS 232-10

We would love to hear what you have to say about this pattern!

If you want to leave a question, please make sure you select the correct category in the form below, to speed up the answering process. Required fields are marked *.

Comments / Questions (8)

country flag Elizabeth Hayes wrote:

Thank you once again for your quick and helpful response. I really appreciate that you offer this service.

20.03.2024 - 21:29

country flag Elizabeth Hayes wrote:

In the yoke instructions, there is a yarn over before and after the stocking stitches. Are those yarn overs worked on the right side and on the wrong side or only on the right side?

20.03.2024 - 19:15

DROPS Design answered:

Dear Elizabeth, those yarnovers are done on the RS rows only. Happy Knitting!

20.03.2024 - 21:26

country flag Elizabeth Hayes wrote:

Thank you so much for your quick and helpful response. I didn't realize that "A.5" referred to the whole set of A.5 patterns.

18.03.2024 - 22:42

country flag Elizabeth Hayes wrote:

In the yoke section, last paragraph, second sentence, it says to work A.5. I see diagrams for A.5A through A.5E, but not for A.5. I'm making size small. Which diagram should I use?

18.03.2024 - 20:02

DROPS Design answered:

Dear Elizabeth, for exact explanation of how to knit the A.5 pattern, please see the next paragraph (the next to the one you are referring to) under the title PATTERN. It tells you in detail in what order should be the parts of the A.5 (A.5A-A.5E) knitted. Happy Knitting! (6 band stitches in garter stitch, A.5A, work A.5B 2-2-3-3-4-5 times in total, A.5C, A.2, 66-66-82-78-84-90 stitches in stocking stitch, A.2, A.5D, work A.5B 5-5-7-7-9-11 times in total, A.5C, A.2, 66-66-82-78-84-90 stitches in stocking stitch, A.2, A.5D, work A.5B 2-2-3-3-4-5 times in total, A.5E, and 6 band stitches in garter stitch. )

18.03.2024 - 20:26

country flag Heidi Flamsholt wrote:

Jeg er kun nået til bærestykket, og har strikket den 1. række efter diagram A1, 2, 3 og 4. Nu skal jeg så strikke fra vrang siden, og ifølge jeres forklaring, skal jeg strikke efter diagrammerne omvendt, altså først A4 osv.. Det stemmer så ikke med maskerne, idet jeg pludselig har for mange???Jeg har 119 masker efter den 1 række mønster.

18.08.2023 - 22:23

country flag Ann Vials wrote:

Where do I find the size guide for this pattern please?

14.05.2023 - 12:06

DROPS Design answered:

Dear Ann, this model is worked in sizes: S - M - L - XL - XXL - XXXL. Below the pattern instructions, you can find a measurement schematic which include the measurements in cm of different parts of the garment. For example, the measurements of the jacket's bust (multiply by 2 for the whole bust) is 45cm for the smallest size, 48 for size M, e.t.c. Check the following lesson for more information: https://www.garnstudio.com/lesson.php?id=24&cid=19. Happy knitting!

14.05.2023 - 17:43

country flag Amal wrote:

Thank you for the beautiful pattern. I made this in the beige and now I’m working on the pink one. I love the yarn but I’m having a difficult time maintaining tension. Do you have any tips on how to knit this without having so many uneven stitches? Thank you

24.06.2022 - 05:00

DROPS Design answered:

Dear Amal, you may try different kind of needles, either you work with wood or metal, this can influence the way you are working and the tension - but sometimes blocking/washing just help to smooth irregular stitches. Your yarn store might have even more ideas/advices to share with you. Happy knitting!

24.06.2022 - 08:58

country flag Ulrike wrote:

Ich würde das Modell "Sommerabend" nennen

16.01.2022 - 20:31