
Popular categories
Looking for a yarn?


Comments / Questions (29)
![]() Favier wrote:
Favier wrote:
« Reprendre les manches sur la même …, au dessus des 4 m rabattues… » : je ne comprends pas du tout comment intégrer les manches au tricot du dos et des devants. Comment intégrer 110 maillesx2 sur les 4 mailles rabattues x2 et comment continuer à les tricoter. La vidéo sur le raglan montre un dos et deux manches et non un dos deux manches et deux devants comme sur le modèle. En outre comment continue t’on à tricoter les manches sur le tricot ?
18.03.2026 - 08:58DROPS Design answered:
Bonjour Mme Favier, retrouvez ici, en vidéo comment on ajoute les manches au-dessus des mailles rabattues pour les emmanchures, pour vous aider à réaliser les premiers rangs plus facilement, vous pouvez utiliser la technique du magic loop. Vous tricotez l'empiècement en point fantaisie = vous continuez comme avant mais avec 2 m jersey pour chaque raglan. Bon tricot!
18.03.2026 - 16:06
![]() Sabine Berning wrote:
Sabine Berning wrote:
Hallo, können Sie mir bitte ein Foto schicken, auf dem ich das Muster der Vorderseite sehen kann? Vielen Dank
05.01.2026 - 20:23DROPS Design answered:
Liebe Frau Berning, wir haben keine andere Fotos dafür, aber das Muster M.1 stricken Sie so: (1 Masche glattrechts (1. und 3. Masche), 1 Masche krausrechts (2. und 4. Masche)). Viel Spaß beim Stricken!
06.01.2026 - 09:13
![]() Ulla wrote:
Ulla wrote:
Hej. Har stickat hela tröjan fram till kragen. Har svårt att se hur jag stickar kragen. Bra om det går att göra den tydligare. Mönstrets text: "När kragen mäter 10 (10-11) cm sätts alla m på en tråd (m skall sys samman med maskstygn mitt bak efteråt)." Kan jag sticka kragen högre än 10-11 cm, ex 15-20 cm utan att det ser konstigt ut? Eller finns det något annat sätt att göra? Hur gör jag det på bästa sätt. Tack för hjälpen,
12.07.2025 - 12:43DROPS Design answered:
Hei Ulla. Du har 21-21-22 masker og skal strikke frem og tilbake over disse maskene, samtidig som når arbeidet måler 2 cm strikkes det over færre og færre masker (forkortede pinner), så strikkes det over alle maskene og kragen har fått en "buet form". Fortsett til kragen måler 10-10-11 cm. Målet 10-10-11 cm er den lengden kragen må ha for å passe forstykket og halve bakstykket når det senere skal sys fast, så du kan ikke forlenge kragen til 15-20 cm. 10-10-11 cm er lengden på kragen, ikke høyden. mvh DROS Design
31.07.2025 - 10:58
![]() Corinna Anne-Greth Kleinfeld wrote:
Corinna Anne-Greth Kleinfeld wrote:
Hallo,eine Verständnissfrage wenn ich für die Raglanabnahme in jeder Reihe abgnehmen soll heisst das für mich Hin und Rückreihe wieso dann noch in jeder 2. Reihe? Ist es so gemeint 1x in Hin und Rückreihe und als nächstest in der 2. Reihe und dann wieder Jede usw. Vielen Dank für die Hilfe
03.11.2024 - 08:50DROPS Design answered:
Liebe Frau Kleinfeld, hier wird man abwechslungsweise in jeder Reihe und in jeder 2. Reihe abnehmen, dh so stricken: * 1 Reihe mit Abnahmen, 1 Reihe ohne Abnahmen, 1 Reihe mit Abnahmen*, und diese 3 Reihen wiederholen, dh die Abnahmen werden bei einer Hin- sowie bei einer Rückreihe gearbeitet werden. Viel Spaß beim Stricken!
04.11.2024 - 09:07
![]() Brigitte Pioger wrote:
Brigitte Pioger wrote:
Bonjour je suis arrivé a l’empiècement de ce modèle je dois monter les manches là où il y’a 4 mailles et mètre 106 mailles je ne comprends pas comment puis je compte sur vous pour m’expliquer ce que je ne comprends pas ! Merci
30.06.2024 - 19:08DROPS Design answered:
Bonjour Mme Pioger, dans cette vidéo, nous montrons comment tricoter les manches tricotées en rond au-dessus des mailles rabattues pour les emmanchures, les premiers rangs/tours peuvent être un peu difficile, vous pouvez tricoter les mailles des manches avec une autre aiguille circulaire/les aiguilles doubles pointes ou avec la technique du magic loop pendant les premiers rangs. Bon tricot!
01.07.2024 - 10:10
![]() Kate Knight wrote:
Kate Knight wrote:
I would love to knit pattern 53-9 keeping the mohair look. Could I knit it using Drops Kid Silk combined with another yarn?
08.03.2022 - 12:29DROPS Design answered:
Dear Mrs Knight, the best alternative would be using a yarn group B maybe Sky - but you will find some patterns using Kid-Silk with almost same tension here - it would be a good idea to make a swatch first to check if you get the correct tension and like the fabric. Happy knitting!
08.03.2022 - 21:57
![]() Monica wrote:
Monica wrote:
När man har gjort alla avmaskningar och har 96 maskor kvar på stickan, ska man då maska av de mittersta maskorna på avig- eller rätsidan? Och när man ska sticka varje kragdel för sig och sätta maskorna på en tråd vartannat varv, 3 maskor 6 ggr och 4 maskor 1 gång..... ska man då sticka de maskorna först och därefter sätta dom på en tråd, eller hur gör man?
07.02.2022 - 21:21DROPS Design answered:
Hej Monica, du lukker af samtidig som du strikker maskerne mod kraven, da har du tråden klar når du skal strikke kraven. Når du sætter maskerne på en tråd, strikker du dem først, så du hele tiden har tråden at fortsætte med. God fornøjelse!
09.02.2022 - 12:52
![]() Monica wrote:
Monica wrote:
Hej igen och tack för svaret på min förra fråga! Blev dock nu lite osäker där det står "maska av växelvis varje och vartannat varv". Vad exakt menas med det? Ska man maska av på varv 1 och 2 men inte på varv 3 och 4, sedan maska av på varv 5 och 6 osv? Har jag tänkt rätt då, eller??
02.02.2022 - 09:51DROPS Design answered:
Hej Monica. Då bir det ingen avmaskning på vart 3:e varv. Dvs avmaska på varv 1,2,4,5,7,8 osv. Mvh DROPS Design
04.02.2022 - 11:55
![]() Monica wrote:
Monica wrote:
Har jätteproblem med att få in ärmarna på rundstickan då det blir alldeles för stramt. Sedan står det "8 avm per varv (1 avm på varje sida av de 2 m slätst)". Så långt förstår jag. Men i meningen som kommer därefter står "Maska av 1 m 43 (47-52) ggr på växelvis varje och vartannat varv." Var någonstans gör man denna minskade maska??
29.01.2022 - 15:49DROPS Design answered:
Hej Monica. Du göra minskningen till raglan på varje sida av de 2 m i slätstickning. Du minskar till raglan på växelvis varje och vartannat varv. Mvh DROPS Design
01.02.2022 - 09:11
![]() Lucy Van Rooij wrote:
Lucy Van Rooij wrote:
Ik zie dat anderen ook al de foutieve telling hebben opgemerkt. Ook was de hoeveelheid wol te weinig. Met Karisma (ook pen 4) heb ik bijna 18 bollen van 50 gr nodig gehad, ipv de vermelde 14. Verder was de beschrijving van de sjaalkraag raadselachtig. Je moet steken op een hulpnaald zetten en dan weer terug?! Wat doe je er intussen mee? Ik heb maar de methode van model 119-6 toegepast. Tip: tussen patroon en ribbelboord geen rechte breien, om te voorkomen dat boord naar binnen vouwt.
04.04.2021 - 13:11
|
|||||||
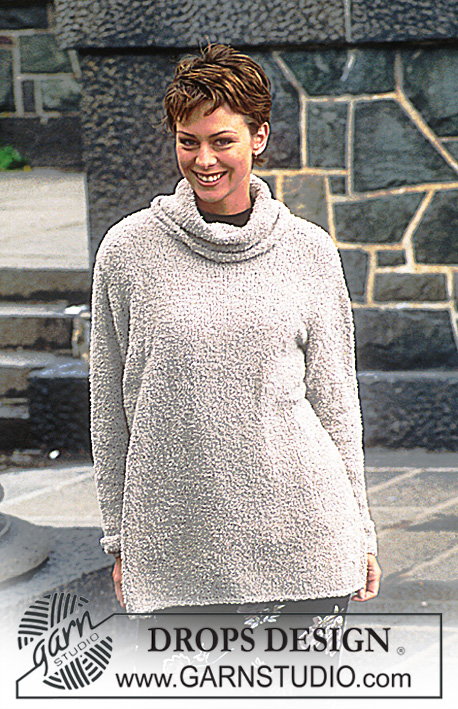
DROPS 53-9 |
|||||||
|
|
|||||||
DROPS Cardigan in Karisma Angora-Tweed.
DROPS 53-9 |
|||||||
|
Gauge: 21 sts and 28 rows in Pattern stitch = 10 x 10 cm (4" x 4") Note: maintaining the gauge is especially important when shaping the raglan. Garter Stitch, when knitting flat: Knit all sts, all rows. Garter Stitch, when knitting in the round: *Rnd 1, knit. Rnd 2, purl *. Repeat from * - *. Rib: *knit 1, purl 1*. Repeat from * - *. Pattern: See chart. The pattern is seen from the right side. The chart is placed vertically on the page. NOTE: this is the pattern stitch written out: Row 1 (and all uneven rows): *K 1, P 1* Row 2 (and all even rows): knit all sts Buttonholes: when the work measures: 22 (27-30) cm [8⅝" (10⅝" - 11.75")] 29 (34.5-38) cm [11⅜"(13⅝" - 15")] 36 (42-46) cm [14⅛" (16.5" - 18⅛")] 43 (49.5-54) cm [17" (19.5" - 21.25")] 50 (57-62) cm [19.75" (22⅜" - 24⅜")] 57 (65-70) cm [22⅜" (25⅝" - 27.5")] bind off the 3rd and 4th sts and cast on 2 new sts over the bound-off sts on the next row. Body: Cast on 264 (280-300) sts and knit 4 rows garter st, then work in Pattern but keep the 6 sts at each side (the center front) in garter st for the buttonband for the entire body (remember buttonholes on the right buttonband - see instructions above). When the work measures 53 (59-63) cm [21" (23.25" - 24.75")] knit the next row as follows: 6 sts garter st for the buttonband, 61 (65-70) sts for the front, bind off 4 sts for armhole, 122 (130-140) sts for the back, bind off 4 sts for armhole, 61 (65-70) sts for the front, 6 sts garter st for the button band. Put the work aside. Sleeves: Cast on 46 (46-48) sts on double pointed needles; join and place a marker at the join. Knit 4 rows garter stitch garter st, then work in Pattern. When the work measures 6 cm [2⅜"] inc 1 st at each side of marker 25 (30-33) times Size S/M: every 4th row Size M/L: alternately every 3rd and 4th row Size XL: every 3rd row = 96 (106-114) sts. When the work measures 45 (44-43) cm [17.75" (17⅜" - 17")], bind off 2 sts each side of marker = 92 (102-110) sts. Put the work aside. Body: Put the sleeves in on the same circular needles as the body where 4 sts are bound off for armholes = 440 (476-512) sts on needle. Place a marker at each join between the sleeves and body = 4 markers. Continue in Pattern stitch, but knit the first stitch on each side of the marker in stockinette stitch (2 sts stockinette stitch in each raglan between body and sleeves). Raglan shaping: Read the entire next section before knitting! There are 8 decreases per row (1 decrease inside each side of 2 sts of stockinette stitch). Dec 1 stitch 43 (47-52) times on either side of the markers alternately every and every other row: *Row 1: decrease; Row 2: work even; Row 3: decrease*. Repeat these three rows until all decreases are completed. Make the decreases as follows: Before the 2 sts stockinette stitch: Right side: K 2 tog. Wrong side: Take the next two sts off the needle, put them back on the left needle twisted (one by one), purl the 2 sts together into back of stitch. After the 2 sts stockinette stitch: Right side: Slip 1, knit 1, psso Wrong side: P 2 tog At the same time, when the work measures 58 (66-71) cm [22⅞" (26" - 28")] form collar: The collar is created by increasing the number of sts worked in garter st (changing from pattern stitch, without increasing the number of sts). Inc 2 garter sts each front band 2 times every other row, 1 st 10 (10-11) times every 4th row and finally 1 st 1 (1-1) time on every 6th row (= 21 (21-22) sts collar). After the last raglan decrease the work measures approximately 76 (84-90) cm [30" (33" - 35.5")] and 96 (100-96) sts remain on the needle (including sts from the collar). Work even for 2 cm [0.75"] = 78 (86-92) cm [30.75" (33.75" - 36.25")]. Bind off all sts except the 21 (21-22) sts of garter st for the collar on every front piece. Knit each collar part separately. Right collar: = 21 (21-22). Set a row marker and measure the work from here. Continue in garter st. After 2 cm [0.75"] put sts on a stitch holder every other row at the inside edge: 3 sts 6 times, 3 (3-4) sts 1 time. Then put all sts back on the needle and continue to knit garter st - be careful not knit too loosely on the first row. When the collar measures 10 (10-11) cm [4" (4" - 4.25")] put all sts on a stitch holder. Left collar: Knit as for the right collar, reversing shaping. Assembly: Sew the 4 sts together directly under the sleeve. Weave the collar together at the center back with sts, then sew the collar to the body. Sew a loop of chain sts on either side of the cardigan to hold the belt. Sew on the buttons. Belt: Cast on 11 sts and knit first row as follows: 1 stitch garter st, 9 sts rib, 1 stitch garter st. Continue in this pattern until the work measures 150 cm (59") or desired length; bind off all sts. |
|||||||
Diagram explanations |
|||||||
|
|||||||
 |
|||||||
Have you finished this pattern?Tag your pictures with #dropspattern or submit them to the #dropsfan gallery. Do you need help with this pattern?You'll find 25 tutorial videos, a Comments/Questions area and more by visiting the pattern on garnstudio.com. © 1982-2026 DROPS Design A/S. We reserve all rights. This document, including all its sub-sections, has copyrights. Read more about what you can do with our patterns at the bottom of each pattern on our site. |
|||||||


With over 40 years in knitting and crochet design, DROPS Design offers one of the most extensive collections of free patterns on the internet - translated to 17 languages. As of today we count 324 catalogs and 12290 patterns - 12280 of which are translated into English (US/in).
We work hard to bring you the best knitting and crochet have to offer, inspiration and advice as well as great quality yarns at incredible prices! Would you like to use our patterns for other than personal use? You can read what you are allowed to do in the Copyright text at the bottom of all our patterns. Happy crafting!
Post a comment to pattern DROPS 53-9
We would love to hear what you have to say about this pattern!
If you want to leave a question, please make sure you select the correct category in the form below, to speed up the answering process. Required fields are marked *.