
Popular categories
Looking for a yarn?


Comments / Questions (99)
![]() Martine wrote:
Martine wrote:
Bonjour, Juste une petite question, je tricote ce modèle en9/12 mois, j’ai fait les 15 augmentations pour le raglan, je suis à seulement 9cm du marqueur, comment dois-je continuer jusqu’a avoir 12 cm. Merci pour vos explications.
01.08.2024 - 15:37DROPS Design answered:
Bonjour Martine, vous n'avez probablement pas la bonne tension de 28 rangs = 10 cm en hauteur, tricotez simplement comme avant, sans augmenter cette fois jusqu'à ce que l'ouvrage mesure 12 cm (notez qu'il s'agit ici de la 4ème taille soit 12/18 mois). Bon tricot!
02.08.2024 - 08:46
![]() Linda wrote:
Linda wrote:
What are band stitches?
07.07.2024 - 02:18DROPS Design answered:
Dear Linda, we call band stitches the stitches in the buttonband or buttonhole band, on the edges of the front pieces. These stitches are not worked in any special way, just serve as a way to group them when indicating how to work them in the written instructions. In this pattern, these are worked in garter stitch usually. Happy knitting!
07.07.2024 - 22:57
![]() Herma Van Den Hoven wrote:
Herma Van Den Hoven wrote:
Als ik de mouwen van het vestje verder wil breien met een rondbreinaald i.p.v. naalden zonder knop welke lengte moet ik dan gebruiken? Ik bedoel niet de magic loop maar een kort rondbreinaaldje
06.07.2024 - 21:10DROPS Design answered:
Dag Herma,
Dat weet zo niet en het hangt ook van de maat af die je breit, maar als je heel weinig steken in de rondte wilt breien wordt dat heel lastig en kun je beter naalden zonder knop nemen of de magic loop techniek gebruiken.
07.08.2024 - 12:40
![]() Herma Van Den Hoven wrote:
Herma Van Den Hoven wrote:
Nou zeg….Word ik uitgemaakt voor een spammer terwijl ik alleen maar iemand help
28.06.2024 - 19:58
![]() Herma Van Den Hoven wrote:
Herma Van Den Hoven wrote:
Voor Alice Oldenburger Als je die omslag even heen en weer steekt met je andere naald dan zit iet goed op de naald en gaat het averecht breien beter en zonder gat groet Herma
28.06.2024 - 14:00
![]() Herma Van Den Hoven wrote:
Herma Van Den Hoven wrote:
Voeg 1 markeerdraad in na de voorbies op het begin van de naald; de pas wordt gemeten vanaf deze markeerdraad! Snap ik niet, die plek kan je toch gewoon zien?
28.06.2024 - 13:53DROPS Design answered:
Dag Herma,
Dat klopt, dus je zou hem ook weglaten. Opmeten gaat dus langs de voorbies.
30.06.2024 - 20:48
![]() Herma Van Den Hoven wrote:
Herma Van Den Hoven wrote:
Voeg 1 markeerdraad in na de voorbies op het begin van de naald; de pas wordt gemeten vanaf deze markeerdraad!
28.06.2024 - 13:53
![]() Alice Oldenburger wrote:
Alice Oldenburger wrote:
In het patroon wordt bij de pas voor het meerderen van de steken aangegeven om de omslagen aan de averechte kant gedraaid averecht te breien. Dan ontstaat er aan de ene kant van A1 bij de meerderingen een gat en aan de andere kant van A1 niet en is het volgens patroon . Moet de steek (met gat) anders worden gebreid?
26.06.2024 - 23:58DROPS Design answered:
Dag Alice,
Aan beide kanten van A.1 heb je een omslag welke je gedraaid breit op de volgende naald. Door gedraaid te breien ontstaat er geen gat, dus ik begrijp niet waar dat gat dan zou ontstaan.
07.08.2024 - 10:12
![]() Catherine JACQUESSON wrote:
Catherine JACQUESSON wrote:
Bonjour, mon échantillon est trop long mais la largeur est correcte; l'ennui est que l'explication est en nombre de rangs et pas en cm et comment faire pour la partie raglan?
19.05.2024 - 20:26DROPS Design answered:
Bonjour Mme Jacquesson, vous pouvez essayer d'utiliser un autre type d'aiguille (parfois le matériau modifie notre façon de tricoter et joue sur la longueur des mailles), ou bien adapter les augmentations sur votre propre échantillon pour avoir la bonne longueur à la fin. Bon tricot!
21.05.2024 - 13:07
![]() Anna wrote:
Anna wrote:
Dette stykke “ Fortsæt i glatstrik, 5 kantmasker retstrik og A.1, og tag ud på hver side af A.1 på hver pind fra retsiden totalt 11-13-14-15 (17-18) gange = 153-173-185-197 (217-231) masker.” passer ikke. Men jeg fik det til at passe hvis jeg kun tog ud på hver anden pind, som jeres anden opskrift med sweater
18.05.2024 - 00:58
|
|||||||
Dream in Blue Cardigan#dreaminbluecardigan |
|||||||
 |
 |
||||||
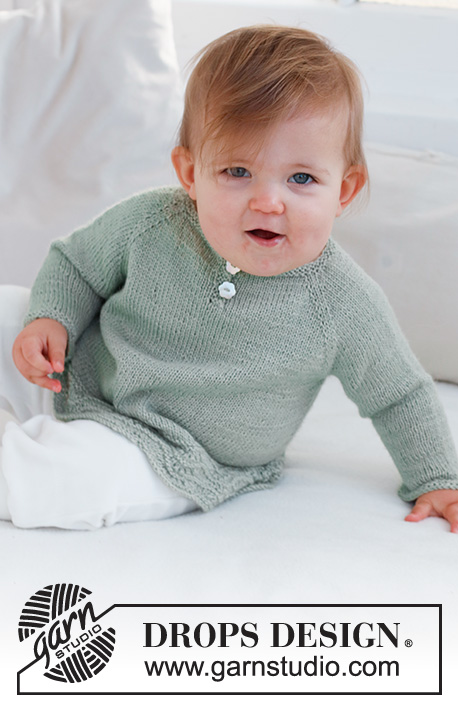
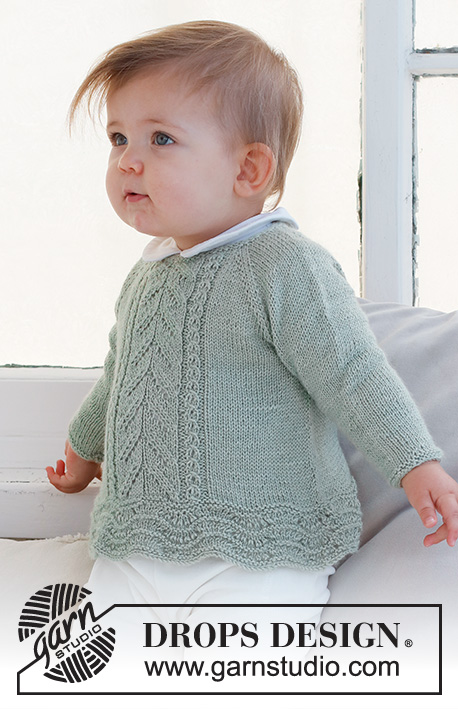
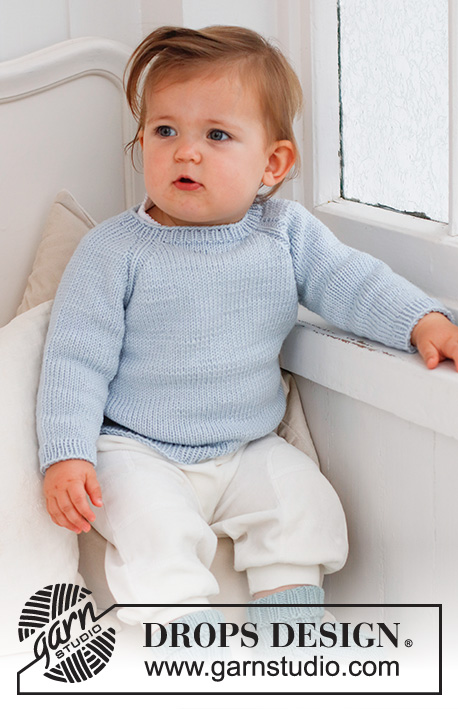
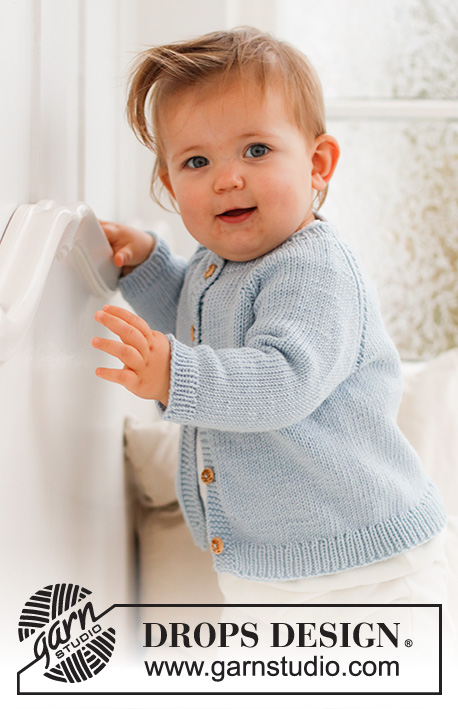
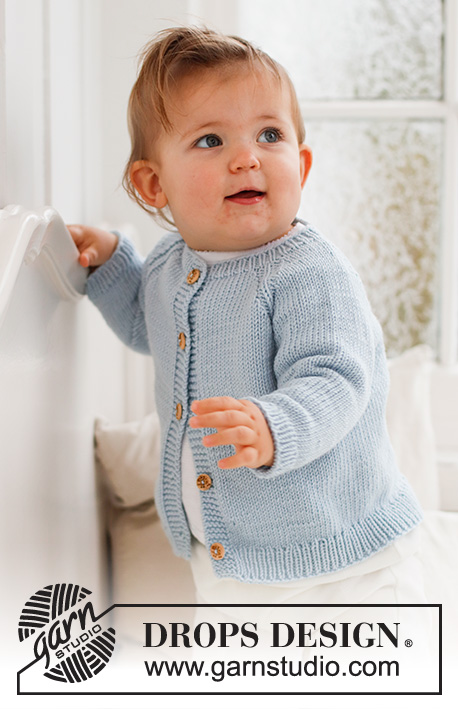
Knitted jacket for babies and children in DROPS Merino Extra Fine. The piece is worked top down with raglan. Sizes 0 - 4 years.
DROPS Baby 42-6 |
|||||||
|
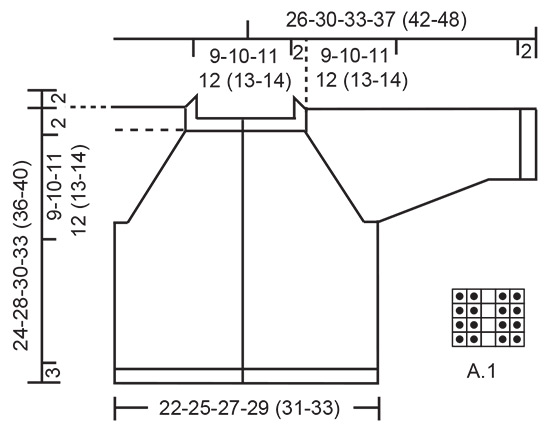
------------------------------------------------------- EXPLANATIONS FOR THE PATTERN: ------------------------------------------------------- RIDGE/GARTER STITCH (worked back and forth): Knit all rows. 1 ridge = knit 2 rows. PATTERN: See diagram A.1. The diagram shows all rows in the pattern from the right side. DECREASE TIP (sleeves): Decrease 1 stitch on either side of the marker as follows: Work until there are 3 stitches left before the marker, knit 2 together, knit 2 (marker sits between these 2 stitches), slip 1 stitch as if to knit, knit 1 and pass the slipped stitch over the knitted stitch. BUTTONHOLES: Work buttonholes on the right band (when the garment is worn). Work from the right side when there are 3 stitches left on the row as follows: Make 1 yarn over, knit 2 together and knit 1. On the next row, knit the yarn over to leave a hole. The first buttonhole is worked when the rib on the neck measures 1½-2 cm = ½"-¾". Then work the other 4-4-4-4 (5-5) buttonholes with approx. 5-6-6½-7 (6½-7) cm = 2"-2⅜"-2½"-2¾" (2½"-2¾") between each one. ------------------------------------------------------- START THE PIECE HERE: ------------------------------------------------------- JACKET – SHORT OVERVIEW OF THE PIECE: The neck and yoke are worked back and forth with circular needle. The yoke is divided for the body and sleeves and the body continued back and forth. The sleeves are worked in the round with double pointed needles. NECK: Cast on 65-69-73-77 (81-87) stitches with circular needle size 3 MM = US 2.5 and DROPS Merino Extra Fine. Purl 1 row from the wrong side with 5 band stitches in GARTER STITCH – read description above, on each side. Then work rib as follows: 5 band stitches in garter stitch, * knit 1, purl 1 *, work from *-* until there are 6 stitches left, knit 1 and 5 band stitches in garter stitch. Remember the BUTTONHOLES – read description above. When the rib measures 2 cm = ¾", change to circular needle size 4 MM = US 6. Insert 1 marker after the band at the beginning of the row; the yoke is measured from this marker! YOKE: Work the next row from the right side as follows: 5 band stitches in garter stitch, knit 5-6-7-8 (8-10), 1 yarn over, A.1, 1 yarn over, knit 6-6-6-6 (8-8), 1 yarn over, A.1, 1 yarn over, knit 13-15-17-19 (19-21), 1 yarn over, A.1, 1 yarn over, knit 6-6-6-6 (8-8), 1 yarn over, A.1, 1 yarn over, knit 5-6-7-8 (8-10) and 5 band stitches in garter stitch. You have increased 8 stitches for raglan. The yarn overs are purled twisted on the next row and continued in stockinette stitch. Continue the pattern and increase on each side of A.1 on each row from the right side a total of 11-13-14-15 (17-18) times = 153-173-185-197 (217-231) stitches. REMEMBER THE KNITTING GAUGE! When the piece measures 9-10-11-12 (13-14) cm = 3½"-4"-4⅜"-4¾" (5⅛"-5½") from the marker, divide the yoke for the body and sleeves as follows: 5 band stitches in garter stitch, work 19-22-24-26 (29-32) stitches in stockinette stitch, place the next 32-36-38-40 (44-46) stitches on a thread for the sleeve, cast on 6-6-8-8 (6-6) stitches, work 41-47-51-55 (61-65) stitches in stockinette stitch, place the next 32-36-38-40 (44-46) stitches on a thread for the sleeve, cast on 6-6-8-8 (6-6) stitches, work 19-22-24-26 (29-32) stitches in stockinette stitch and 5 band stitches in garter stitch. BODY: = 101-113-125-133 (141-151) stitches. Continue back and forth with stockinette stitch and 5 band stitches in garter stitch on each side until the body measures 10-13-14-16 (18-21) cm = 4"-5⅛"-5½"-6¼" (7"-8¼") from the division. Now increase 10-12-14-14 (16-16) stitches evenly spaced on the next row from the right side (do not increase over the bands) = 111-125-139-147 (157-167) stitches. Change to circular needle size 3 MM = US 2.5 and work rib, starting from the wrong side as follows: 5 band stitches in garter stitch, * purl 1, knit 1 *, work from *-* until there are 6 stitches left, purl 1 and 5 band stitches in garter stitch. Bind off when the rib measures 3 cm = 1⅛". The jacket measures approx. 24-28-30-33 (36-40) cm = 9½"-11"-11¾"-13" (14¼"-15¾") from the shoulder down. SLEEVES: Place the 32-36-38-40 (44-46) stitches from the thread on the one side of the piece on double pointed needles size 4 MM = US 6 and knit up 1 stitch in each of the 6-6-8-8 (6-6) stitches cast on under the sleeve = 38-42-46-48 (50-52) stitches. Insert a marker in the middle of the new stitches under the sleeve (= mid-under sleeve). Start at the marker and work stockinette stitch in the round. When the sleeve measures 2 cm = ¾" from the division, decrease 1 stitch on each side of the marker - read DECREASE TIP! Decrease like this every 3-3-2-2½ (3-4) cm = 1⅛"-1⅛"-¾"-1" (1⅛"-1½") a total of 2-3-5-5 (5-5) times = 34-36-36-38 (40-42) stitches. When the sleeve measures 8-11-12-15 (18-23) cm = 3⅛"-4⅜"-4¾"-6" (7"-9"), increase 4-4-4-4 (4-6) stitches evenly spaced = 38-40-40-42 (44-48) stitches. Change to double pointed needles size 3 MM = US 2.5 and work rib (knit 1, purl 1) for 2 cm = ¾". Bind off. The sleeve measures approx. 10-13-14-17 (20-25) cm = 4"-5⅛"-5½"-6¾" (8"-9¾"). Work the other sleeve in the same way. |
|||||||
Diagram explanations |
|||||||
|
|||||||
 |
|||||||
Have you finished this pattern?Tag your pictures with #dropspattern #dreaminbluecardigan or submit them to the #dropsfan gallery. Do you need help with this pattern?You'll find 27 tutorial videos, a Comments/Questions area and more by visiting the pattern on garnstudio.com. © 1982-2026 DROPS Design A/S. We reserve all rights. This document, including all its sub-sections, has copyrights. Read more about what you can do with our patterns at the bottom of each pattern on our site. |
|||||||


With over 40 years in knitting and crochet design, DROPS Design offers one of the most extensive collections of free patterns on the internet - translated to 17 languages. As of today we count 324 catalogs and 12290 patterns - 12280 of which are translated into English (US/in).
We work hard to bring you the best knitting and crochet have to offer, inspiration and advice as well as great quality yarns at incredible prices! Would you like to use our patterns for other than personal use? You can read what you are allowed to do in the Copyright text at the bottom of all our patterns. Happy crafting!
Post a comment to pattern DROPS Baby 42-6
We would love to hear what you have to say about this pattern!
If you want to leave a question, please make sure you select the correct category in the form below, to speed up the answering process. Required fields are marked *.