
Popular categories
Looking for a yarn?


Comments / Questions (32)
![]() Rt wrote:
Rt wrote:
Pour le devant, quand j'ai tricoté les 6m, augmenté 2 m, et tricoté 8m, je tombe sur une maille envers de cote anglaise et non une maille avec jeté, comme indiqué pour faire la diminution. Du coup où me suis trompée ? ou que dois je faire ? merci
03.04.2026 - 19:30
![]() Rose wrote:
Rose wrote:
Bonjour, il n'y a pas de diagramme pour le pull sans manche. pourriez vous me dire à quelles largeurs d'épaules correspondent les tailles S/M, L/XL ar comment savoir si on est M/L? merci
01.03.2026 - 18:33DROPS Design answered:
Bonjour Rose, retrouvez sous PULL SANS MANCHES en haut, sous l'onglet "Explications" la largeur et la longueur pour chaque taille. Bon tricot!
02.03.2026 - 10:33
![]() Carmen wrote:
Carmen wrote:
Hola, llevo muchos días esperando la respuesta a Isabel porque me pasa lo mismo. Siquiendo las instrucciones, el dibujo no me sale. De hecho, al ejemplo en la foto de galería #dropsfan (de Francia) tampoco le ha salido igual. Es bonito pero no es el de la modelo. Podrían aclarar esa duda?? Gracias
31.01.2026 - 10:41DROPS Design answered:
Hola Carmen, los aumentos se trabajan siempre a 8 puntos desde el inicio de la fila, mientras que las disminuciones se trabajan a 8 puntos desde estos. Por lo tanto, no se trabaja siempre después de los mismos 8 puntos, si no que se cuenta 8 puntos desde los primeros 8, teniendo en cuenta los aumentos ya trabajados entre ellos.
23.02.2026 - 00:32
![]() Domenja wrote:
Domenja wrote:
Bonjour, j'aime beaucoup ce modèle. Les côtés sont-ils fermés par une couture ou un autre type d'attache ? Vous écrivez qu'on tricote avec une aiguille circulaire en AR. Merci.
26.01.2026 - 17:16DROPS Design answered:
Bonjour Mme Domenja, il n'y a pas de couture sur les côtés, et aucune attache ni boutons non plus; les 2 "panneaux" dos et devant sont "libres". Bon tricot!
27.01.2026 - 08:53
![]() Isabel wrote:
Isabel wrote:
En relación a la pregunta anterior. He dado como bueno que habría que hacer las disminuciones y aumentos a los 8 puntos como en la primera disminución pero el dibujo queda mal. Pueden confirmarme en qué puntos se hacen los aumentos y disminuciones la segunda vez y las demás? Gracias
20.01.2026 - 22:21DROPS Design answered:
Hola Isabel, sí, se aumenta después de 8 puntos desde el inicio de la hilera. Al disminuir, cuentas 8 puntos desde estos 8 puntos (por lo que, al haber aumentado 2 puntos después de los primeros 8 puntos, el patrón se ha desplazado respecto al aumento anterior). Después de estos 8 puntos (2 son los puntos aumentados previamente y 6 puntos) se trabaja la disminución.
23.02.2026 - 00:31
![]() Isabel wrote:
Isabel wrote:
En la parte delantera del chaleco, tengo una pregunta. La segunda vez que me toca aumentar y disminuir (a la 14,° hilera), también tengo que hacerlo a los 8 puntos de comenzar la hilera??? Un saludo y gracias!!!!
18.01.2026 - 17:37DROPS Design answered:
Hola Isabel, sí, se aumenta después de 8 puntos desde el inicio de la hilera. Al disminuir, cuentas 8 puntos desde estos 8 puntos (por lo que, al haber aumentado 2 puntos después de los primeros 8 puntos, el patrón se ha desplazado respecto al aumento anterior). Después de estos 8 puntos (2 son los puntos aumentados previamente y 6 puntos) se trabaja la disminución.
23.02.2026 - 00:30
![]() Isabel wrote:
Isabel wrote:
Buenos días, he empezado a hacerlo con agujas circulares pero, es posible que mida más en los extremos que en el centro?? Me está pasando que si lo mido en el borde, me mide 26 cm y si lo mido en el centro, mide 23 cm. (Estoy haciendo todavía la espalda) Gracias
27.11.2025 - 12:44DROPS Design answered:
Hola Isabel, ¿estás midiendo la prenda sobre una superficie plana, con la prenda recta y bien colocada? Porque antes del escote debería ser una forma normal rectangular, no con picos en los extremos. En este caso se trabaja con una aguja circular pero debería trabajarse cómo si usarás agujas rectas, ya que trabajas de ida y vuelta y no en redondo.
15.12.2025 - 00:31
![]() Anete wrote:
Anete wrote:
It is unclear why to cast on and then decrease, but not to just knit and after 19 cm start to increase/decrease rows. Could you explain please?
15.11.2025 - 10:53
![]() Isabel wrote:
Isabel wrote:
Buenos días, en la explicación dice de hacer esta labor con agujas circulares, pero, ¿se podría hacer con agujas normales????? La razón de la pregunta es que sí tengo agujas del 5, pero no circulares. Muchas gracias
27.10.2025 - 08:25
![]() Anja Sørensen wrote:
Anja Sørensen wrote:
De to pinde ret i hver ende af pandebåndet kommer med når jeg syr det sammen og vender det. Det er ellers en fin og nem opskrift
04.02.2025 - 10:56DROPS Design answered:
Hej Anja, det kan være at du kan sy det sammen fra retsiden indenfor kantmaskerne så de ikke kan ses fra retsiden, se vores videoer hvordan man kan sy pænt sammen :)
12.02.2025 - 10:07
|
|
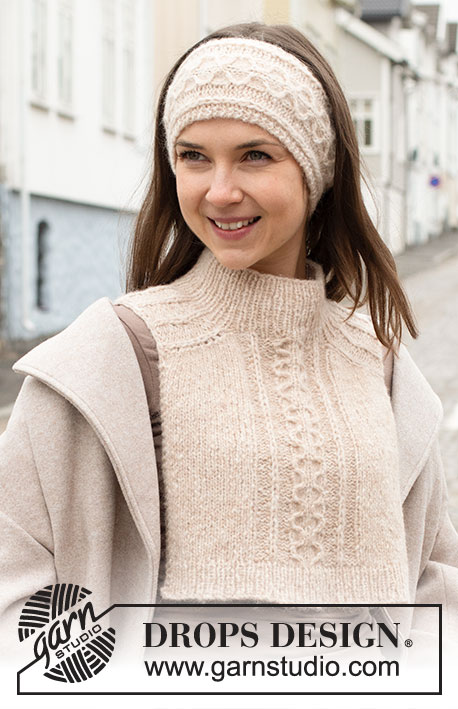
Sugar Cane Set#sugarcaneset |
|
 |
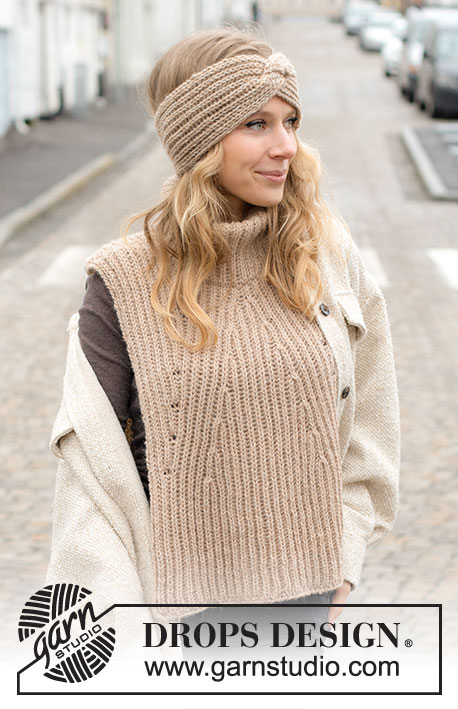 |
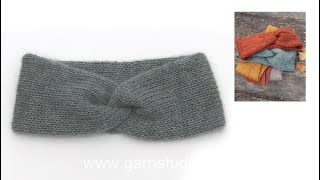
Knitted headband and vest in 2 strands DROPS Alpaca. The piece is worked with English rib, cables and displacements. Sizes S to XXXL.
DROPS 225-13 |
|
|
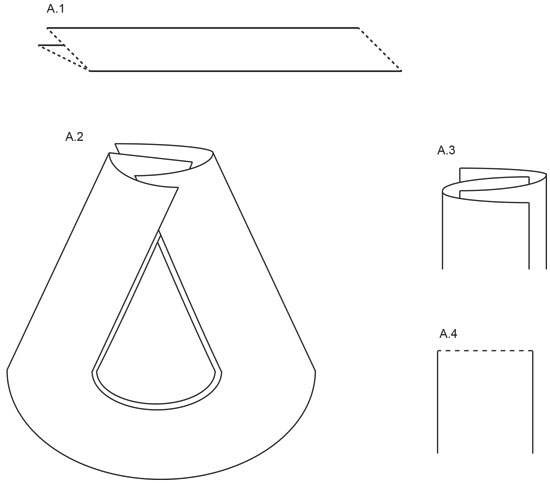
------------------------------------------------------- EXPLANATIONS FOR THE PATTERN: ------------------------------------------------------- RIDGE/GARTER STITCH (worked back and forth): Knit all rows. 1 ridge = knit 2 rows. KNITTING TIP (headband): To get a good fit, the headband should be approx. 6-7 cm = 2⅜"-2¾" shorter than head-size. ENGLISH RIB STITCH: When counting stitches the yarn overs are not counted as stitches. DIAGRAMS: See diagrams A.1 to A.4. The diagrams are used when assembling the headband. ENGLISH RIB (back and forth): ROW 1 (wrong side): Work the edge stitch as described in the text – applies to each row, * knit 1, 1 yarn over, slip 1 stitch as if to purl *, work from *-* until there are 2 stitches left, knit 1 and 1 edge stitch. ROW 2 (right side): Work the edge stitch, * 1 yarn over, slip 1 stitch as if to purl, knit together the yarn over and slipped stitch *, work from *-* until there are 2 stitches left, make 1 yarn over, slip 1 stitch as if to purl and 1 edge stitch. ROW 3 (wrong side): Work the edge stitch, * knit together the yarn over and slipped stitch, 1 yarn over, slip 1 stitch as if to purl *, work from *-* until there are 2 stitches left, knit together the yarn over and slipped stitch and 1 edge stitch. Repeat rows 2 and 3 onwards. ENGLISH RIB (in the round): ROUND 1: * Make 1 yarn over, slip 1 stitch as if to purl, knit 1 *, repeat from *-* to end of round. ROUND 2: * Purl together the yarn over and slipped stitch, make 1 yarn over, slip 1 stitch as if to purl *, repeat from *-* to end of round. ROUND 3: * Make 1 yarn over, slip 1 stitch as if to purl, knit together the yarn over and slipped stitch *, repeat from *-* to end of round. Repeat rounds 2 and 3 onwards. INCREASE TIP (for vest): All increases are worked from the right side! Increase 2 stitches by working 3 stitches in one stitch as follows: Knit the stitch, but do not slip it from the left needle, make 1 yarn over and knit the stitch 1 more time (= 2 stitches increased). Work the new stitches in English rib – note on the first row after the increases (from the wrong side), the knitted stitches are knitted without yarn overs as they have not been made. DECREASE TIP (for vest): All decreases are worked from the right side! Decrease after the first marker-stitch: Work the 8 stitches after the marker-stitch as before, slip the next stitch + yarn over (= 1 English rib stitch) as if to knit, knit together the next 2 stitches and pass the slipped stitch + yarn-over over the knitted together stitches (= 2 stitches decreased). Decrease before the second marker-stitch: Work until there are 11 stitches left before the marker-stitch, knit together the next 3 stitches + yarn overs (= 2 stitches decreased). ------------------------------------------------------- START THE PIECE HERE: ------------------------------------------------------- HEADBAND – SHORT OVERVIEW OF THE PIECE: The piece is worked back and forth. The ends are sewn together in such a way that gives a cable mid-front. HEADBAND: Cast on 19-21-23 stitches a little loosely with needle size 4 MM = US 6 and 1 strand of each color DROPS Alpaca (= 2 strands). Work 1 RIDGE back and forth – read description above. You now continue with 1 edge stitch on each side, which are slipped as if to knit at the beginning of each row and knitted at the end of each row – this applies to EVERY row. Work ENGLISH RIB (back and forth) – read description above, with 1 edge stitch on each side. Read ENGLISH RIB STITCH. REMEMBER THE KNITTING GAUGE! When the headband measures 49-51-53 cm = 19¼"-20"-21" from the cast-on edge – read KNITTING TIP, work 1 ridge. Loosely bind off with knit from the right side. ASSEMBLY: The piece is a rectangle. Fold it double lengthwise – see diagram A.1. Now put the long sides together in layers, without twisting the piece – see diagram A.2. The ends are alternately inside and outside of each other and edge to edge, - see diagram A.3. Sew through all layers along the broken line in diagram A.4 (across the ends); sew with tight casting stitches, 1 stitch in each stitch – it is important to sew through all the layers so the seam is invisible when the band is turned inside-out. Cut and fasten the strand. Turn the piece inside-out, so the seam is on the inside. ------------------------------------------------------- VEST – SHORT OVERVIEW OF THE PIECE: The front and back pieces are worked back and forth with circular needle, then sewn together at the shoulders. The double neck is worked in the round to finish. BACK PIECE: Cast on 88-94-100 stitches with circular needle size 5 MM = US 8 and 1 strand of each color DROPS Alpaca (= 2 strands). You now continue with 1 edge stitch on each side of the piece which are slipped as if to knit at the beginning of each row and knitted at the end of each row – this applies to EVERY row: Work the edge stitch, * knit 2 together (= 1 stitch decreased), make 1 yarn over, slip 1 stitch as if to purl *, work from *-* until there are 3 stitches left, knit 2 together (= 1 stitch decreased) and 1 edge stitch. There are 59-63-67 stitches. Read ENGLISH RIB STITCH. Continue rows 2 and 3 of ENGLISH RIB back and forth – read description above. REMEMBER THE KNITTING GAUGE! When the piece measures 46-48-50 cm = 18"-19"-19¾", bind off the middle 19 stitches for the neck and each shoulder is finished separately. Bind off 2 stitches on the next row from the neck = 18-20-22 stitches on the shoulder. Continue with English rib and 1 edge stitch on each side. When the piece measures 48-50-52 cm = 19"-19¾"-20½" bind off with knit; to avoid the bind-off edge being tight, the yarn-overs are bind off as separate stitches. Work the other shoulder in the same way. FRONT PIECE: Cast on 88-94-100 stitches with circular needle size 5 MM = US 8 and 1 strand of each color DROPS Alpaca (= 2 strands). You now continue with 1 edge stitch on each side of the piece which are slipped as if to knit at the beginning of each row and knitted at the end of the row – this applies to every row: Work the edge stitch, * knit 2 together (= 1 stitch decreased), make 1 yarn over, slip 1 stitch as if to purl *, work from *-* until there are 3 stitches left, knit 2 together (= 1 stitch decreased) and 1 edge stitch. There are 59-63-67 stitches. Continue rows 2 and 3 of English rib back and forth When the piece measures 17-19-21 cm = 6¾"-7½"-8¼" – adjust so the next row is from the right side, insert 2 markers as follows: 1 marker in the 6th-8th-10th stitch from each side (= purled stitch in the pattern). On the next row from the right side, start to displace stitches, decreasing and increasing as follows: Work the first 6-8-10 stitches as before, increase 2 stitches in the next stitch – read INCREASE TIP, work the next 8 stitches, decrease 2 stitches – read DECREASE TIP, work until there are 11 stitches left before the next marker, decrease 2 stitches – remember DECREASE TIP, work the next 8 stitches, increase 2 stitches in the next stitch – remember INCREASE TIP, work the last 6-8-10 stitches. You have both increased and decreased 4 stitches. Decrease and increase like this every 14th row (every 7th knitted stitch in height) a total of 7 times. Continue working until the piece measures 42-44-46 cm = 16½"-17¼"-18". Now place the middle 11 stitches on a thread for the neck and finish each shoulder separately. Bind off on each row from the neck as follows: 2 stitches 3 times = 18-20-22 stitches on the shoulder. Continue with English rib and 1 edge stitch on each side. When the piece measures 48-50-52 cm = 19"-19¾"-20½" bind off with knit; to avoid the bind-off edge being tight, the yarn-overs are bind off as separate stitches. Work the other shoulder in the same way. ASSEMBLY: Sew the shoulder seams, inside the bind-off edge. HIGH NECK: Start approx. mid-back and knit up 26 stitches as far as the thread in front, work the stitches from the thread as before, knit up 27 stitches to mid-back = 64 stitches. Work ENGLISH RIB in the round – read description above, making sure the English rib is continued as before above the thread. When the neck measures 24 cm = 9½", bind off with knit over the English rib and purl over purl – to avoid the bind-off edge being tight, the yarn-overs are bind off as separate stitches. Fold the neck to the outside or inside as in the picture. If the neck is folded to the inside it can be sewn so that it becomes a double neck. To avoid the neck being tight and rolling outwards, it is important that the seam is elastic. |
|
 |
|
Have you finished this pattern?Tag your pictures with #dropspattern #sugarcaneset or submit them to the #dropsfan gallery. Do you need help with this pattern?You'll find 29 tutorial videos, a Comments/Questions area and more by visiting the pattern on garnstudio.com. © 1982-2026 DROPS Design A/S. We reserve all rights. This document, including all its sub-sections, has copyrights. Read more about what you can do with our patterns at the bottom of each pattern on our site. |
|


With over 40 years in knitting and crochet design, DROPS Design offers one of the most extensive collections of free patterns on the internet - translated to 17 languages. As of today we count 324 catalogs and 12278 patterns - 12268 of which are translated into English (US/in).
We work hard to bring you the best knitting and crochet have to offer, inspiration and advice as well as great quality yarns at incredible prices! Would you like to use our patterns for other than personal use? You can read what you are allowed to do in the Copyright text at the bottom of all our patterns. Happy crafting!
Post a comment to pattern DROPS 225-13
We would love to hear what you have to say about this pattern!
If you want to leave a question, please make sure you select the correct category in the form below, to speed up the answering process. Required fields are marked *.