
Popular categories
Looking for a yarn?


Comments / Questions (6)
![]() Ewa wrote:
Ewa wrote:
HI, would it be nice to add some shortened stitches in the back of the yolk? Or it is not needed in this pattern?
10.01.2026 - 17:34DROPS Design answered:
Witaj Ewo, ja bym dodała kilka rzędów skróconych z tyłu swetra. Dekolt zawsze się wtedy lepiej układa. Pozdrawiam!
11.01.2026 - 17:23
![]() Mathilde wrote:
Mathilde wrote:
Hei! Hva er vanskelighetsnivået på denne?
05.08.2025 - 14:30DROPS Design answered:
Hej Mathilde. Denna er ikke så vanskelig, men man bör nok ha stickat något tidigare. Mvh DROPS Design
29.08.2025 - 13:51
![]() Marketa wrote:
Marketa wrote:
Dobrý den, nerozumím nahazování ok. Nahazuje se pouze v jedné řadě a nebo ve dvou? A poprvé se nahazuje mezi 2 oky a pak za zadní nit v té jedné řadě? Děkuji za odpověď
15.05.2025 - 18:54
![]() Nicole wrote:
Nicole wrote:
Pourquoi tous les pulls d'homme sont tricotés de haut en bas ? J'aimerais pouvoir tricoter les dos et devants séparément Merci pour la réponse Niole
13.12.2022 - 18:42DROPS Design answered:
Bonjour Nicole, cette façon de tricoter de haut en bas est largement appréciée par de nombreuses tricoteuses, raison pour laquelle nous proposons de nombreux modèles réalisés de cette façon, mais vous pouvez également retrouver des modèles tricotés de bas en haut. Bon tricot!
14.12.2022 - 07:52
![]() Arnaud wrote:
Arnaud wrote:
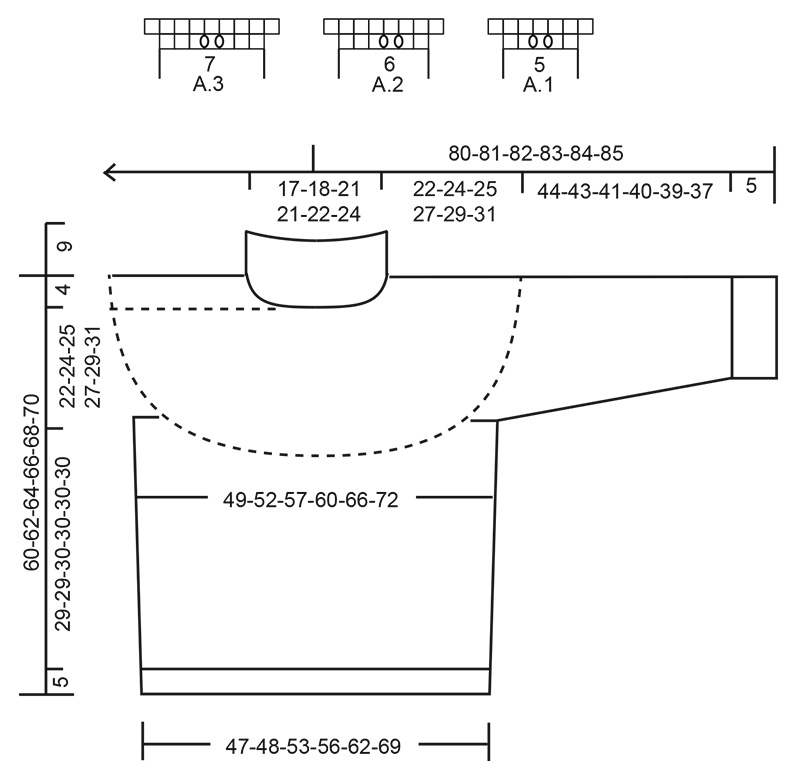
Bonjour, je ne comprends pas le descriptif de l augmentation 2. Toutes ces augmentations se font sur 1 seul rang ? Que signifie A3 au dessus des 14 premières mailles puis A2 au dessus des 42 mailles suivantes. Merci de votre aide
21.11.2022 - 07:21DROPS Design answered:
Bonjour Arnaud, les augmentations décrites sous AUGMENTATIONS se font effectivement sur un même tour; cette leçon explique comment procéder. Tricoter A.3 au-dessus des 14 premières mailles, A.2 au-dessus des 42 suivantes signifie que vous devez tricoter les 14 premières mailles en suivant A.3 (= répétez 2 fois le diagramme), et répétez 7 fois A.2 (= 7 fois 6 mailles = 42 mailles). Bon tricot!
21.11.2022 - 10:32
![]() Ana wrote:
Ana wrote:
He tejido este jersey y, después de lavarlo a mano con agua fría, cambió la densidad de puntos de 11p x 15v a 11p x 18v en una muestra de 10cm x 10cm. Recomendaría tenerlo en cuenta para el cálculo de la longitud de las prendas.
23.10.2021 - 20:28
|
|||||||
Sailor Blues Sweater#sailorbluessweater |
|||||||
 |
 |
||||||
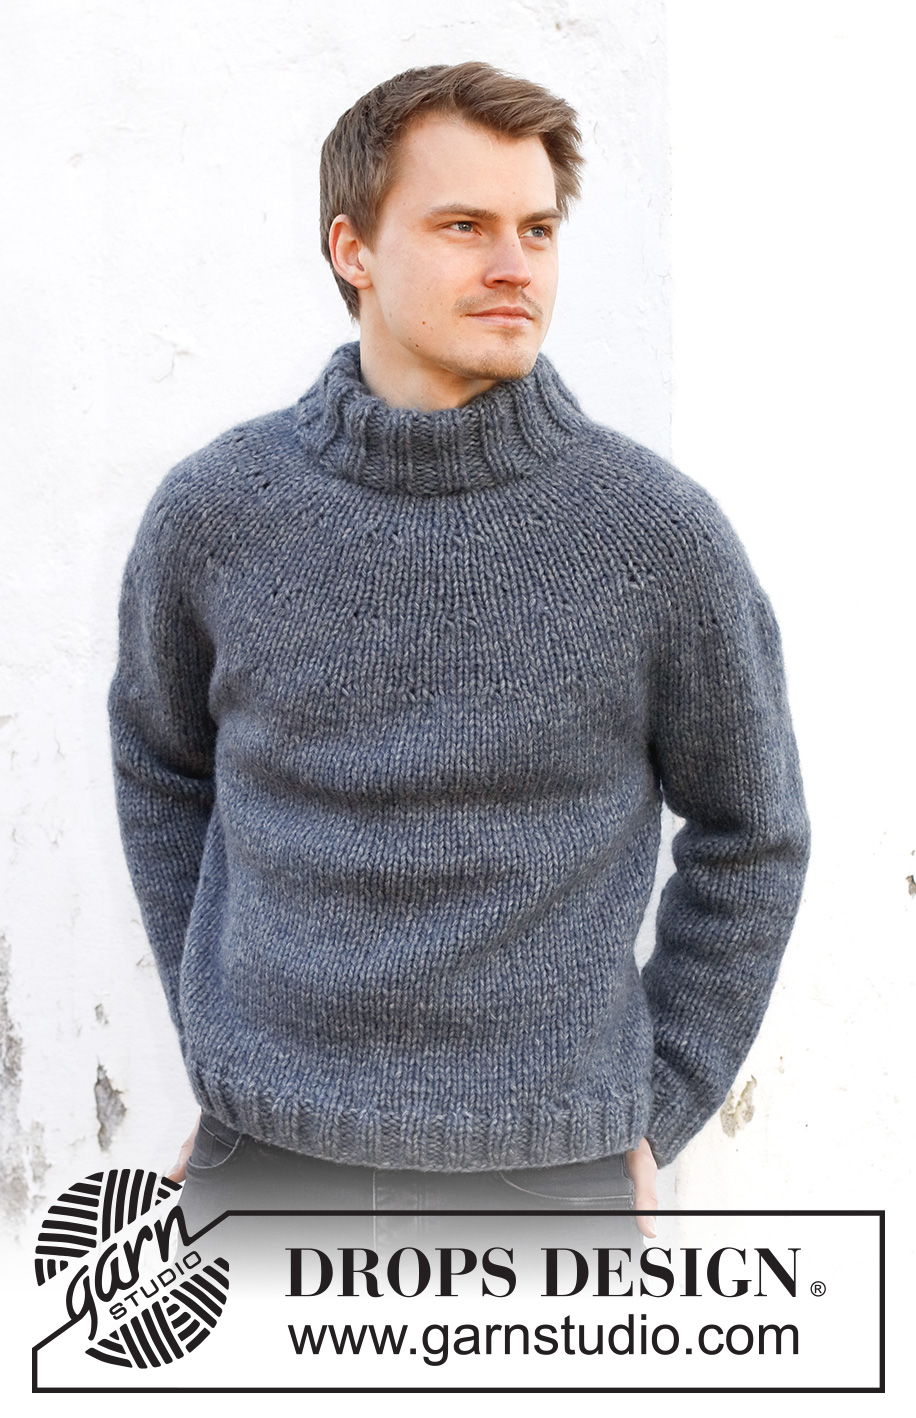
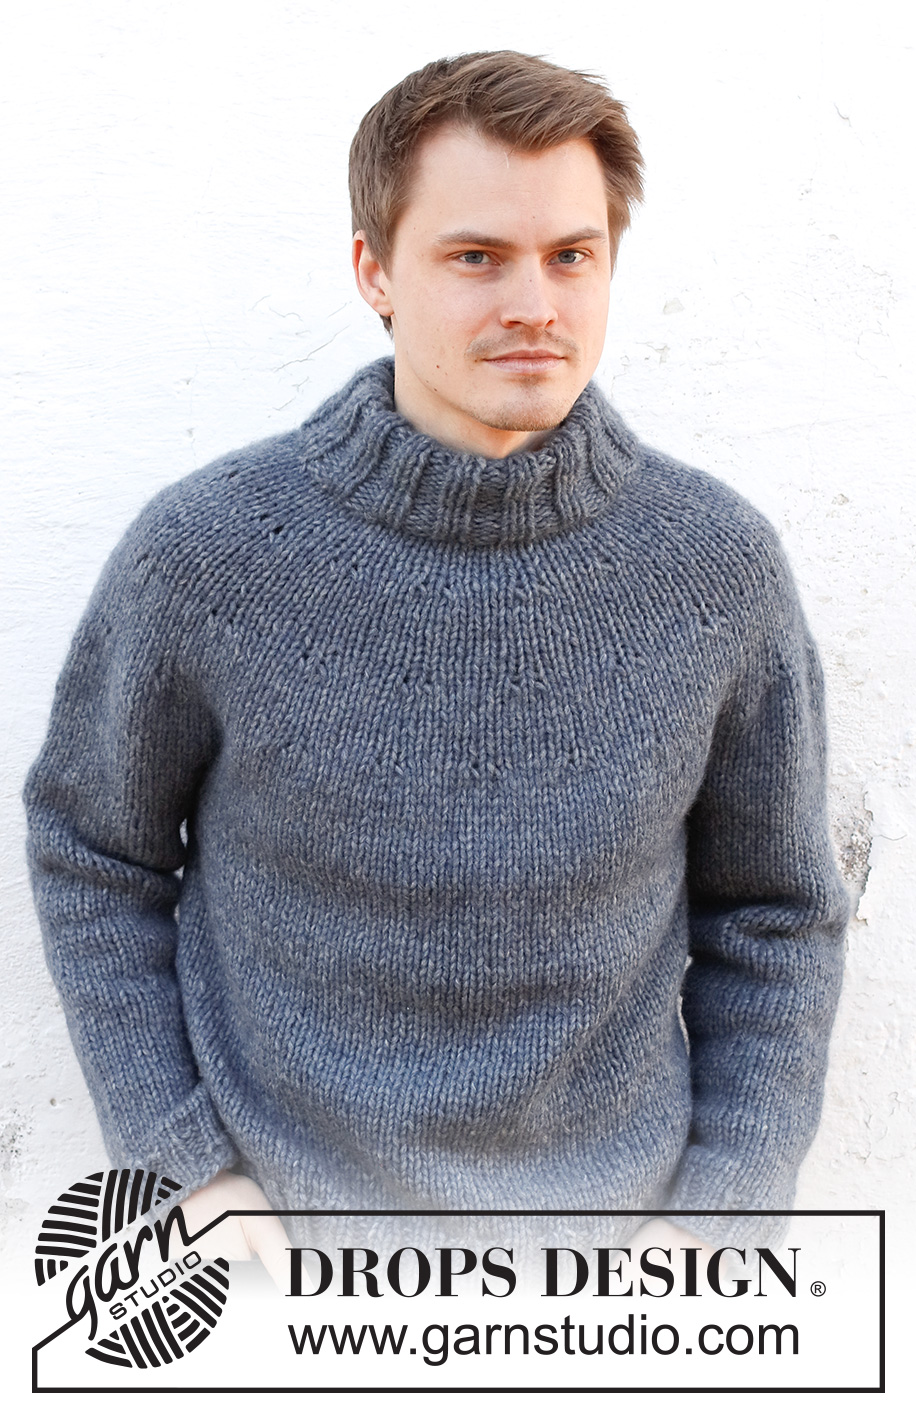
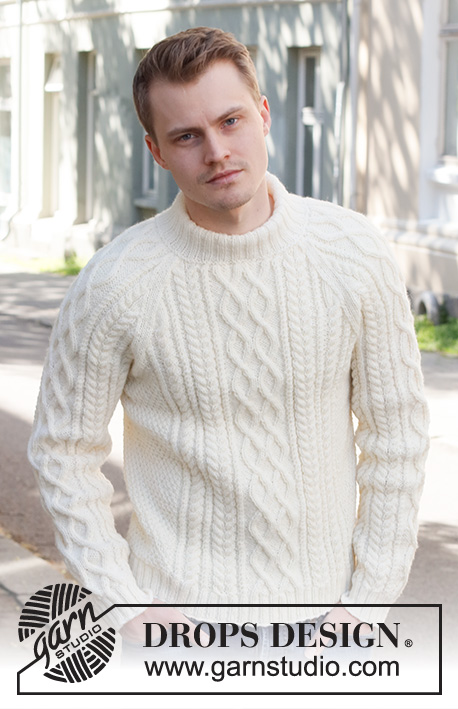
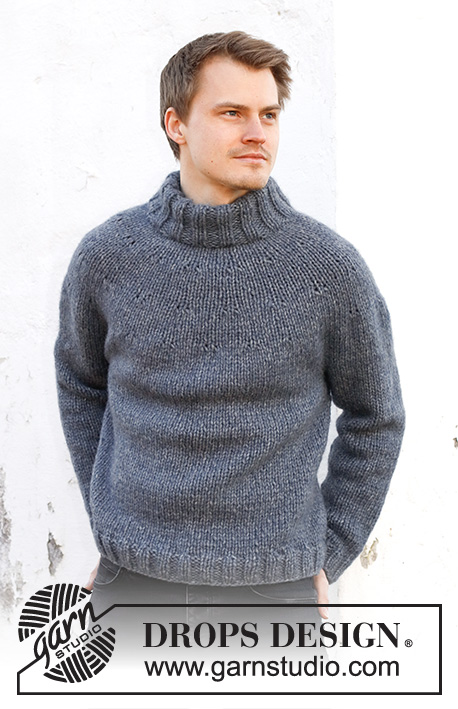
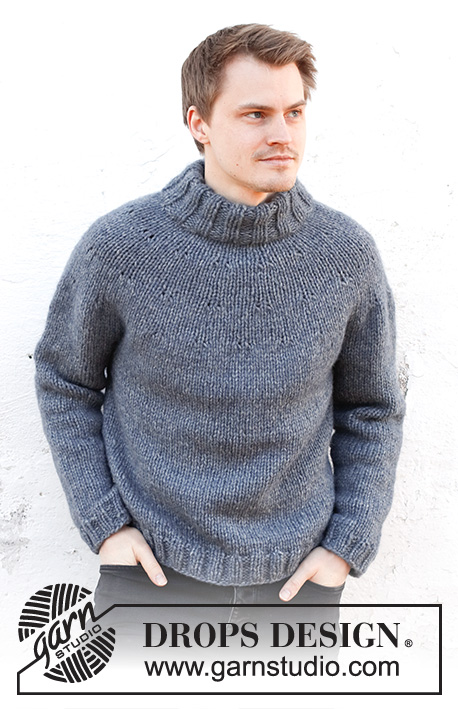
Knitted sweater for men in DROPS Wish. The piece is worked top down, with round yoke and double neck. Sizes S - XXXL.
DROPS 224-19 |
|||||||
|
------------------------------------------------------- EXPLANATIONS FOR THE PATTERN: ------------------------------------------------------- PATTERN: See diagrams A.1 to A.3. INCREASE TIP (evenly spaced): To work out how to increase evenly, count the total number of stitches on the needle (e.g. 60 stitches) and divide by the number of increases to be made (e.g. 5) = 12 In this example, increase by making 1 yarn over after alternately each 12th stitch. On the next round work the yarn overs twisted to avoid holes. DECREASE TIP (for body and sleeves): Decrease 1 stitch on either side of the marker thread as follows: Work until there are 3 stitches left before the marker thread, knit 2 together, knit 2 (marker thread sits between these 2 stitches), slip 1 stitch as if to knit, knit 1 and pass the slipped stitch over the knitted stitch (2 stitches decreased). BINDING-OFF TIP: To avoid the bind-off edge being tight you can bind off with a larger size needle. If the edge is still tight, make 1 yarn over after approx. each 6th stitch at the same time as binding off; the yarn overs are bind off as normal stitches. ------------------------------------------------------- START THE PIECE HERE: ------------------------------------------------------- SWEATER – SHORT OVERVIEW OF THE PIECE: The piece is worked in the round with circular needle, top down. The yoke is divided for the body and sleeves and the body continued in the round with circular needle. The sleeves are worked with short circular needle/double pointed needles, top down. NECK: Cast on 75-80-85-85-90-95 stitches with short circular needle size 6 MM = US 10 and DROPS Wish. Knit 1 round, then work rib in the round (knit 2, purl 3) for 4 cm = 1½". Now decrease all purl-3 to purl-2 = 60-64-68-68-72-76 stitches. Continue the new rib until the neck measures 18 cm = 7". Knit 1 round where you increase 5-6-7-12-13-19 stitches evenly spaced – read INCREASE = 65-70-75-80-85-95 stitches. Knit 1 round (the yarn overs are knitted twisted). Insert 1 marker at the beginning of the round (= mid-back); the yoke is measured from here! YOKE: Change to circular needle size 8 MM = US 11. Work stockinette stitch in the round for 4 cm = 1½". REMEMBER THE KNITTING GAUGE!: Now increase as follows: INCREASE 1: Work A.1 on the whole round (= 13-14-15-16-17-19 repeats of 5 stitches). When the diagram has been completed in height you have increased 26-28-30-32-34-38 stitches = 91-98-105-112-119-133 stitches. Continue with stockinette stitch until the piece measures 10-11-11-12-13-14 cm = 4"-4⅜"-4⅜"-4¾"-5⅛"-5½" from the marker. INCREASE 2: Work A.3 over the first 0-7-7-14-14-0 stitches (= 0-1-1-2-2-0 repeats of 7 stitches), A.2 over the next 42-42-42-42-42-60 stitches (= 7-7-7-7-7-10 repeats of 6 stitches), A.3 over the next 7-0-7-0-7-7 stitches, A.2 over the next 42-42-42-42-42-66 stitches, A.3 over the next 0-7-7-14-14-0 stitches. When the diagrams have been completed in height you have increased 30-32-34-36-38-44 stitches = 121-130-139-148-157-177 stitches. Continue with stockinette stitch until the piece measures 16-18-19-21-22-24 cm = 6¼"-7"-7½"-8¼"-8¾"-9½" from the marker. INCREASE 3: Work A.3 over the first 0-7-0-7-0-7 stitches, A.2 over the next 54-48-66-60-78-78 stitches (= 9-8-11-10-13-13 repeats of 6 stitches), A.3 over the next 7-14-7-14-7-7 stitches (= 1-2-1-2-1-1 repeats of 7 stitches), A.2 over the next 60-54-66-60-72-78 stitches (= 10-9-11-10-12-13 repeats of 6 stitches), A.3 over the next 0-7-0-7-0-7 stitches. When the diagrams have been completed in height you have increased 40-42-46-48-52-58 stitches = 161-172-185-196-209-235 stitches. Continue with stockinette stitch until the piece measures 22-24-25-27-29-31 cm = 8¾"-9½"-9¾"-10⅝"-11⅜"-12¼" from the marker. Now divide for the body and sleeves as follows: Work the first 24-25-27-29-32-36 stitches (= ½ back piece), place the next 33-35-38-40-40-46 stitches on 1 thread for the sleeve, cast on 6-6-8-8-8-8 stitches (= in side under sleeve), work 47-51-55-58-65-71 stitches (= front piece), place the next 33-35-38-40-40-46 stitches on 1 thread for the sleeve, cast on 6-6-8-8-8-8 stitches (= in side under sleeve), work the remaining 24-26-27-29-32-36 stitches (= ½ back piece). The body and sleeves are finished separately. THE PIECE IS NOW MEASURED FROM HERE! BODY: = 107-114-125-132-145-159 stitches. Insert a marker thread in the middle of the cast-on stitches in each side. Allow the threads to follow your work onwards; they are used when decreasing later. Continue with stockinette stitch in the round for 4 cm = 1½". Now decrease 1 stitch on each side of both marker threads – read DECREASE TIP. The decreases are now finished in size S. Repeat the decrease in sizes M, L, XL, XXL and XXXL when the piece measures 15 cm = 6" from the division = 103-106-117-124-137-151 stitches. Continue working until the body measures 29-29-30-30-30-30 cm = 11⅜"-11⅜"-11¾"-11¾"-11¾"-11¾" from the division; try the sweater on and work to desired length (5 cm = 2" left to finished length). Increase 21-22-23-24-27-29 stitches evenly spaced = 124-128-140-148-164-180 stitches. Change to circular needle size 6 MM = US 10 and work rib (knit 2, purl 2) for 5 cm = 2". Bind off with knit over knit and purl over purl – read BINDING-OFF TIP. The sweater measures approx. 60-62-64-66-68-70 cm = 23⅝"-24⅜"-25¼"-26"-26¾"-27½" from the shoulder down. SLEEVES: Place the 33-35-38-40-40-46 stitches from the thread on the one side of the piece on double pointed needles/short circular needle size 8 MM = US 11 and knit up 1 stitch in each of the 6-6-8-8-8-8 stitches cast on under the sleeve = 39-41-46-48-48-54 stitches. Insert a marker thread in the middle of the new stitches under the sleeve. Allow the thread to follow your work onwards; it is used when decreasing later Start at the marker thread and work stockinette stitch in the round for 4 cm = 1½". Then decrease 1 stitch on each side of the marker thread – read DECREASE TIP. Decrease like this every 7-6½-5-4-3½-3 cm = 2¾"-2½"-2"-1½"-1¼"-1⅛" a total of 6-6-8-9-9-10 times = 27-29-30-30-30-34 stitches. Continue working until the sleeve measures 44-43-41-40-39-37 cm = 17¼"-17"-16⅛"-15¾"-15¼"-14½" from the division (shorter measurements in larger sizes due to wider neck and longer yoke). Try the sweater on and work to desired length (approx. 5 cm = 2" left to finished length). Increase 5-7-6-10-10-10 stitches evenly spaced = 32-36-36-40-40-44 stitches. Change to double pointed needles size 6 MM = US 10 and work rib (knit 2, purl 2) for 5 cm = 2". Bind off with knit over knit and purl over purl – remember BINDING-OFF TIP. The sleeve measures approx. 49-48-46-45-44-42 cm = 19¼"-19"-18"-17¾"-17¼"-16½" from the division. Work the other sleeve in the same way. ASSEMBLY: Fold the neck double to the inside and sew down. To avoid the neck being tight and rolling outwards, it is important that the seam is elastic. |
|||||||
Diagram explanations |
|||||||
|
|||||||
 |
|||||||
Have you finished this pattern?Tag your pictures with #dropspattern #sailorbluessweater or submit them to the #dropsfan gallery. Do you need help with this pattern?You'll find 27 tutorial videos, a Comments/Questions area and more by visiting the pattern on garnstudio.com. © 1982-2026 DROPS Design A/S. We reserve all rights. This document, including all its sub-sections, has copyrights. Read more about what you can do with our patterns at the bottom of each pattern on our site. |
|||||||


With over 40 years in knitting and crochet design, DROPS Design offers one of the most extensive collections of free patterns on the internet - translated to 17 languages. As of today we count 324 catalogs and 12290 patterns - 12280 of which are translated into English (US/in).
We work hard to bring you the best knitting and crochet have to offer, inspiration and advice as well as great quality yarns at incredible prices! Would you like to use our patterns for other than personal use? You can read what you are allowed to do in the Copyright text at the bottom of all our patterns. Happy crafting!
Post a comment to pattern DROPS 224-19
We would love to hear what you have to say about this pattern!
If you want to leave a question, please make sure you select the correct category in the form below, to speed up the answering process. Required fields are marked *.