
Popular categories
Looking for a yarn?


Comments / Questions (34)
![]() Susan wrote:
Susan wrote:
I’m not sure where I am moving markers to on page 5, under yoke increases. I believe my markers are already in the right place ??
26.04.2026 - 22:17DROPS Design answered:
Dear Susan, you need to ensure that there are now 34-34-32-38-34-32 stitches between the marker-stitches on each sleeve. If so, then you may not need to move the markers. Otherwise, adjust the placement of the markers here so that the increases will be in the correct place from here onwards. Happy knitting!
27.04.2026 - 01:52
![]() Christy wrote:
Christy wrote:
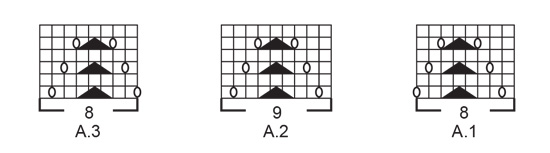
What does "A.1,A.2, and A.3 are repeated in height" mean?
10.03.2026 - 16:25DROPS Design answered:
Hi Christy, When you have worked the diagrams from the first row at the bottom to the last row at the top, you begin at the bottom of the diagram again and work upwards. This is repeating the diagram in height. Regards, Drops Team.
11.03.2026 - 07:05
![]() Claudia wrote:
Claudia wrote:
I am working on pattern 40-21 and am also confused. Does the lace pattern go all across the back of the sweater or just down the center of the back? When I follow the first row instructions on the pattern rows I am getting pattern on the right side of the back and stocking on the left. Help
19.09.2025 - 14:28DROPS Design answered:
Hi, Claudia, the lace patterns runs down the center of the back, the pattern should be placed like this: 5 band stitches, knit A.1, knit the rest of the right front piece, knit the right sleeve, knit 4-5-5-5-5-5 stitches into the back piece, knit A.1, A.2 and A.3, knit the rest of the back piece, knit the left sleeve, knit the left front piece until you have 13 stitches left, then knit A.3 and finish with 5 band stitches. Happy knitting!
28.10.2025 - 13:18
![]() Anna wrote:
Anna wrote:
Wat een leuk vestje is dit! En hoe duidelijk is het patroon beschreven. En...tot mijn verrassing wordt er ook ajour gebreid op het achterpand. Zou het niet leuk zijn, als daar ook een foto van gemaakt zou zijn? Uiteindelijk kies je toch van de plaatjes. Nogmaals compliment voor jullie patronen en een hartelijke groet.
06.12.2024 - 21:59
![]() Samira Ben wrote:
Samira Ben wrote:
Bonjour Je suis en train de réaliser ce modèle 40-21 et je viens de répéter pour la troisième fois mais toujours le même décalage au niveau du point fantaisie dos car vous mentionnez qu'on travaille du jersey jusqu'à 5 m après le marqueur 2 mais puisqu'on fait des augmentations ce nombre de mailles après le marqueur 2 change normalement (pour ne pas avoir un décalage Merci de m'éclaircir
26.09.2024 - 00:50DROPS Design answered:
Bonjour Mme Ben, au tout 1er rang, vous tricotez en jersey jusqu'à ce qu'à 5 mailles après le marqueur -2 (pour le motif ajouré du dos), mais comme vous augmentez après le marqueur -2 sur l'endroit (avant le marqueur -2 sur l'envers), ce nombre de mailles jersey de part et d'autre de A.1, A.2, A.3 au milieu dos, va augmenter; continuez à bien aligner les diagrammes A.1, A.2 et A.3 comme avant, et tricotez en jersey les mailles de part et d'autre de ces diagrammes, autrement dit, le nombre de mailles jersey avant A.1 et après A.3 (sur l'endroit) va augmenter. Bon tricot!
26.09.2024 - 08:18
![]() Kathy wrote:
Kathy wrote:
Hi I am working on pattern 40-21 butterfly in fall confused. There are three charts A1,A2,A3, do I work first row of A1 followed by row 1 on A2 and A3 or do i finish one chart at a time and what direction do i follow the chart. Thanks
22.03.2024 - 17:08DROPS Design answered:
Dear Kathy, the patterns are knitted besides each other. In the first pattren row you knit "The first row is worked as follows: 5 band stitches in garter stitch, work (forst row of) A.1 (= 8 stitches), work stocking stitch until you have reached 4-5-5-5-5-5 stitches past marker 2, work (first row of) A.1 (= 8 stitches), (first row of) A.2 (= 9 stitches), (first row of) A.3 (= 8 stitches), work stocking stitch until there are 13 stitches left on the row, work (first row of)A.3 (= 8 stitches) and finish with 5 band stitches in garter stitch. In the next row, you knit the second row of each pattern etc. Happy Knitting!
23.03.2024 - 22:49
![]() Ciolek wrote:
Ciolek wrote:
Bonjour merci beaucoup tout compris encore merci vraiment vous faites est bon travail cordialement Madame Ciolek
16.03.2024 - 10:46
![]() Ciolek wrote:
Ciolek wrote:
Le bonjour si j'ai bien compris je prendre la maille juste devant:t ou derrière qui ce:trouve entre deux maille sinon je propose:de:vous envoiye:une photo prive sur instagram sa serai bête de reste sur une incompréhension merci avance
15.03.2024 - 07:36DROPS Design answered:
Bonjour Mme Ciolek, vous augmentez pour l'empiècement de la même façon que vous l'avez fait auparavant, la seule différence est que le marqueur est dans une maille autrement dit, augmentez avant la maille avec le marqueur en relevant le fil de l'arrière vers l'avant et en le tricotant à l'endroit et augmentez après la maille avec le marqueur en relevant le fil de l'avant vers l'arrière et en le tricotant dans le brin arrière. Cette vidéo pourra probablement vous aider aussi. Bon tricot!
15.03.2024 - 09:37
![]() Ciolek wrote:
Ciolek wrote:
Bonjour je revient. Vers vous j'ai bien mes 38 mailles pour les manche je comprendre pas combien de marqueur je déplace Décalé ( veut dire que les devant et manche sont ensemble que je touche pas au 2 marqueur qui ce trouve dans le dos 75 mailles merci avance cordialement
14.03.2024 - 11:04DROPS Design answered:
Bonjour Mme Ciolek, jusque là les marqueurs étaient placés tous entre 2 mailles, maintenant vous devez les placer dans une maille (celle du raglan), et cette maille est la dernière maille du devant gauche + la 1ère et la dernière maille du dos + la première maile du devant droit, ainsi vous avez bien vos 38 mailles pour les manches entre les mailles avec un marqueur. Bon tricot!
14.03.2024 - 16:31
![]() Laura wrote:
Laura wrote:
At the beginning of the “Yoke Increases” it says to move the markers to the outermost stitch on the front and back pieces, but they seem to already be there at the end of the sleeve increases. I’m not sure where to move them.
10.03.2024 - 00:07DROPS Design answered:
Dear Laura, if you think they were correctly positioned and the number of stitches between all markers is the number indicated then you don't need to move them. Simply continue working as stated below. Happy knitting!
11.03.2024 - 00:26
|
||||||||||||||||||||||
Butterfly in Fall#butterflyinfallcardigan |
||||||||||||||||||||||
 |
 |
|||||||||||||||||||||
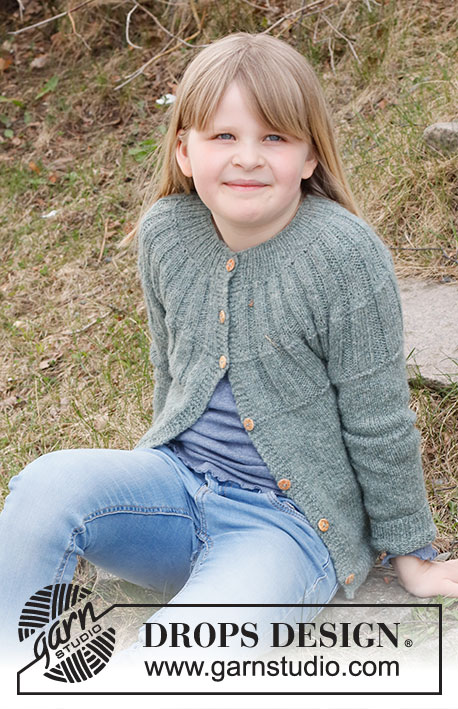
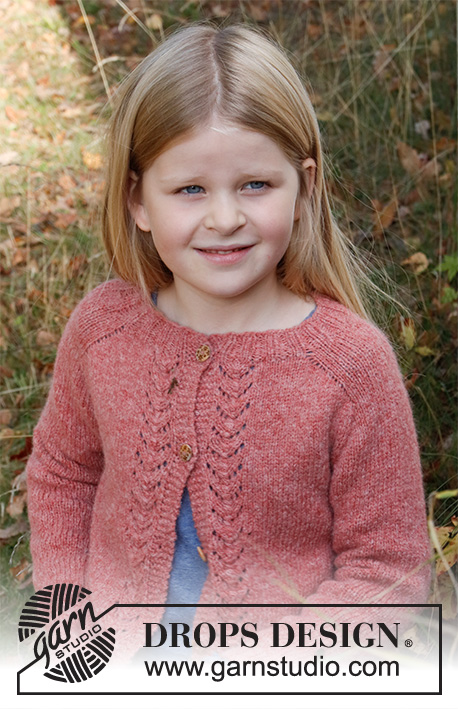
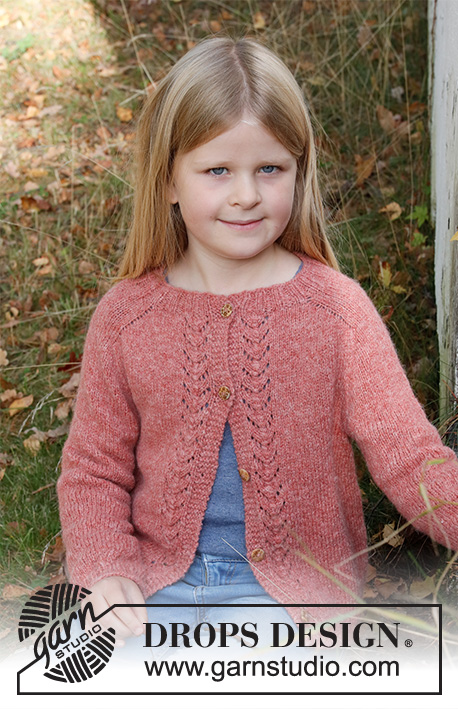
Knitted jacket for children in DROPS Sky. The piece is worked top down with lace pattern and saddle shoulders. Sizes 3 – 14 years.
DROPS Children 40-21 |
||||||||||||||||||||||
|
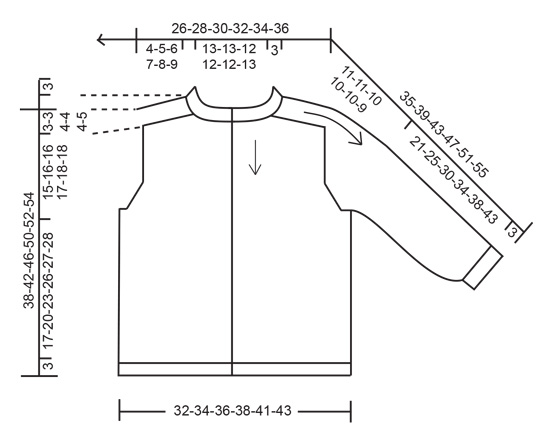
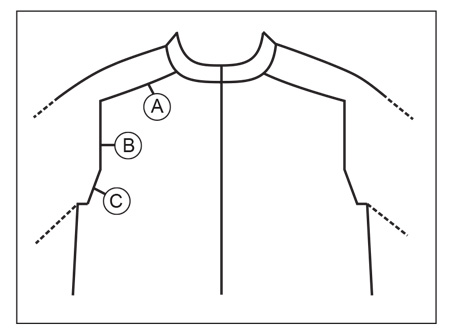
------------------------------------------------------- EXPLANATIONS FOR THE PATTERN: ------------------------------------------------------- RIDGE/GARTER STITCH (worked back and forth): Knit all rows. 1 ridge in height = Knit 2 rows. PATTERN: See diagrams A.1 to A.3. The diagrams show all rows in the pattern from the right side. INCREASE TIP-1 (evenly spaced): To work out how to increase evenly, count the total number of stitches on the needle (e.g. 88 stitches) minus bands (e.g. 10 stitches) and divide the remaining stitches by the number of increases to be made (e.g. 17) = 4.6. In this example, increase by making 1 yarn over after alternately each 4th and 5th stitch. Do not increase on the bands. On the next row work the yarn overs twisted to avoid holes. INCREASE TIP-2 (for saddle shoulders, sleeves and yoke from the RIGHT SIDE): BEFORE MARKER: The new stitch twists to the right. Use the left needle to pick up the strand between 2 stitches from the previous row, pick up the back strand and knit in the front loop. AFTER MARKER: The new stitch twists to the left. Use the left needle to pick up the strand between 2 stitches from the previous row, pick up the front strand and knit in the back loop. INCREASE TIP-3 (for saddle shoulders from the WRONG SIDE): BEFORE MARKER: The new stitch twists to the right. Use the left needle to pick up the strand between 2 stitches from the previous row, pick up the front strand and purl in the back loop. AFTER MARKER: The new stitch twists to the left. Use the left needle to pick up the strand between 2 stitches from the previous row, pick up the back strand and purl in the front loop. DECREASE TIP (for sleeves): Start 3 stitches before the marker thread, knit 2 together, knit 2 (marker thread sits between these 2 stitches), slip 1 stitch as if to knit, knit 1 and pass the slipped stitch over the knitted stitch (2 stitches decreased). BUTTONHOLES: Work buttonholes on the right band (when the garment is worn). Work from the right side when there are 3 stitches left on the row as follows: Make 1 yarn over, knit 2 together and knit 1. On the next row (wrong side), knit the yarn over to leave a hole. The first buttonhole is worked when the neck measures approx. 1½-2 cm = ½"-¾". Then work the other 4-5-5-6-6-6 buttonholes with approx. 7½-7-7½-7-7½-8 cm = 2⅞"-2¾"-2⅞"-2¾"-2⅞"-3⅛" between each one. BINDING-OFF TIP: To avoid the bind-off edge being tight you can bind off with a larger size needle. If the edge is still tight, make 1 yarn over after approx. each 6th stitch at the same time as binding off; the yarn overs are bind off as normal stitches. ------------------------------------------------------- START THE PIECE HERE: ------------------------------------------------------- JACKET – SHORT OVERVIEW OF THE PIECE: The neck and yoke are worked with circular needle, back and forth from mid front and top down. Stitches are increased for the saddle shoulders, then for the sleeves and finally for the yoke. The yoke is divided for the body and sleeves and the body continued back and forth with circular needle. The sleeves are worked in the round with double pointed needles, top down. NECK: Cast on 88-88-92-92-96-100 stitches (including 5 band stitches on each side towards mid front) with circular needle size 3 MM = US 2.5 and Sky. Purl 1 row (= wrong side). The next row is worked as follows from the right side: 5 band stitches in GARTER STITCH – read description above, * knit 2, purl 2 *, work from *-* until there are 7 stitches left, knit 2 and finish with 5 band stitches in garter stitch. Continue this rib for 3 cm = 1⅛" – remember the BUTTONHOLES on the right band – read description above. When the rib is finished, knit 1 row from the right side where you increase 17-21-21-25-21-21 stitches evenly spaced – read INCREASE TIP-1 = 105-109-113-117-117-121 stitches. Purl 1 row from the wrong side (yarn overs purled twisted and the 5 band stitches on each side are knitted). Now work the yoke as described below. YOKE: Change to circular needle size 4 MM = US 6. Insert 1 marker after the band at the beginning of the row; the yoke is measured from this marker! In addition insert 4 other markers, without working the stitches, as follows – each marker is inserted between 2 stitches, will be used when increasing for the saddle shoulders and should have a different color to the marker on the neck. Marker 1: Start mid-front, count 22-23-23-23-23-23 stitches (= front piece), insert the marker before the next stitch. Marker 2: Count 14-14-16-18-18-20 stitches from marker 1 (= shoulder), insert the marker before the next stitch. Marker 3: Count 33-35-35-35-35-35 stitches from marker 2 (= back piece), insert the marker before the next stitch. Marker 4: Count 14-14-16-18-18-20 stitches from marker 3 (= shoulder), insert the marker before the next stitch. There are 22-23-23-23-23-23 stitches left after marker 4 (= front piece). Allow these 4 markers to follow your work onwards. SADDLE-SHOULDER INCREASES: Read the whole section before continuing – on the first row you begin to work the pattern at the same time as starting to increase for the shoulders! PATTERN: The first row is worked as follows: 5 band stitches in garter stitch, work A.1 (= 8 stitches), work stockinette stitch until you have reached 4-5-5-5-5-5 stitches past marker 2, work A.1 (= 8 stitches), A.2 (= 9 stitches), A.3 (= 8 stitches), work stockinette stitch until there are 13 stitches left on the row, work A.3 (= 8 stitches) and finish with 5 band stitches in garter stitch. Continue this pattern – A.1, A.2 and A.3 are repeated in height. AT THE SAME TIME on the first row from the right side increase 4 stitches for the shoulders as follows: Increase BEFORE markers 1 and 3 and AFTER markers 2 and 4 – read INCREASE TIP-2. You are only increasing on the front and back pieces, the number of shoulder stitches remains the same. On the next row (wrong side) increase as follows: Increase BEFORE markers 4 and 2 and AFTER markers 3 and 1 – read INCREASE TIP-3. You increase on EVERY row, working differently on the right and wrong sides, so the stitches lie neatly. Continue the pattern and increase on every row (both on the right and wrong sides) a total of 12-14-16-20-22-26 times = 153-165-177-197-205-225 stitches. REMEMBER THE KNITTING GAUGE! After the last increase the piece measures approx. 4-5-6-7-8-9 cm = 1½"-2"-2⅜"-2¾"-3⅛"-3½" from the marker on the neck. Now increase for the sleeves as follows. SLEEVE INCREASES: Continue the lace pattern, stockinette stitch and 5 band stitches in garter stitch on each side. AT THE SAME TIME on the next row from the right side increase 4 stitches for the sleeves as follows: Increase AFTER markers 1 and 3 and BEFORE markers 2 and 4 – remember INCREASE TIP-2. You increase only on the sleeves and the number of stitches on the front and back pieces remains the same. Increase like this every 2nd row (each row from the right side) a total of 10-10-8-10-8-6 times = 193-205-209-237-237-249 stitches. The piece measures approx. 11-12-12-14-14-13 cm = 4⅜"-4¾"-4¾"-5½"-5½"-5⅛" from the marker on the neck. Now increase for the yoke as described below. YOKE INCREASES: Move the 4 markers so each marker sits in the outermost stitch on the front pieces and back piece. There are now 34-34-32-38-34-32 stitches between the marker-stitches on each sleeve. On the next row from the right side increase 8 stitches, by increasing both before and after all 4 marker-stitches – remember INCREASE TIP-2. You are now increasing on the front/back pieces and on the sleeves. Increase like this every 2nd row (each row from the right side) a total of 4-4-5-2-4-4 times = 225-237-249-253-269-281 stitches. When all the increases are finished, the piece measures approx. 14-15-15-16-17-16 cm = 5½"-6"-6"-6¼"-6¾"-6¼" from the marker on the neck. Continue working, without further increases, until the piece measures 15-16-16-17-18-18 cm = 6"-6¼"-6¼"-6¾"-7"-7" from the marker on the neck. Now divide for the body and sleeves as follows: Work the first 36-38-40-41-44-46 stitches as before (= front piece), place the next 46-48-50-50-52-54 stitches on a thread for the sleeve, cast on 6-6-6-8-8-8 stitches (= in side under sleeve), work 61-65-69-71-77-81 stitches (= back piece), place the next 46-48-50-50-52-54 stitches on a thread for the sleeve, cast on 6-6-6-8-8-8 stitches (= in side under sleeve), work the last 36-38-40-41-44-46 stitches (= front piece). The body and sleeves are finished separately. THE PIECE IS NOW MEASURED FROM HERE. BODY: = 145-153-161-169-181-189 stitches. Continue back and forth with lace pattern, stockinette stitch and 5 band stitches in garter stitch on each side until the piece measures 17-20-23-26-27-28 cm = 6¾"-8"-9"-10¼"-10⅝"-11" from the division. There is approx. 3 cm = 1⅛" left to finished length; try the jacket on and work to desired length. To avoid the ribbing being tight, work 1 row from the right side where you increase 31-31-35-35-39-39 stitches evenly spaced – remember INCREASE TIP-1 = 176-184-196-204-220-228 stitches. Change to circular needle size 3 MM = US 2.5. The next row is worked as follows from the wrong side: 5 band stitches in garter stitch, * purl 2, knit 2 *, work from *-* until there are 7 stitches left, purl 2 and 5 band stitches in garter stitch. Continue this rib for 3 cm = 1⅛". Bind off with garter stitch over garter stitch, knit over knit and purl over purl – read BINDING-OFF TIP! The jacket measures approx. 38-42-46-50-52-54 cm = 15"-16½"-18"-19¾"-20½"-21¼" from the shoulder down. SLEEVES: Place the 46-48-50-50-52-54 stitches from the thread on the one side of the piece on double pointed needles size 4 MM = US 6 and knit up 1 stitch in each of the 6-6-6-8-8-8 stitches cast on under the sleeve = 52-54-56-58-60-62 stitches. Insert a marker thread in the middle of the 6-6-6-8-8-8 new stitches under the sleeve. Start at the marker thread and work stockinette stitch in the round. When the sleeve measures 3 cm = 1⅛" from the division, decrease 2 stitches mid-under the sleeve – read DECREASE TIP. Decrease like this every 2½-3-3-3½-4-4 cm = 1"-1⅛"-1⅛"-1¼"-1½"-1½" a total of 4 times in all sizes = 44-46-48-50-52-54 stitches. Continue working without further decreases until the piece measures 21-25-30-34-38-43 cm = 8¼"-9¾"-11¾"-13⅜"-15"-17" from the division. There is approx. 3 cm = 1⅛" left to finished length; try the jacket on and work to desired length. Knit 1 round where you decrease 4-6-4-6-4-6 stitches evenly spaced = 40-40-44-44-48-48 stitches. Change to double pointed needles size 3 MM = US 2.5 and work rib (knit 2, purl 2) for 3 cm = 1⅛". Bind off with knit over knit and purl over purl – remember BINDING-OFF TIP! The sleeve measures approx. 24-28-33-37-41-46 cm = 9½"-11"-13"-14½"-16⅛"-18" from the division. Work the other sleeve in the same way. ASSEMBLY: Sew the buttons onto the left band. |
||||||||||||||||||||||
Diagram explanations |
||||||||||||||||||||||
|
||||||||||||||||||||||
 |
||||||||||||||||||||||
 |
||||||||||||||||||||||
 |
||||||||||||||||||||||
Have you finished this pattern?Tag your pictures with #dropspattern #butterflyinfallcardigan or submit them to the #dropsfan gallery. Do you need help with this pattern?You'll find 32 tutorial videos, a Comments/Questions area and more by visiting the pattern on garnstudio.com. © 1982-2026 DROPS Design A/S. We reserve all rights. This document, including all its sub-sections, has copyrights. Read more about what you can do with our patterns at the bottom of each pattern on our site. |
||||||||||||||||||||||


With over 40 years in knitting and crochet design, DROPS Design offers one of the most extensive collections of free patterns on the internet - translated to 17 languages. As of today we count 325 catalogs and 12298 patterns - 12288 of which are translated into English (US/in).
We work hard to bring you the best knitting and crochet have to offer, inspiration and advice as well as great quality yarns at incredible prices! Would you like to use our patterns for other than personal use? You can read what you are allowed to do in the Copyright text at the bottom of all our patterns. Happy crafting!
Post a comment to pattern DROPS Children 40-21
We would love to hear what you have to say about this pattern!
If you want to leave a question, please make sure you select the correct category in the form below, to speed up the answering process. Required fields are marked *.