
Popular categories
Looking for a yarn?


Comments / Questions (6)
![]() Christiane wrote:
Christiane wrote:
Bonjour. Dans ce modèle et plusieurs autres modèles pour tricoter les manches vous utilisez les aiguilles double pointes. Est-ce qu’on peut utiliser les aiguilles circulaires de 20cm? Sinon est ce qu’on peut tricoter les manches à plat
25.11.2025 - 22:05DROPS Design answered:
Bonjour Christiane, on utilise des aiguilles doubles pointes pour le bas de la manche, lorsque l'aiguille circulaire de 40 cm est trop grande; en fonction de votre taille, une 20 cm peut éventuellement passer, noter que la circonférence des mailles doit être inférieure à la longueur de l'aiguille circulaire, vous pouvez aussi tricoter en magic loop - ou bien adapter pour des aiguilles droites. Bon tricot!
26.11.2025 - 09:18
![]() Rigmor wrote:
Rigmor wrote:
Det var fråga om ärmhålet
06.03.2024 - 16:01DROPS Design answered:
Hei Rigmor. Vet ikke hva du har gjort feil, men har du riktig strikkefasthet, har du gjort alle økningene? Hvilken str strikker du? mvh DROPS Design
11.03.2024 - 10:26
![]() Rigmor Lundblad wrote:
Rigmor Lundblad wrote:
Jag får inte ärmhålet på tröjan att stämma överens med ärmen.Ärmkullen blir flr liten.Var är felet .Svara på sv eller eng
06.03.2024 - 16:00
![]() Maja wrote:
Maja wrote:
Hallo! Ich habe gestern eine Frage zum Ärmel gestellt. Nach mehrfachem Lesen glaube ich verstanden zu haben, was ich falsch gemacht habe. Heisst diese Stelle „Dann je 2 Maschen beidseitig abketten, bis die Arbeit eine Länge von 51-51-51-51-51-51 cm hat.“, ich muss am Anfang jeder Reihe abketten bis zur Höhe von 51 cm? Wie viele Maschen bleiben dann und wie viele ca. am Schluss zum Abketten, nachdem ich je 1xbeids. 3 M. abgekettet habe? Herzlichen Dank für eine kurze Rückmeldung.
08.08.2021 - 09:31DROPS Design answered:
Liebe Maja, ja genau, Sie sollen jetzt 2 Maschen am Anfang jeder Reihe (Hin- sowie Rückreihe) abketten bis die Ärmel eine Länge von 51 cm hat, beachten Sie nur, daß Sie genausoviele Maschen beidseitig abgekettet haben, je nach Ihrer Maschenprobe in der Höhe wird die Maschenanzahl unterschiedlich ist, Hauptsache ist hier die Länge. Viel Spaß beim stricken!
09.08.2021 - 08:45
![]() Maja wrote:
Maja wrote:
Hallo! Der Ärmel in der Skizze hat unten eine Rundung und geht dann senkrecht hoch, damit er angenäht werden kann. Wenn ich jedoch so abkette wie im Muster, bildet sich in der langen Kante eine Art „Dreieck“. Wenn ich den Ärmel an Vorder- und Rückenteil halte, hat es beim Ärmel zu viel Material, ich könnte keine saubere gerade Naht machen. Habe ich etwas falsch gemacht? Ich könnte ein Foto senden. Danke für eure Hilfe und viele Grüsse aus der Schweiz.
07.08.2021 - 13:00DROPS Design answered:
Liebe Maja, die Skizze ist nur standard, ketten Sie ab, wie in der Anleitung erklärt, so stimmt es auch. Viel Spaß beim stricken!
09.08.2021 - 08:04
![]() Jorun Irene Husdal wrote:
Jorun Irene Husdal wrote:
Hei! Det står at det skal være diagrammer for både denne og kardigan-versjonen. Men jeg ser ingen diagrammer på noen av dem. Hva har skjedd her?
12.01.2021 - 00:00DROPS Design answered:
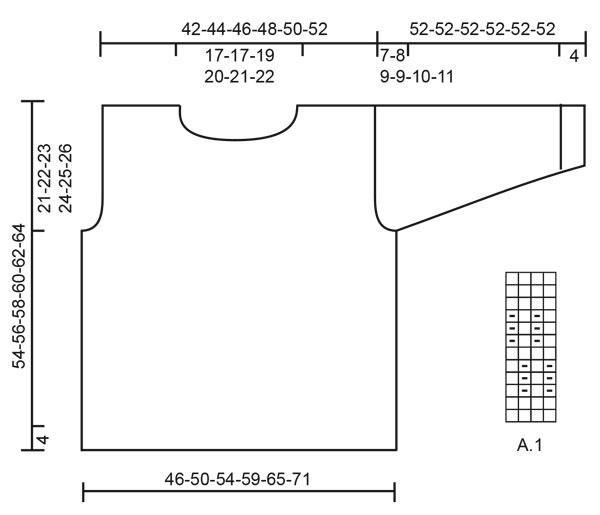
Hei Jorunn Irene, Diagrammet er på bunnen av oppskriften, ved siden av målskissen. God fornøyelse!
13.01.2021 - 07:50
|
|||||||
Mustard Seeds#mustardseedssweater |
|||||||
 |
 |
||||||
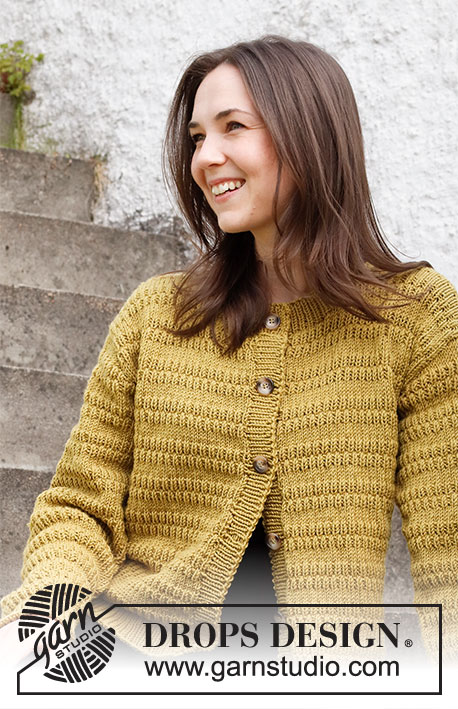
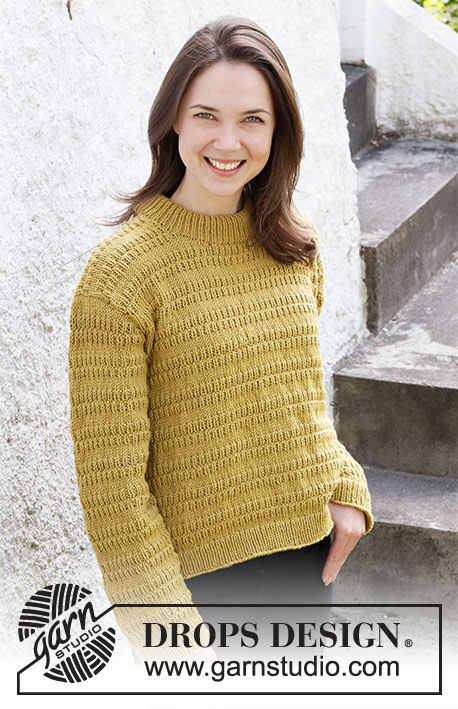
Knitted sweater in DROPS Merino Extra Fine. The piece is worked with textured pattern. Sizes S - XXXL.
DROPS 215-18 |
|||||||
|
------------------------------------------------------- EXPLANATIONS FOR THE PATTERN: ------------------------------------------------------- RIDGE/GARTER STITCH (worked back and forth): Knit all rows. 1 ridge in height = Knit 2 rows. PATTERN: See diagram A.1. DECREASE TIP (evenly spaced): To work out how to decrease evenly, count the total number of stitches on the needle (e.g. 110 stitches) and divide the stitches by the number of decreases to be made (e.g. 16) = 6.8. In this example decrease by knitting together approx. each 6th and 7th stitch. INCREASE TIP (for sleeves): Work until there are 3 stitches left before the marker thread, 1 yarn over, knit 6 (marker thread sits between these 6 stitches), 1 yarn over. On the next round work the yarn overs twisted to avoid holes. Then work the new stitches into the pattern. ------------------------------------------------------- START THE PIECE HERE: ------------------------------------------------------- SWEATER – SHORT OVERVIEW OF THE PIECE: The back and front pieces are worked separately, back and forth and then sewn together. The sleeves are worked in the round with short circular needle/double pointed needles. The neck is worked to finish. BACK PIECE: Cast on 110-120-128-140-154-170 stitches (including 1 edge stitch on each side) with circular needle size 3.5 mm = US 4 and Merino Extra Fine. Purl 1 row from the wrong side. The next row is worked as follows from the right side: 1 edge stitch in GARTER STITCH – read description above, * knit 1, purl 1 *, work from *-* until there is 1 stitch left and 1 edge stitch in garter stitch. Work this rib for 4 cm = 1½". When the rib is finished knit 1 row from the right side and decrease 16-18-18-20-22-26 stitches evenly spaced – read DECREASE TIP = 94-102-110-120-132-144 stitches. Purl 1 row from the wrong side with 1 edge stitch in garter stitch on each side. Change to circular needle size 4.5 mm = US 7. Now work pattern A.1 with 1 edge stitch in garter stitch on each side. REMEMBER THE KNITTING GAUGE! When A.1 has been completed in height, repeat this diagram. Continue until the piece measures 33-34-35-36-37-38 cm = 13"-13⅜"-13¾"-14¼"-14½"-15". Now bind off stitches for the armholes at the beginning of each row on both sides as follows: Bind off 3 stitches 1 time, 2 stitches 1-2-2-3-4-5 times and 1 stitch 0-0-2-3-5-7 times = 84-88-92-96-100-104 stitches. Continue with the pattern until the piece measures 52-54-56-58-60-62 cm = 20½"-21¼"-22"-22¾"-23⅝"-24⅜". Now place the middle 30-32-34-34-36-36 stitches on a thread for the neck and each shoulder is finished separately. Bind off 1 stitch on the next row from the neck = 26-27-28-30-31-33 stitches. Work until the piece measures 54-56-58-60-62-64 cm = 21¼"-22"-22¾"-23⅝"-24⅜"-25¼" (= 21-22-23-24-25-26 cm = 8¼"-8¾"-9"-9½"-9¾"-10¼" from the bottom of the armholes), bind off. Work the other shoulder in the same way. FRONT PIECE: Cast on and work in the same way as the back piece until the piece measures 46-48-50-52-54-56 cm = 18"-19"-19¾"-20½"-21¼"-22" = 84-88-92-96-100-104 stitches. Now place the middle 24-26-28-28-30-30 stitches on a thread and each shoulder is finished separately. Continue to bind off at the beginning of each row from the neck as follows: 2 stitches 1 time, 1 stitch 2 times = 26-27-28-30-31-33 stitches. Work until the piece measures 54-56-58-60-62-64 cm = 21¼"-22"-22¾"-23⅝"-24⅜"-25¼" (= 21-22-23-24-25-26 cm = 8¼"-8¾"-9"-9½"-9¾"-10¼" from the bottom of the armholes), bind off. Work the other shoulder in the same way. SLEEVE: Cast on 60-62-64-66-68-70 stitches double pointed needles size 3.5 mm = US 4. Knit 1 round, then work rib (knit 1, purl 1) in the round for 4 cm = 1½". Knit 1 round where you decrease 8 stitches evenly spaced = 52-54-56-58-60-62 stitches. Change to double pointed needles size 4.5 mm = US 7. Knit 1 more round. Insert a marker thread at the beginning of the round (= mid under the sleeve). Work A.1 in the round. When the piece measures 8 cm = 3⅛" from the cast-on edge, begin to increase under the sleeve – read INCREASE TIP. Increase like this every 3-2½-2-2-1½-1 cm = 1⅛"-⅞"-¾"-¾"-½"-⅜" a total of 11-12-13-14-17-22 times = 74-78-82-86-94-106 stitches. When the sleeve measures 45-44-43-43-42-41 cm = 17¾"-17¼"-17"-17"-16½"-16⅛", bind off the middle 6 stitches under the sleeve for the armhole. Work the sleeve cap as follows: Continue the pattern back and forth and bind off stitches on each side as follows: Bind off 2 stitches 3-3-4-4-4-4 times and 1 stitch 1-1-1-1-2-3 times, then bind off 2 stitches on each side until the piece measures 51-51-51-51-51-51 cm = 20"-20"-20"-20"-20"-20". Bind off 3 stitches on each side, then bind off the remaining stitches. The sleeve measures approx. 52-52-52-52-52-52 cm = 20½"-20½"-20½"-20½"-20½"-20½". Work the other sleeve in the same way. ASSEMBLY: Sew the shoulder seams with grafting stitches, inside the bind-off edge. Sew the sleeves to the body and sew the side seams. NECK: Knit up approx. 96 to 116 stitches around the neck, with circular needle size 3.5 mm = US 4 (including the stitches on the thread and number divisible by 2). Work rib (knit 1, purl 1) in the round for 9 cm = 3½". Bind off. Fold the neck to the inside and sew down. To avoid the neck being tight and rolling outwards, it is important that the seam is elastic. |
|||||||
Diagram explanations |
|||||||
|
|||||||
 |
|||||||
Have you finished this pattern?Tag your pictures with #dropspattern #mustardseedssweater or submit them to the #dropsfan gallery. Do you need help with this pattern?You'll find 28 tutorial videos, a Comments/Questions area and more by visiting the pattern on garnstudio.com. © 1982-2026 DROPS Design A/S. We reserve all rights. This document, including all its sub-sections, has copyrights. Read more about what you can do with our patterns at the bottom of each pattern on our site. |
|||||||


With over 40 years in knitting and crochet design, DROPS Design offers one of the most extensive collections of free patterns on the internet - translated to 17 languages. As of today we count 324 catalogs and 12290 patterns - 12280 of which are translated into English (US/in).
We work hard to bring you the best knitting and crochet have to offer, inspiration and advice as well as great quality yarns at incredible prices! Would you like to use our patterns for other than personal use? You can read what you are allowed to do in the Copyright text at the bottom of all our patterns. Happy crafting!
Post a comment to pattern DROPS 215-18
We would love to hear what you have to say about this pattern!
If you want to leave a question, please make sure you select the correct category in the form below, to speed up the answering process. Required fields are marked *.