
Popular categories
Looking for a yarn?


Comments / Questions (98)
![]() Joanne Healy wrote:
Joanne Healy wrote:
I just proudly completed this sweater for my husband. Upon immediately putting it on he exclaimed "The buttons are on the wrong side". I checked the pattern and it states to make them on the right side of the right side of the sweater. Do different countries have the buttons on different sides?
24.11.2022 - 03:33DROPS Design answered:
Dear Mrs Healy, thanks for the information, we will ask design.
25.11.2022 - 08:38
![]() Faes wrote:
Faes wrote:
1) Wat wordt er precies bedoeld met ‘meerder 1 steek aan de binnenkant van de laatste twee steken’? Wordt er bedoeld TUSSEN de 2 laatste steken (dus vlak voor de ribbelsteek) of VOOR de 2 laatste steken (dus een omslag, een steek en daarna de ribbelsteek)? 2) Gebeurt de meerdering voor het armsgat ook met een omslag?
23.11.2022 - 21:00DROPS Design answered:
Dag Faes,
1) Hiermee wordt VOOR de laatste 2 steken bedoeld. 2) Ja, het meerderen voor de armsgaten kun je ook met omslagen doen, die je op de volgende naald gedraaid breit.
27.11.2022 - 14:14
![]() Betty wrote:
Betty wrote:
Bonsoir, Quand l'ouvrage mesure 5 cm, j'aimerai savoir si vous appelez l'ouvrage les mailles de côté sous la manche et si les diminutions concernant les côtés sont faites avant de terminer les augmentations de l'encolure. Merci de m'éclairer.
02.11.2022 - 20:32DROPS Design answered:
Bonjour Betty, le terme "l'ouvrage " représente la partie tricotée depuis le début, depuis le rang de montage, autrement dit, vous commencez à augmenter à 5 cm après le rang de montage. Les augmentations de l'encolure V ne seront pas terminées lorsque vous mettrez le devant droit en attente, veillez juste à tricoter le devant gauche de la même façon et terminez ensuite les augmentations de l'encolure V dans la partie DOS & DEVANTS:. Bon tricot!
03.11.2022 - 09:52
![]() Anamarija Knego wrote:
Anamarija Knego wrote:
Good day, Somehow my front pieces are bigger than back piece (before i put them all together). My question is - does it need to be like that, or both sides needs to be the same lenght before i put all together onto needle? Thank you.
07.09.2022 - 15:19DROPS Design answered:
Dear Mrs Knego , do you mean larger or longer? Make sure you worked the same number of rows on both front and back pieces before working them together and make sure also you kept the same tension on each piece. It can be also a good idea to show your work to your store (even sending them a picture by mail), this might be easier for them to understand what happened. Happy knitting!
08.09.2022 - 08:59
![]() Anamarija Knego wrote:
Anamarija Knego wrote:
Good day, please, I have one doubt. Somehow my front pieces are bigger than my back piece. Is that good, or both sides needs to be the same lenght? Thank you, Anamarija
07.09.2022 - 13:37DROPS Design answered:
Dear Mrs Knego, both front pieces should be as long as back piece - see measurements in chart, it might help you. Happy knitting!
07.09.2022 - 14:55
![]() Susanne wrote:
Susanne wrote:
Die Weste ist fertig und sehr schön. Ich habe diese jedoch etwas länger gestrickt,. Bei der Fertigstellung ist mir aufgefallen, dass die Knöpfe an der linken Seite befestigt sind, üblich ist sonst bei Herren jedoch ( bei Hemden etc.) die Befestigung an der rechten Seite. Leider ist mir dies erst jetzt aufgefallen . Vielleicht ändern Sie die Strickanleitung.
20.08.2022 - 21:58
![]() Susanne wrote:
Susanne wrote:
Ich stricke gerade am Vorderteil (xxl) den V-Ausschnitt. In der Beschreibung wird die Zunahme in jeder 2. und 4. Reihe beschrieben. Meines Erachtens wäre verständlicher, wenn man als „diese Zunahme in jeder Hinreihe wiederholen bis…“. erklärt.
10.07.2022 - 20:53DROPS Design answered:
Liebe Susanne, "in jeder Hinreihe" würde für "in jeder 2. Reihe" passen, aber hier sollen Sie abwechselnd in jeder 2. und in jeder 4. Reihe für den Halsausschnitt zunehmen, dh so: *1 Hinreihe mit Zunahmen, 1 Reihe ohne Zunahmen, 1 Hinreihe mit Zunahmen, 3 Reihen ohne Zunahmen*, von *bis* wiederholen Sie bis die gewünschte Zunahmenanzahl erreicht wird. Viel Spaß beim stricken!
11.07.2022 - 08:46
![]() Luisa wrote:
Luisa wrote:
Buongiorno, nella lavorazione del collo non mi è chiara la spiegazione degli aumenti: “aumentare usando i gettati solo dove finisce il collo a V (cioè il punto, a circa 33-34-35-36-37-38 cm dal bordo di chiusura verso l’alto” gli aumenti quindi sono sul collo dietro? Oppure sono alla base dello scollo a V (dove finivano gli aumenti del collo a V? C’è un motivo per cui il bordo del collo non si può lavorare in un unico pezzo anziché fare dx e sx? Grazie mille
07.04.2022 - 14:05DROPS Design answered:
Buonasera Luisa, gli aumenti sono alla base del collo a V. Buon lavoro!
07.04.2022 - 21:22
![]() Luisa wrote:
Luisa wrote:
Buonasera ancora una domanda. Com’è possibile che sul davanti sx gli aumenti per lo scalfo (a parte il primo) vadano fatti sui ferri dritti, quando per la parte dx gli stessi aumenti vanno fatti sui ferri rovesci? Così le due parti avrebbero gli aumenti alternati.
30.03.2022 - 23:15DROPS Design answered:
Buonasera Luisa, le istruzioni per gli aumenti per lo scalfo sono corrette. Buon lavoro!
05.04.2022 - 22:11
![]() Luisa wrote:
Luisa wrote:
Buonasera, per gli aumenti del collo a V quando si dice ogni 2 o 4 ferri si conta: 1 ferro dritto aumento, ferro a rovescio, ferro dritto aumento (2). E 1 ferro aumento, un ferro a rovescio, 1 ferro dritto, un ferro rovescio, 1 ferro dritto aumento. Corretto?
30.03.2022 - 17:45DROPS Design answered:
Buongiorno Luisa, è corretto il procedimento. Buon lavoro!
05.04.2022 - 08:24
|
||||
Boston Vest#bostonvest |
||||
 |
 |
|||
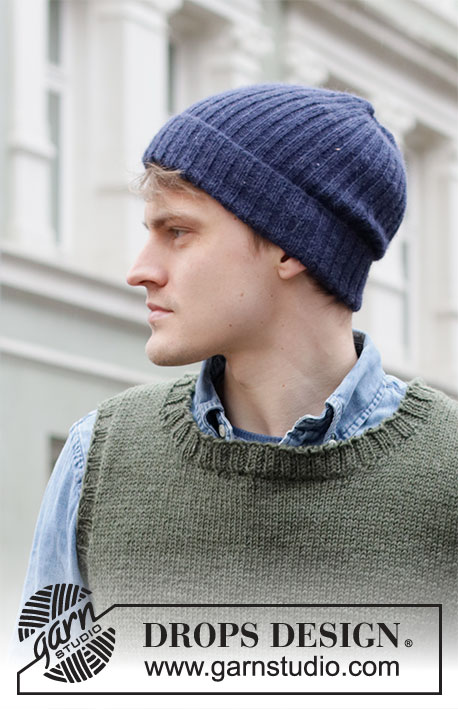
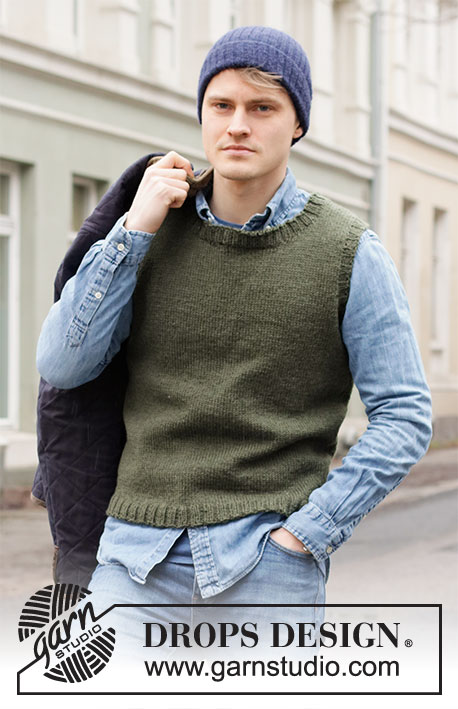
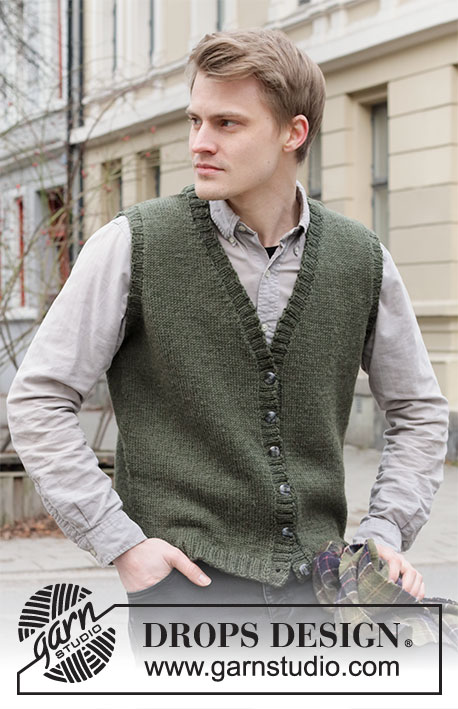
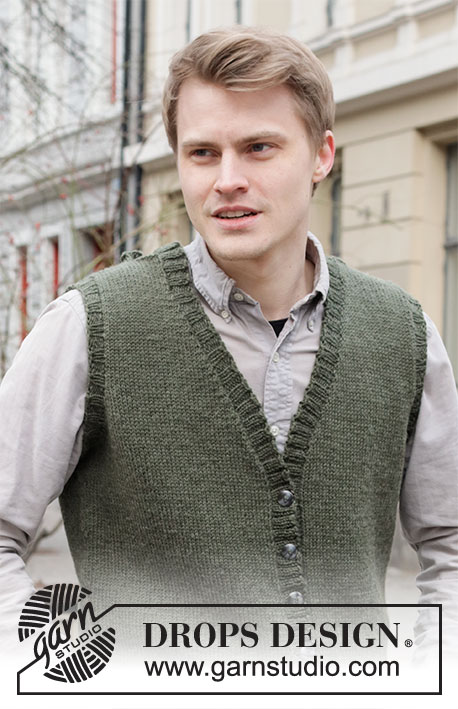
Knitted vest for men in DROPS Karisma. The piece is worked top down with V-neck and ribbed edges. Sizes S - XXXL.
DROPS 219-3 |
||||
|
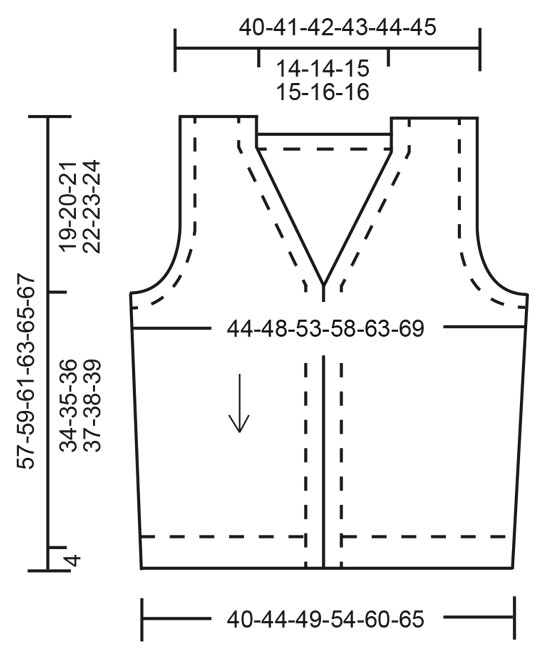
------------------------------------------------------- EXPLANATIONS FOR THE PATTERN: ------------------------------------------------------- RIDGE/GARTER STITCH (worked back and forth): Knit all rows. 1 ridge in height = Knit 2 rows. INCREASE TIP (for V-neck): Make 1 yarn over between 2 stitches. On the next row, work the yarn over twisted to avoid a hole. DECREASE TIP (for sides of body): Decrease 1 stitch on each side of the stitch with the marker thread as follows: Work until there are 3 stitches left before the stitch with the marker thread, knit 2 together, knit 2, slip 1 stitch as if to knit, knit 1 and pass the slipped stitch over the knitted stitch. BUTTONHOLES: Work buttonholes from the right side and on the right band. The bottom buttonhole is worked approx. 2 cm = ¾" from the bottom edge, the top buttonhole approx.1 cm = ⅜" from the beginning of the v-neck (approx. 32-33-34-35-36-37 cm = 12½"-13"-13⅜"-13¾"-14¼"-14½" measured from the bottom of the vest). Work a total of 6 buttonholes with approx. 6-6-6½-6½-7-7 cm = 2⅜"-2⅜"-2½"-2½"-2¾"-2¾" between each one. Position them in the purled sections (seen from the right side). 1 buttonhole = purl 2 together, 1 yarn over. On the next row (wrong side) knit the yarn to leave a hole. BINDING-OFF TIP: To avoid the bind-off edge being tight you can bind off with a larger size needle. If the edge is still tight, make 1 yarn over after approx. each 4th stitch at the same time as binding off; the yarn overs are bind off as normal stitches. ------------------------------------------------------- START THE PIECE HERE: ------------------------------------------------------- VEST – SHORT OVERVIEW OF THE PIECE: The vest is worked top down. Each shoulder is worked separately, back and forth, and stitches are increased/cast on for the V-neck and armholes. Then all pieces are joined together and the body finished working back and forth. Stiches are picked up for the neck, sleeve edges and bands, which are worked in rib to finish. FRONT PIECES: Right front piece: Cast on 20-21-21-22-22-23 stitches (including 1 edge stitch on each side) using circular needle size 4 mm = US 6 and Karisma. Work 1 edge stitch in GARTER STITCH – read description above, work stockinette stitch until there is 1 stitch left on the row and then 1 edge stitch in garter stitch. Continue like this back and forth. When the piece measures 4-5-5-6-6-7 cm = 1½"-2"-2"-2⅜"-2⅜"-2¾", start to increase for the V-neck and when the piece measures 18-18-18-17-17-16 cm = 7"-7"-7"-6¾"-6¾"-6¼", increase for the armholes, read description below: V-neck: Increase 1 stitch inside the last 2 stitches on the next row from the right side – read INCREASE TIP. Increase like this alternately every 2nd and 4th row a total of 19-19-20-20-21-21 times (increases for the V-neck are not finished when the armhole is finished, but are continued on the body). REMEMBER THE KNITTING GAUGE! Armhole: Increase 1 stitch inside the first 2 stitches on every row from the right side 2-1-1-3-4-4 times, then cast on new stitches at the end of every row from the wrong side as follows: Cast on 2 stitches 0-2-2-3-3-4 times and 3 stitches 0-0-1-1-2-3 times (= a total of 2-5-8-12-16-21 stitches increased). Lay the piece to one side and work the left front piece. Left front piece: Cast on 20-21-21-22-22-23 stitches (including 1 edge stitch on each side) using circular needle size 4 mm = US 6 and Karisma. Work 1 edge stitch in garter stitch, stockinette stitch until there is 1 stitch left on the row and then 1 edge stitch in garter stitch. Continue like this back and forth. When the piece measures 4-5-5-6-6-7 cm = 1½"-2"-2"-2⅜"-2⅜"-2¾", start to increase for the V-neck and when the piece measures 18-18-18-17-17-16 cm = 7"-7"-7"-6¾"-6¾"-6¼", increase for the armholes, read description below: V-neck: Increase 1 stitch inside the first 2 stitches on the next row from the right side – remember INCREASE TIP. Increase like this alternately every 2nd and 4th row a total of 19-19-20-20-21-21 times. Armhole: Increase 1 stitch inside the last 2 stitches on each row from the right side 2-1-1-3-4-4 times, then cast on new stitches at the end of every row from the right side as follows: Cast on 2 stitches 0-2-2-3-3-4 times and 3 stitches 0-0-1-1-2-3 times (= a total of 2-5-8-12-16-21 stitches increased). Lay the piece to one side and work the back piece. BACK PIECE: Each shoulder is worked separately before being joined together. Right shoulder: Cast on 20-21-21-22-22-23 stitches (including 1 edge stitch on each side) using circular needle size 4 mm = US 6 and Karisma. Work 1 edge stitch in garter stitch, stockinette stitch until there is 1 stitch left on the row and then 1 edge stitch in garter stitch. Continue like this back and forth. When the piece measures 4 cm = 1½" increase 1 stitch inside the first 2 stitches on the next row from the right side = 21-22-22-23-23-24 stitches. Work 1 row back from the wrong side. Lay the piece to one side and work the left shoulder. Left shoulder: Cast on 20-21-21-22-22-23 stitches (including 1 edge stitch on each side) using circular needle size 4 mm = US 6 and Karisma. Work 1 edge stitch in garter stitch, stockinette stitch until there is 1 stitch left on the row and then 1 edge stitch in garter stitch. Continue like this back and forth. When the piece measures 4 cm = 1½" increase 1 stitch inside the last 2 stitches on the next row from the right side = 21-22-22-23-23-24 stitches. Work 1 row back from the wrong side. Now work the 2 shoulders together as follows: Work the 21-22-22-23-23-24 stitches from the left shoulder as before, cast on 36-36-38-38-40-40 stitches (= neck) work the 21-22-22-23-23-24 stitches from the right shoulder as before = 78-80-82-84-86-88 stitches. Work stockinette stitch back and forth with 1 stitch in garter stitch on each side. When the piece measures 18-18-18-17-17-16 cm = 7"-7"-7"-6¾"-6¾"-6¼", increase/cast on stitches on each side of the piece for the armholes, in the same way as on the front pieces (= a total of 2-5-8-12-16-21 stitches increased for each armhole) = 82-90-98-108-118-130 stitches. When all the increases are finished, work the body. THE PIECE IS NOW MEASURED FROM HERE! BODY: Now join all the pieces together from the right side as follows: Starting with the left front piece, work 1 edge stitch in garter stitch and stockinette stitch as before, then cast on 11-11-13-13-15-15 new stitches (= in side under sleeve), stockinette stitch over the 82-90-98-108-118-130 stitches on the back piece, cast on 11-11-13-13-15-15 new stitches (= in side under sleeve), stockinette stitch over the right front piece until there is 1 stitch left and finish with 1 edge stitch in garter stitch. The number of stitches on the needle is dependent on how many increases still remain for the V-neck. Insert 1 marker in the middle stitch of the 11-11-13-13-15-15 new stitches in each side. Allow the markers to follow your work onwards; stitches will later be decreased on each side of both markers. When all the increases for the V-neck are finished there are = 186-202-222-242-266-290 stitches on the needle. When the piece measures 5 cm = 2", decrease on both sides of each marker – read DECREASE TIP (= 4 stitches decreased). Decrease like this every 9-9-10-10-10-11 cm = 3½"-3½"-4"-4"-4"-4⅜" a total of 4 times = 170-186-206-226-250-274 stitches. When the piece measures 34-35-36-37-38-39 cm = 13⅜"-13¾"-14¼"-14½"-15"-15¼" increase 26-26-30-34-38-42 stitches evenly spaced = 196-212-236-260-288-316 stitches. Change to circular needle size 3 mm = US 2,5 and work rib, starting from the right side (= knit 2 / purl 2) with 1 edge stitch in garter stitch on each side until the rib measures 4 cm = 1½". Bind off with knit over knit and purl over purl – read BINDING-OFF TIP. The vest measures approx.57-59-61-63-65-67 cm = 22½"-23¼"-24"-24¾"-25½"-26⅜" from the shoulder down. ASSEMBLY: Sew the shoulder seams with grafting stitches. ARMHOLE EDGE: Knit up 88-132 stitches inside the 1 edge stitch around the armhole with short circular needle size 3 mm = US 2,5 and Karisma; adjust so the number of stitches is divisible by 4. Work rib in the round (= knit 2 / purl 2) for 2 cm = ¾". Bind off with knit over knit and purl over purl – remember BINDING-OFF TIP! Work the other sleeve edge in the same way. RIGHT BAND AND NECK: Starting from the right side at the bottom of the right front piece, knit up 144-172 stitches with short circular needle size 3 mm = US 2,5 and Karisma, inside the 1 edge stitch, and as far as mid-back of the neck. Adjust so the number of stitches is divisible by 4. Purl 1 row from the wrong side and increase using yarn overs just where the V-neck finishes (i.e. the point, approx. 33-34-35-36-37-38 cm = 13"-13⅜"-13¾"-14¼"-14½"-15" from the bind-off edge upwards), * purl 1, 1 yarn over *, work from *-* a total of 4 times (= 4 stitches increased). On the next row from the right side work as follows: 2 edge stitches in garter stitch, then rib (= knit 2 / purl 2) to end of row (yarn overs worked twisted to avoid holes). Make sure the band is neither too tight nor too loose for the length of the front piece; knit up more/less stitches if necessary. When the band measures 1 cm = ⅜" work the BUTTONHOLES – read description above. When the band/neck measures 2½ cm = ⅞", Bind off with knit over knit and purl over purl – remember BINDING-OFF TIP. LEFT BAND AND NECK: Starting mid-back of neck with circular needle size 3 mm = US 2,5 and Karisma and working from the right side, knit up the same number of stitches as on the right band and neck inside the 1 edge stitch down the left front piece. Purl 1 row from the wrong side and increase with yarn overs just where the V-neck finishes (i.e. the point, approx. 33-34-35-36-37-38 cm = 13"-13⅜"-13¾"-14¼"-14½"-15" from the bind-off edge upwards), * purl 1, 1 yarn over *, work from *-* a total of 4 times (= 4 stitches increased). On the next row from the right side work as follows: Work rib (= knit 2 / purl 2) until there are 2 stitches left and finish with 2 stitches in garter stitch (yarn overs worked twisted to avoid holes). When the band/neck measures 2½ cm = ⅞", Bind off with knit over knit and purl over purl – remember BINDING-OFF TIP. ASSEMBLY: Sew buttons onto the left band. |
||||
Diagram explanations |
||||
|
||||
 |
||||
Have you finished this pattern?Tag your pictures with #dropspattern #bostonvest or submit them to the #dropsfan gallery. Do you need help with this pattern?You'll find 25 tutorial videos, a Comments/Questions area and more by visiting the pattern on garnstudio.com. © 1982-2026 DROPS Design A/S. We reserve all rights. This document, including all its sub-sections, has copyrights. Read more about what you can do with our patterns at the bottom of each pattern on our site. |
||||


With over 40 years in knitting and crochet design, DROPS Design offers one of the most extensive collections of free patterns on the internet - translated to 17 languages. As of today we count 324 catalogs and 12290 patterns - 12280 of which are translated into English (US/in).
We work hard to bring you the best knitting and crochet have to offer, inspiration and advice as well as great quality yarns at incredible prices! Would you like to use our patterns for other than personal use? You can read what you are allowed to do in the Copyright text at the bottom of all our patterns. Happy crafting!
Post a comment to pattern DROPS 219-3
We would love to hear what you have to say about this pattern!
If you want to leave a question, please make sure you select the correct category in the form below, to speed up the answering process. Required fields are marked *.