
Popular categories
Looking for a yarn?


Comments / Questions (20)
![]() Claudia wrote:
Claudia wrote:
Hallo, wo fange ich mit der Ärmelaufnahme an? An den neu angeschlagenen Maschen des Rumpfteils, die für den Armauschnitt am Vorderteil aufgenommenen wurden oder kurz danach? Irgendwie ist mir das, aus der Anleitung nicht ganz klar. Danke, für die Antwort!
20.03.2021 - 07:52DROPS Design answered:
Liebe Claudia, starten Sie sofort nach den neuangeschlagenen Maschen bis die stillgelegten Maschen und nur bis die neu angeschlagenen Maschen, dh die Maschen sollen in den Reihen aufgenommen werden, nicht in die neu angeschlagenen Maschen. Die ersten Reihen von der Ärmel werden dann an den neu angeschlagenen Maschen für das Armoch zusammen genäht. Viel Spaß beim stricken!
22.03.2021 - 10:22
![]() Eva Andersson wrote:
Eva Andersson wrote:
Jag ska sticka modell218-7 sunday vibes i Drops sky färg hasselnöt. Vilken färg i Kid silk passar till denna färg?Liknar den mest? Mvh Eva
25.02.2021 - 17:02DROPS Design answered:
Hej Eva, DROPS Kid Silk 35 chokolade passer perfekt til DROPS Sky hasselnöt men se også denne: Garnkombinationer :)
26.02.2021 - 08:21
![]() Camilla wrote:
Camilla wrote:
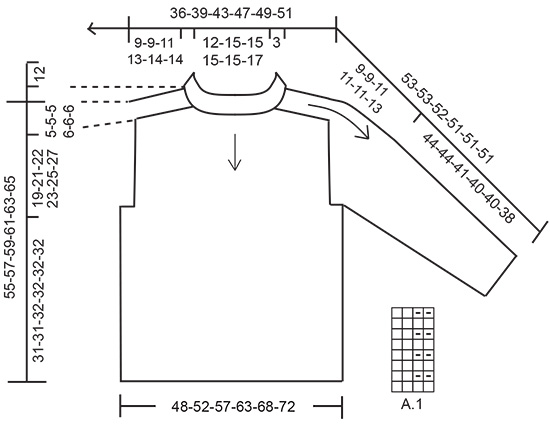
Hei! Spørsmål ang skulder økning størrelse M. Har 72m på pinne, så skal man øke 1 før & 1 etter skulder. "Øk slik på hver omg totalt 18 ganger og på hver 2.omg 2ganger = 152m", men jeg får ikke matten til å stemme. Blir helt gæren. Skal jeg øke 4m, så 8m, så 4m, så 8m i 18 omg? Da får jeg 108m bare. 152 tallet, skal det være total m på pinne etter økning eller er det antall m laget ved å øke? Hjelp!
24.01.2021 - 20:34DROPS Design answered:
Hei Camilla. Du starter med 72 masker på pinnen. Så skal det økes på hver omgang med 4 masker 18 ganger (18 x 4 masker = 72 økte masker) + 2 ganger der det økes på hver 2. omgang (2 x 4 =8). Da blir det 72 masker + 72 økte masker + 8 økte masker = 152 masker. God Fornøyelse!
01.02.2021 - 09:42
![]() Maria wrote:
Maria wrote:
Guten Tag Stimmt die Menge (Grösse L 250 gr. Sky / 100 gr Kid Silk) des Material für diesen Pullover? Mir scheint es, dass es zuwenig ist. Können Sie mir die Menge bestätigen? Vielen Dank für die Unterstützung.
20.01.2021 - 07:10DROPS Design answered:
Liebe Maria, so stimmt es, Sie brauchen 200 g DROPS Sky (4 Knäuel) und 100 g DROPS Kid-Silk (4 Knäuel) in der Größe S mit einer Maschenprobe von 15 Maschen in der Breite und 24 Reihen in der Höhe im Strukturmuster (= A.1) mit 1 Faden von jeder Garnqualität (= 2 Fäden). Hier lesen Sie mehr über die Maschenprobe. Viel Spaß beim stricken!
20.01.2021 - 07:52
![]() Undine wrote:
Undine wrote:
Ich würde diesen Pullover gerne mit Puna 06 und Kid Silk stricken. Das Puna Garn in Grau natural mix habe ich schon. Welche Farbe von Kid Silk passt dazu?
03.12.2020 - 16:11DROPS Design answered:
Liebe Undine, wenden Sie sich bitte direkt an Ihrem DROPS Laden, gerne wird man Ihnen die beste passen Farbe empfehlen - auch telefonisch oder per E-Mail. Viel Spaß beim stricken!
03.12.2020 - 16:43
![]() Sigrid wrote:
Sigrid wrote:
Hallo, auf den Fotos sieht es nach einem einfachen 2re / 2li Muster aus - das Diagramm zeigt aber etwas anderes? Vielen Dank
21.11.2020 - 21:04DROPS Design answered:
Liebe Sigrid, ja genau, Muster is 2 Maschen rechts, 2 Maschen kraus rechts (=diese 2 Maschen werden in runden abwechslungsweise rechts und links gestrickt). Viel Spaß beim stricken!
23.11.2020 - 08:59
![]() Heather wrote:
Heather wrote:
I'm so sorry to be such a dunder Kopf but unless I go to the original pattern instructions, there is no English version of pattern or diagrams. English being my first language, lol over time I might learn to read Norwegian but I could use some help with this! Thank you ever so much. Looking forward ☺️ to your response.
27.09.2020 - 09:50DROPS Design answered:
Dear Heather, thanks for noticing, missing diagram text in US-English will be added - you can check it from the Uk-English pattern while pattern will be updated. Happy knitting!
28.09.2020 - 10:02
![]() Leora wrote:
Leora wrote:
I do not see the diagram on this page.
12.09.2020 - 18:16DROPS Design answered:
Dear Leora, you will find diagram A.1 next to the measurement chart (just below sleeve), it's a diagram worked over 4 sts and 8 rows. Happy knitting!
14.09.2020 - 10:02
![]() Silje wrote:
Silje wrote:
Hvorfor skal ikke for- og bakstykke strikkes sammen på rundpinne? Og hvorfor skal ikke ermene strikkes på rundpinne?
08.09.2020 - 13:42DROPS Design answered:
Hej Silje, det bliver lettere at strikke frem og tilbage med de forkortede pinde på ærmet. Men du må gerne strikke rundt om du hellere vil det :)
09.09.2020 - 13:56
![]() Jodhi wrote:
Jodhi wrote:
On your pattern you say.....FRONT PIECE: = 62-66-74-82-90-94 stitches. ......... The piece is now measured from here. The new stitches are worked in garter stitch (a total of 5-6-6-6-6-6-7 stitches in garter stitch on each side of the piece). I think it should be 5-6-6-6-6-7. I think you have one too many 6s listed in the stitches.
24.08.2020 - 00:33DROPS Design answered:
Dear Jodhi, thanks for your feedback, pattern will be edited asap. Happy knitting!
24.08.2020 - 09:03
|
||||||||||
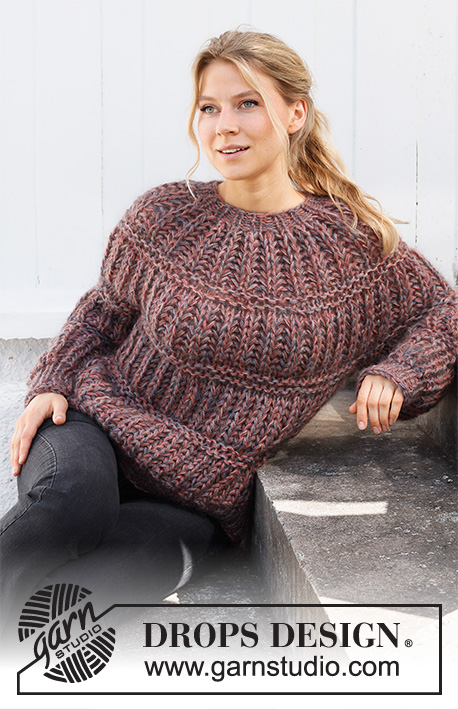
Sunday Vibes#sundayvibessweater |
||||||||||
 |
 |
|||||||||
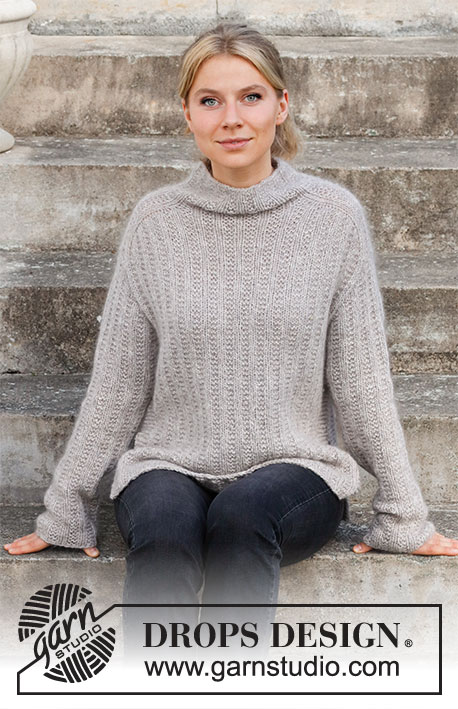
Knitted sweater in DROPS Sky and DROPS Kid-Silk. The piece is worked top down, with textured pattern and saddle shoulders. Sizes S - XXXL.
DROPS 218-7 |
||||||||||
|
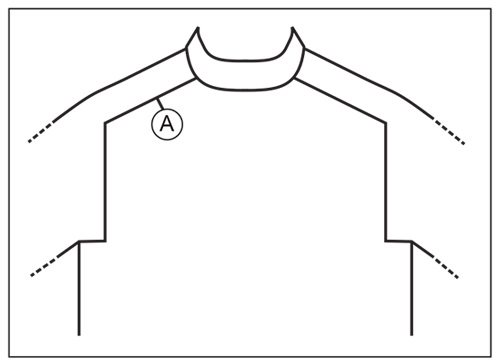
------------------------------------------------------- EXPLANATIONS FOR THE PATTERN: ------------------------------------------------------- RIDGE/GARTER STITCH (worked back and forth): Knit all rows. 1 ridge in height = Knit 2 rows. PATTERN: See diagram A.1. The diagram shows all rows in the pattern from the right side. INCREASE TIP (for saddle shoulder increase): BEFORE MARKER: The new stitch will be twisted, leaning towards the right. Use left needle to pick up strand between 2 stitches from the round below, pick up strand from behind and knit stitch in front loop. AFTER MARKER: The new stitch will be twisted, leaning towards the left. Use left needle to pick up strand between 2 stitches from the round below, pick up strand from the front and knit stitch in back loop. DECREASE TIP (for sleeves): All decreases are worked from the right side! Decrease 1 stitch inside the 1 edge stitch on each side as follows: Work 1 edge stitch in garter stitch, slip 1 stitch as if to knit, knit 1 and pass the slipped stitch over the knitted stitch (= 1 stitch decreased), work until there are 3 stitches left, knit 2 together (= 1 stitch decreased) and 1 edge stitch in garter stitch. BINDING-OFF TIP: To avoid the bind-off edge being tight you can bind off with a larger size needle. If the edge is still tight, make 1 yarn over after approx. each 4th stitch at the same time as binding off; the yarn overs are bind off as normal stitches. ------------------------------------------------------- START THE PIECE HERE: ------------------------------------------------------- SWEATER – SHORT OVERVIEW OF THE PIECE: The neck and yoke are worked in the round with circular needle, top down, until the increases for saddle shoulders are finished. The shoulder stitches are placed on threads and the front and back piece finished back and forth, separately. The sleeves are worked back and forth with circular needle, top down. NECK: Cast on 64-72-72-80-80-88 stitches with circular needle size 6 mm = US 10, 1 strand Sky and 1 strand Kid-silk (= 2 strands). Knit 1 round, then work pattern A.1 in the round for 12 cm = 4¾". REMEMBER THE KNITTING GAUGE! Insert 1 marker at the beginning of the round (= approx. mid-back), the piece is measured from the first marker! Insert 4 more markers as follows: Insert 1st marker after 8-12-12-12-12-16 stitches (= half back piece), count 14-14-14-18-18-18 stitches (= shoulder), insert 2nd marker here, count 18-22-22-22-22-26 stitches (= front piece), insert 3rd marker here, count 14-14-14-18-18-18 stitches (= shoulder), insert 4th marker here, there are 10-10-10-10-10-10 stitches left on the round (= half back piece). SADDLE SHOULDER INCREASE: Continue with the pattern as before, and increase 4 stitches on round: Increase BEFORE 1st and 3rd marker, and AFTER 2nd and 4th marker – read INCREASE TIP. Increases are only on front piece and back piece and number of shoulder stitches remains the same. Increase like this every round 18-18-22-26-30-30 times in total, and then every 2nd round 2-2-2-2-2-2 times = 144-152-168-192-208-216 stitches. When all the increases are finished, the piece measures approx. 9-9-11-13-14-14 cm = 3½"-3½"-4⅜"-5⅛"-5½"-5½" from the marker mid-back. Now divide for the front and back pieces (the 2 knitted stitches on each side of both shoulders are worked into the back and front pieces) as follows: Work the first 30-34-38-42-46-50 stitches (= half back piece), work the next 10-10-10-14-14-14 stitches before placing them on a thread (= shoulder), work the next 62-66-74-82-90-94 stitches (= front piece), work the next 10-10-10-14-14-14 stitches before placing them on a thread (= shoulder) and work the last 32-32-36-40-44-44 stitches (= half back piece). Cut the strand, place the back-piece on a thread and work the front piece. FRONT PIECE: = 62-66-74-82-90-94 stitches. Work back and forth with pattern as before and cast on 1 stitch at the end of the first 2 rows (= 1 edge stitch on each side) = 64-68-76-84-92-96 stitches. The new stitches are worked in GARTER STITCH – read description above. When the piece measures 19-21-22-23-25-27 cm = 7½"-8¼"-8¾"-9"-9¾"-10⅝" from the marker, cast on 4-5-5-5-5-6 stitches at the end of the next 2 rows for the armholes = 72-78-86-94-102-108 stitches. The piece is now measured from here. The new stitches are worked in garter stitch (a total of 5-6-6-6-6-7 stitches in garter stitch on each side of the piece). Continue working until the piece measures 31-31-32-32-32-32 cm = 12¼"-12¼"-12½"-12½"-12½"-12½". Bind off with knit over knit and purl over garter stitch – read BINDING-OFF TIP. The sweater measures approx. 55-57-59-61-63-65 cm = 21⅝"-22½"-23¼"-24"-24¾"-25½" from the shoulder down. BACK PIECE: Work in the same way as the front piece. SLEEVE: The sleeve is worked back and forth, top down from the shoulder stitches. Insert a marker in the middle of the shoulder stitches. The sleeve is measured from this marker. With 1 strand of each quality and circular needle size 6 mm = US 10, knit up stitches from the right side inside the 1 edge stitch as follows: Start at the bottom-inside corner of the armhole and knit up 23-23-27-27-27-31 stitches as far as the shoulder stitches, work the 10-10-10-14-14-14 shoulder stitches in pattern as before, knit up 23-23-27-27-27-31 stitches down the other side of the armhole = 56-56-64-68-68-76 stitches. Work pattern (A.1) with short rows back and forth as follows: ROW 1 (= wrong side): 1 edge stitch in garter stitch, * purl 2, knit 2 (ridge) *, work from *-* as far as the shoulder stitches, work the 10-10-10-14-14-14 shoulder stitches in pattern as before, purl 2. Turn and tighten the strand to avoid a large hole. ROW 2: Work A.1 as before over the first 14-14-14-18-18-18 stitches, turn, tighten the strand to avoid a large hole. ROW 3: Work A.1 as before over the first 16-16-16-20-20-20 stitches, turn, tighten the strand to avoid a large hole. ROW 4: Work A.1 as before over the first 18-18-18-22-22-22 stitches, turn, tighten the strand to avoid a large hole. Continue back and forth like this, working 2 more stitches before turning on each row until there is 1 stitch left on each side; the short rows are now finished. The sleeve cap measures approx. 9-9-11-11-11-13 cm = 3½"-3½"-4⅜"-4⅜"-4⅜"-5⅛". Remove the marker and insert it in the middle of the row. THE PIECE IS NOW MEASURED FROM HERE. Work back and forth with textured pattern and 1 edge stitch in garter stitch on each side. When the sleeve measures 7-7-7-7-7-8 cm = 2¾"-2¾"-2¾"-2¾"-2¾"-3⅛" from the end of the short rows, decrease 1 stitch on each side – read DECREASE TIP. Decrease like this every 3-3-2-1½-1½-1 cm = 1⅛"-1⅛"-¾"-½"-½"-⅜" a total of 8-8-10-12-12-14 times = 40-40-44-44-44-48 stitches. Continue working until the sleeve measures 44-44-41-40-40-38 cm = 17¼"-17¼"-16⅛"-15¾"-15¾"-15" – or to desired length. Bind off with knit over knit and purl over garter stitch – remember BINDING-OFF TIP. Work the other sleeve in the same way. ASSEMBLY: Sew the sleeve seams inside the 1 edge stitch on each side and sew the sleeves to the 4-5-5-5-5-6 stitches cast on for the armholes. Sew the side seams from the armholes and down, leaving 17 cm = 6¾" for the split. |
||||||||||
Diagram explanations |
||||||||||
|
||||||||||
 |
||||||||||
 |
||||||||||
Have you finished this pattern?Tag your pictures with #dropspattern #sundayvibessweater or submit them to the #dropsfan gallery. Do you need help with this pattern?You'll find 24 tutorial videos, a Comments/Questions area and more by visiting the pattern on garnstudio.com. © 1982-2026 DROPS Design A/S. We reserve all rights. This document, including all its sub-sections, has copyrights. Read more about what you can do with our patterns at the bottom of each pattern on our site. |
||||||||||


With over 40 years in knitting and crochet design, DROPS Design offers one of the most extensive collections of free patterns on the internet - translated to 17 languages. As of today we count 324 catalogs and 12290 patterns - 12280 of which are translated into English (US/in).
We work hard to bring you the best knitting and crochet have to offer, inspiration and advice as well as great quality yarns at incredible prices! Would you like to use our patterns for other than personal use? You can read what you are allowed to do in the Copyright text at the bottom of all our patterns. Happy crafting!
Post a comment to pattern DROPS 218-7
We would love to hear what you have to say about this pattern!
If you want to leave a question, please make sure you select the correct category in the form below, to speed up the answering process. Required fields are marked *.