
Popular categories
Looking for a yarn?


Comments / Questions (96)
![]() Gosset wrote:
Gosset wrote:
Très beau modèle
30.04.2025 - 11:09
![]() Guylaine Belzile wrote:
Guylaine Belzile wrote:
Je voulais faire une commande et j'ai vu que le site nous amène à un lien qui se trouve au Royaume-Uni. Y a t il un site Drops au Canada?
26.04.2025 - 22:36DROPS Design answered:
Bonjour, vous pouvez trouver ici tous les magasins qui vendent ou envoient au Canada. Bon tricot!
27.04.2025 - 12:35
![]() Cinzia wrote:
Cinzia wrote:
Buongiorno, potrei cortesemente sapere la modella che taglia indossa ? Sono in dubbio se lavorare la M o la L perché non lo vorrei troppo aderente
26.04.2025 - 15:24DROPS Design answered:
Buonasera Cinzia, solitamente le modelle indossano la taglia M: in ogni caso può trovare le misure del capo finito alla fine della pagina. Buon lavoro!
27.04.2025 - 23:57
![]() Con Hilo Y Agujas wrote:
Con Hilo Y Agujas wrote:
Qué significa disminuir 1 pto x 5 cada 2da fila: 1 pto x 4?
03.10.2024 - 16:28
![]() Carol wrote:
Carol wrote:
I’m viewing this pattern in English (American) but cannot read all comments because they are numerous languages. Isn’t there a way to translate for each country the user selects? It would make questions & answered easier for all.
04.09.2024 - 13:29
![]() Carol wrote:
Carol wrote:
I printed this pattern in April 2018 and now would like to make it. My question, I do not see any updated corrections to the pattern online, are there any corrections? Thank you for your assistance. Carol from Michigan, USA.
24.08.2024 - 15:47DROPS Design answered:
Dear Carol, if there are any corrections, there will be a notification in red, right above the DIAGRAM. In this pattern, there have been no corrections. If you have any doubts while you work, you can always check the online version, which shows the corrected version already. Happy knitting!
25.08.2024 - 22:40
![]() Florence wrote:
Florence wrote:
Bonjour, je voudrais savoir si le pull peut se tricoter en rond jusqu’au manches, puis en allers et retours jusqu’au col? Ensuite pour les augmentations de côté, de quelles augmentations s’agit il ? Merci pour votre réponse.
02.07.2024 - 18:20DROPS Design answered:
Bonjour Florence, c'est déjà le cas en fait: vous tricotez en rond jusqu'aux emmanchures et vous terminez le dos et le devant séparément en allers et retours. Quand on doit augmenter de chaque coté pour le bas du top, on va augmenter sur les côtés du top = au début du tour + à la moitié du tour approximativement soit de chaque côté des marqueurs placés pour le devant et le dos (devant = 87-95-103 m et dos = 89-97-105 m.. Bon tricot!
03.07.2024 - 08:10
![]() Edith Gravel wrote:
Edith Gravel wrote:
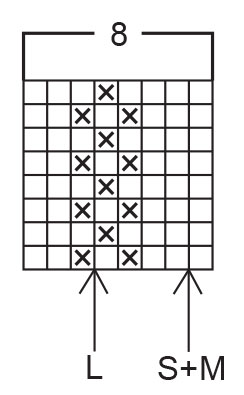
Bonjour à toutes. Question sur les flèches du diagramme . Je tricote en rond la taille large. La flèche du diagramme indique que je dois débuter le digramme à partir du deuxième carreau. Est ce que je tricote le diagramme ainsi à chaque rang ( à partir du deuxième carreau) ou est ce que la flèche ne s’applique qu’au premier rang ? Merci d’avance pour votre réponse .
28.06.2024 - 20:09DROPS Design answered:
Bonjour Mme Gravel, le diagramme se tricote sur 8 mailles, et on lit le diagramme de droite à gauche tous les tours (sur l'endroit; de gauche à droite, sur l'envers, on le lira de droite à gauche); en taille L vous tricotez d'abord les 3 premières mailles du diagramme puis vous répétez les 8 mailles du diagramme tout le tour. Bon tricot!
01.07.2024 - 08:07
![]() Barbara Click wrote:
Barbara Click wrote:
Please explain how you keep the pattern while at the same time increasing both sides of markers? Considering the increases do not fall in the K portion of the design … I am making the medium…
23.06.2024 - 00:21DROPS Design answered:
Dear Barbara, the stitches that does not fit into the pattern (because of increases or decreases) should be knitted, until you have eough stitches for a full repeat (for increases), or until you decreased enough stitches, so you will only have stitches for one less repeat. Happy Knitting!
23.06.2024 - 01:22
![]() Edith Gravel wrote:
Edith Gravel wrote:
Bonjour à toutes, j’aime beaucoup ce modèle . Je voudrais savoir comment le diagramme doit se lire lorsqu’on tricote en rond ? Ex: rang 1 : droite à gauche , rang 2 : gauche à droite? Et ainsi de suite? Merci de votre réponse.
17.06.2024 - 23:01DROPS Design answered:
Bonjour Mme Gravel, les diagrammes se lisent de bas en haut, en rond et tous les rangs sur l'endroit on lit de droit à gauche et sur l'envers, de gauche à droite. Bon tricot!
18.06.2024 - 07:44
|
|||||||
Summer Charm |
|||||||
|
|
|||||||
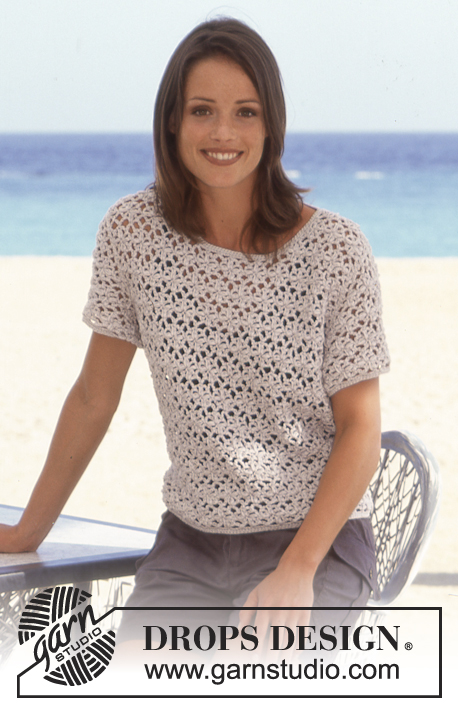
DROPS Sleeveless Top in Muskat.
DROPS 60-13 |
|||||||
|
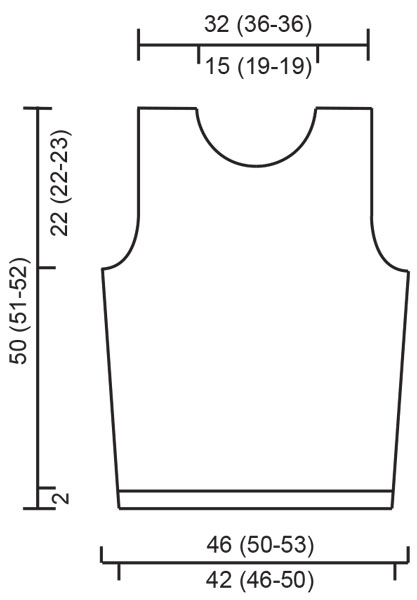
Gauge: 21 sts x 28 rows in stockinette st = 10 x 10 cm [4" x 4"]. Garter st, when knitting flat: Knit all sts, all rows. Seed stitch (on an even number of sts): Row 1: * K 1, P 1 * Row 2: * P 1, K 1 * Seed stitch (on an odd number of sts): All rows: K 1, *P 1, K 1* Seed stitch (worked in the round): Round 1: * knit 1, purl 1 * Round 2: * knit the purl sts from the previous round and purl the knit sts from the previous round * Pattern: See chart (1 chart = 1 repeat). The pattern is seen from the right side. Arrows indicate the starting points on the chart for different sizes. Make decreases as follows on the right side: Before the 3 edge sts: K 2 tog. After the 3 edge sts: sl 1, K 1, psso Make decreases as follows on the wrong side: Before the 3 edge sts: P 2 tog into back of st. After 3 edge sts: P 2 tog. BODY Cast on 176 (192-208) sts; join and place a marker at the join. K1 round, P1 round, then work 3 rounds in seed st. Attach a marker at each side, front = 87 (95-103) sts, back = 89 (97-105) sts. Establish Pattern - start at the appropriate arrow on the chart. After the seed st border, on next round inc 1 st at each side of the markers, repeat every 5 cm [2"] a total of 4 times = 192 (208-224) sts. Front = 95 (103-111) sts, back = 97 (105-113) sts. Work the increased sts into the pattern as you go along. When the work measures 27 (28-28) cm [10⅝" (11" - 11")] work 3 rounds with seed st over 6 (6-7) sts at each side of each marker (work rem sts as before), on next round bind off 3 (3-4) sts for armholes at each side of each marker, and then work back and forth on the needles - front = 89 (97-103) sts, back = 91 (99-105) sts. Front: = 89 (97-103) sts. Dec 1 st for armholes inside 3 edge sts (work the edge sts in seed st throughout) at each side every row 5 (5-8) times, then every other row 4 times, then every 4th row 2 times = 67 (75-75) sts. When the work measures 37 cm [14.5"] work 3 rows with seed st over the center 15 (23-23) sts (work rem sts as before), on next row bind off the center 9 (17-17) sts for the neck, and work each shoulder separately. Continue and dec 1 st at neck edge - dec inside 3 edge sts (work these sts in seed st throughout) on every row 6 times, then on every other row 2 times, then every 4th row 2 times. Bind off when the work measures 50 (51-52) cm [19.75" (20" - 20.5")]. Back: = 91 (99-105) sts. Bind off for armholes inside 3 edge sts as for the front = 69 (77-77) sts. When the work measures 47 (48-49) cm [18.5" (18⅞" - 19.25")] work 3 rows with seed st over the center 33 (41-41) sts (work rem sts as before), on next row bind off the center 27 (35-35) sts for the neck and work each shoulder separately. Continue and dec 1 st at each neck edge inside 3 edge sts (these sts are worked in seed st) every row 2 times. Bind off when the work measures 50 (51-52) cm [19.75" (20" - 20.5")]. Assembly: Sew shoulder seams. Crochet a border around the neck from the right side as follows: 1st round : 1 single crochet (sc), * ch 4 over 2 knit sts, 1 slip st in the 3rd knit st *, repeat * - *. 2nd round : * 4 sc in the ch space, 1 slip st in the slip st from the previous round *, repeat * - *. |
|||||||
Diagram explanations |
|||||||
|
|||||||
 |
|||||||
 |
|||||||
Have you finished this pattern?Tag your pictures with #dropspattern or submit them to the #dropsfan gallery. Do you need help with this pattern?You'll find 22 tutorial videos, a Comments/Questions area and more by visiting the pattern on garnstudio.com. © 1982-2026 DROPS Design A/S. We reserve all rights. This document, including all its sub-sections, has copyrights. Read more about what you can do with our patterns at the bottom of each pattern on our site. |
|||||||


With over 40 years in knitting and crochet design, DROPS Design offers one of the most extensive collections of free patterns on the internet - translated to 17 languages. As of today we count 324 catalogs and 12290 patterns - 12280 of which are translated into English (US/in).
We work hard to bring you the best knitting and crochet have to offer, inspiration and advice as well as great quality yarns at incredible prices! Would you like to use our patterns for other than personal use? You can read what you are allowed to do in the Copyright text at the bottom of all our patterns. Happy crafting!
Post a comment to pattern DROPS 60-13
We would love to hear what you have to say about this pattern!
If you want to leave a question, please make sure you select the correct category in the form below, to speed up the answering process. Required fields are marked *.