
Popular categories
Looking for a yarn?


Comments / Questions (39)
![]() Ambra wrote:
Ambra wrote:
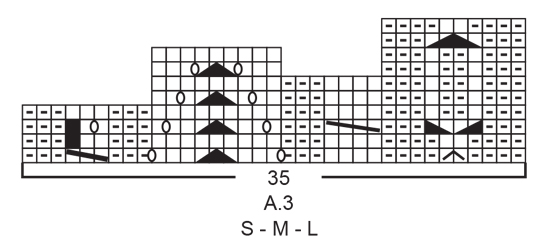
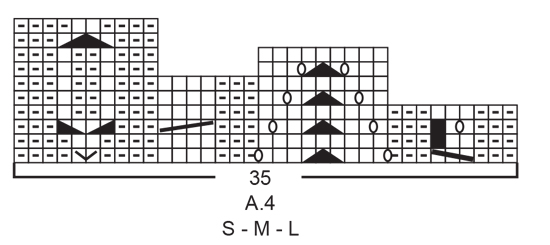
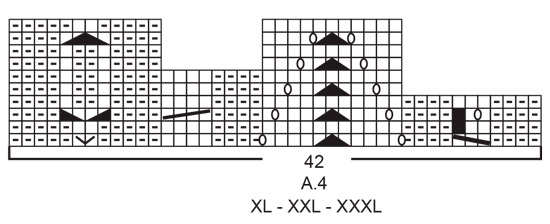
Su schema a3 primo disegno rigo 9 di 10 il simbolo a freccia tutta nera prende 4 maglie Su a3 terzo disegno rigo 7 di 8 lo stesso simbolo prende solo 3 maglie come in leggenda Come si fa quando è rappresentato su 4 maglie all’inizio ?
14.03.2026 - 10:03DROPS Design answered:
Buonasera Ambra, non deve vedere il simbolo come triangolo nero intero che copre 4 maglie, ma come 2 triangoli rettangoli separati da lavorare seguendo la legenda. Buon lavoro!
26.04.2026 - 22:12
![]() Ambra Ricchi wrote:
Ambra Ricchi wrote:
Nello schema inizio a3 e fine a4 il simbolo a punta nero prende 4maglie Mentre sempre in a3 il terzo motivo lo stesso segno prende tre maglie Fra le spiegazioni dei simboli vedo solo il simbolo tutto nero che prende 3 maglie E quello di 4 maglie come si fa? Grazie
12.03.2026 - 15:40DROPS Design answered:
Buonasera Ambra, non deve vedere il simbolo come triangolo nero intero che copre 4 maglie, ma come 2 triangoli rettangoli separati da lavorare seguendo la legenda. Buon lavoro!
26.04.2026 - 22:12
![]() Lieve Verstraete wrote:
Lieve Verstraete wrote:
Beste, Bij rechter voorpand staat : brei 1 naald recht aan goede kant en minder tegelijkertijd 8 steken verdeeld etc = ok Maar dan staat er brei 1 naald recht aan de verkeerde kant over alle steken : moet dat niet zijn over de 26 steken van de sjaalkraag ? Anders heb je een rij ribbels op de schouder... Alvast dank voor het snelle antwoord
16.10.2025 - 15:49DROPS Design answered:
Dag Lieve,
Ja, zo te zien is het wel echt de bedoeling om alle steken recht te breien aan de verkeerde kant. Maar je kunt er natuurlijk zelf voor kiezen om alleen het gedeelte over de sjaalkraag recht te breien en de rest averecht.
21.10.2025 - 22:16
![]() Juliette wrote:
Juliette wrote:
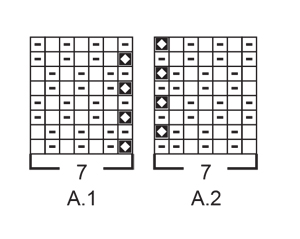
Bonjour, juste une petite correction dans votre réponse du 28 janvier. Le 2ième rang(sur l’envers) la séquence des mailles des mailles pour A2, glisser 1m endroit puis 3x(1m end, 1m env). La 1ere maille est glissée à l’endroit. Par la suite A1 se tricote comme suis: 3x( 1m env, 1m end), 1m endroit. Aussi ce n’est pas un point de riz parce que ce dernier s’effectue sur 2 rangs alors que celui-ci s’effectue sur 4 rangs… mais ça lui ressemble beaucoup!
28.01.2025 - 21:16DROPS Design answered:
Bonjour Juliette, erreur de ma part effectivement, on va bien glisser 1 m à l'end au début de A.2 sur l'envers, comme indiqué par la légende du diagramme. Ce point est un point de blé, pas un point de riz: on tricote alternativement 1 m end, 1 m env sur 2 rangs puis on tricote 1 m env, 1 m end sur 2 rangs. On l'appelle aussi parfois un point de blé double en hauteur, mais les noms varient aussi souvent. Bon tricot!
29.01.2025 - 09:52
![]() Juliette wrote:
Juliette wrote:
Bonjour, Si j’ai bien compris A2-rang 1 va être VVDVDVD et A1-rang2 VDVDVDD. (V envers, D endroit) A2: pourquoi la dernière maille du rang 1 est-elle envers? Parce que quand je vais faire les augmentations-2, cette maille va devenir une maille endroit afin de respecter la séquence de A2? A1: c’est la même chose mais sûrement la première maille du rang 2. Dont la dernière maille va devenir un envers. Encore merci pour votre aide!
27.01.2025 - 21:56DROPS Design answered:
Bonjour Juliette, A.1 et A.2 se tricotent au point de blé, sur l'endroit, on lit les diagramme de droite à gauche soit 1er rang: A.1: glisser 1 m à l'end, (1 m env, 1m en)x3, et A.2: (1 m end, 1 m env)x2, 1 m end, 2 m env. Et, 2ème rang (sur l'envers): A.2: glissez 1 m à l'env, (1 m end, 1 m env)x3 et A.1 = (1 m end, 1 m env)x2, 1 m end, 2 m env. Les augmentations du col vont se tricoter soit à l'endroit (si la maille suivante/précédente doit être une maille envers) soit à l'envers (si la maille suivante/précédente doit être une maille endroit). Bon tricot!
28.01.2025 - 10:11
![]() Juliette wrote:
Juliette wrote:
Bonjour, j’en suis à faire les augmentations 2 pour le col. Donc A1 ET A2 et pas seulement A1 comme indiqué puisque l’on augmente à l’endroit au début et à la fin du rang? Lorsque je sais une augmentation quelle valeur ont les mailles lisières lorsque je dois les tricoter? Je suis un peu beaucoup confuse avec les augmentations et le schéma… Merci beaucoup pour votre aide!
23.01.2025 - 19:50DROPS Design answered:
Bonjour Juliette, les augmentations du col se font à 1 maille du bord de chaque côté (quand on tricote encore le dos et les devants ensemble), autrement dit, vous augmentez sur l'endroit après la 1ère maille de A.1 et avant la dernière maille de A.2 - mais effectivement, elles vont se tricoter en suivant le point fantaisie pour le continuer, vous aurez ainsi davantage de mailles après/avant la maille lisière, donc en A.1 sur le devant droit et en A.2 sur le devant gauche. Bon tricot!
24.01.2025 - 09:37
![]() Sylvie Isler wrote:
Sylvie Isler wrote:
Juste un éclaircissement sur les épaules du devant si j'ai bien compris je fais mes 11 diminutions que sur la partie jersey et je commence le col sur toutes les mailles restantes par 1 côte mousse et 1 rang raccourci *2 je peux faire n'importe quelle méthode de rang raccourci ? Merci pour une réponse la plus rapide possible
27.08.2024 - 14:46DROPS Design answered:
Bonjour Mme Isler, on doit diminuer 11 mailles dans la partie A.3 pour compenser le nombre de mailles des torsades et ainsi conserver la bonne largeur; vous pouvez effectivement utiliser la technique de rangs raccourcis que vous préférez. Le col du devant droit se commence sur l'endroit et celui du devant gauche sur l'envers, ainsi on a davantage de rangs à l'extérieur du col pour un joli retombé. Bon tricot!
28.08.2024 - 08:30
![]() Hildegard Peristi wrote:
Hildegard Peristi wrote:
Guten Tag Meine Frage ist : warum ist der Versand bei euch so teuer, ich wollte mir Wolle bestellen, hätte aber für den Versand gleich viel bezahlt wie für die Wolle. Habe mehrmals bei einer anderen Firma auch aus Dt. bestellt, die verlangen 7,00 € ist doch ein ziemlicher Unterschied. Danke mfg. Peristi Hildegard
18.06.2024 - 14:31DROPS Design answered:
Liebe Frau Peristi, hier finden Sie die Liste von den DROPS Händlern in Deutschland (oder wählen Sie das gewünschte Land), vielleicht finden Sie einen in Ihrem Gegend, die Verskandkosten sind vielleicht je nach Laden auch verschieden, besuchen Sie die Onlineshop um mehr zu lesen. Viel Spaß beim Stricken!
18.06.2024 - 15:28
![]() Ginet wrote:
Ginet wrote:
Re-bonjour, inutile de me répondre à ma précédente question..´ j’ai trouvé la réponse un peu plus loin dans les questions! Merci quand même!
20.05.2024 - 18:22
![]() Ginet wrote:
Ginet wrote:
Bonjour, j’aimerais savoir la description de l’icône en tête de flèche sur 4 mailles présenté en A3. Merci!
20.05.2024 - 17:11DROPS Design answered:
Bonjour Mme Ginet, pensez-vous bien au symbole utilisé au début de A.3? Il s'agit alors du 5ème symbole de la légende, soit, une petite torsade sur 2 mailles à tricoter ainsi: placez 1 maille sur l'aiguille auxiliaire devant l'ouvrage, tricotez la maille suivante à l'endroit, reprenez la maille en attente et tricotez la à l'endroit. Bon tricot!
21.05.2024 - 13:50
|
||||||||||||||||||||||||||||||||||||||||
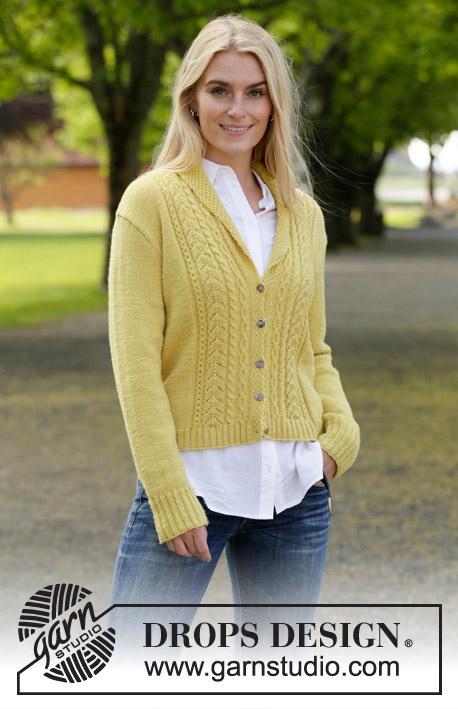
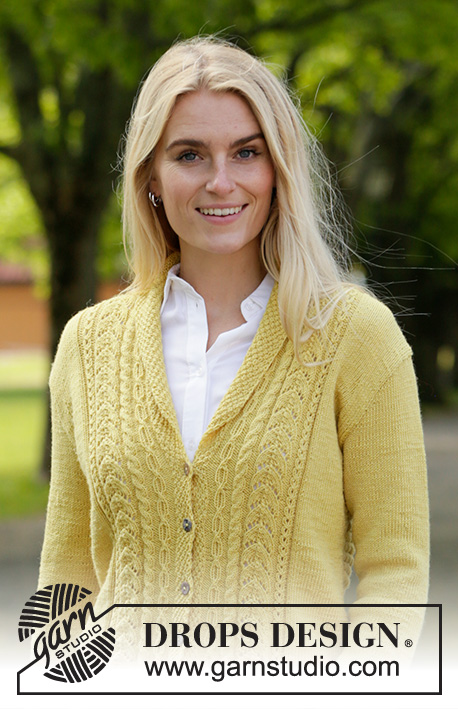
Marigold Sunshine#marigoldsunshinejacket |
||||||||||||||||||||||||||||||||||||||||
 |
 |
|||||||||||||||||||||||||||||||||||||||
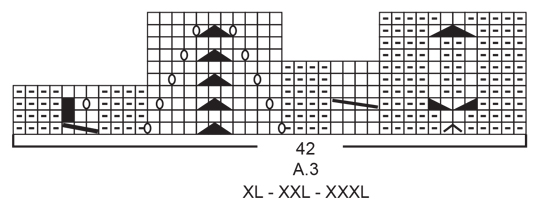
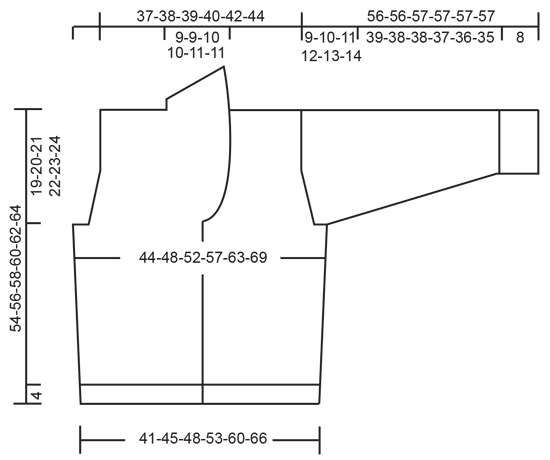
Knitted jacket in DROPS BabyMerino. The piece is worked with cables, lace pattern and shawl collar. Sizes S - XXXL.
DROPS 207-4 |
||||||||||||||||||||||||||||||||||||||||
|
------------------------------------------------------- EXPLANATIONS FOR THE PATTERN: ------------------------------------------------------- RIDGE/GARTER STITCH (worked back and forth): Knit all rows. 1 ridge in height = Knit 2 rows. PATTERN: See diagrams A.1 to A.4. Choose diagram for your size (applies to A.3 and A.4). The diagrams show all rows in the pattern seen from the right side. NOTE: Both A.3 and A.4 show 1 repeat in height, but the diagrams differ in height because each cable/lace pattern covers different numbers of rows in height. And the smallest cable in A.3 and A.4 varies from 3 to 2 stitches. The number of stitches in the pattern can therefore vary by 1 stitch, depending on where you are in the cable. DECREASE TIP-1 (evenly spaced): All decreases are made from the right side! To work out how to decrease evenly, count the total number of stitches on needle (e.g. 252 stitches) minus the bands (e.g. 14 stitches) and divide the remaining stitches by the number of decreases to be made (e.g. 26) = 9.2. In this example decrease by knitting together approx. each 8th and 9th stitch together. Do not decrease on bands. DECREASE TIP-2 (for armholes): All decreases are worked from the right side! Decrease for the armholes on the inside of the 6 outermost stitches towards the armholes as described below. Decrease as follows after the 6 outermost stitches: Work 1 edge stitch in garter stitch, knit 5, slip 1 stitch as if to knit, knit 1 and pass the slipped stitch over the knitted stitch (= 1 stitch decreased). Decrease as follows before the 6 outermost stitches: Work until there are 8 stitches left on the row, knit 2 together, knit 5 and finish with 1 edge stitch in garter stitch (= 1 stitch decreased). INCREASE TIP-1 (for sides of body and mid under sleeves): All increases are worked from the right side! Start 3 stitches before the marker thread, make 1 yarn over, knit 6 (the marker thread sits in the middle of these 6 stitches), 1 yarn over (= 2 stitches increased). On the next row (wrong side) purl the yarn overs twisted to avoid holes. Then work the new stitches in stockinette stitch. INCREASE TIP-2 (for shawl collar): All increases are worked from the right side! Increase for the collar on the inside of the outermost stitch towards mid front (i.e. on the inside of the slipped stitch). Increase 1 stitch by making 1 yarn over. On the next row work the yarn over twisted to avoid a hole. The increased stitches are worked into A.1 / A.2 as you go. BUTTONHOLES: Work buttonholes on the right band. 1 BUTTONHOLE = Start from the right side and knit the 3rd and 4th stitch from the edge together, then make 1 yarn over. On the next row (wrong side) knit the yarn over (= hole). Work buttonholes when the piece measures: S: 2, 9, 15, 22 and 28 cm = ¾", 3½", 6", 8¾" and 11" M: 2, 9, 16, 23 and 29 cm = ¾", 3½", 6¼", 9" and 11⅜" L: 2, 9, 16, 23 and 30 cm = ¾", 3½", 6¼", 9" and 11¾" XL: 2, 8, 14, 20, 26 and 31 cm = ¾", 3⅛", 5½", 8", 10¼" and 12¼" XXL: 2, 8, 14, 20, 26 and 32 cm = ¾", 3⅛", 5½", 8", 10¼" and 12½" XXXL: 2, 9, 15, 21, 27 and 33 cm = ¾", 3½", 6", 8¼", 10⅝" and 13" ------------------------------------------------------- START THE PIECE HERE: ------------------------------------------------------- JACKET – SHORT OVERVIEW OF THE PIECE: The body is worked back and forth with circular needle from mid front, bottom up as far as the armholes. Then the back and front pieces are finished separately. The sleeves are worked in the round with double pointed needles/short circular needle, bottom up. BODY: Cast on 252-276-296-328-364-396 stitches (including 7 band stitches on each side towards mid front) with circular needle size 2.5 mm = US 1,5 and BabyMerino. Purl 1 row (= wrong side). The next row is worked as follows from the right side: Work A.1 over the first 7 stitches (= band), * knit 2, purl 2 *, work from *-* until there are 9 stitches left on the row, knit 2 and finish with A.2 over the last 7 stitches (= band). Continue this rib for 4 cm = 1½" – remember BUTTONHOLES on right band – read description above. Purl 1 row from the wrong side (bands worked in A.1/A.2) – AT THE SAME TIME decrease 26-30-34-36-40-44 stitches evenly spaced – read DECREASE TIP-1 = 226-246-262-292-324-352 stitches. Change to circular needle size 3 mm = US 2,5. Insert 1 marker thread 64-69-73-82-90-97 stitches in from each side (= 98-108-116-128-144-158 stitches between marker threads on back piece). Read PATTERN and work the next row from the right side as follows: 7 band stitches in A.1, work A.3 (= 35-35-35-42-42-42 stitches), work stockinette stitch until there are 42-42-42-49-49-49 stitches left on the row, work A.4 (= 35-35-35-42-42-42 stitches) and finish with 7 band stitches in A.2. Continue this pattern. REMEMBER THE KNITTING GAUGE! Now increase in the sides, increase for the shawl collar and decrease for the armholes as described below (increasing to shawl collar and decreasing for armholes will in some sizes occur simultaneously): INCREASING IN SIDES: When the piece measures 10 cm = 4" in all sizes increase 1 stitch on each side of both marker threads – read INCREASE TIP-1 (= 4 stitches increased). Increase like this every 7-7-7-8-8-8 cm = 2¾"-2¾"-2¾"-3⅛"-3⅛"-3⅛" a total of 4 times on each side (= a total of 16 stitches increased). SHAWL COLLAR: When the piece measures approx. 29-30-31-32-33-34 cm = 11⅜"-11¾"-12¼"-12½"-13"-13⅜" (you should have worked a couple of rows after the last buttonhole), increase 1 stitch on each side towards mid front – read INCREASE TIP-2. Increase for the collar like this every 2nd row (i.e. every row from the right side) a total of 8-8-10-10-12-12 times (after the final increase for the collar there are 15-15-17-17-19-19 stitches on the band/collar). ARMHOLES: When the piece measures 35-36-37-38-39-40 cm = 13¾"-14¼"-14½"-15"-15¼"-15¾", bind off for the armholes on each side of the body; the next row is worked as follows from the wrong side: Work as before until there are 3-5-7-9-11-13 stitches left before the first marker thread, bind off 6-10-14-18-22-26 stitches for the armhole, work as before until there are 3-5-7-9-11-13 stitches left before the second marker thread, bind off 6-10-14-18-22-26 stitches for the armhole and work to end of row as before. Front and back pieces are now finished separately. RIGHT FRONT PIECE (when garment is worn): Continue back and forth as before with A.1 over the band/shawl collar, A.3 (= 35-35-35-42-42-42 stitches) and stockinette stitch over the remaining stitches. AT THE SAME TIME on the first row from the right side decrease 1 stitch in the side for the armhole – read DECREASE TIP-2. Decrease for the armhole like this every 2nd row (i.e. each row from the right side) a total of 6-7-8-11-15-17 times. After all increases and decreases there are 67-69-72-76-80-83 stitches on the row. Continue the pattern. When the piece measures approx. 53-55-57-59-61-63 cm = 21"-21⅝"-22½"-23¼"-24"-24¾" knit 1 row from the right side as before – AT THE SAME TIME on this row decrease 8-8-8-11-11-11 stitches evenly over the 35-35-35-42-42-42 stitches in A.3 = 59-61-64-65-69-72 stitches left. Knit 1 row from the wrong side over all stitches. The next row is worked as follows from the right side: Knit 26-26-29-29-32-32 stitches (= shawl collar) and bind off the 33-35-35-36-37-40 stitches on the shoulder. Cut the strand. Now work RIGHT COLLAR as described below. RIGHT COLLAR: Keep the 26-26-29-29-32-32 stitches on circular needle size 3 mm = US 2,5. The collar is worked in garter stitch with short rows towards the neck. Start from the wrong side and knit 1 row. Now work garter stitch back and forth as follows: * Work 1 ridge back and forth over all 26-26-29-29-32-32 stitches, work 1 ridge back and forth over the first 20-20-23-23-26-26 stitches *, work from *-* until the collar measures approx. 7-7-7-7-8-8 cm = 2¾"-2¾"-2¾"-2¾"-3⅛"-3⅛" inside where shortest (measures approx. 14-14-14-14-16-16 cm = 5½"-5½"-5½"-5½"-6¼"-6¼" outside where longest). Bind off with knit from the right side. LEFT FRONT PIECE (when garment is worn): Continue back and forth as before with stockinette stitch, A.4 (= 35-35-35-42-42-42 stitches) and A.2 over the band/shawl collar. AT THE SAME TIME on the first row from the right side decrease 1 stitch in the side for the armhole – read DECREASE TIP-2. Decrease for the armhole like this every 2nd row (i.e. each row from the right side) a total of 6-7-8-11-15-17 times. After all increases and decreases there are 67-69-72-76-80-83 stitches on the row. Continue the pattern. When the piece measures 53-55-57-59-61-63 cm = 21"-21⅝"-22½"-23¼"-24"-24¾", work 1 row from the right side as before – AT THE SAME TIME on this row decrease 8-8-8-11-11-11 stitches evenly over the 35-35-35-42-42-42 stitches in A.4 = 59-61-64-65-69-72 stitches left. Knit 1 row from the wrong side over all stitches. The next row is worked as follows from the right side: Bind off 33-35-35-36-37-40 stitches for the shoulder and knit the remaining 26-26-29-29-32-32 stitches (= shawl collar). Now work LEFT COLLAR as described below. LEFT COLLAR: = 26-26-29-29-32-32 stitches. Start from the wrong side and work garter stitch back and forth as follows: * Work 1 ridge back and forth over all 26-26-29-29-32-32 stitches, work 1 ridge back and forth over the first 20-20-23-23-26-26 stitches *, work from *-* until the collar measures approx. 7-7-7-7-8-8 cm = 2¾"-2¾"-2¾"-2¾"-3⅛"-3⅛" inside where shortest (measures approx. 14-14-14-14-16-16 cm = 5½"-5½"-5½"-5½"-6¼"-6¼" outside where longest). Knit 1 row from the wrong side and bind off with knit from the right side. BACK PIECE: = 100-106-110-118-130-140 stitches. Continue with stockinette stitch. AT THE SAME TIME on the first row from the right side decrease 1 stitch on each side for the armholes – read DECREASE TIP-2. Decrease for the armholes like this every 2nd row a total of 6-7-8-11-15-17 times = 88-92-94-96-100-106 stitches. Work until the piece measures 52-54-56-58-60-62 cm = 20½"-21¼"-22"-22¾"-23⅝"-24⅜". Now bind off the middle 18-18-20-20-22-22 stitches for the neck and each shoulder is finished separately. Continue with stockinette stitch and bind off at the beginning of each row from the neck as follows: Bind off 1 stitch 2 times = 33-35-35-36-37-40 stitches. Work until the piece measures 54-56-58-60-62-64 cm = 21¼"-22"-22¾"-23⅝"-24⅜"-25¼". Knit 1 row from the wrong side and bind off with knit from the right side. Work the other shoulder in the same way. SLEEVE: Cast on 68-72-72-76-76-80 stitches with double pointed needles size 2.5 mm = US 1,5 and BabyMerino. Knit 1 round, then work rib in the round (= knit 2/ purl 2) for 8 cm = 3⅛". Change to double pointed needles size 3 mm = US 2,5 and knit 1 round where you decrease 12-14-12-14-12-12 stitches evenly spaced = 56-58-60-62-64-68 stitches. Insert 1 marker thread at the beginning of the round = mid under sleeve and allow it to follow your work onwards; it will be used when increasing mid under sleeve. Work stockinette stitch in the round. When the sleeve measures 9-9-9-9-10-10 cm = 3½"-3½"-3½"-3½"-4"-4" from the cast-on edge, increase 2 stitches mid under the sleeve – read INCREASE TIP-1. Increase like this every 3½-3-2½-2-1½-1½ cm = 1¼"-1⅛"-1"-¾"-½"-½" a total of 11-13-15-18-21-22 times = 78-84-90-98-106-112 stitches. Continue working until the sleeve measures 47-46-46-45-44-43 cm = 18½"-18"-18"-17¾"-17¼"-17" (there is 9-10-11-12-13-14 cm = 3½"-4"-4⅜"-4¾"-5⅛"-5½" left to finished length; alternately, continue to desired length). NOTE; Shorter measurements in larger sizes due to broader shoulders and longer sleeve cap. The next round is worked as follows: Start 3 stitches before the marker thread, bind off 6 stitches (= mid under sleeve) and work stockinette stitch to end of round = 72-78-84-92-100-106 stitches left. Now work stockinette stitch back and forth and AT THE SAME TIME bind off stitches for the sleeve cap at the beginning of each row on both sides as follows: Bind off 3 stitches 1 time on each side, 2 stitches 2-2-2-3-3-3 times on each side and 1 stitch 5-7-9-9-11-12 times on each side. Then bind off 2 stitches on each side until the sleeve measures approx. 55-55-56-56-56-56 cm = 21⅝"-21⅝"-22"-22"-22"-22". Bind off 3 stitches 1 time on each side and then bind off the remaining stitches. The sleeve measures approx. 56-56-57-57-57-57 cm = 22"-22"-22½"-22½"-22½"-22½" from the top down. Work the other sleeve in the same way. ASSEMBLY: Sew the shoulder seams inside the bind-off edge. Sew in the sleeves inside the 1 edge stitch. Sew the collar together mid back (make sure the seam turns towards the wrong side when the collar is turned down). Sew the collar to the neck at the back, with the seam on the wrong side. |
||||||||||||||||||||||||||||||||||||||||
Diagram explanations |
||||||||||||||||||||||||||||||||||||||||
|
||||||||||||||||||||||||||||||||||||||||
 |
||||||||||||||||||||||||||||||||||||||||
 |
||||||||||||||||||||||||||||||||||||||||
 |
||||||||||||||||||||||||||||||||||||||||
 |
||||||||||||||||||||||||||||||||||||||||
 |
||||||||||||||||||||||||||||||||||||||||
 |
||||||||||||||||||||||||||||||||||||||||
Have you finished this pattern?Tag your pictures with #dropspattern #marigoldsunshinejacket or submit them to the #dropsfan gallery. Do you need help with this pattern?You'll find 28 tutorial videos, a Comments/Questions area and more by visiting the pattern on garnstudio.com. © 1982-2026 DROPS Design A/S. We reserve all rights. This document, including all its sub-sections, has copyrights. Read more about what you can do with our patterns at the bottom of each pattern on our site. |
||||||||||||||||||||||||||||||||||||||||


With over 40 years in knitting and crochet design, DROPS Design offers one of the most extensive collections of free patterns on the internet - translated to 17 languages. As of today we count 324 catalogs and 12290 patterns - 12280 of which are translated into English (US/in).
We work hard to bring you the best knitting and crochet have to offer, inspiration and advice as well as great quality yarns at incredible prices! Would you like to use our patterns for other than personal use? You can read what you are allowed to do in the Copyright text at the bottom of all our patterns. Happy crafting!
Post a comment to pattern DROPS 207-4
We would love to hear what you have to say about this pattern!
If you want to leave a question, please make sure you select the correct category in the form below, to speed up the answering process. Required fields are marked *.