
Popular categories
Looking for a yarn?


Comments / Questions (36)
![]() Jane wrote:
Jane wrote:
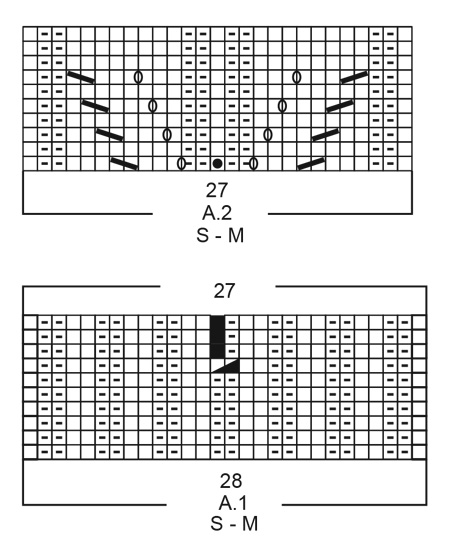
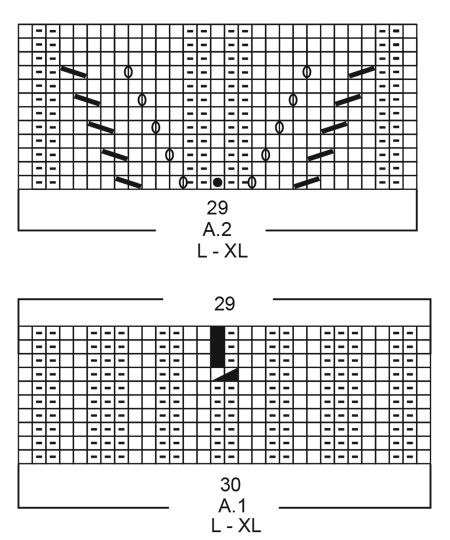
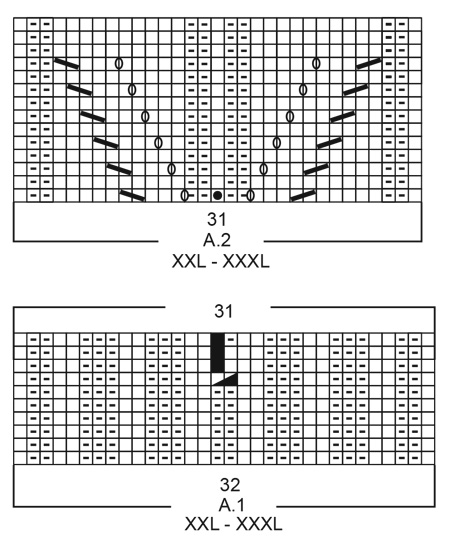
On A2 it shows a dark slant going over 2 stitches but nothing on diagram to say what it does. Is it an increase or decrease?
09.03.2022 - 21:31DROPS Design answered:
Hi Jane, The diagonal line from top left to bottom right is: Slip 1 stitch as if to knit, knit 1 and pass the slipped stitch over the knitted stitch. A diagonal line from bottom left to top right is: Knit 2 together. Happy knitting!
10.03.2022 - 07:02
![]() Jane wrote:
Jane wrote:
On A 2 it shows a slant over two stitches but nothing on diagram to say what it is help
09.03.2022 - 21:29DROPS Design answered:
Dear Jane, the both slant over 2 stitches in A.2 are explained under the 4th and 5th symbol - see diagram key: / = knit 2 stitches together; \ = slip 1 as if to knit, knit 1, pass the slipped stitch over the knitted stitch. Happy knitting!
10.03.2022 - 10:04
![]() Cathy Kapp wrote:
Cathy Kapp wrote:
I understand what you're saying to put a marker on each side of the A2 stitches worked to mark where the front, sleeves and back are. In the pattern there are also a section where you knit 12 stitches after the first A2 and the third A2 stitches. What are they part of, front, sleeve or back? I'm still just trying to find where each section starts and ends. Thanks for your help.
16.12.2021 - 16:35DROPS Design answered:
Dear Mrs Kapp, yoke is worked in the round from mid back, the 12 sts between 1st and 2nd A.2 + the 12 sts between 3rd and 4th A.2 are for the sleeves. You are increasing with a yarn over on each side of each A.2 (= raglan lines), ie after 1st increase there are for ex; 14 sts for each sleeve. Happy knitting!
17.12.2021 - 07:59
![]() Cathy Kapp wrote:
Cathy Kapp wrote:
I really love this design but find it very hard to follow the pattern which is not written very well. I am an experienced knitter and I've been knitting for more than 50 years. Please tell me how I can put markers where the front, sleeve, back and other sleeve is, this would make it easier to see any mistakes I make. I'm assuming when I get to the last row on the diagram that I start at row 1 again. Thanks for your help.
14.12.2021 - 02:28DROPS Design answered:
Hi Cathy, You can insert markers on each side of all A.2 sections (each transition between body and sleeves). When you have completed a diagram go to row 1 for the next repeat as you say. Happy knitting!
14.12.2021 - 07:07
![]() Mathilde wrote:
Mathilde wrote:
PS ^^ : En démarrant le col, lorsque l'on monte les 138 mailles, lesquelles concernent les côtés ? ( les épaules, puis les manches ) ? Seraient-ce les 8 côtes ? Encore Merci pour votre aide, par avance :)
15.10.2021 - 01:51DROPS Design answered:
Bonjour Mathilde, les tours commencent au milieu dos, les 28 m de A.1 seront ensuite tricotées en suivant A.2 (= raglans) et les 12 m (1 m end, (2 m end, 2 m env) x 8, 2 m env, 1 m end) sont pour les manches. Bon tricot!
15.10.2021 - 08:01
![]() Mathilde wrote:
Mathilde wrote:
Bonjour à l'équipe ;) . Je me demandais si le fait de relever les mailles de dessous la manche, était équivalent à les faire "glisser" sur l'aiguille ? Je sais relever des mailles sur un ouvrage commencé mais sur une "chainette" de points rajoutés.. je ne l'ai jamais fait :/ Merci par avance de votre réponse et bonne journée ;)
14.10.2021 - 21:42DROPS Design answered:
Bonjour Mathilde, cette leçon montre, dans les photos 18A/B comment soit monter (A) soit relever (B) les mailles dans les mailles montées sous la manche. En espérant que ceci puisse vous aider. Bon tricot!
15.10.2021 - 07:50
![]() Julita Skowrońska wrote:
Julita Skowrońska wrote:
Dzień dobry Schemat A2 ma w każdym rozmiarze jedno oczko mniej niż A1, a powinien być przerabiany jako ciągłość A1. Czy to błąd czy ja źle rozumiem schemat? Dziękuję i pozdrawiam Julita
04.08.2021 - 08:10DROPS Design answered:
Witaj Julito, na końcu schematu A.1 masz 27 oczek, a na początku schematu A.2 jest ich również 27. Zobacz dokładnie opis symboli. Pozdrawiamy!
04.08.2021 - 09:32
![]() Giusi wrote:
Giusi wrote:
Buongiorno 🙂 Sarebbe possibile realizzare un'alzata sul dietro per creare uno scollo anatomico? In caso potreste indicarmi un modello da cui ricavare le istruzioni? Grazie!
08.04.2021 - 10:32DROPS Design answered:
Buonasera Giusi, si, può realizzare un'alzata sul dietro del collo per migliorare la vestibilità: può cercarne una che la piace tra i modelli top down. Buon lavoro!
09.04.2021 - 23:22
![]() Marian Stagelund wrote:
Marian Stagelund wrote:
Fed måde at strikke på, oppe fra og ned, det var hurtig at finde ud af om str passede, når bærestykket var færdig, sæt arbejdet på to rundpinde, og prøv den. Jeg havde svært ved at strikke diagrammet i siden sammen, men at være kreativ lønner sig, så efter et par forsøg, var jeg tilfreds.
27.03.2021 - 07:03
![]() Aluisa Toni wrote:
Aluisa Toni wrote:
E' possibile lavorare questo modello dal basso e con due ferri? Perché mi piace molto il modello ma non ho mai lavorato il top-down. Grazie
08.01.2021 - 13:51DROPS Design answered:
Buongiorno Aluisa, questo modello è stato progettato per la lavorazione dall'alto in tondo: se volesse lavorarlo dal basso dovrebbe riprogettarlo tutto. Buon lavoro!
09.01.2021 - 12:36
|
|||||||||||||||||||||||||
Sweet Heather#sweetheathersweater |
|||||||||||||||||||||||||
 |
 |
||||||||||||||||||||||||
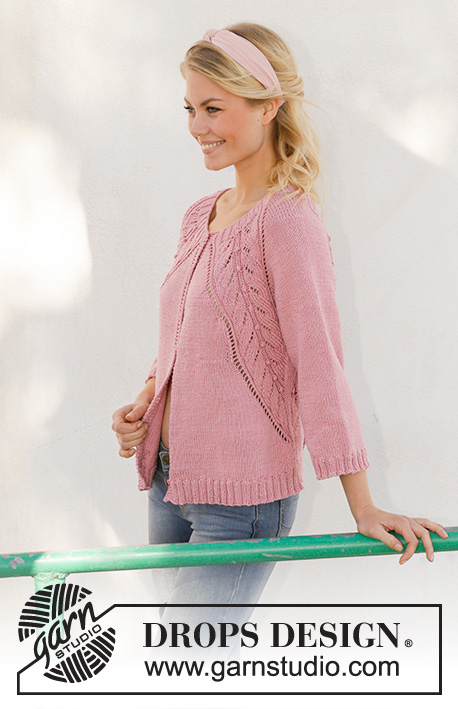
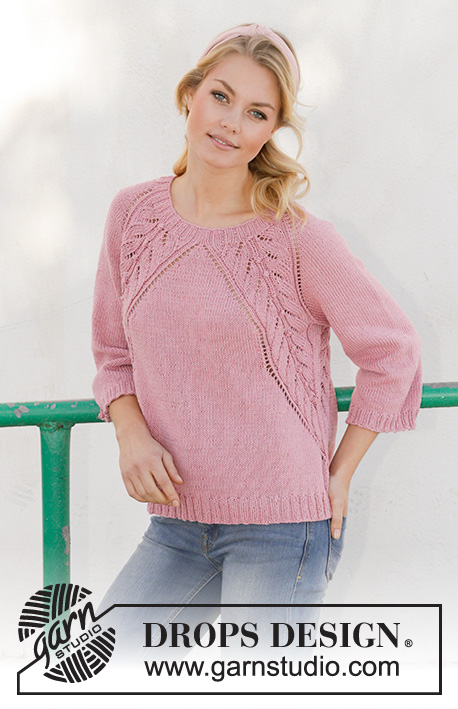
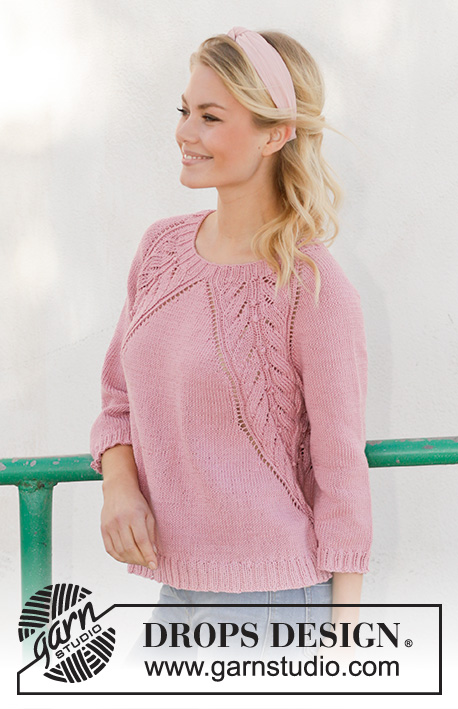
Knitted sweater with raglan in DROPS Merino Extra Fine. The piece is worked top down with lace pattern. Sizes S - XXXL
DROPS 201-18 |
|||||||||||||||||||||||||
|
------------------------------------------------------- EXPLANATIONS FOR THE PATTERN: ------------------------------------------------------- PATTERN: See diagrams A.1 to A.4. Choose diagrams for your size (applies to A.1 and A.2). RAGLAN: Increase 1 stitch on each side of A.2 (= 8 stitches increased on round). Increase 1 stitch by making 1 yarn over; on the next round knit the yarn overs to leave holes. Then work the new stitches in stockinette stitch. ROW OF HOLES: The increases to raglan on the front and back pieces are finished before the increases on the sleeves. So that the row of holes made by the increases inside A.2 continue, work a lace pattern as far as the body (A.3/A.4) inside A.2 as follows: Work A.3 when 2 stitches remain before A.2 and sleeve on the back piece and when 2 stitches remain before the last repeat of A.2 on the front piece. Work A.4 after the first repeat of A.2 on the front piece and after the sleeve and A.2 on the back piece. INCREASE TIP-1 (for body): Increase 1 stitch inside A.2 on back and front piece (= 4 stitches increased on round). On the next round knit the yarn overs to leave holes. Each time you increase, the number of stockinette stitches is increased between the 2 repeats of A.2 on the back and front pieces. INCREASE TIP-2 (evenly spaced): To work out how to increase evenly, count the total number of stitches on the needle (e.g. 206 stitches) and divide by the number of increases to be made (e.g. 30) = 6.9. In this example, increase by making 1 yarn over after approx. each 7th stitch. On the next round work the yarn overs twisted to avoid holes. DECREASE TIP-1 (for sides of body): Work until there are 3 stitches left before the marker thread, knit 2 together, knit 2 (marker thread sits between these 2 stitches), slip 1 stitch as if to knit, knit 1 and pass the slipped stitch over the knitted stitch. Repeat on other side (= 4 stitches decreased on round). DECREASE TIP-2 (for sleeves): Decrease 1 stitch on each side of the marker thread as follows: Work until there are 3 stitches left before the marker thread, knit 2 together, knit 2 (marker thread sits between these 2 stitches), slip 1 stitch as if to knit, knit 1 and pass the slipped stitch over the knitted stitch. ------------------------------------------------------- START THE PIECE HERE: ------------------------------------------------------- SWEATER – SHORT OVERVIEW OF THE PIECE: The piece is worked in the round with circular needle, top down. The sleeves are worked in the round with short circular needle/double pointed needles. NECK: Cast on 138-138-146-146-154-154 stitches with circular needle size 3 mm = US 2,5 and Merino Extra Fine. Knit 1 round then work rib as follows: Knit 1, A.1 (choose diagram for your size) over the first 28-28-30-30-32-32 stitches, knit 1, (purl 2 /knit 2) over the next 8 stitches, purl 2, knit 1, A.1 over the next 28-28-30-30-32-32 stitches, knit 1, A.1 over the next 28-28-30-30-32-32 stitches, knit 1, (purl 2 /knit 2) over the next 8 stitches, purl 2, knit 1, A.1 over the next 28-28-30-30-32-32 stitches. Continue like this in the round until A.1 has been completed in height = 134-134-142-142-150-150 stitches. YOKE: Change to circular needle size 4 mm = US 6 and work pattern as follows: Knit 1 (= mid-stitch on back piece), 1 yarn over, A.2 (choose diagram for your size) over the next 27-27-29-29-31-31 stitches (= half back piece), 1 yarn over, knit 12, 1 yarn over (= sleeve), A.2 over the next 27-27-29-29-31-31 stitches, 1 yarn over, knit 1 (= mid-stitch on front piece), 1 yarn over, A.2 over the next 27-27-29-29-31-31 stitches (= front piece), 1 yarn over, knit 12 , 1 yarn over (= sleeve), A.2 over the next 27-27-29-29-31-31 stitches, 1 yarn over, (= half back piece). You have now increased 8 stitches to RAGLAN – read description above. Continue this pattern in the round and increase to raglan every 2nd round a total of 20-24-26-30-35-38 times = 294-326-350-382-430-454 stitches. REMEMBER THE KNITTING GAUGE! Continue with increases to raglan on the sleeves 4-4-5-3-0-1 more times (= a total 24-28-31-33-35-39 increases on sleeves). On the front and back pieces work patterns A.3 and A.4 so that you continue the ROW OF HOLES – read description above, every 2nd round as before without increasing. The other stitches are worked in pattern as before. When all increases are finished there are 310-342-370-394-430-458 stitches on the round. The piece measures approx. 21-23-25-27-29-31 cm = 8¼"-9"-9¾"-10⅝"-11⅜"-12¼" from the cast-on edge and down mid back. The next round is worked as follows: Work the first 48-52-56-60-67-70 stitches (= half back piece), place the next 60-68-74-78-82-90 stitches on a thread (= sleeve), cast on 8-8-10-10-12-14 new stitches on needle (= in side under sleeve), work the next 95-103-111-119-133-139 stitches (= front piece), place the next 60-68-74-78-82-90 stitches on a thread (= sleeve), cast on 8-8-10-10-12-14 new stitches on needle (= in side under sleeve) and work the remaining 47-51-55-59-66-69 stitches on round (= half back piece). THE PIECE IS NOW MEASURED FROM HERE! BODY: = 206-222-242-258-290-306 stitches. Insert a marker thread in the middle of the new stitches under each sleeve (= 4-4-5-5-6-7 new stitches on each side of marker thread). Allow the threads to follow your work onwards. Continue the pattern in the round as before; i.e. work as follows: Stockinette stitch as far as A.2, 1 yarn over, work A.2 over the next 27-27-29-29-31-31 stitches, stockinette stitch over the next 8-8-10-10-12-14 stitches and decrease at the same time 1 stitch on each side of the marker thread in the side – read DECREASE TIP-1, work A.2 over the next 27-27-29-29-31-31 stitches, 1 yarn over, stockinette stitch as far as the next repeat of A.2, 1 yarn over, work A.2 over the next 27-27-29-29-31-31 stitches, stockinette stitch over the next 8-8-10-10-12-14 stitches and decrease at the same time 1 stitch on each side of the marker thread - remember DECREASE TIP-1, A.2 over the next 27-27-29-29-31-31 stitches, 1 yarn over and stockinette stitch over the remaining stitches on the round. You have now increased 1 stitch on the inside of A.2 on the front and back pieces – read INCREASE TIP-1 (= 4 stitches increased) and decreased 1 stitch on each side of both marker threads in the sides (= 4 stitches decreased); i.e. the number of stitches remains the same. Continue to increase and decrease like this every 2nd round a total of 31-31-34-34-37-38 times until the whole pattern has disappeared into the sides. As the stitches in the pattern decrease work as many stitches in the pattern as there is room for; i.e. when there is not room to work the decrease and yarn over in the lace pattern in A.2 work stockinette stitch over these stitches. When the whole pattern has gone, the piece measures approx. 22-22-24-24-26-27 cm = 8¾"-8¾"-9½"-9½"-10¼"-10⅝" from the division. Now work stockinette stitch in the round until the piece measures 28 cm = 11" from the division (= approx. 6-6-4-4-2-1 cm = 2⅜"-2⅜"-1½"-1½"-¾"-⅜" stockinette stitch after the pattern in the sides). Now increase 30-34-38-38-42-46 stitches evenly spaced = 236-256-280-296-332-352 stitches. Change to circular needle size 3 mm = US 2,5 and work rib (= knit 2 / purl 2) for 4 cm = 1½". Bind off with knit over knit and purl over purl. Make sure the bind-off edge is not tight; you can use a size larger needle when binding off if necessary. The sweater measures approx. 56-58-60-62-64-66 cm = 22"-22¾"-23⅝"-24⅜"-25¼"-26" from the shoulder down. SLEEVE: Place the 60-68-74-78-82-90 stitches from the thread on the one side of the piece on short circular needle/double pointed needles size 4 mm = US 6 and knit up 1 stitch in each of the 8-8-10-10-12-14 new stitches cast on under the sleeve = 68-76-84-88-94-104 stitches. Insert a marker thread in the middle of the new 8-8-10-10-12-14 stitches (= 4-4-5-5-6-7 new stitches on each side of the marker thread). Work stockinette stitch in the round. When the sleeve measures 4-4-4-3-3-2 cm = 1½"-1½"-1½"-1⅛"-1⅛"-¾", decrease 1 stitch on each side of the marker thread – read DECREASE TIP-2. Decrease like this every 0-4-2-1½-1-1 cm = 0"-1½"-¾"-½"-⅜"-⅜" a total of 1-4-7-7-9-12 times (only 1 decrease in size S) = 66-68-70-74-76-80 stitches. When the sleeve measures 29-28-26-25-23-22 cm = 11⅜"-11"-10¼"-9¾"-9"-8¾", increase 6-8-6-6-8-8 stitches evenly spaced = 72-76-76-80-84-88 stitches. Change to double pointed needles size 3 mm = US 2,5 and work rib (= knit 2 / purl 2) for 3 cm = 1⅛". Bind off with knit over knit and purl over purl. Make sure the bind-off edge is not tight; you can use a size larger needle when binding off if necessary. The sleeve measures approx. 32-31-29-28-26-25 cm = 12½"-12¼"-11⅜"-11"-10¼"-9¾". Work the other sleeve in the same way. |
|||||||||||||||||||||||||
Diagram explanations |
|||||||||||||||||||||||||
|
|||||||||||||||||||||||||
 |
|||||||||||||||||||||||||
 |
|||||||||||||||||||||||||
 |
|||||||||||||||||||||||||
 |
|||||||||||||||||||||||||
Have you finished this pattern?Tag your pictures with #dropspattern #sweetheathersweater or submit them to the #dropsfan gallery. Do you need help with this pattern?You'll find 24 tutorial videos, a Comments/Questions area and more by visiting the pattern on garnstudio.com. © 1982-2026 DROPS Design A/S. We reserve all rights. This document, including all its sub-sections, has copyrights. Read more about what you can do with our patterns at the bottom of each pattern on our site. |
|||||||||||||||||||||||||


With over 40 years in knitting and crochet design, DROPS Design offers one of the most extensive collections of free patterns on the internet - translated to 17 languages. As of today we count 324 catalogs and 12290 patterns - 12280 of which are translated into English (US/in).
We work hard to bring you the best knitting and crochet have to offer, inspiration and advice as well as great quality yarns at incredible prices! Would you like to use our patterns for other than personal use? You can read what you are allowed to do in the Copyright text at the bottom of all our patterns. Happy crafting!
Post a comment to pattern DROPS 201-18
We would love to hear what you have to say about this pattern!
If you want to leave a question, please make sure you select the correct category in the form below, to speed up the answering process. Required fields are marked *.