
Popular categories
Looking for a yarn?


Comments / Questions (57)
![]() Fabienne wrote:
Fabienne wrote:
Bonjour Pour les augmentations vous expliquez qu'il faut tricoter jusqu'à ce qu'il reste deux mailles avant le fil marqueur mais vous n'indiquez pas où mettre les fils marqueurs . Comment faire ? Merci pour votre réponse
14.04.2026 - 18:36DROPS Design answered:
Bonjour Fabienne, le paragraphe AUGMENTATIONS-2 (côtés dos/devants): concerne les augmentations faites sur les côtés du gilet, de chaque côté, là où on a placé un fil marqueur au milieu des mailles montées à la place des manches. Ces augmentations sont faites quand l'ouvrage mesure 14 cm après la séparation (on a auparavant diminué de chaque côté des fils marqueurs). Bon tricot!
15.04.2026 - 07:45
![]() Fiorella Cappellini wrote:
Fiorella Cappellini wrote:
Non capisco il gettato tra due maglie nello schema i cerchietti sono vicini xche in ogni riga ho 6 gettati e cali 4 punti dove sbaglio? Grazie mille
20.10.2025 - 14:51
![]() Marisa wrote:
Marisa wrote:
Buongiorno. Gli orli a legaccio si arrotolano. Come posso rimediare? Grazie
05.09.2025 - 08:45DROPS Design answered:
Buongiorno Marisa, provi a bloccare il lavoro alla fine. Buon lavoro!
07.09.2025 - 15:28
![]() Marta wrote:
Marta wrote:
Hej, mam pytanie o zwężanie rękawa. Czy w przypadku rozmiarów S/M należy przerobić 3 okrążenia bez zwężania i w kolejnym zamknąć oczka, znowu 3, zamknąć itd? Czy też 2 okrążenia bez zwężania, a w 3. już zamykać oczka, 2 i znów zamykać? Z góry dziękuję za odpowiedź! :)
18.07.2025 - 13:46DROPS Design answered:
Witaj Marto, przerabiasz 2 okrążenia bez zamykania oczek, zamykasz oczka w 3-cim okrążeniu, znów 2 okrążenia bez zamykania oczek, zamykasz oczka w 3-cim okrążeniu, itd. Pozdrawiamy!
18.07.2025 - 13:51
![]() Marisa wrote:
Marisa wrote:
Buonasera. Si possono allungare le maniche di questo modello fino al polsino?
17.01.2025 - 21:38DROPS Design answered:
Buonasera Marisa, può apportare al modello le modifiche che preferisce. Buon lavoro!
19.01.2025 - 15:06
![]() Chantal wrote:
Chantal wrote:
Bonjour, Pour ce modèle je ne trouve pas où il faut mettre le fil marqueur , ce qu il fait que je suis perdu dans les explications
02.12.2024 - 19:22DROPS Design answered:
Bonjour Chantal, dans ce modèle, on place des fils marqueurs lors de la division de l'ouvrage après l'empiècement, au milieu des nouvelles mailles montées sous les manches. Bon tricot!
03.12.2024 - 08:55
![]() Kathy wrote:
Kathy wrote:
Working on chart a1. I start with 140 stitches (size xl) and understand i increase 8 sts each row. I fond understand how, when a1 has hern worked one time (30 rows) i can have 260 sts on needle. The chart is 30 rows, so wouldnt i have 380? (The original 140 plus 30 rows with 8 increases).
26.04.2024 - 01:32DROPS Design answered:
Hi Kathy, In size XL you should have 136 stitches after the first increase on the yoke. When you begin chart A.1 you also increase for raglan (4 stitches increased on each row) and work the increases shown in diagram A.1 which is worked across each sleeve. There are 15 increases on each side of A.1 in height = 30 x 2 = 60 increased stitches on the sleeves. In addition you increase for raglan on each row from the right side = 4 x 15 = 60 stitches. A total of 120 increased stitches for raglan and in A.1. 136 + 120 = 256 stitches on the row in size XL. Hope this helps and happy knitting!
26.04.2024 - 06:50
![]() Justyna Wikłacz wrote:
Justyna Wikłacz wrote:
Doszłam do dołu tułowia zgodnie z instrukcją i cały dół się wywija. Co mogę z tym zrobić?
30.03.2023 - 16:27DROPS Design answered:
Witaj Justyno, po wykonaniu należy sweter zblokować, czyli namoczyć w letniej wodzie, wycisnąć w ręczniku, rozłożyć na płasko naciągając lekko do właściwych rozmiarów i pozostawić do wyschnięcia. Możesz ułożyć sweter na ręczniku i dół przypiąć szpilkami. To powinno pomóc. Pozdrawiamy!
31.03.2023 - 08:15
![]() Marie José Ferrer wrote:
Marie José Ferrer wrote:
Pourquoi n'y a t'il pas d'explication avec aiguilles droites ?
31.01.2023 - 13:37DROPS Design answered:
Bonjour Mme Ferrer, en Scandinavie, il est fréquent d'utiliser des aiguilles circulaires, pour tricoter en allers et retours (comme par exemple ici l'empiècement et le bas du gilet) ou en rond (comme pour les manches). Découvrez ici comment adapter un modèle sur aiguilles droites. Bon tricot!
31.01.2023 - 17:37
![]() Eva Lindahl wrote:
Eva Lindahl wrote:
Jag har stickat kläder i 50 år men aldrig följt ett så krångligt mönster! Efter att ha repat upp stickningen ett tiotal gånger ger jag upp. Garnet får ligga till sig och användas till bågot annat.
22.12.2022 - 08:53
|
|||||||||||||||||||||||||
Blue Nostalgia Cardigan#bluenostalgiacardigan |
|||||||||||||||||||||||||
 |
 |
||||||||||||||||||||||||
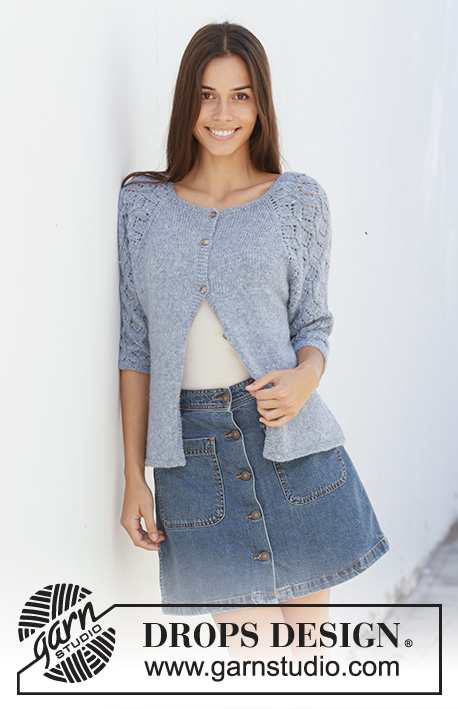
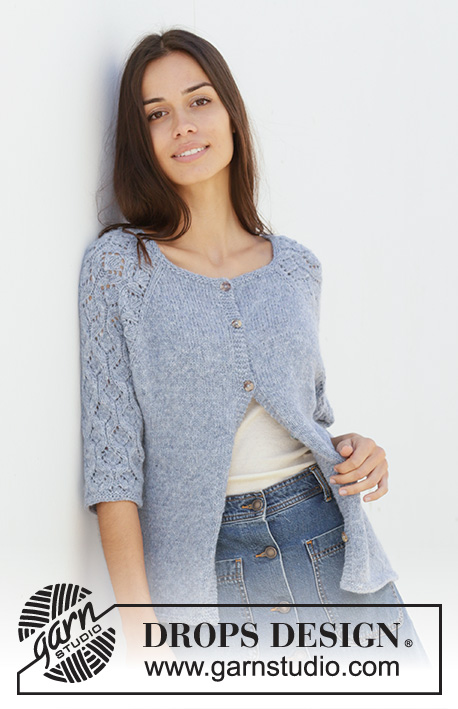
Knitted jacket with raglan in DROPS Sky. The piece is worked top down with lace pattern on sleeves. Sizes S – XXXL.
DROPS 199-4 |
|||||||||||||||||||||||||
|
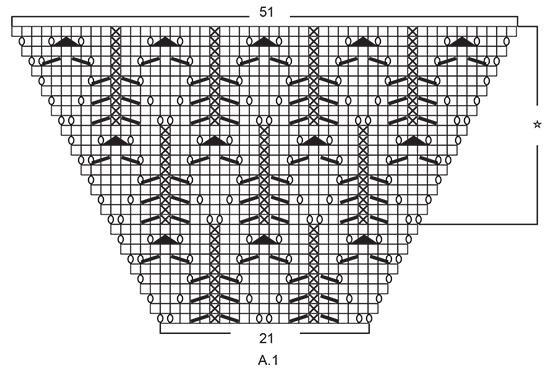
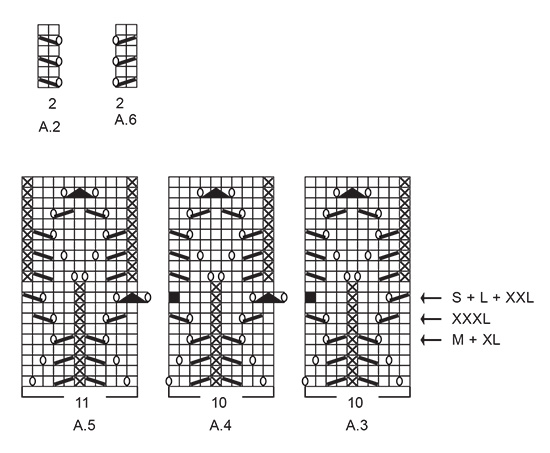
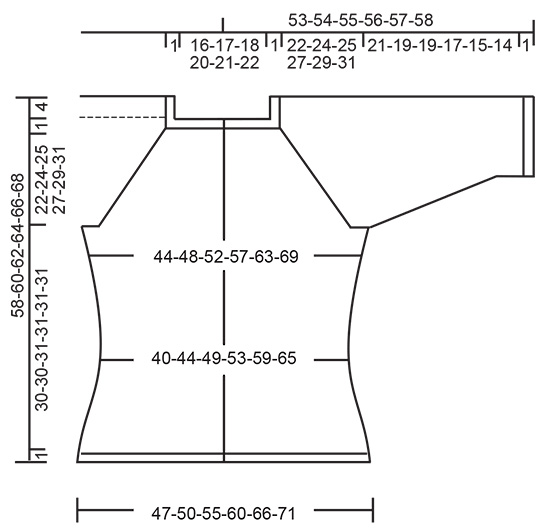
------------------------------------------------------- EXPLANATIONS FOR THE PIECE: ------------------------------------------------------- RIDGE/GARTER STITCH (worked back and forth): Knit all rows. 1 ridge in height = Knit 2 rows. INCREASE TIP-1 (evenly spaced): To work out how to increase evenly, count the total number of stitches on the needle (e.g. 110 stitches), minus bands (e.g. 10 stitches) and divide the remaining stitches by the number of increases to be made (e.g. 10) = 10. In this example, increase by making 1 yarn over after each 10th stitch. On the next row (wrong side) purl the yarn overs twisted to avoid holes. Do not increase on the bands. PATTERN: See diagrams A.1 to A.6. Find your size in the diagrams (applies to A.3 to A.5). The diagrams show all the rows in the pattern seen from the right side. BUTTONHOLES: Work buttonholes on right band (when garment is worn). Work from the right side when there are 3 stitches left on the row as follows: Make 1 yarn over, knit the next 2 stitches together and knit the last stitch. On the next row knit the yarn over to leave a hole. The first buttonhole is worked when the piece measures approx. 1½-2 cm = ½" from the cast-on edge. Then work the other 5-5-5-6-6-6 buttonholes with approx. 9-9-9-8½-8½-8½ cm = 3½"-3½"-3½"-3¼"-3¼"-3¼" between each one. DECREASE TIP (for sides of body and sleeves): All decreases worked from the right side! Work until there are 3 stitches left before the marker thread, knit 2 together, knit 2 (marker thread sits between these 2 stitches), slip 1 stitch as if to knit, knit 1 and pass the slipped stitch over the knitted stitch. INCREASE TIP-2 (for sides of body): All increases are worked from the right side! Work until there are 2 stitches left before the marker thread, 1 yarn over, knit 4 (marker thread sits in middle of these stitches), 1 yarn over. On the next row (wrong side) purl the yarn overs twisted to avoid holes. Then work the new stitches in stockinette stitch. RIDGE/GARTER STITCH (worked in the round): 1 ridge in height = 2 rounds; i.e. knit 1 round and purl 1 round ------------------------------------------------------- START THE PIECE HERE: ------------------------------------------------------- JACKET - SHORT OVERVIEW OF THE PIECE: Yoke and body are worked back and forth with circular needle from mid front, top down. The sleeves are worked in the round with short circular needle/double pointed needles, top down. YOKE: Cast on 110-116-120-126-130-136 stitches (including 5 band stitches on each side towards mid front) with circular needle size 3.5 mm = US 4 and Sky. Work 2 RIDGES – read description above. Knit 1 row from the right side where you increase 10-8-8-10-10-8 stitches evenly spaced – read INCREASE TIP-1 = 120-124-128-136-140-144 stitches. Change to circular needle size 4mm = US 6. Purl 1 row from the wrong side with 5 band stitches in garter stitch on each side. The next row is worked as follows from the right side: 5 band stitches in garter stitch, stockinette stitch over the next 15-16-17-19-20-21 stitches (= front piece), 1 yarn over, 2 stitches stockinette stitch, A.1 over 21 stitches (= sleeve), 2 stitches stockinette stitch, 1 yarn over, 30-32-34-38-40-42 stitches stockinette stitch (= back piece), 1 yarn over, 2 stitches stockinette stitch, A.1 over 21 stitches (= sleeve), 2 stitches stockinette stitch, 1 yarn over, stockinette stitch over the next 15-16-17-19-20-21 stitches and finish with 5 band stitches in garter stitch (= front piece). There are now 128-132-136-144-148-152 stitches on the needle. Continue this pattern onwards. In other words, increase on the sleeves on each side as shown in A.1. On the next row (wrong side) purl the yarn overs on the sleeves (= holes) and the increased stitches are worked into the pattern as shown in A.1. On front and back pieces, you increase with a yarn over before/after the 2 stitches in stockinette stitch (there will be 2 stitches in stockinette stitch between each raglan increase). On the next row (wrong side) purl these yarn overs twisted (= no holes) and the increased stitches are then worked in stockinette stitch. Increase like this every 2nd row (i.e. each row from right side). You increase a total of 8 stitches on each increase row (= 4 yarn overs + 4 yarn overs increased in A.1). REMEMBER THE KNITTING GAUGE and remember BUTTONHOLES on right band – read description above. When A.1 has been worked 1 time in height there are 240-244-248-256-260-264 stitches on the needle. Continue this pattern, i.e. the pattern repeats as shown in A.1. Each time you have worked 20 rows in height there is room for 1 more repeat with lace pattern in width on each sleeve. When you have increased a total of 24-27-29-32-34-38 times on each side of A.1 there are 312-340-360-392-412-448 stitches on the needle and the piece measures approx. 18-20-22-24-25-28 cm = 7"-8"-8¾"-9½"-9¾"-11" from the cast on edge mid front. Continue with band stitches in garter stitch, stockinette stitch and pattern as before, but without increasing. In other words over the 69-75-79-85-89-97 stitches in A.1 work as follows: Work A.2 (= 2 stitches), 2-0-2-0-2-1 stitches stockinette stitch, start on row marked with arrow in your size and work A.3 (= 10 stitches), A.4 over the next 40-50-50-60-60-70 stitches (= 4-5-5-6-6-7 repeats of 10 stitches), A.5 (= 11 stitches), 2-0-2-0-2-1 stitches stockinette stitch and A.6 (= 2 stitches). Continue working until the piece measures 23-25-26-28-30-32 cm = 9"-9¾"-10¼"-11"-11¾"-12½" from the cast-on edge mid front. The next row is worked as follows from the wrong side: Work 5 band stitches in garter stitch, 41-45-49-54-59-65 stitches stockinette stitch (= front piece), place the next 69-75-77-83-83-89 stitches on 1 thread for sleeve, cast on10-10-12-12-14-14 new stitches on the needle (= in side under sleeve), 82-90-98-108-118-130 stitches in stockinette stitch (= back piece), place the next 69-75-77-83-83-89 stitches on 1 thread for sleeve, cast on 10-10-12-12-14-14 new stitches on needle (= in side under sleeve), 41-45-49-54-59-65 stitches stockinette stitch and 5 band stitches in garter stitch (= front piece). Body and sleeves are continued separately. THE PIECE IS NOW MEASURED FROM HERE! BODY: = 194-210-230-250-274-298 stitches. Insert 1 marker thread in each side, in the middle of the 10-10-12-12-14-14 stitches cast on under each sleeve. Allow them to follow your work onwards; they will be used later when decreasing/increasing. Work stockinette stitch, with 5 band stitches in garter stitch on each side of the piece. When the piece measures 2 cm = ¾" from the division, decrease 1 stitch on each side of both marker threads - read DECREASE TIP = 4 stitches decreased. Decrease like this every 3 cm = 1⅛" a total of 4 times = 178-194-214-234-258-282 stitches. Continue until the piece measures 14 cm = 5½" from the division. Now increase 1 stitch on each side of both marker threads – read INCREASE TIP-2 = 4 stitches increased. Increase like this every 2 cm = ¾" a total of 7 times = 206-222-242-262-286-310 stitches. Continue until the piece measures 30-30-31-31-31-31 cm = 11¾"-11¾"-12¼"-12¼"-12¼"-12¼" from the division. Change to circular needle size 3.5 mm = US 4. Work 2 ridges back and forth over all stitches. Loosely bind off with knit, but to avoid the bind-off edge being tight you can bind off with size 4 mm = US 6 needle. The jacket measures approx. 58-60-62-64-66-68 cm = 22¾"-23⅝"-24⅜"-26¼"-26"-26¾" from the shoulder down. SLEEVE: Place the 69-75-77-83-83-89 stitches from the thread on one side of the piece on short circular needle/double pointed needles size 4 mm = US 6 and knit up 1 stitch in each of the 10-10-12-12-14-14 stitches cast on under sleeve = 79-85-89-95-97-103 stitches. Insert 1 marker thread in the middle of the 10-10-12-12-14-14 stitches under the sleeve and allow the marker thread to follow your work onwards; it will be used later when decreasing. Start the round by the marker thread. Start on the correct round in the diagrams so that the pattern continues on from the yoke and work as follows: Work 4-2-4-2-3-1 stitches stockinette stitch, A.3 (= 10 stitches), A.4 over the next 50-60-60-70-70-80 stitches (= 5-6-6-7-7-8 repeats of 10 stitches), A.5 (= 11 stitches) and 4-2-4-2-3-1 stitches stockinette stitch. Continue this pattern. When the piece measures 2 cm = ¾" from the division, decrease 2 stitches mid under sleeve – remember DECREASE TIP. Decrease like this every 3rd-3rd-3rd-2nd-2nd-2nd round a total of 14-15-15-16-15-16 times = 51-55-59-63-67-71 stitches. The stitches which do not fit into the pattern as you decrease are worked in stockinette stitch, but make sure when decreasing in the pattern you also make 1 yarn over. Continue until the piece measures 21-19-19-17-15-14 cm = 8¼"-7½"-7½"-6¾"-6"-5½" from the division (shorter measurements in larger sizes due to longer yoke). Change to double pointed needles size 3.5 mm = US 4. Work 2 RIDGES in the round – read description above. Loosely bind off with knit, but to avoid the bind-off edge being tight you can bind off with size 4 mm = US 6 needles. The sleeve measures approx. 22-20-20-18-16-15 cm = 8¾"-8"-8"-7"-6¼"-6" from the division. Work the other sleeve in the same way. ASSEMBLY: Sew buttons onto left band. |
|||||||||||||||||||||||||
Diagram explanations |
|||||||||||||||||||||||||
|
|||||||||||||||||||||||||
 |
|||||||||||||||||||||||||
 |
|||||||||||||||||||||||||
 |
|||||||||||||||||||||||||
Have you finished this pattern?Tag your pictures with #dropspattern #bluenostalgiacardigan or submit them to the #dropsfan gallery. Do you need help with this pattern?You'll find 27 tutorial videos, a Comments/Questions area and more by visiting the pattern on garnstudio.com. © 1982-2026 DROPS Design A/S. We reserve all rights. This document, including all its sub-sections, has copyrights. Read more about what you can do with our patterns at the bottom of each pattern on our site. |
|||||||||||||||||||||||||


With over 40 years in knitting and crochet design, DROPS Design offers one of the most extensive collections of free patterns on the internet - translated to 17 languages. As of today we count 324 catalogs and 12290 patterns - 12280 of which are translated into English (US/in).
We work hard to bring you the best knitting and crochet have to offer, inspiration and advice as well as great quality yarns at incredible prices! Would you like to use our patterns for other than personal use? You can read what you are allowed to do in the Copyright text at the bottom of all our patterns. Happy crafting!
Post a comment to pattern DROPS 199-4
We would love to hear what you have to say about this pattern!
If you want to leave a question, please make sure you select the correct category in the form below, to speed up the answering process. Required fields are marked *.