
Popular categories
Looking for a yarn?


Comments / Questions (27)
![]() Agen wrote:
Agen wrote:
J’aimerais savoir comment choisir sa taille pour un pull Merci d’avance
03.04.2026 - 23:21DROPS Design answered:
Bonjour Mme Agen, découvrez ici comment trouver votre taille. Bon tricot!
08.04.2026 - 08:58
![]() Marga Van Dijk wrote:
Marga Van Dijk wrote:
Ik begrijp iets niet ik heb twee toeren gebreid nu moet ik toer drie breien maar hoe moet je dat doen met A1 want je hebt nummer steken ik begrijp er niets van
03.02.2026 - 23:05DROPS Design answered:
Dag Marga,
Je breit A.1 in de overgangen van de panden naar de mouwen, dus op 4 plekken zit A.1. Op de mouwen en de panden brei je tricotsteek. De raglanmeerderingen maak je steeds aan beide kanten van A.1, zodat er steeds meer tricotsteken op de panden en de mouwen komen. A.1 blijft steeds hetzelfde in de breedte. De derde naald van A.1 brei je recht.
04.02.2026 - 18:51
![]() Ester Tenenhaus wrote:
Ester Tenenhaus wrote:
Hi, I started knitting this sweater. And I stopped, the first row of the increase is clearly written. The second row I really couldn't figure out where to increase. Or maybe you can help me and tell me if it's possible to put marks where you need to increase Thank you very much for the examples Ester
18.05.2025 - 20:31DROPS Design answered:
Dear Mrs Tenenhaus, just continue increasing exactly as explained under RAGLAN this means: increase 1 stitch at the beginning of the round (as 1st round), then work until A.1, increase 1 stitch, work A.1, increase 1 stitch (as on first round, there are just always more sts before/after each A.1), and repeat these increases on each A.1, at the end of the round increase just before the last A.1 (as increase after A.1 was done at the beg of the round). Happy knitting!
19.05.2025 - 09:51
![]() Kerstin wrote:
Kerstin wrote:
För att det ska bli rätt i både mönster och avsättning för bak-fram-stycken och ärmar måste man veta var varvet börjar. I beskrivningen börjar varvet vid bakre höger axel men det måste vara fel - eller så har jag uppfattat det fel. Tacksam för besked!
20.10.2024 - 00:32DROPS Design answered:
Hei Kerstin. Jo, omgangen starter ved høyre erme og bakstykke. mvh DROPS Design
23.10.2024 - 11:07
![]() Shelagh wrote:
Shelagh wrote:
Hi. When working the RAGLAN it says ‘increase every 2nd round.’ As you explained, this means row 3, 5 etc. so how and where do you increase on the plain knit round? Thank you!
05.09.2024 - 09:21DROPS Design answered:
Dear Shelagh, you will increase on round 1, 3, 5 etc.. and work the even numbered rounds as before, ie with A.1 at each raglan and the other stitches in stocking stitch; knit the yarn overs twisted to avoid holes (see RAGLAN). Happy knitting!
06.09.2024 - 07:40
![]() Pia wrote:
Pia wrote:
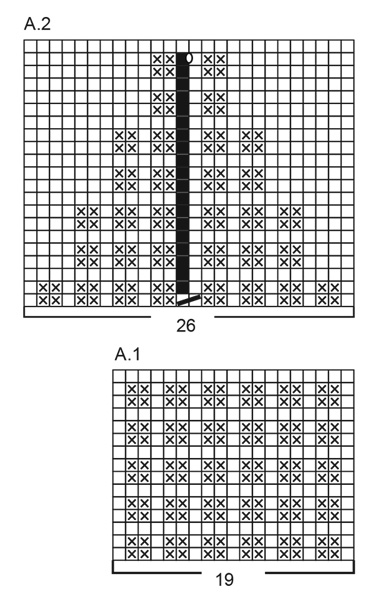
A.2 skal det diagram læses oppefra og ned eller nedfra og op.
26.03.2024 - 17:54DROPS Design answered:
Hej Pia. Det skal læses nedfra og op. Mvh DROPS Design
27.03.2024 - 14:02
![]() Diana wrote:
Diana wrote:
Hallo,in der Anleitung steht,nach den letzten Raglanzunahmen hat die Arbeit eine Lävon 26cm ( Gr.Xxl) .Es soll weiter gearbeitet werden,bis die Arbeit eine Länge von 26cm hat. Heisst das,ich beginne gleich mit dem Rumpfteil?
11.02.2024 - 18:50DROPS Design answered:
Liebe Diana, in diese Größe wird die Arbeit nach der letzten Zunahmen verteilt, Viel Spaß beim stricken!
12.02.2024 - 09:07
![]() Vicki Hood wrote:
Vicki Hood wrote:
I\'m on the part of A.2 chart. Just starting. What does the black square on space 14, on A.12 chart mean? Is this a knit or purl.? Pattern is very confusing.
04.06.2023 - 05:16DROPS Design answered:
Dear Vicki, the black square represents an empty space. On the first round of A.2, you decrease 1 stitch; this black square would represent the position of the decreased stitch. Since it has been decreased already, when working the chart, simply ignore this symbol and go to the next symbol of the chart (you don't need to skip any stitches). Happy knitting!
04.06.2023 - 17:44
![]() Vicki Hood wrote:
Vicki Hood wrote:
Problem with the YOKE. I worked the first round of the RAGLAN. But having a problem with the following: "Continue this pattern and increase every 2nd round a total of 24-27-30-33-36-39 times = 306-338-370-398-434-474 stitches." Looking at the A-1 Chart, and What would be every 2nd round on the Chart? 1st row is the knit purl purl knit etc. 2nd row knit purl purl knit etc, 3rd row is a knit row then it repeats. On what row is considered "every 2nd round" ?
26.03.2023 - 22:16DROPS Design answered:
Hi Vicki, The first increases for raglan are worked on the first (bottom row) of diagram A.1. The 2nd set of increases will be on row 3, the third on row 5, etc, so every other row in the diagram. Happy knitting!
27.03.2023 - 06:50
![]() Hansson wrote:
Hansson wrote:
Tycker mycket om Drops och alla lektioner som lärt mig sticka! Tack😀 MEN varför visar ni inte foto med baksidan av tröjorna också, det skulle underlätta mycket för mig att förstå mönstret lättare då.
02.09.2022 - 09:59
|
|||||||||||||||||||
Wednesday Mood#wednesdaymoodsweater |
|||||||||||||||||||
 |
 |
||||||||||||||||||
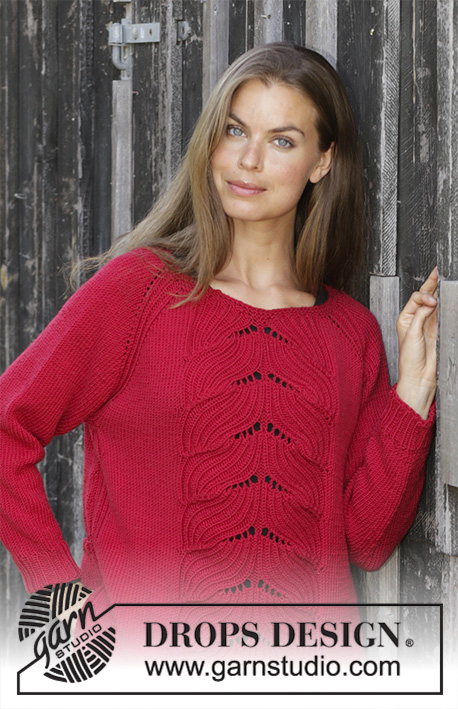
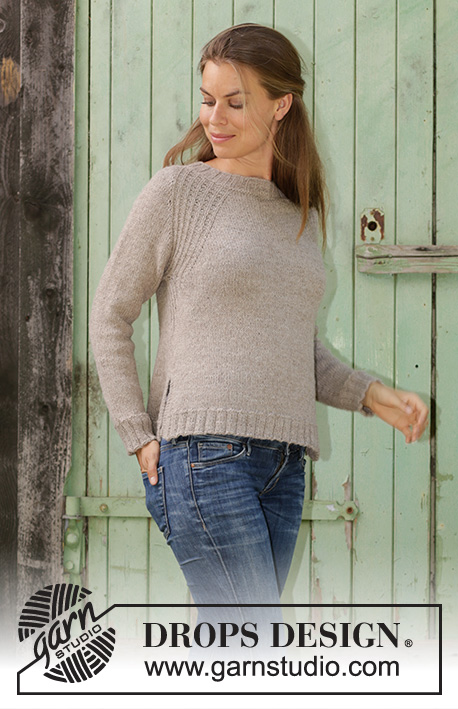
Knitted sweater with raglan in DROPS Puna or DROPS Daisy. The piece is worked top down with texture. Sizes S - XXXL.
DROPS 196-30 |
|||||||||||||||||||
|
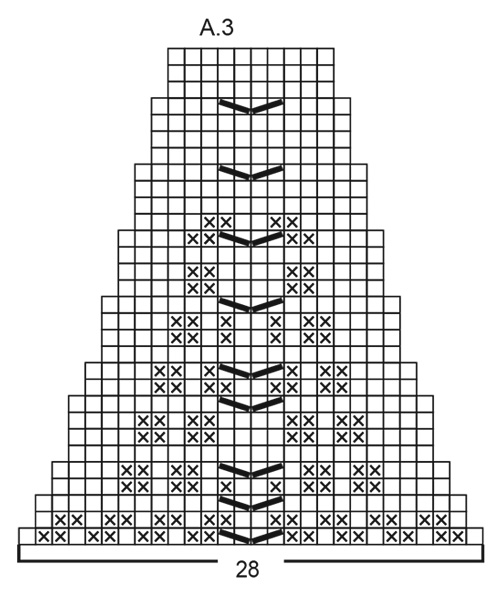
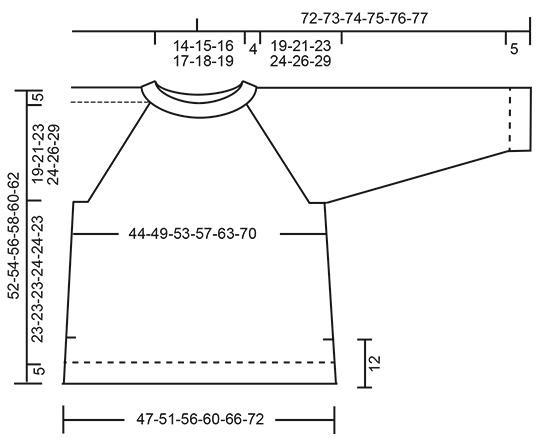
------------------------------------------------------- EXPLANATIONS FOR THE PATTERN: ------------------------------------------------------- PATTERN: See diagrams A.1 to A.3. The diagrams show all rows in the pattern seen from the right side. INCREASE TIP-1 (evenly spaced): To work out how to increase evenly, count the total number of stitches on the needle (e.g. 110 stitches) and divide by the number of increases to be made (e.g. 4) = 27.5. In this example, increase by making 1 yarn over alternately after the 27th and 28th stitch. On the next round work the yarn overs twisted to avoid holes. RAGLAN: Increase 1 stitch on each side of A.1 in each transition between body and sleeves (= 8 stitches increased on the round). Increase 1 stitch by making 1 yarn over. On the next round knit the yarn overs twisted to avoid holes. Then work the new stitches in stockinette stitch. INCREASE TIP-2 (for sides of body): Work until there are 2 stitches left before the marker thread, 1 yarn over, knit 4 (marker thread sits in the middle of these 4 stitches), 1 yarn over. On the next round knit the yarn over twisted to avoid a hole. Then work the new stitch in stockinette stitch. RIDGE/GARTER STITCH (worked back and forth): 1 ridge = Knit 2 rows. DECREASE TIP (for sleeves): Decrease 1 stitch on each side of the marker thread as follows: Work until there are 2 stitches left before the marker thread, knit 2 together, (marker thread sits here), slip 1 stitch as if to knit, knit 1 and pass the slipped stitch over the knitted stitch. ------------------------------------------------------- START THE PIECE HERE: ------------------------------------------------------- SWEATER - SHORT OVERVIEW OF THE PIECE: Neck, yoke and body are worked in the round with circular needle, top down. The body is divided at the split and then the front and back pieces are finished separately, back and forth on the needle. The sleeves are worked in the round with short circular needle/double pointed needles, top down. NECK: Cast on 110-115-120-125-135-145 stitches with circular needle size 3.5 mm = US 4 and Puna or Daisy. Knit 1 round. Then work rib (= knit 3 / purl 2) for 4 cm = 1½". Knit 1 round where you increase 4-7-10-9-11-17 stitches evenly on round – read INCREASE TIP-1 = 114-122-130-134-146-162 stitches. Purl 1 round. Change to circular needle size 4 mm and work yoke as described below. YOKE: THE PIECE IS NOW MEASURED FROM HERE! The first round is worked as follows: Make 1 yarn over, knit 18-22-26-28-34-42 stitches (= back piece), make 1 yarn over, work A.1 (= 19 stitches), make 1 yarn over, knit 1 (= sleeve), make 1 yarn over, work A.1 (= 19 stitches), make 1 yarn over, knit 18-22-26-28-34-42 stitches (= front piece), make 1 yarn over, work A.1 (= 19 stitches), make 1 yarn over, knit 1 (= sleeve), make 1 yarn over, work A.1 (= 19 stitches). The first increase to RAGLAN – read description above, is now finished. Continue this pattern and increase every 2nd round a total of 24-27-30-33-36-39 times = 306-338-370-398-434-474 stitches. REMEMBER THE KNITTING GAUGE! When all the increases to raglan are finished, the piece measures approx. 17-19-21-24-26-28 cm = 6¾"-7½"-8¼"-9½"-10¼"-11". Continue working pattern and with knit (but without increasing) until the piece measures 19-21-23-24-26-29 cm = 7½"-8¼"-9"-9½"-10¼"-11⅜" (adjust so that the next round in the pattern is a knitted row). The next round is worked as follows: Work 75-85-95-103-115-129 stitches as before (= back piece), place the next 69-75-81-87-93-99 stitches on 1 thread for sleeve, cast on 8 new stitches on the needle (= in side under sleeve), work the next 84-94-104-112-124-138 stitches as before (= front piece), place the next 69-75-81-87-93-99 stitches on 1 thread for sleeve, cast on 8 new stitches on the needle (= in side under sleeve), and work the last 9 stitches as before (= back piece). Body and sleeves are finished separately. THE PIECE IS NOW MEASURED FROM HERE! BODY: = 184-204-224-240-264-292 stitches. Insert 1 marker thread in each side; in the middle of the 8 stitches cast on under each sleeve. Allow the marker threads to follow your work onwards; they will be used when you increase. Continue in the round and work A.2 (= 26 stitches) over the 8 new stitches cast on under each sleeve and the 9 stitches on each side of these (i.e. 13 stitches on each side of the marker thread in each side). When A.2 has been completed in height the piece measures approx. 7½ cm = 3". Continue in the round with knit and on the next round increase 1 stitch on each side of both marker threads – read INCREASE TIP-2 (= 4 stitches increased on the round). Increase like this every 3 cm a total of 3 times = 196-216-236-252-276-304 stitches. Continue working until the piece measures 16-16-16-17-17-16 cm = 6¼"-6¼"-6¼"-6¾"-6¾"-6¼". Now divide the piece for the front and back pieces and each is finished separately, back and forth on the needle. Place the 98-108-118-126-138-152 stitches between the 2 marker threads in each side on 1 thread for the front piece. Work the back piece as follows: BACK PIECE: = 98-108-118-126-138-152 stitches. Work stockinette stitch with 5 stitches in GARTER STITCH – read description above, on each side of the piece. When the piece measures 23-23-23-24-24-23 cm = 9"-9"-9"-9½"-9½"-9" increase 30-30-30-37-40-41 stitches evenly on row (but not over the stitches in garter stitch) = 128-138-148-163-178-193 stitches. Change to circular needle size 3.5 mm = US 4 and work 1 ridge. The next row is worked as follows – from the right side: 5 stitches in garter stitch, * knit 3, purl 2 *, work from *-* until there are 8 stitches left on the row, knit 3 and 5 stitches in garter stitch. Work rib like this for 5 cm. Bind off with knit over knit and purl over purl – to avoid the bind-off edge being tight you can bind off with a needle size 4 mm = US 6. The whole sweater measures approx. 52-54-56-58-60-62 cm = 20½"-21¼"-22"-22¾"-23⅝"-24⅜" from the shoulder down. FRONT PIECE: = 98-108-118-126-138-152 stitches. Place the stitches back on circular needle size 4 mm = US 6 and work in the same way as for the back piece. SLEEVE: Place the 69-75-81-87-93-99 stitches from the thread on the one side of the piece on short circular needle/double pointed needles size 4 mm = US 6 and knit up 1 stitch in each of the 8 stitches cast on under the sleeve = 77-83-89-95-101-107 stitches. Insert 1 marker thread in the middle of the 8 stitches under the sleeve and allow this marker thread to follow your work onwards. The marker thread will be used a little later when decreasing mid under sleeve. Work A.3 (= 28 stitches) mid under sleeve (i.e. 14 stitches of A.3 on each side of the marker thread). The remaining stitches on the round are knitted. When A.3 has been completed in height, you have decreased 18 stitches = 59-65-71-77-83-89 stitches. Continue in the round with knit and on the next round decrease 2 stitches under the sleeve – read DECREASE TIP. Decrease like this every 10th-7th-6th-5th-4th-3rd round a total of 7-9-11-13-15-17 times = 45-47-49-51-53-55 stitches. Continue with knit until the piece measures 37-35-34-33-32-29 cm = 14½"-13¾"-13⅜"-13"-12½"-11⅜" (shorter measurements in larger sizes due to longer yoke). Knit 1 round where you increase 5-8-6-9-7-10 stitches evenly on round = 50-55-55-60-60-65 stitches. Change to double pointed needles size 3.5 mm = US 4 and purl 1 round. Then work rib (= knit 3 / purl 2) for 5 cm = 2". Bind off with knit over knit and purl over purl – to avoid the bind-off edge being tight you can bind off with a needle size 4 mm = US 6. Work the other sleeve in the same way. |
|||||||||||||||||||
Diagram explanations |
|||||||||||||||||||
|
|||||||||||||||||||
 |
|||||||||||||||||||
 |
|||||||||||||||||||
 |
|||||||||||||||||||
Have you finished this pattern?Tag your pictures with #dropspattern #wednesdaymoodsweater or submit them to the #dropsfan gallery. Do you need help with this pattern?You'll find 28 tutorial videos, a Comments/Questions area and more by visiting the pattern on garnstudio.com. © 1982-2026 DROPS Design A/S. We reserve all rights. This document, including all its sub-sections, has copyrights. Read more about what you can do with our patterns at the bottom of each pattern on our site. |
|||||||||||||||||||


With over 40 years in knitting and crochet design, DROPS Design offers one of the most extensive collections of free patterns on the internet - translated to 17 languages. As of today we count 324 catalogs and 12290 patterns - 12280 of which are translated into English (US/in).
We work hard to bring you the best knitting and crochet have to offer, inspiration and advice as well as great quality yarns at incredible prices! Would you like to use our patterns for other than personal use? You can read what you are allowed to do in the Copyright text at the bottom of all our patterns. Happy crafting!
Post a comment to pattern DROPS 196-30
We would love to hear what you have to say about this pattern!
If you want to leave a question, please make sure you select the correct category in the form below, to speed up the answering process. Required fields are marked *.