
Popular categories
Looking for a yarn?


Comments / Questions (197)
Vera wrote:
Do you ship to Canada or Germany? How much would this cost?
21.11.2018 - 23:32DROPS Design answered:
Dear Vera, yes we ship in both countries see DROPS stores shipping to USA and DROPS stores shipping to Germany. Happy knitting!
22.11.2018 - 09:05
![]() Tine wrote:
Tine wrote:
Is geen antwoord op de vraag. Ik wil weten of ik na het laten wachten van steken bij naar beneden breien voor lijf, steeds meer steken laat wachten voor de voorpanden, of eerst over alle steken moet breien. is niet heel duidelijk, ik DENK dat ik steeds meer steken moet laten wachten? de tekening maakt mij ook niet wijzer over wat voor vorm ik moet krijgen
21.11.2018 - 20:34DROPS Design answered:
Dag Tine,
Je moet inderdaad steeds meer steken laten wachten. Er staat ergens halverwege de verkorte toeren dat je de laatste naald op de verkeerde kant breit. Deze laatste naald is ook een verkorte toer. Nadat je de verkorte toeren voor het rechter voorpand hebt gedaan knip je de draad af en doe je de verkorte toeren voor het linker voorpand. Let erop dat je de verkorte toeren tussen de juiste markeerdraden maakt, zoals aangegeven in het patroon. Pas bij het breien van de pas brei je weer over alle steken. Hopelijk is het zo duidelijk.
22.11.2018 - 11:09
![]() Petra wrote:
Petra wrote:
Hej stickar kofta 194-17 och funderar på när man kommit till varv 2 (avigsidan) när du stickar ”framstycken och ner över bålen på bakstycke”. Står det att man ska sticka tillbaka. Skall man sticka rät maska ovan rät maska och avig maska ovanför avig maska?
20.11.2018 - 18:19DROPS Design answered:
Hei Petra. Strikk rett over rett og vrang over vrang, og etter diagram der disse er. Diagrammene er vist fra rettsiden, så når du srtikker fra vrangsiden leses de motsatt vei: fra venstre mote høyre, rettmasker strikkes som vrangmasker, og vrangmasker strikkes som rettmasker. God fornøyelse.
23.11.2018 - 10:07
![]() Roberta Courtney wrote:
Roberta Courtney wrote:
Would it be possible to do a tutorial for A2.? It is to explain 6,7,8 of the diagram explanations. Thanks
19.11.2018 - 20:35DROPS Design answered:
Dear Mrs Courtney, this video is showing how to knit the pattern without the increases, just make sure to not forget to work the yarn over as shown in diagram when you need to (= either before the K2 twisted tog or after the K2 tog). Happy knitting!
20.11.2018 - 08:14
![]() Susan Greenfield wrote:
Susan Greenfield wrote:
Can I make this in just brushed alpaca silk? Plus can I buy a printed pattern?
16.11.2018 - 20:24DROPS Design answered:
Dear Mrs Greenfield, this jacket is worked with 2 strands yarn group C (= Air + Brushed Alpaca Silk), you could replace Air by Brushed Alpaca Silk working then with 2 strands Brushed Alpaca Silk, but remember the texture will be different - read more about alternatives here. Our patterns can be printed for free - you may ask your DROPS Store for any printed version. Happy knitting!
19.11.2018 - 07:54
![]() Tine Vanderheyden wrote:
Tine Vanderheyden wrote:
In het patroon staat: \"Ga zo verder heen en weer gebreid door steeds 3 steken minder te breien dan de vorige naald en meerder 1 steek na elke kabel/A.4 iedere 4e naald tot u 7 herhalingen van A.4 in de hoogte heeft gebreid (= 42 naalden). Het werk meet ongeveer 72-72-77-77-84-84 cm vanaf het midden van de cirkel en naar beneden midden achter. De laatste naald wordt aan de verkeerde kant gebreid. Knip de draad niet af.\" Is die naald aan de verkeerde kant over alle steken ?
15.11.2018 - 21:51DROPS Design answered:
Dag Tine,
Je breit verder zoals beschreven staat bij NAALD 1 t/m NAALD 4, dat betekent dus dat je zowel op de heengaande als de teruggaande naald 3 steken minder breit.
19.11.2018 - 08:56
![]() Ursula wrote:
Ursula wrote:
Hello Rachael, I had the same problem (look below in German) - there is missing only one word in the description: ROW 3 (right side): Work until there are 4 stitches MORE left before the cable/A.4 with the marker thread mid back, turn. That ist the solution.
15.11.2018 - 18:50
![]() Rachael wrote:
Rachael wrote:
I have followed the short row basic video and still have this hole as you purl into this stitch every odd row. (Even row it is a slipped stitch)
15.11.2018 - 09:42DROPS Design answered:
Dear Rachel, don't forget to tighten the yarn wen working first stitch - you can also use the technique with wrap & turns if you rather.
15.11.2018 - 13:36
![]() Rachael wrote:
Rachael wrote:
Hi again. I think you misunderstood my question. In row 3 of your instructions for lower front, you say to work till 4 stitches before cable with marker thread in it. This is the same instruction as row 1. I have done this with the repeats (18 rows)and it leave a huge hole when you knit stitches together. Is this an error and should read 4 more stitches before cable? .
15.11.2018 - 09:40DROPS Design answered:
Dear Rachel, your question has been forwarded to our design team. Thanks in advance for your patience.
15.11.2018 - 13:36Rachael wrote:
Hi. I’m a little confused with the description for the lower left front. If I’m always turning with 4 stitches left before mid back for 18 rows this is going to leave a huge hole when all are knitted together. Is this supposed to be staggered like the other side? Eg 4 more stitches before mid back (8 stitches total; then 12; 16 etc. thanks
15.11.2018 - 09:02DROPS Design answered:
Dear Rachel, after you have worked the short rows on the left side, you'll work the right side mirored, then work an edge placing all sts on the circle back on needle - the final piece should look like as the measurement chart thanks to the short rows. Happy knitting!
15.11.2018 - 09:32
|
|||||||||||||||||||||||||||||||
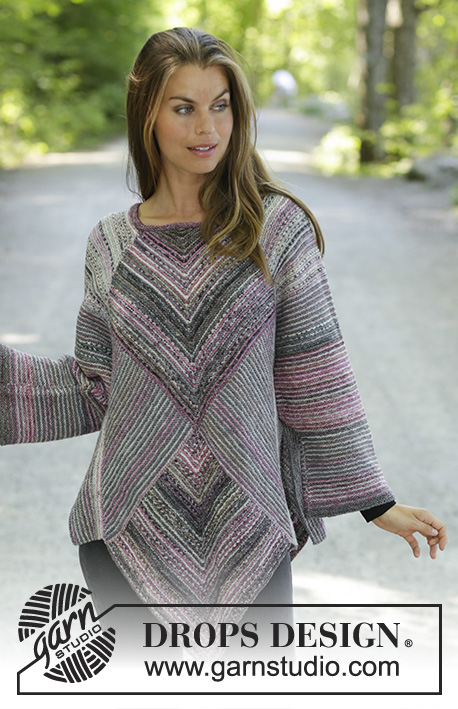
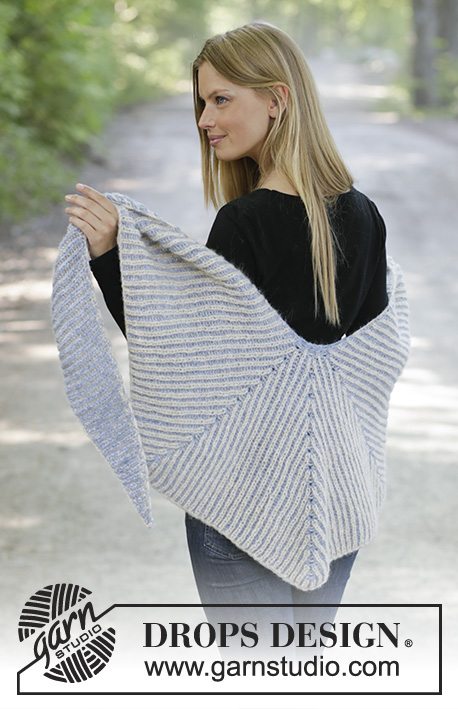
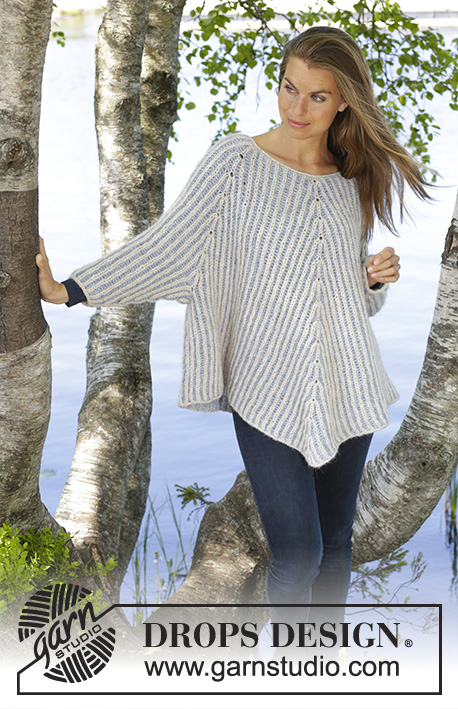
Empress#empressjacket |
|||||||||||||||||||||||||||||||
 |
 |
||||||||||||||||||||||||||||||
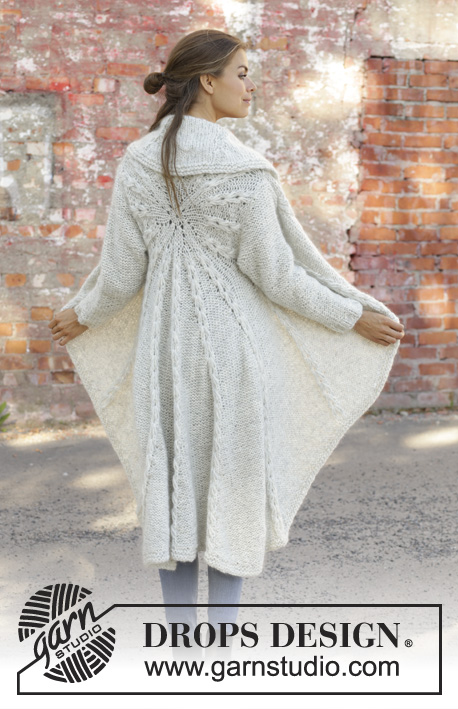
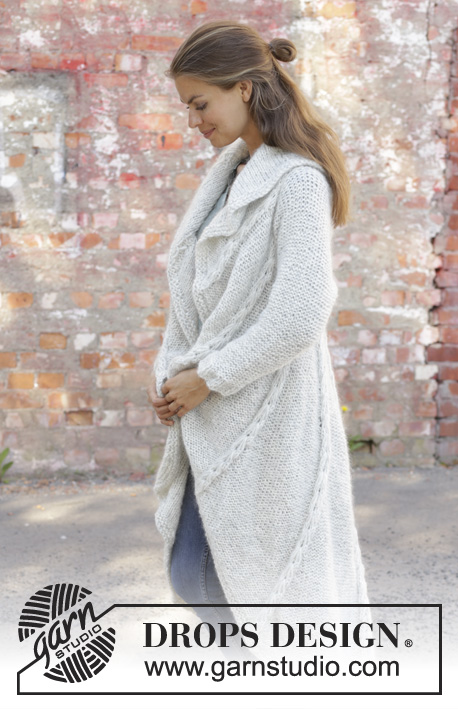
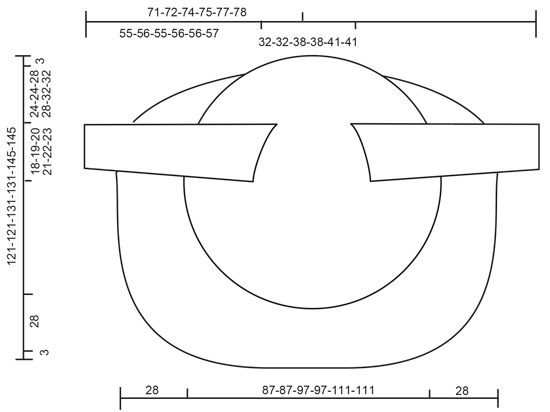
Knitted long circle jacket in 1 strand DROPS Air and 1 strand DROPS Brushed Alpaca Silk. The piece is worked in the round in a circle with texture. Sizes S - XXXL.
DROPS 194-17 |
|||||||||||||||||||||||||||||||
|
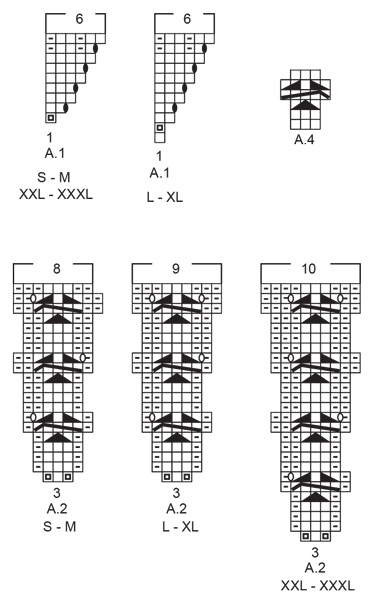
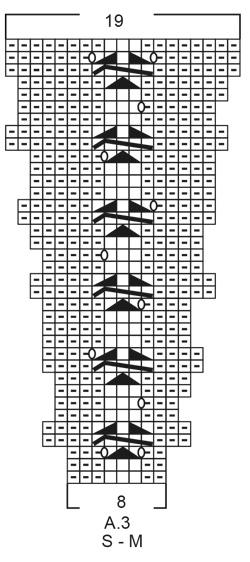
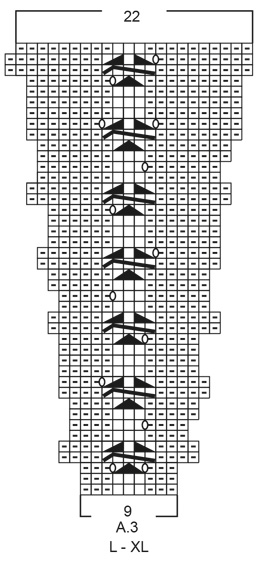
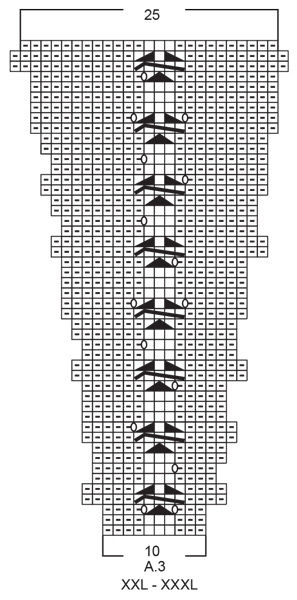
------------------------------------------------------- EXPLANATIONS FOR THE PATTERN: ------------------------------------------------------- RIDGE/GARTER STITCH (worked in the round): 1 ridge = 2 rounds. Knit 1 round and purl 1 round. RIDGE/GARTER STITCH (worked back and forth): 1 ridge = knit 2 rows. PATTERN: See diagrams A.1 to A.4. Choose diagram for your size. The diagrams show all the rows in the pattern seen from the right side! DECREASE TIP (for sleeves): All decreases are made from the side in purl! Decrease 1 stitch by purling 2 stitches together ------------------------------------------------------- START THE PIECE HERE: ------------------------------------------------------- CIRCLE JACKET - SHORT OVERVIEW OF THE PIECE: The piece is worked in the round in a circle from the middle of the back outwards. Change to circular needle(s) when necessary. Then work back and forth with short rows for the front pieces and down the back. The sleeves are worked top down in stockinette stitch with the wrong side out. Because of the weight of the yarn, the garment will stretch somewhat after use. CIRCLE JACKET: CIRCLE: Cast on 8 stitches with double pointed needles size 8 mm = US 11 and 1 strand Air and 1 strand Brushed Alpaca Silk (= 2 strands). Divide the stitches between 4 needles so that there are 2 stitches on each. Insert a marker thread at the beginning of the round. Allow the marker thread to follow your work onwards. Work pattern in the round according to A.1 – choose diagram for your size, a total of 8 times on the round. REMEMBER THE KNITTING GAUGE! When A.1 is finished, there are 48 stitches on the round. Now work pattern as follows: Work A.2 – choose diagram for your size, a total of 16 times on the round. After the next-to-last round in A.2 there are 128-128-144-144-160-160 stitches on the round. The last round in A.2 is worked as follows: Work the first 39-39-45-45-49-49 stitches (there is now 1-1-0-0-1-1 stitch left in the last repeat of A.2 worked), insert a new marker thread here (follows your work onwards and is later used when you work short rows from the front pieces and down the body on the back piece), bind off the next 20-21-22-23-24-25 stitches (= armhole), work the next 49-47-55-53-63-61 stitches, bind off the last 20-21-22-23-24-25 stitches (= armhole). The piece measures approx. 39-39-41-41-47-47 cm = 15¼"-15¼"-16⅛"-16⅛"-18½"-18½" in diameter. The next round is worked as follows: Work A.3 – choose diagram for your size (= 8-8-9-9-10-10 stitches on the first round in the diagram) a total of 16 times on the round and at the same time cast on 20-21-22-23-24-25 new stitches on the needle where the stitches were bind off for the armholes = 128-128-144-144-160-160 stitches. Continue in the round with A.3 until the whole diagram has been completed in height. There are now 304-304-352-352-400-400 stitches on the round. The piece measures approx. 87-87-97-97-111-111 cm = 34¼"-34¼"-38¼"-38¼"-43¾"-43¾" in diameter. Cut the strand. Place the first 94-94-110-110-124-124 stitches on the round (= stitches between the 2 marker threads) on a thread. FRONT PIECES AND DOWN THE BODY: There are now 210-210-242-242-276-276 stitches for the front pieces and down the body on the back piece. Start from the right side after the second marker thread and work short rows back and forth for the front pieces and down the body on the back piece as follows: ROW 1 (right side): Purl over purl and work A.4 (= 3 stitches) over each cable until there are 3 stitches left before the next marker thread (i.e. start of round), turn. ROW 2 (wrong side): Work back until there are 3 stitches left before the marker thread, turn. ROW 3: Purl over purl and work A.4 over each of the cables until there are 6 stitches left before the marker thread, AT THE SAME TIME increase 1 purled stitch after each cable/A.4, turn. ROW 4: Work back until there are 6 stitches left before the marker thread, turn. Continue back and forth like this by working 3 fewer stitches than the previous row and increase 1 stitch after each cable/A.4 every 4th row until you have worked 7 repeats of A.4 in height (= 42 rows). The piece measures approx. 72-72-77-77-84-84 cm = 28⅜"-28⅜"-30⅜"-30⅜"-33"-33" from the middle of the circle and down mid back. The last row is worked from the wrong side. Do not cut the strand. Insert a marker thread in the middle cable/A.4 mid back of jacket. Continue back and forth with pattern as before over the bottom of the left front piece as follows: ROW 1 (right side): Work until there are 4 stitches left before the cable/A.4 with the marker thread mid back, turn. ROW 2 (wrong side): Work until there are 3 more stitches left before the marker thread than the previous row (start of round), AT THE SAME TIME increase 1 purled stitch after each cable/A.4, turn. ROW 3 (right side): Work until there are 4 more stitches than last time left before the cable/A.4 with the marker thread mid back, turn. ROW 4 (wrong side): Work until there are 3 more stitches before the marker thread than the previous row, turn. Continue back and forth with pattern and increase after each cable/A.4 every 4th row until you have worked 3 repeats of A.4 in height (= 18 rows). Cut the strand. Start from the right side and after A.4/mid back and work short rows back and forth over the bottom of the right front piece in the same way, but reversed, i.e. each row from the wrong side is turned when there are 4 more stitches before the cable/A.4 with the marker thread mid back than the previous time and on each row from the right side is turned when there are 3 more stitches left than the previous time. EDGE: Place all stitches on the circle back on circular needle and work 2 RIDGES – read description above, around the whole circle. Bind off, but to avoid the bind-off edge being tight you can make 1 yarn over after approx. each 5th stitch - the yarn overs are bind off as normal stitches. SLEEVE: The sleeve is worked in stockinette stitch with the wrong side out (reversed stockinette stitch). Cast on 11-11-12-12-14-14 stitches with circular needle size 8 mm = US 11 and 1 strand Air and 1 strand Brushed Alpaca Silk (= 2 strands). Work stockinette stitch back and forth, AT THE SAME TIME cast on new stitches at the end of each row in each side as follows: Cast on 2 stitches 2 times, 1 stitch 3-4-5-6-6-7 times, 2 stitches 1 time and 4 stitches 1 time = 37-39-42-44-46-48 stitches. THE PIECE IS NOW MEASURED FROM HERE. Continue back and forth with stockinette stitch and 1 edge stitch in GARTER STITCH – read description above, in each side. When the piece measures 4 cm decrease 1 stitch inside the 1 edge stitch in garter stitch in each side – read DECREASE TIP. Decrease like this every 7-6-6-5-5-4 cm = 2¾"-2⅜"-2⅜"-2"-2"-1½" a total of 6-7-7-8-8-9 times = 25-25-28-28-30-30 stitches. When the piece measures 42-42-40-40-39-39 cm = 16½"-16½"-15¾"-15¾"-15¼"-15¼" increase 7-7-4-9-7-7 stitches evenly on row = 32-32-32-37-37-37 stitches. Change to circular needle size 7 mm = US 10,75. Work rib, starting from the side with purl (reversed stockinette stitch/the wrong side out) as follows: 1 edge stitch in garter stitch (knit 2, purl 3) until there is 1 stitch left, 1 edge stitch in garter stitch. When the rib measures 5 cm = 2" bind off with knit over knit and purl over purl. The sleeve measures approx. 55-56-55-56-56-57 cm = 21⅝"-22"-21⅝"-22"-22"-22½" from the sleeve cap down. Work the other sleeve in the same way. ASSEMBLY: Sew sleeves to body inside the bind-off/cast-on edge. Sew sleeve seams. Make sure that the seam is not tight. |
|||||||||||||||||||||||||||||||
Diagram explanations |
|||||||||||||||||||||||||||||||
|
|||||||||||||||||||||||||||||||
 |
|||||||||||||||||||||||||||||||
 |
|||||||||||||||||||||||||||||||
 |
|||||||||||||||||||||||||||||||
 |
|||||||||||||||||||||||||||||||
 |
|||||||||||||||||||||||||||||||
Have you finished this pattern?Tag your pictures with #dropspattern #empressjacket or submit them to the #dropsfan gallery. Do you need help with this pattern?You'll find 30 tutorial videos, a Comments/Questions area and more by visiting the pattern on garnstudio.com. © 1982-2026 DROPS Design A/S. We reserve all rights. This document, including all its sub-sections, has copyrights. Read more about what you can do with our patterns at the bottom of each pattern on our site. |
|||||||||||||||||||||||||||||||


With over 40 years in knitting and crochet design, DROPS Design offers one of the most extensive collections of free patterns on the internet - translated to 17 languages. As of today we count 324 catalogs and 12291 patterns - 12281 of which are translated into English (US/in).
We work hard to bring you the best knitting and crochet have to offer, inspiration and advice as well as great quality yarns at incredible prices! Would you like to use our patterns for other than personal use? You can read what you are allowed to do in the Copyright text at the bottom of all our patterns. Happy crafting!
Post a comment to pattern DROPS 194-17
We would love to hear what you have to say about this pattern!
If you want to leave a question, please make sure you select the correct category in the form below, to speed up the answering process. Required fields are marked *.