
Popular categories
Looking for a yarn?


|
||||
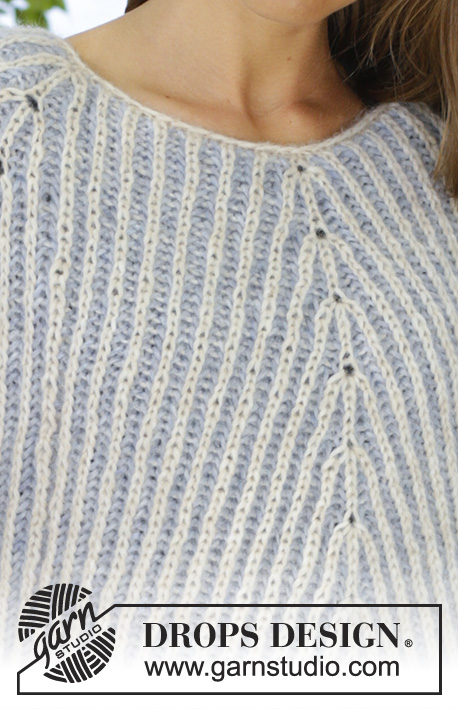
Sea Air |
||||
 |
 |
|||
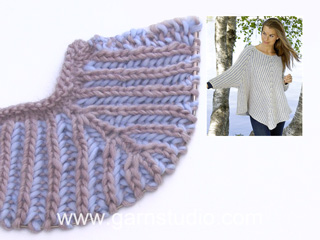
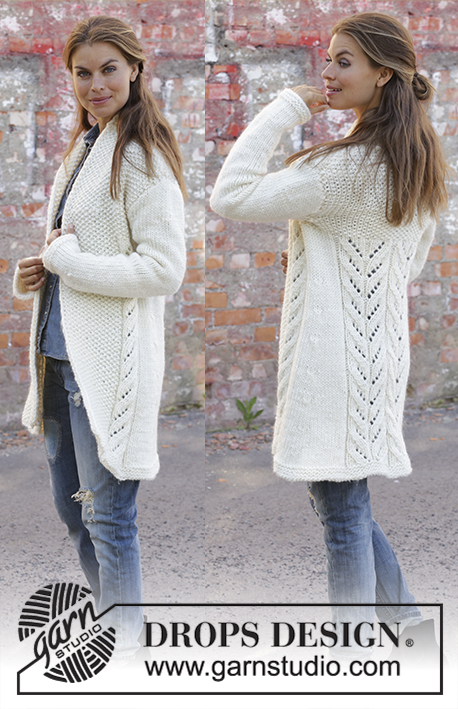
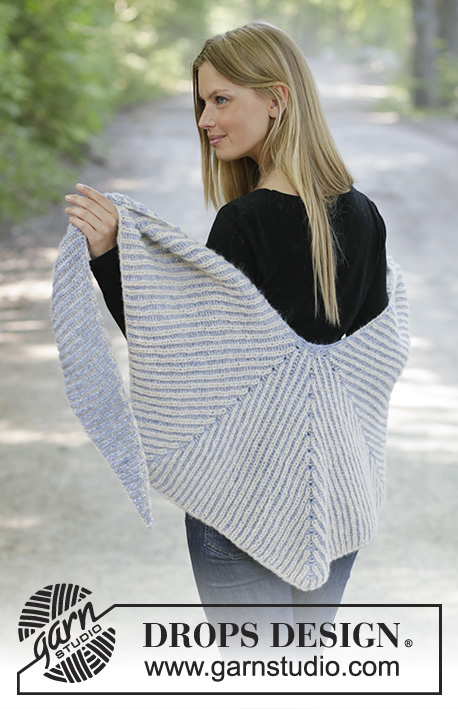
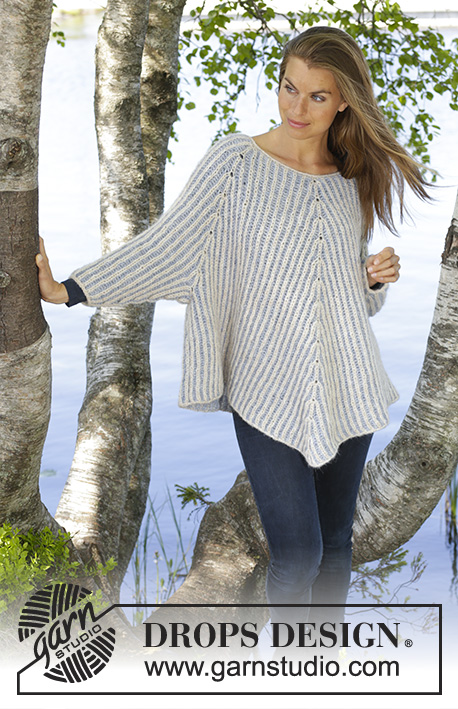
Knitted poncho sweater with raglan in DROPS Air. The piece is worked top down with English rib in two colors. Sizes S - XXXL.
DROPS 194-13 |
||||
|
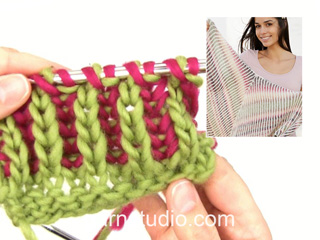
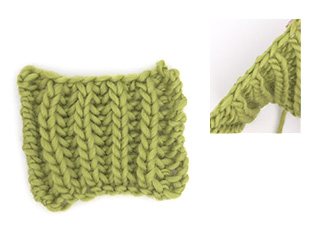
------------------------------------------------------- EXPLANATIONS FOR THE PATTERN: ------------------------------------------------------- ENGLISH RIB IN TWO COLORS (in the round): ROUND 1: Worked with color wheat. Work * 1 yarn over, slip 1 stitch as if to purl, knit 1*, work from *-*. ROUND 2: Worked with color fog. * Purl the yarn over and the slipped stitch together, 1 yarn over, slip 1 stitch as if to purl *, work from *-* (be careful; the last yarn over does not look like a yarn over, but the wheat strand is at the front of the piece, lay the strand over so that it becomes a yarn over) - read KNITTING TIP. ROUND 3: Worked with color wheat. Work * 1 yarn over, slip 1 stitch as if to purl, knit together the yarn over and the slipped stitch *, work from *-* (be careful; the last yarn over does not look like a yarn over, but the fog strand is at the front of the piece, lay the strand over so that it becomes a yarn over). Repeat rounds 2 and 3. KNITTING TIP: If you are in doubt as to which color to use on the next round, you can always see which color the previous round was worked with by the color of the yarn overs. INCREASE TIP-1 (evenly spaced): To work out how to increase evenly, count the total number of stitches on the needle (e.g. 68 stitches) and divide by the number of increases to be made (e.g. 4) = 17. In this example, increase by making 1 yarn over after each 17th stitch. On the next round knit the yarn overs twisted to avoid holes. INCREASE TIP-2: All increases are made on 1 round with wheat. Increase 4 stitches as follows: Work 5 stitches in the stitch and the yarn over as follows: * Knit the yarn over and stitch together, but wait with slipping the stitch and yarn over off the needle, make 1 yarn over the right needle *, work from *-* a total of 2 times and knit together the stitch and yarn over 1 more time = 5 stitches (= 4 stitches increased). On the next round work the increased stitches into the English rib. NOTE: work each increased stitch individually (do not work yarn over and stitch together). DECREASE TIP (for sleeves): All decreases are made on 1 round of wheat. Decrease as follows: Work until there are 3 stitches left before the marker thread (without the yarn overs, the yarn overs between the stitches are also slipped), slip the next 3 stitches to right needle as if to knit together: Slip 1 knit stitch + 1 purl stitch + 1 knit stitch (= stitch with marker) = 3 stitches without the yarn overs. Then knit together: 1 purl stitch and 1 knit stitch (= 2 stitches). Now pass the 3 slipped stitches over the stitches that was knitted together (= 4 stitches decreased – not counting the yarn overs). ------------------------------------------------------- START THE PIECE HERE: ------------------------------------------------------- PONCHO SWEATER - SHORT OVERVIEW OF THE PIECE: The piece is worked in the round with circular needle, top down. First work the yoke, where you increase stitches for sleeves and body. Then divide the piece; the body is continued in the round with circular needle and the sleeves are worked in the round with short circular needle/double pointed needles. YOKE: The round starts in the transition between 1 sleeve and the back piece. Cast on 68-72-76-80-84-88 stitches with circular needle size 6 mm / US 10 and wheat. Knit 1 round. Knit 1 round and increase 4-0-4-0-4-0 stitches evenly on round – read INCREASE TIP-1. Knit 1 round. Change to circular needle size 7 mm / US 10.75. Then work ENGLISH RIB IN 2 COLORS (in the round) – read description above. Insert 6 markers in the piece as follows (all the markers are inserted in a knitted stitch of wheat): Back piece: Work 13-13-15-15-17-17 stitches, work 1 stitch and insert marker 1 in this stitch (= mid back), work 13-13-15-15-17-17 stitches. Right sleeve: Work 1 stitch and insert marker 2 in this stitch, work 7 stitches, work 1 stitch and insert marker 3 in this stitch. Front piece: Work 13-13-15-15-17-17 stitches, work 1 stitch and insert marker 4 in this stitch (= mid front), work 13-13-15-15-17-17 stitches. Left sleeve: Work 1 stitch and insert marker 5 in this stitch, work 7 stitches, work 1 stitch and insert marker 6 in this stitch. Work 1 round with fog (= 2nd round of English rib). On the next round (= 3rd round of English rib) increase 4 stitches in each stitch with a marker (= knitted stitch of wheat) – read INCREASE TIP-2 above. REMEMBER THE GAUGE! Repeat this increase every 6th round of wheat (i.e. every 12th round) to finished length. When the piece measures 31-33-34-36-38-40 cm / 12⅛"-13"-13⅜"-14⅛"-14⅞"-15 ¾" from the cast-on edge (you have now increased approx. 8-9-9-10-10-11 times) there are approx. 91-99-103-111-115-123 stitches on the front/back pieces (i.e. the stitches between markers 3 and 5 = front piece and the stitches between markers 6 and 2 = back piece) and approx. 41-45-45-49-49-53 stitches on each sleeve (including the stitches with the markers) = a total of 264-288-296-320-328-352 stitches. Cut the strand and displace the start of the round to the stitch with marker 2 (stitch with marker 2 = first stitch on next round). Now divide the piece for body and sleeves as follows: Right sleeve: Place the stitches between markers 2 and 3 (including the stitches with these markers) on a thread for sleeve (= approx. 41-45-45-49-49-53 stitches) and cast on 7 stitches under the sleeve. Front piece: Work English rib as before as far as the stitch marker 5 (= approx. 91-99-103-111-115-123 stitches). Left sleeve: Place the stitches between markers 5 and 6 (including the stitches with these markers) on a thread for sleeve (= approx. 41-45-45-49-49-53 stitches and cast on 7 stitches under the sleeve. Back piece: Work English rib as before to end of round (= approx. 91-99-103-111-115-123 stitches). BODY: = approx. 196-212-220-236-244-260 stitches. Continue in the round with English rib and increase 4 stitches in the stitches with marker 1 and marker 4 (= mid front/back) every 6th round with wheat as before (i.e. every 12th round). In other words, increase 8 stitches each 6th round with wheat. Continue like this until the piece measures 24-24-25-25-25-25 cm / 9⅜"-9⅜"-9 ¾"-9 ¾"-9 ¾"-9 ¾" from where the body was divided from the sleeves = approx. 244-260-268-284-292-308 stitches (after 6 increases on the body). Adjust so that the next round is a round with wheat. Bind off with knit over knit and purl over purl; the yarn overs are bind off as normal stitches with knit. This is to avoid the bind-off edge being tight. SLEEVE: Place the stitches from the thread on the one side of the piece on short circular needle size 7 mm / US 10.75 (= approx. 41-45-45-49-49-53 stitches) and knit up 1 stitch in each of the 7 stitches cast on under the sleeve = approx. 48-52-52-56-56-60 stitches. Insert 1 marker in the knitted stitch mid under sleeve. Continue in the round with English rib. Change to double pointed needles when necessary. When the sleeve measures 2 cm / ¾" from where it was divided from the body, decrease 4 stitches in the stitch with the marker (= knitted stitch) – read DECREASE TIP. Decrease like this every 4½-3½-4½-3-3½-2½ cm a total of 5-6-5-6-5-6 times = 28-28-32-32-36-36 stitches. Continue in the round with English rib until the sleeve measures 25-24-23-21-19-18 cm / 9 ¾"-9⅜"-9"-8 ¼"-7⅜"-7" from where it was divided from the body; adjust so that the next round will be worked with wheat. Change to double pointed needles size 6 mm / US 10. Knit 1 round with wheat, the yarn overs are knitted together with the purled stitches. Then bind off with knit; make sure the bind-off edge is not tight. You can bind off with a size larger needle if this is a problem. Work the other sleeve in the same way. |
||||
Diagram explanations |
||||
|
||||

|
||||
|
Have you made this or any other of our designs? Tag your pictures in social media with #dropsdesign so we can see them! Do you need help with this pattern?You'll find tutorial videos, a Comments/Questions area and more by visiting the pattern on garnstudio.com. © 1982-2024 DROPS Design A/S. We reserve all rights. This document, including all its sub-sections, has copyrights. Read more about what you can do with our patterns at the bottom of each pattern on our site. |
||||


With over 40 years in knitting and crochet design, DROPS Design offers one of the most extensive collections of free patterns on the internet - translated to 17 languages. As of today we count 304 catalogs and 11422 patterns - 11417 of which are translated into English (US/in).
We work hard to bring you the best knitting and crochet have to offer, inspiration and advice as well as great quality yarns at incredible prices! Would you like to use our patterns for other than personal use? You can read what you are allowed to do in the Copyright text at the bottom of all our patterns. Happy crafting!
Comments / Questions (24)
This looks beautiful on my list!
04.11.2022 - 23:49Er maskene fordelt på både forstykket og rygg .Finner ikke noe om bakstykke. Mvh Grethe Rød
23.09.2021 - 11:30DROPS Design answered:
Hej Grethe. Ja det stämmer, maskene är fordelt på både forstykket og rygg, så du stickar allt på en gång. Mvh DROPS Design
23.09.2021 - 13:51I would like to make this pattern as a poncho with no sleeves. Do you have any suggestions as to the length of circular needles required towards the bottom and how to continue at the point of separation for sleeves etc.? Do I continue with the same increase every 6 rows or would this change? I'm not sure how wide this would be towards the bottom with so many increases.
12.03.2021 - 15:27DROPS Design answered:
Dear Kate, we are unfortunately not able to adjust every pattern to every single request, you might have to try working to the division for sleeves then try on the poncho and decide how to continue depending on the desired shape. Your DROPS store should be able to assist you if required - even per mail or telephone. Thanks for your comprehension. Happy knitting!
12.03.2021 - 15:39Starter jeg med en vrang pind eller en ret pind der står farven er tåge
10.01.2021 - 16:40DROPS Design answered:
Hej Hennelis, Pinden med hvede strikkes fra retsiden, med mindre du vil have den anden side ud - se også gerne videoen som er lavet til denne opskrift :)
11.01.2021 - 12:55HalliHallo Kann mir mal jemand erklärende erklären was das "4-0-4-0-4-0" bedeutet? Sind es Zunahmen für das Vorderteil? LG DonnaKlara
17.12.2020 - 18:33DROPS Design answered:
Liebe DonnaKlara, die Anleitung ist in 6 Größe geschrieben, und so werden diese Zahl gelesen: bei der 1. 3. und 5. Größe sollen Sie 4 Maschen gleichmäßig zunehmen - bei der 2., 4. und 6. Größe wird es nicht zugenommen. Viel Spaß beim stricken!
18.12.2020 - 07:04Hei! Jeg skjønner ikke hvordan jeg skal gjøre den første økningen, altså i omgang nr. 2. Jeg har lagt opp 80 masker, hvor mange økninger og hvor mange masker skal Det bli på pinnen etter økningen?
26.01.2020 - 15:41DROPS Design answered:
Hei Torgunn. Les ØKETIPS-1 (jevn fordeling) i oppskriften. Du har 80 masker og skal øke jevnt fordelt 0 ganger i str XL. dette er 1. økningen i oppskriften i str XL. Om du mener 1. økningen i patentstrikk, altså 3.omgang i patentmønsteret– les ØKETIPS-2, evnt se Hjelpevideo under oppskriften: Hvordan øke i helpatent ved å strikke flere masker i samme maske. God Fornøyelse!
10.02.2020 - 13:31Hejsa. Er det mon muligt at bruge Drops Brushed Alpaca Silk til denne opskrift?
03.01.2020 - 20:55DROPS Design answered:
Hej Ja du kan använda Drops Brushed Alpaca till detta mönster. Använd gärna vår omregner för att beräkna garnåtgången. Tänk också på att få rätt stickfasthet. Lycka till!
31.01.2020 - 11:09Bonjour,j'ai un petit problème pour installer les marqueurs,es ce que je dois compter les jetés comme des mailles à tricoter dans le premier rang de côte? Parce que la j'y arrive pas
07.11.2019 - 12:01DROPS Design answered:
Bonjour Mme Renancio, les marqueurs doivent être placés sur une maille, pas entre les mailles, et les jetés ne comptent pas comme une maille; vous pouvez placer vos marqueurs avant de tricoter le tour, ce peut être plus simple, indiquez-nous la taille tricotée, nous pourrons vous donner le détail si besoin. Bon tricot!
07.11.2019 - 12:08Når jeg følger jeres video om udtagning, får jeg på omgangen efter udtagning for mange masker på pinden. Iflg video strikkes der slå om, løs af, en vrang, slå om løs af, en vrang, slå om løs af. Det giver tre ekstra masker seks gange, altså atten masker for meget?
21.09.2018 - 09:26DROPS Design answered:
Hej Birgit, du har 2 nye masker på hver side af midterste maske. De 2 nye masker danner en ny patentmaske på hver side af den du udgik fra. God fornøjelse!
24.09.2018 - 10:19Jättebra videounstruktion om ökning! Finns det en med minskningsstickning också?
17.09.2018 - 21:33