
Popular categories
Looking for a yarn?


Comments / Questions (23)
![]() Crissie wrote:
Crissie wrote:
Hi another question, if I knit sleeves on straight needles, does pattern change, what about alternate row. Thanks again
03.02.2017 - 20:20DROPS Design answered:
Dear Crissie, please read here how to adjust a pattern on straight needles. Start reading diagrams starting from the bottom corner on the right side towards the left from RS and work from WS reading from the left towards the right. Happy knitting!
06.02.2017 - 09:05
![]() Crissie wrote:
Crissie wrote:
Thanks so much for all your help
03.02.2017 - 16:17
![]() Crissie wrote:
Crissie wrote:
Thank you for your prompt reply, still not sure "adjust to pattern". Are 2 ridges repeated after each set of M2b. Thanks again
03.02.2017 - 09:53DROPS Design answered:
Dear Crissie, work first 2 ridges then repeat M.2 in height until piece measures 8 cm, there are no ridges between the repeat in M.2. Happy knitting!
03.02.2017 - 13:32
![]() Crissie Grehan wrote:
Crissie Grehan wrote:
Working Sleeve first, Don't understand lace pattern for sleeve, work 2 ridges then M 2b, how many rows are in M 2b. ?. 8cm adjust to the pattern ? what pattern. Thank you
02.02.2017 - 19:23DROPS Design answered:
Dear Mrs Grehan, you work M.2b until piece measures 8 cm from the cast on edge (including the 2 ridges), adjust after a full repeat of diagram in height. Happy knitting!
03.02.2017 - 09:09
![]() Heleen wrote:
Heleen wrote:
Hallo, ik heb een proeflapje gemaakt om de meerderingen te oefenen in de mouw. In het patroon staat dat je midden in de mouw steeds 2 steken moet meerderen, maar als ik dat doe komt mijn patroon niet mooi meer uit. Wat doe ik fout?
30.03.2016 - 22:34DROPS Design answered:
Hoi Helen. Je meerdert aan beide zijkanten van de eerste st op de nld (middenonder mouw) en breit dan gaandeweg het patroon in de nieuwe steken.
01.04.2016 - 16:31Clare wrote:
I wish to knit this pattern but have not used circular needles. Am I able to use this pattern using traditional two long needle method? Thanks Clare
12.01.2016 - 20:15DROPS Design answered:
Dear Clare, you will find here relevant informations to adjust to straight needle. Happy knitting!
13.01.2016 - 09:41
![]() Silber-Faden; Jana Dähnert wrote:
Silber-Faden; Jana Dähnert wrote:
Liebe DROPS-Mitarbeiter, unsere Kundin möchte diese Anleitung nacharbeiten. Für die Mengenberechnung des Ersatzgarnes ist die Paris-Angabe von 50g/85m nicht richtig. Wir bitten um Änderung, um Folgefehler zu vermeiden. Freundliche Grüße
28.12.2015 - 17:24
![]() Mo Shamseldin wrote:
Mo Shamseldin wrote:
Where do I find pattern 2A and 2B?
14.11.2015 - 19:07DROPS Design answered:
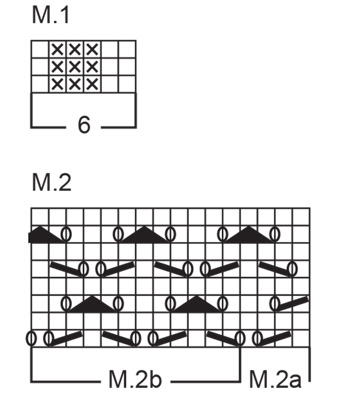
Dear Mo. It's at the bottom at M.2, along the bottom of this diagram you see M.2A and M.2B
17.11.2015 - 16:51
![]() L.DEKKER wrote:
L.DEKKER wrote:
Snap het alourpatroon niet er staat,1r 2r samen omslg dan weer een omslag en een overhaling hoe briei ik de 2 omslagen op 2naalden opde averechtse kant
26.05.2015 - 16:44DROPS Design answered:
Hoi. Je hebt 1 r (leeg vierkantje) tussen de 2 omslagen. De verkeerde kant wordt av gebreid (r op de goede kant)
26.05.2015 - 16:55
![]() Karin wrote:
Karin wrote:
You knit pattern on 175 st. This makes M1 29 times +1 extra st. for symmetry at the end
15.06.2013 - 09:32
|
|||||||||||||||||||
Frederika |
|||||||||||||||||||
 |
 |
||||||||||||||||||
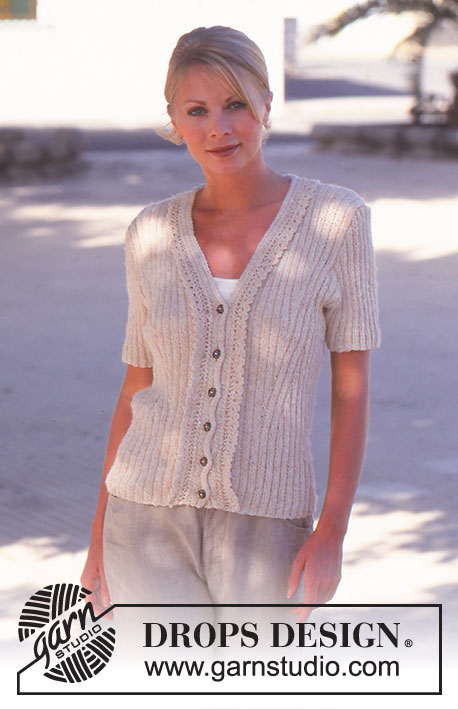
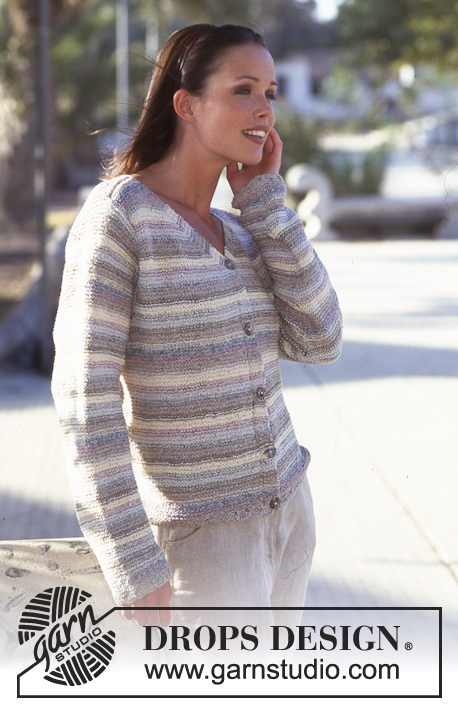
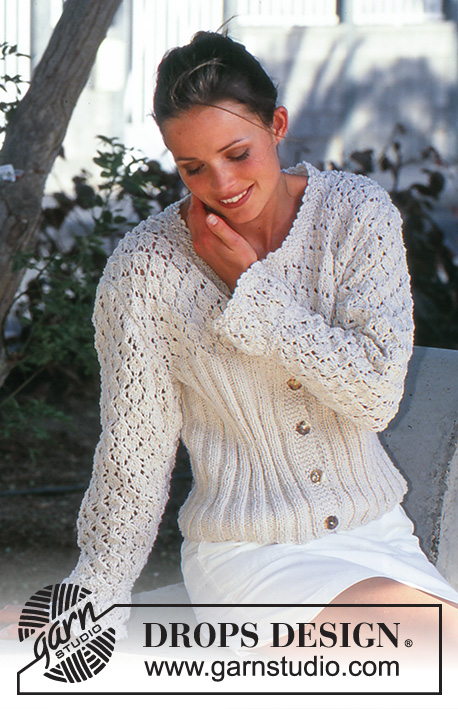
DROPS Cardigan in Silke or Paris with lace pattern.
DROPS 61-7 |
|||||||||||||||||||
|
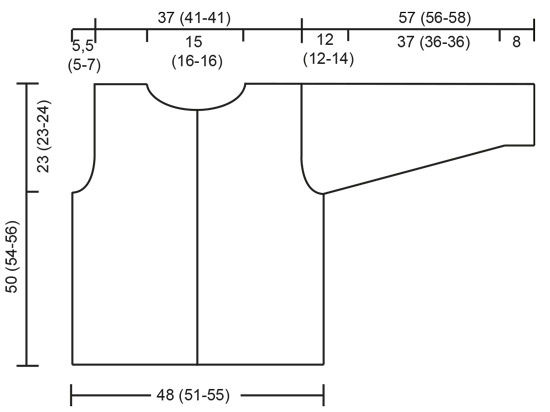
Gauge: 17 sts x 22 rows in stockinette st = 10 x 10 cm [4" x 4"]. (Be sure to maintain the gauge - if knit too loosely the garment will stretch. Silke is not machine washable). Pattern: See charts (1 chart = 1 repeat). The pattern is shown from the right side. Garter st, when knitting flat: Knit all sts, all rows. Garter st, when knitting in the round: *Rnd 1, knit. Rnd 2, purl.* Repeat from * - *. Buttonholes: When the work measures 2 cm [0.75"], 9.5 (10-10) cm [3.75" (4" - 4")], 17 (18-18) cm [6.75" (7" - 7")], 25 (26-26) cm [9⅞" (10.25" - 10.25")], 32.5 (34-34) cm [12.75" (13⅜" - 13⅜")] and 40 (42-42) cm [15.75" (16.5" - 16.5")] bind off for buttonholes on the right front as follows: bind off the 3rd and 4th sts and cast on 2 new sts over the bound-off sts on the next row. Knitting tip: Because of the pattern stitch, it is easy to make a mistake in the number of stitches bound off, increased or decreased. Be sure you have the correct number of sts in each row. Body: Cast on 173 (185-197) sts (including 5 sts at each end for the button bands) on circular needles and knit Pattern 1, keeping the 5 button band sts at each side in garter st throughout. Make buttonholes on the right front (see instructions above). When the work measures 27 (31-32) cm [10⅝" (12.25" - 12⅝")] knit the next row as follows: 44 (47-50) sts for the front, bind off 4 sts for armhole, 77 (83-89) sts for the back, bind off 4 sts for armhole, 44 (47-50) sts for the front. Knit the rest of each part separately. Front: = 44 (47-50) sts. Knit the next row as follows from the center front edge: 5 sts garter st (button band), Pattern 2A one time; knit the remaining sts in Pattern 2B, keeping the armhole edge st in garter st throughout. Continue in pattern and bind off for armholes every other row: 3 sts 1 (1-2) times, 2 sts 1 time, 1 st 2 times = 37 (40-40) sts. When the work measures 40 (42-42) cm [15.75" (16.5" - 16.5")], bind off at the neck edge every other row: 11 (12-12) sts 1 time, 3 sts 1 time, 2 sts 1 time, 1 st 2 times. Bind off when the work measures 50 (54-56) cm [19.75" (21.25" - 22")]. Back: = 77 (83-89) sts. Knit Pattern 2B, centering the pattern across the row. Keep 1 st at each armhole edge in garter st throughout. Bind off for armholes as on the front = 63 (69-69) sts. When the work measures 48 (52-54) cm [18⅞" (20.5" - 21.25")] bind off the center 21 (23-23) sts for the neck. Bind off 2 sts at each neck edge on the next row. Bind off when the work measures 50 (54-56) cm [19.75" (21.25" - 22")]. Sleeves: Cast on 54 sts on double pointed needles; join and place a marker at the join. Knit 4 rows garter st, then Pattern 2B, centering the pattern across the row. When the work measures 8 cm [3⅛"] - adjust for complete pattern - knit 4 rows garter st, decreasing 18 sts evenly distributed on the first row of garter st = 36 sts. Then knit Pattern 2B, centering the pattern across the row. Inc 1 st each side of marker 18 (18-19) times: Sizes S+M: every 4th row Size L: alternately every 3rd and 4th row = 72 (72-74) sts. Knit the increased sts into the pattern as you go along. When the work measures 45 (44-44) cm [17.75" (17.25" - 17.25")] bind off 2 sts each side of marker. Knit the rest back and forth on the needles. Bind off for sleeve caps each side every other row: 3 sts 2 times, 2 sts 3 (3-4) times, 1 st 2 (2-3) times, 2 sts 4 times, 3 sts 2 times, bind off. The work measures approx. 57 (56-58) cm [22.5" (22" - 22⅞")]. Assembly: Sew shoulder seams. Pick up approx. 75-90 sts around the neck and knit 4 rows garter st, bind off. Crochet border: Crochet borders around the neck and the sleeve edges. Crochet from the right side as follows: 1 single crochet (sc), *ch 4 over 1 knit st, 1 sc in the next knit st *, repeat * - *. Sew in the sleeves and buttons. |
|||||||||||||||||||
Diagram explanations |
|||||||||||||||||||
|
|||||||||||||||||||
 |
|||||||||||||||||||
 |
|||||||||||||||||||
Have you finished this pattern?Tag your pictures with #dropspattern or submit them to the #dropsfan gallery. Do you need help with this pattern?You'll find 27 tutorial videos, a Comments/Questions area and more by visiting the pattern on garnstudio.com. © 1982-2026 DROPS Design A/S. We reserve all rights. This document, including all its sub-sections, has copyrights. Read more about what you can do with our patterns at the bottom of each pattern on our site. |
|||||||||||||||||||


With over 40 years in knitting and crochet design, DROPS Design offers one of the most extensive collections of free patterns on the internet - translated to 17 languages. As of today we count 324 catalogs and 12290 patterns - 12280 of which are translated into English (US/in).
We work hard to bring you the best knitting and crochet have to offer, inspiration and advice as well as great quality yarns at incredible prices! Would you like to use our patterns for other than personal use? You can read what you are allowed to do in the Copyright text at the bottom of all our patterns. Happy crafting!
Post a comment to pattern DROPS 61-7
We would love to hear what you have to say about this pattern!
If you want to leave a question, please make sure you select the correct category in the form below, to speed up the answering process. Required fields are marked *.