
Popular categories
Looking for a yarn?


Comments / Questions (31)
![]() Rhona Baxter wrote:
Rhona Baxter wrote:
Thanks for your reply, but on A3 ,first row in the middle shows 2 knit squares with the centre showing the diagram with between 2 stitches make 1 yarn over ,which increases this to 17.
05.12.2019 - 14:52DROPS Design answered:
Dear Mrs Baxter, oh yes you are right, in A.3 you will have sometimes 17 stitches instead of 16 on the rows where you make the yarn over for the small mock cables (= rows 1 and 5), but the number of stitches is given with 16 sts in A.3 to make it easier. Happy knitting!
05.12.2019 - 15:41
![]() Rhona Baxter wrote:
Rhona Baxter wrote:
Hi, I hope you can help, just trying to get started and having a problem . The first round yoke ,I keeping getting 4 more than the 106( Second size ), start with 98 ,work A2 X 2 =4 stitches, A3 X4 times =4 stitches, sleeves x2 times = 4 which gives me 110 stiches,not 106 as pattern . Can you advise.
05.12.2019 - 13:51DROPS Design answered:
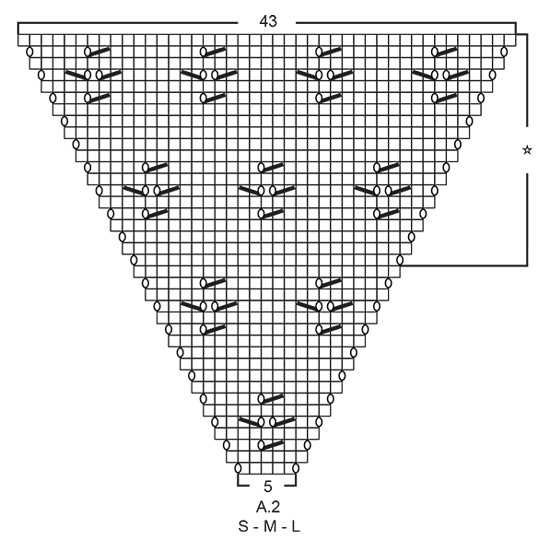
Dear Mrs Baxter, in size M you start with 98 sts and work: A.2 (= 5 sts + 2 inc), A.3 (= 16 sts), YO, K12 (sleeve), YO, A.3 (= 16 sts), A.2 (= 5 sts + 2 inc), A.3 (= 16 sts), YO, K12 (sleeve), YO, A.3 (= 16 sts) = 7+16+1+12+1+16+7+16+1+12+1+16= 106 sts at the end of first round. Happy knitting!
05.12.2019 - 14:24
![]() Birthe Kücken wrote:
Birthe Kücken wrote:
Mange tak for hurtig svar, nu forstår jeg. Med venlig hilsen Birthe
08.05.2019 - 09:49
![]() Birthe Kücken wrote:
Birthe Kücken wrote:
Hvorfor får jeg 110 m og ikke 106 m på første omgang i bærestykket. Med venlig hilsen Birthe
07.05.2019 - 15:17DROPS Design answered:
Hej Birthe, har du læst teksten under KORT OVERSIGT - Jeg tror det kan være derfor: Vær opmærksom på at alle maskeantal som er opgivet på bærestykke og ryg & forstykke er beregnet ud fra at A.3 = 16 masker, men A.3 skifter mellem 16 og 17 masker. Hvis du lige har strikket 1.-2.-5. eller 6.pind i A.3 når et maskeantal opgives har du 4 masker mere på pinden.
08.05.2019 - 09:25
![]() Aase wrote:
Aase wrote:
Skal det være samme mønster bak som framme? Hadde vært en fordel med et tydelig bilde tatt bakfra.
12.03.2019 - 19:46DROPS Design answered:
Hej Åse, ja det stemmer, du strikker samme mønster på for og bagstykket. God fornøjelse!
13.03.2019 - 14:13
![]() Aase wrote:
Aase wrote:
Strever veldig med denne modellen. Når det står at det er en feil i denne oppskriften ( to faktisk) kan jeg da stole på at dere har rettet feilene, eller må jeg selv gjøre det? Hvorfor? Jeg skjønner heller ikke hva blanke ruter betyr. Vanligvis betyr det rettstrikk, men her står det at det skal være to sammen. Hvorfor er det ikke skråstrek da?
09.03.2019 - 13:33DROPS Design answered:
Hei Aase. De rettelsene som ligger nederst på oppskriften er allerede korrigert i teksten, så det er bare til info om at det har vært oppdateringer. En tom rute betyr rett, mens "2 rett sammen" er en skrå strek over 2 ruter - vi har nå dobbelsjekket at alle symbolene er synlige. Kanskje ser du dem om du bytter enhet? (mobil, pc, nettbrett). God fornøyelse
18.03.2019 - 10:42
![]() Mary wrote:
Mary wrote:
The pattern says to begin with A1, but there doesn’t seem to be a pattern 1. CS. Youmplease,explain this to me? Thanks!
01.03.2019 - 17:20DROPS Design answered:
Hello Mary. You can find diagram A1 next to the schematic drawing, at the end of the pattern. Happy knitting!
02.03.2019 - 08:43
![]() Magda wrote:
Magda wrote:
Dzień dobry, czy narzuty po każdej stronie rękawów mają być przerabiane w kolejnym rzędzie jako przekręcone? Nie ma tam dziurek? Pozdrawiam.
29.01.2019 - 23:33DROPS Design answered:
Witaj Magdo, z rysunku wynika, że masz rację, w opisie jest inaczej. Zgłoszę zapytanie i w razie pomyłki zostanie naniesiona korekta. Jeżeli Ci się spieszy, przerabiaj te 4 o. (narzuty z każdej strony rękawa) przekręcone. Pozdrawiam i powodzenia
30.01.2019 - 10:18
![]() J Hofbauer wrote:
J Hofbauer wrote:
Har hittat förklaringen och stickar de 4 maskorna i rätstickning detta första varv. Gott nytt år!
27.12.2018 - 17:39
![]() J Hofbauer wrote:
J Hofbauer wrote:
Kan ni förklara okets första varv. Skall ökas till 106 men jag får 110.
27.12.2018 - 09:25
|
|||||||||||||||||||||||||
Canari#canarisweater |
|||||||||||||||||||||||||
 |
 |
||||||||||||||||||||||||
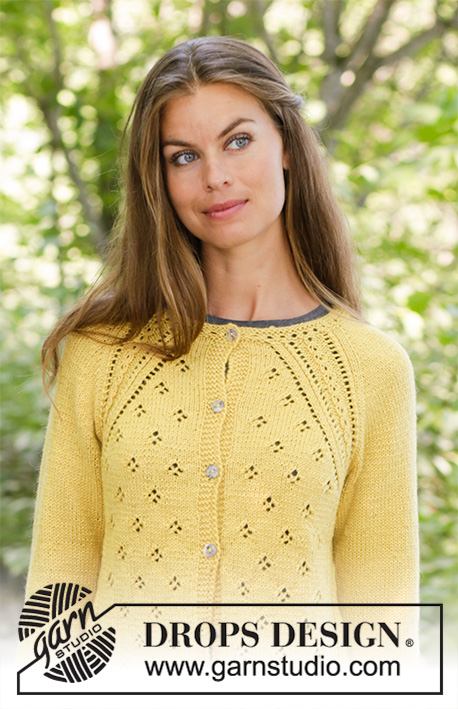
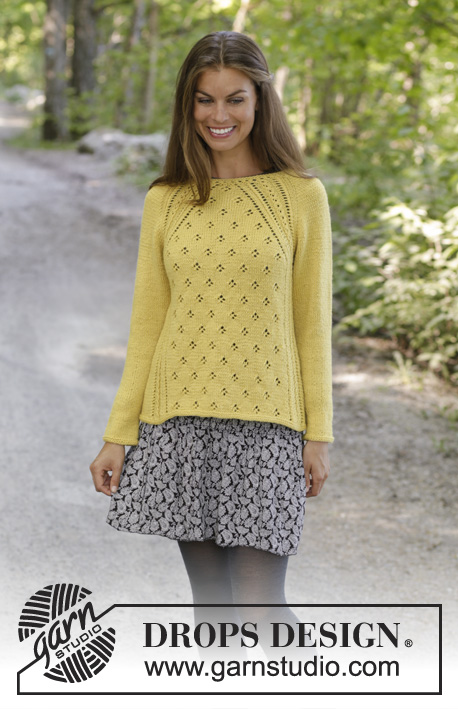
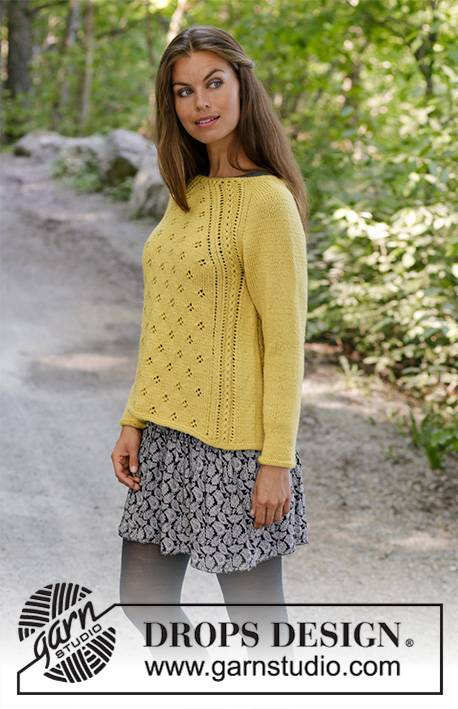
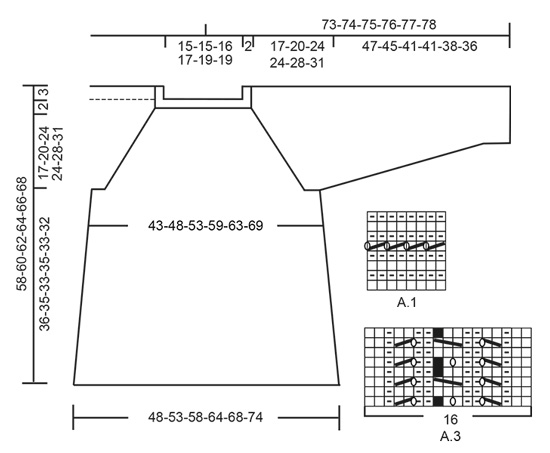
Knitted sweater with raglan in DROPS Karisma. The piece is worked top down with lace pattern. Sizes S - XXXL.
DROPS 195-16 |
|||||||||||||||||||||||||
|
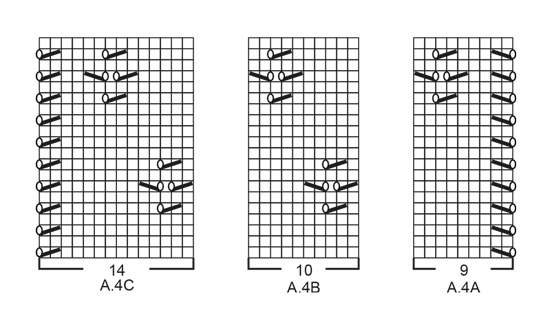
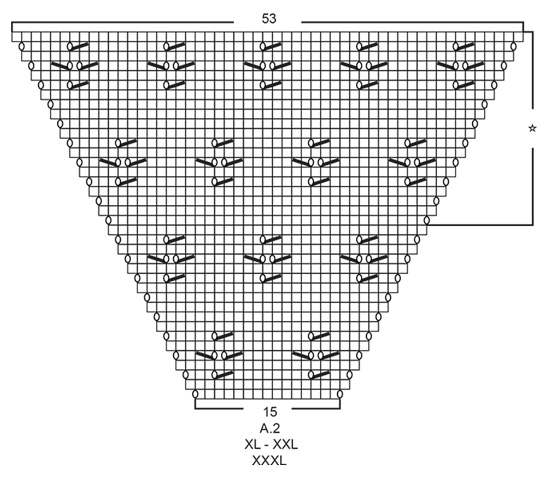
------------------------------------------------------- EXPLANATIONS FOR THE PATTERN: ------------------------------------------------------- RIDGE/GARTER STITCH (worked in the round): 1 ridge = 2 rounds. Knit 1 round and purl 1 round. PATTERN: See diagrams A.1 to A.4. Choose diagram for your size (applies to A.2). The diagrams show all the rows in the pattern seen from the right side. INCREASE TIP-1 (evenly spaced): To work out how to increase evenly, count the total number of stitches on the needle (e.g. 88 stitches) and divide by the number of increases to be made (e.g. 10) = 8.8. In this example, increase by making 1 yarn over after approx. each 9th stitch. On the next round knit the yarn overs twisted to avoid holes. INCREASE TIP-2 (for sides of body): Start 2 stitches before the marker thread, 1 yarn over, knit 4 (marker thread sits in the middle of these 4 stitches), 1 yarn over (= 2 stitches increased). On the next row knit the yarn overs twisted to avoid holes. Then work the increased stitches in stockinette stitch. DECREASE TIP (mid under sleeves): Start 3 stitches before the marker thread, knit 2 together, knit 2 (marker thread sits in the middle of these 2 stitches), slip 1 stitch as if to knit, knit 1 and pass the slipped stitch over the knitted stitch (= 2 stitches decreased). ------------------------------------------------------- START THE PIECE HERE: ------------------------------------------------------- SWEATER - SHORT OVERVIEW OF THE PIECE: Neck, yoke and body are worked in the round with circular needle, top down. The sleeves are worked in the round with short circular needle/double pointed needles, top down. Be aware that all the stitch numbers on the yoke and body are given with A.3 = 16 stitches, but A.3 varies between 16 and 17 stitches. If you have just worked rounds 1-2-5 or 6 in A.3 when the number of stitches is given, you will have 4 more stitches on the needle. NECK: Cast on 88-88-92-96-104-104 stitches with short circular needle size 3.5 mm / US 4 and Karisma. Work A.1. After A.1 knit 1 round where you increase 10-10-6-22-14-14 stitches evenly on round - read INCREASE TIP-1 = 98-98-98-118-118-118 stitches. Change to circular needle size 4 mm / US 6 and work yoke as described below. YOKE: The first round is worked as follows: Work A.2 (= 5-5-5-15-15-15 stitches), A.3 (= 16 stitches), 1 yarn over, work 12 stitches in stockinette stitch (= sleeve), 1 yarn over, work A.3 (= 16 stitches), A.2 (= 5-5-5-15-15-15 stitches), A.3 (= 16 stitches), 1 yarn over, 12 stitches in stockinette stitch (= sleeve), 1 yarn over, A.3 (= 16 stitches). There are now 106-106-106-126-126-126 stitches on the needle. Continue this pattern onwards; i.e. you increase on the front and back pieces in each side as shown in A.2. On the sleeves you increase in each side with a yarn over on each side of the stitches in stockinette stitch. Increase like this every 2nd round. On the round after an increase round the yarn overs in the diagrams are knitted (to leave holes), and increased stitches are worked into the pattern as shown in A.2, while the yarn overs on the sleeves are knitted twisted (to avoid holes), and the increased stitches are worked in stockinette stitch. REMEMBER THE GAUGE! When A.2 has been worked 1 time in height there are 250-250-250-270-270-270 stitches on the needle. Continue this pattern onwards; i.e. the pattern is repeated as shown in A.2 and every time you have worked 10 rows in height there is room for 1 more repeat of the lace pattern on the front and back pieces. When you have increased a total of 24-29-34-34-39-44 times on each side of A.3 there are 290-330-370-390-430-470 stitches on the needle and the piece measures approx. 19-22-26-26-30-33 cm / 7⅜"-8⅝"-10 ¼"-10 ¼"-11 ¾"-13" from the cast-on edge and down mid front. The next round is worked as follows: Work 69-79-89-99-109-119 stitches as before (= back piece), place the next 60-70-80-80-90-100 stitches on 1 thread for sleeve, cast on 6-6-6-8-8-10 new stitches on the needle (= in side under sleeve), work the next 85-95-105-115-125-135 stitches as before (= front piece), place the next 60-70-80-80-90-100 stitches on 1 thread for sleeve, cast on 6-6-6-8-8-10 new stitches on the needle (= in side under sleeve) and work the last 16 stitches as before (= back piece). Cut the strand. Body and sleeves are finished separately. THE PIECE IS NOW MEASURED FROM HERE! BODY: = 182-202-222-246-266-290 stitches. Insert 1 marker thread in each side, in the middle of the 6-6-6-8-8-10 stitches cast on under each sleeve. Allow the marker threads to follow your work onwards; they will be used a little later when you increase. Start the round by one of the marker threads and work the first round as follows: Work 3-3-3-4-4-5 stitches in stockinette stitch, continue A.3 over the next 16 stitches, work A.4A (= 9 stitches), A.4B over the next 30-40-50-60-70-80 stitches (= 3-4-5-6-7-8 repeats of 10 stitches), A.4C (= 14 stitches), continue A.3 over the next 16 stitches, 6-6-6-8-8-10 stitches in stockinette stitch (the marker thread sits in the middle of these 6-6-6-8-8-10 stitches), continue A.3 over the next 16 stitches, work A.4A (= 9 stitches), A.4B over the next 30-40-50-60-70-80 stitches (= 3-4-5-6-7-8 repeats of 10 stitches), work A.4C (= 14 stitches), continue A.3 over the next 16 stitches, and finish with 3-3-3-4-4-5 stitches in stockinette stitch. Continue this pattern. When the piece measures 4 cm / 1½" from the division, increase 1 stitch on each side of both marker threads - read INCREASE TIP-2 = 4 stitches increased. Increase like this every 6-6-5-6-5-5 cm / 2⅜"-2⅜"-1⅞"-2⅜"-1⅞"-1⅞" a total of 5 times = 202-222-242-266-286-310 stitches. Continue until the piece measures approx. 35-34-32-34-32-31 cm / 13 ¾"-13⅜"-12 ½"-13⅜"-12 ½"-12⅛" from the division (shorter measurements in the larger sizes due to longer yoke), or to desired length, but make sure to finish after a complete lace pattern in height. Change to circular needle size 3.5 mm / US 4. Work 2 RIDGES – read description above. Change back to circular needle size 4 mm / US 6. Bind off with knit, but make sure that the bind-off edge is not tight. The sweater measures approx. 58-60-62-64-66-68 cm / 22¾"-23⅝"-24⅜"-25¼"-26"-26¾" from the shoulder down. SLEEVE: Place the 60-70-80-80-90-100 stitches from the thread on the one side of the piece on short circular needle/double pointed needles size 4 mm / US 6 and knit up 1 stitch in each of the 6-6-6-8-8-10 new stitches cast on in the side under the sleeve = 66-76-86-88-98-110 stitches. Insert a marker thread in the middle of the 6-6-6-8-8-10 new stitches in side under sleeve and allow the marker thread to follow your work onwards; it will be used a little later when decreasing mid under sleeve. Start the round by the marker thread and work stockinette stitch in the round. When the piece measures 2-1-1-1-1-1 cm / ¾"-⅜"-⅜"-⅜"-⅜"-⅜" decrease 2 stitches mid under sleeve – read DECREASE TIP. Decrease like this every 2nd round a total of 1-2-3-3-4-7 times = 64-72-80-82-90-96 stitches. Then decrease every 3½-2½-2-2-1½-1 cm a total of 12-15-18-18-21-23 times = 40-42-44-46-48-50 stitches left on the needles .Continue until the piece measures 46-44-40-40-37-35 cm / 18"-17 ¼"-15 ¾"-15 ¾"-14 ½"-13 ¾" from the division or to desired length (shorter measurements in larger sizes due to wider neck and longer yoke). Change to double pointed needles size 3.5 mm / US 4 and work 2 ridges. Change back to double pointed needles size 4 mm / US 6. Bind off with knit. Make sure the bind-off edge is not tight! The sleeve measures approx. 47-45-41-41-38-36cm / 18 ½"-17⅝"-16⅛"-16⅛"-14⅞"-14⅛" from the division. Work the other sleeve in the same way. |
|||||||||||||||||||||||||
Diagram explanations |
|||||||||||||||||||||||||
|
|||||||||||||||||||||||||
 |
|||||||||||||||||||||||||
 |
|||||||||||||||||||||||||
 |
|||||||||||||||||||||||||
 |
|||||||||||||||||||||||||
Have you finished this pattern?Tag your pictures with #dropspattern #canarisweater or submit them to the #dropsfan gallery. Do you need help with this pattern?You'll find 24 tutorial videos, a Comments/Questions area and more by visiting the pattern on garnstudio.com. © 1982-2026 DROPS Design A/S. We reserve all rights. This document, including all its sub-sections, has copyrights. Read more about what you can do with our patterns at the bottom of each pattern on our site. |
|||||||||||||||||||||||||


With over 40 years in knitting and crochet design, DROPS Design offers one of the most extensive collections of free patterns on the internet - translated to 17 languages. As of today we count 324 catalogs and 12290 patterns - 12280 of which are translated into English (US/in).
We work hard to bring you the best knitting and crochet have to offer, inspiration and advice as well as great quality yarns at incredible prices! Would you like to use our patterns for other than personal use? You can read what you are allowed to do in the Copyright text at the bottom of all our patterns. Happy crafting!
Post a comment to pattern DROPS 195-16
We would love to hear what you have to say about this pattern!
If you want to leave a question, please make sure you select the correct category in the form below, to speed up the answering process. Required fields are marked *.