
Popular categories
Looking for a yarn?


Comments / Questions (39)
![]() Isabel Sweertvaegher wrote:
Isabel Sweertvaegher wrote:
Klopt het dat de boord bij voor en achterpand met naald 7 mm is? Moet dit niet 4 mm zijn zoals bij de mouwen?
22.03.2020 - 19:14DROPS Design answered:
Dag Isabel,
Voor het voor en achterpand brei je de boord met naald 7 mm. Bij de mouwen brei je de boord wel met 4 mm.
25.03.2020 - 11:14
![]() Isabel Sweertvaeghee wrote:
Isabel Sweertvaeghee wrote:
Kopt het dat de boordstteek voor achter en voorpand met naald 7mm is? Moet dit niet 4mm zijn zoals bij de mouwen?
22.03.2020 - 19:12
![]() OmaMausi wrote:
OmaMausi wrote:
Hallo liebes Team, ich bin begeistert von euren Anleitungen!!!!!! Habe ein Problem mit der richtigen Größe für meine Schwiegertochter zu finden, sie trägt Kleidergröße 40/42, welche Größe dass er schön leger sitzt empfiehlt ihr mir zu stricken? Ganz herzliche Grüße Margit OmaMausi
08.01.2020 - 17:05
![]() Johanne Kaas Laursen wrote:
Johanne Kaas Laursen wrote:
Hej Hvorfor skal trøjen strikkes på pind 7, når garnet er beregnet til pind 5? Vil det ikke passe bedre med en tykkere garn? Fx Melody?
17.12.2019 - 19:18DROPS Design answered:
Hej Johanne, Den her bluse er designet med 14 masker på 10 cm, hvilket giver den et blødere udtryk. God fornøjelse!
15.01.2020 - 11:20
![]() Carolina wrote:
Carolina wrote:
Hola, tengo una pregunta, ¿las agujas necesarias para realizar este tejido están en el sistema métrico o en el sistema de medidas de Estados Unidos?
05.11.2019 - 16:14DROPS Design answered:
Hola Carolina. Las agujas en todos los patrones y en todos los idiomas (excepto en inglés americano) están en el sistema métrico.
30.11.2019 - 23:21
![]() Alejandra wrote:
Alejandra wrote:
Hola, me encanto el proyecto y tengo muchas ganas de hacerlo ! Solo tengo una duda, si seguiré los pasos de una talla M, cuantos puntos debo montar para la orilla del escote o cuello? Es que en el patrón decía entre 63 a 84 puntos pero quiero estar segura, saludos!
23.09.2019 - 04:00DROPS Design answered:
Hola Alejandra. Para el escote no hay un número determinado para cada talla. Son aprox. ente 63 puntos (para la talla S) y 84 puntos ( para la talla XXXL). La recomendación para la talla M es montar entre 66-69 puntos ( siempre un múltiplo de 3).
24.09.2019 - 23:48
![]() Hanne Gunnarsson wrote:
Hanne Gunnarsson wrote:
Hei! Jeg ser det er blitt spurt om før, men kan ikke se det er gitt et skikkelig svar på det. Etter helpatenten har jeg jo altfor mange masker! Første pinne helpatent økes det jo med vel 28 masker med alle kastene. Teller jeg riktig her nå, så har jeg 87 masker på pinnen. Det må da stå feil ant. masker i oppskriften??
23.05.2019 - 13:38DROPS Design answered:
Hei Hanne. Kastene som lages som en del av helpatenten telles ikke som egne masker, de er 1 maske sammen med den masken som tas løs av - en dobbelmaske om du vil. Før helpatenten øker du 11-12-12-13-13-14 masker jevnt fordelt slik at du har 55-59-59-63-63-67 masker på pinnen. Maskeantallet forblir det samme hele veien. Etter at helpatenten er ferdig fortsettes det i glattstrikk: alle patent-kast strikkes sammen med masken som ble tatt løst av på siste patent-pinne. Samtidig felles det 5-7-4-5-2-3 masker jevnt fordelt. og du har da 50-52-55-58-61-64 masker på pinnen. God fornøyelse
23.05.2019 - 14:57
![]() Nathalie Fredriksen wrote:
Nathalie Fredriksen wrote:
Hei, jeg lurte bare på det med pinnene til denne oppskriften,jeg strikker veldig løst og har prøvd og finne dem men finner dem ikke på sidene deres
23.04.2019 - 17:45DROPS Design answered:
Hei Nathalie. Det som avgjør hvilken pinnestørrelse du må ha er strikkefastheten din. Du sier at du strikker løst, og jeg vil da anta du kanskje må ha mindre pinner enn de som er angitt her. Den eneset måten å finne ut hvilke pinner du trenger er at du lager deg strikkeprøver, til du finner de pinnene som gir deg 14 masker i bredden og 17 pinner i høyden med glattstrikk = 10 x 10 cm. Gå ned ca 3 pinnestørrelser når du strikker vrangbord rundt ermet (dette er for å "stramme inn" ballongermene). her er en liste over alle butikker som selger våre produkter. God fornøyelse
26.04.2019 - 14:31
![]() Irene wrote:
Irene wrote:
Hola, muchas gracias por este hermoso patron, queria saber si en la cantidad de puntos a montar estan incluidos los 2 del borde (1 en cada lado), o si hay que incluirselos a parte de la cantidad que indica el patron. Muchas gracias
05.04.2019 - 18:31DROPS Design answered:
Hola Irene! En la cantidad de puntos a montar estan incluidos los 2 del borde (1 en cada lado). Buen trabajo!
05.04.2019 - 18:40
![]() Trine wrote:
Trine wrote:
Hej:) Jeg er i tvivl om hvilken størrelse jeg skal strikke denne model i og jeg synes ikke jeg kan finde størrelsesvejledningen, som i skriver der er efter opskriften? Vh Trine
15.02.2019 - 09:09DROPS Design answered:
hei Trine. Det ligger en målskisse nederst på siden, under oppskriften. har står alle plaggets mål i alle størrelser. Vi har nå dobbelsjekket den danske oppskriften, og målskissen ligger her også. God fornøyelse.
18.02.2019 - 15:27
|
|
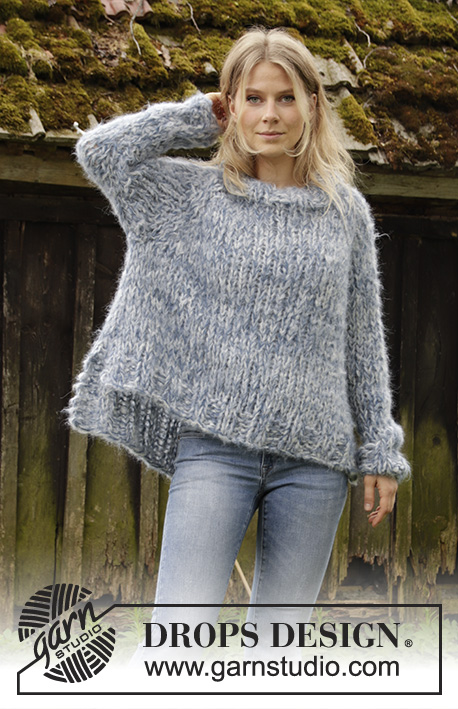
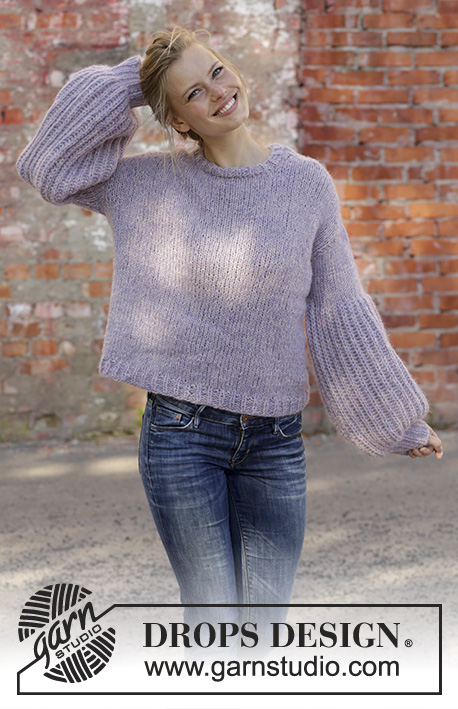
Bewitched#bewitchedsweater |
|
 |
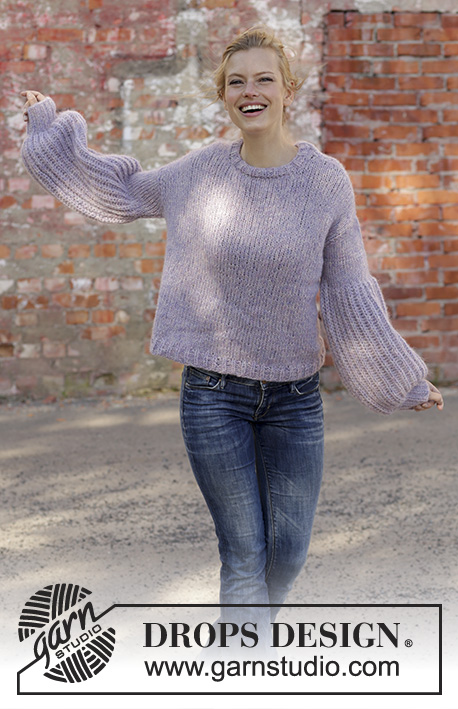 |
Knitted sweater in DROPS Air with English rib. Sizes S - XXXL.
DROPS 194-21 |
|
|
------------------------------------------------------- EXPLANATIONS FOR THE PATTERN: ------------------------------------------------------- RIDGE/GARTER STITCH (worked back and forth): 1 ridge = Knit 2 rows. DECREASE TIP-1 (for sides of front/back piece): All decreases are made from the right side! Work 1 edge stitch in garter stitch, knit 1, slip 1 stitch as if to knit, knit 1, pass the slipped stitch over the knitted stitch (= 1 stitch decreased), knit until there are 4 stitches left, knit 2 together (= 1 stitch decreased), knit 1 and finish with 1 edge stitch in garter stitch. DECREASE TIP-2 (for neck on front piece): Decrease 1 stitch after the 1 stitch as follows: slip 1 stitch as if to knit, knit 1, pass the slipped stitch over the knitted stitch (= 1 stitch decreased). Decrease 1 stitch before the 1 stitch as follows: Work until there are 3 stitches left on the row, knit 2 together (= 1 stitch decreased) and finish with knit 1. INCREASE TIP (evenly spaced): To work out how to increase evenly, count the total number of stitches on the needle (e.g. 44 stitches) and divide by the number of increases to be made (e.g. 11) = 4. In this example, increase by making 1 yarn over after approx. each 4th stitch. On the next round work the yarn overs twisted to avoid holes. ENGLISH RIB: ROW 1: 1 stitch in garter stitch, * knit 1, 1 yarn over, slip 1 stitch as if to purl *, work from *-* until there are 2 stitches left, finish with knit 1 and 1 stitch in garter stitch. ROW 2: 1 stitch in garter stitch, * 1 yarn over, slip 1 stitch as if to purl, knit together the yarn over and the slipped stitch *, work from *-* until there are 2 stitches left, finish with 1 yarn over, slip 1 stitch as if to purl and 1 stitch in garter stitch. ROW 3: 1 stitch in garter stitch, * knit the yarn over and slipped stitch together, 1 yarn over, slip 1 stitch as if to purl *, work from *-* until there are 3 stitches left (including the yarn over), knit the yarn over and slipped stitch together, 1 stitch in garter stitch. Repeat rows 2 and 3 upwards. ------------------------------------------------------- START THE PIECE HERE: ------------------------------------------------------- SWEATER - SHORT OVERVIEW OF THE PIECE: The piece is worked back and forth with circular needle. The front and back pieces are worked separately. The sleeves are worked back and forth with circular needle. The neck is worked in the round with circular needle. BACK PIECE: Cast on 80-83-89-98-104-113 stitches (including 1 edge stitch in each side of the piece) with circular needle size 7 mm / US 10.75 and Air. Work rib (= knit 1 / purl 2) with 1 edge stitch in garter stitch in each side of the piece. When the rib measures 4 cm / 1½", continue with stockinette stitch and 1 edge stitch in garter stitch in each side. REMEMBER THE GAUGE! When the piece measures 8 cm / 3⅛" decrease 1 stitch inside the 2 stitches in each side of the piece – read DECREASE TIP-1. Decrease like this every 6-6-9-6-9-9 cm / 2⅜"-2⅜"-3 ½"-2⅜"-3 ½"-3 ½" a total of 5-5-4-5-4-4 times = 70-73-81-88-96-105 stitches. When the piece measures 35-36-37-38-39-40 cm / 13¾"-14¼"-14½"-15"-15¼"-15¾", bind off 2-2-4-6-6-8 stitches for the armholes at the beginning of the next 2 rows = 66-69-73-76-84-89 stitches. Work stockinette stitch with 1 edge stitch in garter stitch in each side of the piece. When the piece measures 48-50-52-54-56-58 cm / 19"-19¾"-20½"-21¼"-22"-22¾" bind off the middle 26-27-29-30-32-33 stitches for neck = 20-21-22-23-26-28 stitches left on each shoulder. Each shoulder is finished separately. Continue with stockinette stitch and 1 edge stitch in garter stitch as before until the piece measures 52-54-56-58-60-62 cm / 20½"-21¼"-22"-22¾"-23⅝"-24⅜" from the cast-on edge. Bind off with knit. Work the other shoulder in the same way. FRONT PIECE: Cast on and work as for back piece until the piece measures 42-44-44-46-46-48 cm / 16 ½"-17 ¼"-17 ¼"-18"-18"-18⅞" = 66-69-73-76-84-89 stitches. Now bind off the middle 20-21-23-24-26-27 stitches for neck and each shoulder is finished separately = 23-24-25-26-29-31 stitches left on each shoulder. On the next row from the right side decrease 1 stitch inside 1 stitch for neck – read DECREASE TIP-2! Decrease like this every 2nd row a total of 3 times = 20-21-22-23-26-28 stitches. Work stockinette stitch with 1 edge stitch in garter stitch as before until the piece measures 52-54-56-58-60-62 cm / 20½"-21¼"-22"-22¾"-23⅝"-24⅜" from the cast-on edge. Bind off with knit. Work the other shoulder in the same way. SLEEVE: The sleeve is worked back and forth with circular needle. Cast on 44-47-47-50-50-53 stitches (including 1 edge stitch in each side of the piece) with circular needle size 4 mm / US 6 and Air. Work rib (= knit 1, purl 2) with 1 edge stitch in garter stitch in each side of the piece. When the rib measures 7 cm / 2¾", adjust so that the next row is from the right side, work 1 more row of rib but, AT THE SAME TIME increase 11-12-12-13-13-14 stitches evenly on row – read INCREASE TIP = 55-59-59-63-63-67 stitches. Purl 1 row from the wrong side with 1 edge stitch in garter stitch in each side. Change to circular needle size 7 mm / US 10.75 and work ENGLISH RIB – read description above. Continue until the piece measures 39 cm. Now continue with stockinette stitch and 1 edge stitch in garter stitch in each side AT THE SAME TIME as on the first row you decrease 5-7-4-5-2-3 stitches evenly on row = 50-52-55-58-61-64 stitches. Bind off when the sleeve measures 51-51-51-50-49-48 cm / 20"-20"-20"-19⅝"-19 ¼"-18⅞". Work the other sleeve in the same way. ASSEMBLY: Sew shoulder seams in outermost loop of outermost stitch. Sew in the sleeves, inside the 1 edge stitch. Sew sleeve and side seams inside the 1 edge stitch. NECK: Knit up approx. 63 to 84 stitches with circular needle size 7 mm / US 10.75 (make sure the number of stitches is divisible by 3). Work rib (= knit 1, purl 2) in the round over all stitches for 2 cm / ¾". Then bind off with knit over knit and purl over purl. |
|
 |
|
Have you finished this pattern?Tag your pictures with #dropspattern #bewitchedsweater or submit them to the #dropsfan gallery. Do you need help with this pattern?You'll find 26 tutorial videos, a Comments/Questions area and more by visiting the pattern on garnstudio.com. © 1982-2026 DROPS Design A/S. We reserve all rights. This document, including all its sub-sections, has copyrights. Read more about what you can do with our patterns at the bottom of each pattern on our site. |
|


With over 40 years in knitting and crochet design, DROPS Design offers one of the most extensive collections of free patterns on the internet - translated to 17 languages. As of today we count 324 catalogs and 12290 patterns - 12280 of which are translated into English (US/in).
We work hard to bring you the best knitting and crochet have to offer, inspiration and advice as well as great quality yarns at incredible prices! Would you like to use our patterns for other than personal use? You can read what you are allowed to do in the Copyright text at the bottom of all our patterns. Happy crafting!
Post a comment to pattern DROPS 194-21
We would love to hear what you have to say about this pattern!
If you want to leave a question, please make sure you select the correct category in the form below, to speed up the answering process. Required fields are marked *.