
Popular categories
Looking for a yarn?


Comments / Questions (44)
![]() Pat Ellis wrote:
Pat Ellis wrote:
I have bound off and am working on the left side (it is beautiful!) but I have a question. I'm binding off at the beginning of each row - as indicated - but when I get to the increase rows like #37 and 41 and 45 , do I still do those increases???? Seems counter productive but , if I don't do them, what would the pattern look like in those parts? Thanks!!!
19.07.2019 - 14:03DROPS Design answered:
Dear Mrs Ellis, you have to continue increasing as before to get the pattern continuing, and at the same time you cast off at the beginning of every row (= both from RS and from WS) so that you get a straight front piece - see measurement chart. Happy knitting!
05.08.2019 - 16:18
![]() Friederike wrote:
Friederike wrote:
Bei dem letzten Absatz des Kreises steht:"... die nächsten 168 Maschen stricken, diese stilllegen, die letzten 56 Maschen stricken." Müssen die letzten 56 Maschen nicht auch angekettet werden, genau so wie die erste 56 Maschen angekettet werden?
14.07.2019 - 17:41DROPS Design answered:
Liebe Friederike, ja genau, diese letzten 56 Maschen sollen abgekettet werden, die deutsche Anleitung wird korrigiert, danke für den Hinweis. Viel Spaß beim stricken!
15.07.2019 - 10:46
![]() Pat Ellis wrote:
Pat Ellis wrote:
I have finished A3 and about to repeat the last 12 rows. I am not sure I understand “ you continue working rows of holes and garter stitch”. Please help me understand. Thank you
03.07.2019 - 02:44DROPS Design answered:
Dear Mrs Ellis, start each A.3 as before, work to the middle of repeat and work the middle of the repeat as before (see matching row in diagram), then work to the end of repeat and finish repeat as before. this mean you continue the increases at the begin and end of each repeat (with a YO), and there will be more sts stitches inbetween, these stitches will be worked as before in these last 12 rows. Happy knitting!
03.07.2019 - 07:56
![]() Pat Ellis wrote:
Pat Ellis wrote:
I have been moving along well with the pattern but am now to "Now all the stitches in A.1, apart from the middle 5 have been worked in to A.2" Where do I get a "middle 5". I have been knitting for over 60 years and am having serious issues with this pattern... I do appreciate the prompt responses and help. Thank you
20.05.2019 - 22:57DROPS Design answered:
Dear Mrs Ellis, the middle 5 stitches in A.1 will be worked in A.1 on next round, but after this round with a star in A.1, Cut the strand and begin the next round 5 stitches to the left, so that the first stitch in A.2 is the beginning of the round. Continue with A.1 and A.2 as before. Happy knitting!
21.05.2019 - 09:53
![]() Linda Rød wrote:
Linda Rød wrote:
Hei. Skal det fortsettes med mønster (med økninger) på forstykket som det står? Blir det da fellt ca 100 masker på 15cm? Syntes og det er vanskelig å måle arbeidet underveis..
20.05.2019 - 09:45DROPS Design answered:
Hei Linda. Ja, du fortsetter med økninger i A.3, samtidig som det felles 2 masker på hver pinne. Dvs, det felles ca 50 masker i hver side. God fornøyelse
31.05.2019 - 12:01
![]() Pat Ellis wrote:
Pat Ellis wrote:
Never mind - I figured out you're to start at the bottom of the graph! I was trying to make it work starting at the top. Numbers would have helped me. Sorry!
13.05.2019 - 12:51
![]() Pat Ellis wrote:
Pat Ellis wrote:
I need help getting started - sorry! It says CO 8 stitches and follow A.1 but that pattern shows 5 stitches? Also, by the time you YO twice and have decreased 2 stitches you're not increasing any. What am I missing? Thanks for any help you can offer.
11.05.2019 - 23:34DROPS Design answered:
Hello Pat. You read diagrams from bottom to top and from right to left. So you cast on 8 sts, you then: make *1 yo, p1 *, and repeat *-* 8 times. At the end of first round you will have 16 sts. Here is explained how to read a knitting diagram. Happy knitting!
12.05.2019 - 11:02
![]() Pat Ellis wrote:
Pat Ellis wrote:
Is the gauge that is stated on the pattern one that most folks get with the size four needles? I only get twenty-four stitches to equal two and a half inches. I'd have to go up many needle sizes to acheive that gauge. What am I doing wrong?
06.05.2019 - 21:19DROPS Design answered:
Dear Mrs Ellis, the gauge to this pattern is the usual one for DROPS BabyAlpaca Silk = 24 sts x 32 rows in stockinette stitch = 4"x4" - you can first work your swatch then block it to check your tension, and then adjust the needle size if required. Happy knitting!
07.05.2019 - 08:53
![]() Petra wrote:
Petra wrote:
Na 4 regels gaat patroon a2 opeens van 1 steek naar 5 steken, terwijl er maar 2 omhalen genoemd staan (dus lijkt van 1 naar 3 steken te gaan), maar tegelijkertijd worden in a1 opeens 2 steken minder weergegeven, terwijl het aantal steken daar volgens het telpatroon hetzelfde blijft. Zijn die 2 missende steken bij a1 dan steken in a2 geworden? Ik heb dit stuk al eens gebreid door alle steken van a2 na die van a1 te breien maar toen liep de v-vorm scheef dus ik ben bang dat ik hier een fout maak?
05.05.2019 - 18:30DROPS Design answered:
Dag Petra,
Op toer 4 in A.2 worden er in totaal 4 omslagen gemaakt, aan beide kanten van de steek 2 omslagen (dichte ovaal symbool). In A.1 zitten ook meerderingen in de vorm van omslagen (open ovalen) en als er meerderingen zijn, zie je in de naald erna extra steken (zoals in naald 2 en 4 van A.1). Later in het telpatroon van A.1 worden de meerderingen gecompenseerd door minderingen (schuine streepjes over 2 steken).
05.05.2019 - 19:23
![]() Francoise wrote:
Francoise wrote:
J'ai réfléchi et c'est au rg 29 que j'ai un probleme lorsque l'on tricote le début du rg 29 A.1 je n'obtiens pas le jeté en décalé par rapport au jeté précédent.
15.04.2019 - 18:51DROPS Design answered:
Bonjour Françoise, regardez la réponse précédente, dès le 5ème rang de A.2, vous allez incorporer les mailles de A.1 dans A.2 (si vous préférez, A.1 va commencer et se terminer par la diminution, la maille endroit avant le jeté et celle après le jeté de A.1 vont appartenir désormais à A.2). Bon tricot!
23.04.2019 - 10:08
|
|||||||||||||||||||||||||
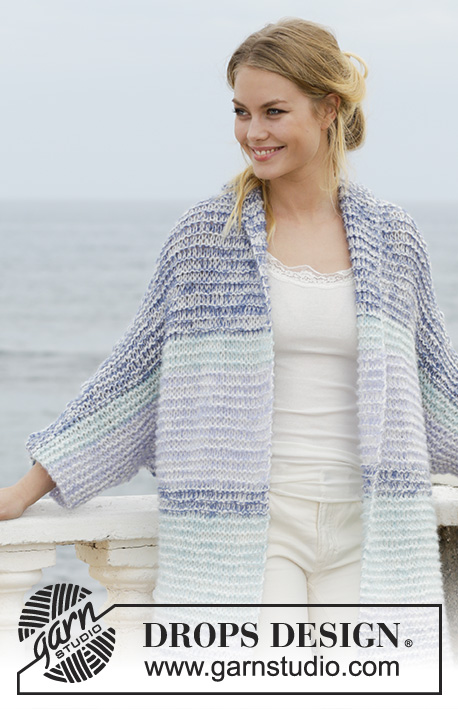
Seaside Dreamer#seasidedreamerjacket |
|||||||||||||||||||||||||
 |
 |
||||||||||||||||||||||||
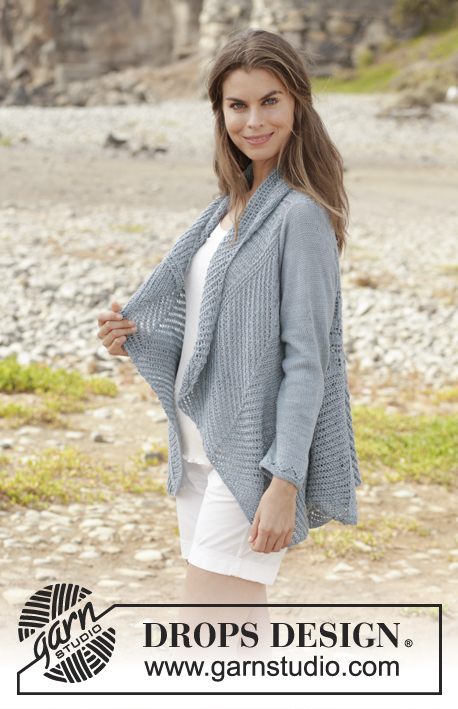
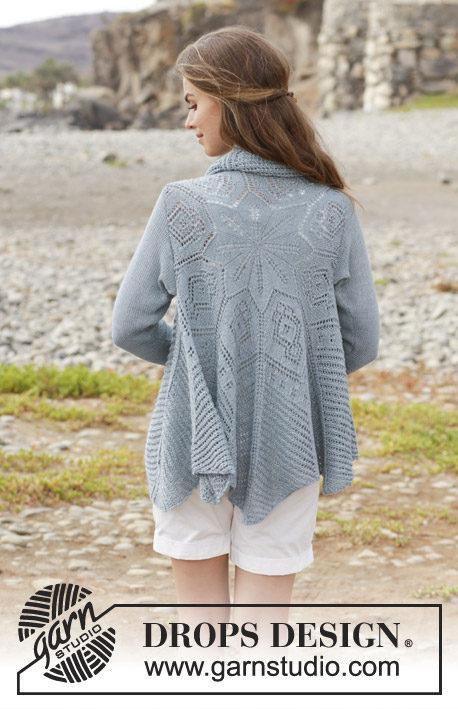
Knitted circle jacket with lace pattern. Sizes S - XXXL. The piece is worked in DROPS BabyAlpaca Silk.
DROPS 191-6 |
|||||||||||||||||||||||||
|
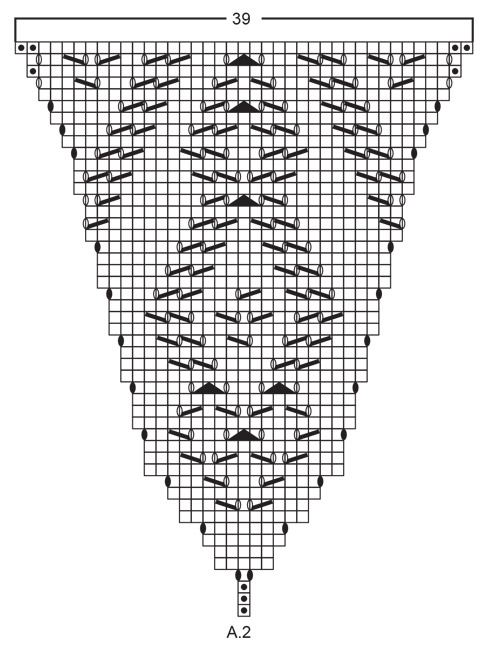
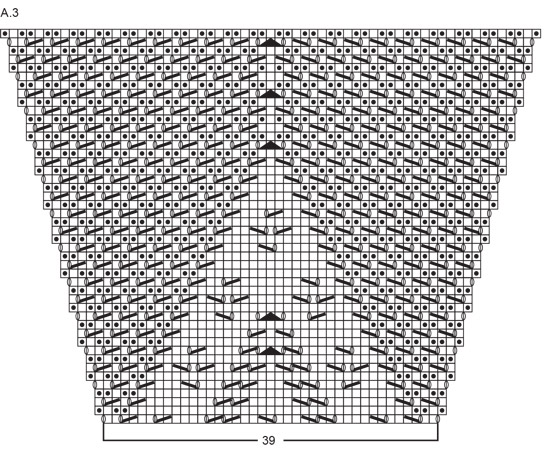
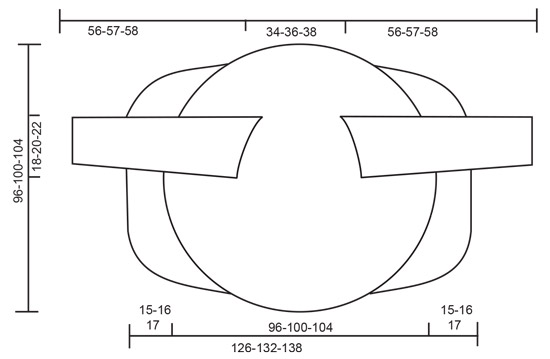
INFORMATION FOR THE PATTERN: PATTERN: See diagrams A.1 to A.4. The diagrams show all the rows in the pattern seen from the right side. RIDGE/GARTER STITCH (worked in the round): 1 ridge = 2 rounds. Knit 1 round and purl 1 round. INCREASE TIP: Start 1 stitch before the marker thread. Make 1 yarn over, knit 2 (the marker thread sits in the middle of these 2 stitches), 1 yarn over. On the next round knit the yarn overs twisted to avoid holes. ---------------------------------------------------------- CIRCLE JACKET: The jacket is worked in the round from the middle of the motif (the back), then back and forth in each side. The sleeves are worked separately and sewn on to finish. Cast on 8 stitches with BabyAlpaca Silk and divide them between 4 double pointed needles size 3 mm / US 2.5. Work according to A.1 (= 8 repeats of A.1 on the round). Insert a marker thread at the beginning of the round. Work up to and including the round before the arrow in A.1= 128 stitches on the needle. From the round with the arrow, work A.2 after each A.1 as follows: Work * A.1 over the first/next 15 stitches as before, work A.2 over the next stitch *, work from *-* a total of 8 times. Continue the pattern like this. The stitches in A.1 are worked into A.2 at the same time as you increase on each side of A.2 (the increases are drawn in the diagram). Work up to and including the round with a star in A.1. Now all the stitches in A.1, apart from the middle 5, have been worked into A.2. Cut the strand and begin the next round 5 stitches to the left, so that the first stitch in A.2 is the beginning of the round. Continue with A.1 and A.2; when A.1 has been worked 1 time in height, repeat A.1a to finished length. Change to circular needle when you have enough stitches. Continue until the piece measures a total of 34-36-38 cm / 13⅜"-14⅛"-14⅞" in diameter, adjust so that next round is a round with increases. Now work armholes as follows (there are approx. 256-272-288 stitches on the needle): Increase as before, i.e. when binding off for armholes increase over these stitches, i.e. make yarn overs that are to be bind off. On next round cast on for the armhole, cast on the same amount of stitches as where bind off for armhole (including the increases), i.e count the stitches that where bind off. Work pattern as before over the first 37-39-42 stitches, bind off the next 44-48-52 stitches for armhole (the number of stitches is without the increases, these increases come in addition to the stitches), work pattern as before until there are 81-87-94 stitches left, bind off the next 44-48-52 stitches for armhole (the number of stitches is without the increases, these increases come in addition to the stitches), work pattern over the last 37-39-42 stitches. On the next round cast on the same amount of stitches that was bind off for armhole (i.e. 44-48-52 stitches + increases that come in addition to the stitches) over the bind-off stitches. Continue with pattern as before. When A.2 has been worked 1 time in height (there are now 352 stitches on the needle), continue with A.3 over A.2 (A.1a continued as before). When A.3 has been worked 1 time in height, repeat the top 12 rounds of A.3; you increase as before every 4th round and you continue working rows of holes and garter stitch. Continue with A.3 and A.1a until the piece measures 96-100-104 cm / 37 ¾"-39⅜"-40⅞", there are approx. 672-696-720 stitches on the needle. Now divide for the front pieces as follows: bind off the first 54-56-58 stitches, work the next 162-168-174 stitches (= left front piece), bind off stitches until you have 216-224-232 stitches left, work the next 162-168-174 stitches (= right front piece), place these stitches on a thread and bind off the last 54-56-58 stitches. Cut and fasten the strand. LEFT FRONT PIECE: Continue with pattern back and forth over the 162-168-174 stitches; adjust on row 1 so that the purled stitches in the ridges are now knitted from the wrong side. AT THE SAME TIME as the first 2 stitches at the beginning of each row are bind off (= 2 stitches bind off on each row). Continue the pattern and to bind off like this until the piece measures a total of 63-66-69 cm / 24 ¾"-26"-27⅛" from the middle of the circle (i.e. the front piece measures approx. 15-16-17 cm / 5⅞"-6 ¼"-6⅝"). Bind off the remaining stitches. RIGHT FRONT PIECE: Work as for the left front piece. SLEEVE: The sleeve is worked in the round with double pointed needles/short circular needle. Cast on 48-56-64 stitches with double pointed needles size 3 mm / US 2.5 and BabyAlpaca Silk. Work 3 RIDGES – see description above, then work A.4 over all stitches (= 6-7-8 repeats in width). When A.4 has been worked 1 time in height continue with stockinette stitch over all stitches. Insert 1 marker thread at the beginning of the round (= mid under sleeve). When the piece measures 5 cm / 2" increase 1 stitch on each side of the marker thread - read INCREASE TIP. Increase every 6th round a total of 18-19-20 times = 84-94-104 stitches. When the piece measures 43-43-42 cm / 16⅞"-16⅞"-16 ½" bind off 4 stitches on each side of the marker thread and continue working back and forth on circular needle = 76-86-96 stitches. Bind off for the sleeve cap at the beginning of each row in each side as follows: 2 stitches 7-7-8 times, 1 stitch 5-7-9 times and 2 stitches in each side until the piece measures 56-57-58 cm / 22"-22⅜"-22 ¾". Bind off the remaining stitches and work the other sleeve in the same way. ASSEMBLY: Gather together the 8 stitches at the beginning of the piece. Sew in the sleeves. |
|||||||||||||||||||||||||
Diagram explanations |
|||||||||||||||||||||||||
|
|||||||||||||||||||||||||
 |
|||||||||||||||||||||||||
 |
|||||||||||||||||||||||||
 |
|||||||||||||||||||||||||
 |
|||||||||||||||||||||||||
Have you finished this pattern?Tag your pictures with #dropspattern #seasidedreamerjacket or submit them to the #dropsfan gallery. Do you need help with this pattern?You'll find 25 tutorial videos, a Comments/Questions area and more by visiting the pattern on garnstudio.com. © 1982-2026 DROPS Design A/S. We reserve all rights. This document, including all its sub-sections, has copyrights. Read more about what you can do with our patterns at the bottom of each pattern on our site. |
|||||||||||||||||||||||||


With over 40 years in knitting and crochet design, DROPS Design offers one of the most extensive collections of free patterns on the internet - translated to 17 languages. As of today we count 324 catalogs and 12290 patterns - 12280 of which are translated into English (US/in).
We work hard to bring you the best knitting and crochet have to offer, inspiration and advice as well as great quality yarns at incredible prices! Would you like to use our patterns for other than personal use? You can read what you are allowed to do in the Copyright text at the bottom of all our patterns. Happy crafting!
Post a comment to pattern DROPS 191-6
We would love to hear what you have to say about this pattern!
If you want to leave a question, please make sure you select the correct category in the form below, to speed up the answering process. Required fields are marked *.