
Looking for a yarn?


Comments / Questions (45)
![]() Dorothy wrote:
Dorothy wrote:
Are the armhole decreases in pattern, or just the next 44 stitches on the needle? I did it in pattern and ended up needing 62 cast ons for size S/M. If it's the next 44 stitches, how do I know the # of yarn overs?
18.01.2025 - 21:40DROPS Design answered:
Dear Dorothy, yes, the 44 stitches that are cast off are first worked in the pattern, alongside the 2 increases. Then, you should cast on 46 stitches (the cast off stitches + increased stitches); this would match the necessary width of the armhole according to the gauge and the size chart. If you need as many as 62 stitches, your cast-on gauge may be too tight; try working slightly looser stitches when casting on. If you need a wider armhole than in the size chart you can cast on more stitches but you need to spread out the stitches in the other sections so that the charts will still match. Happy knitting!
19.01.2025 - 22:25
![]() Myl wrote:
Myl wrote:
Domanda 3 - gli aumenti con i gettati di cui si parla per fare gli scalfi quanti sono? Sono 1 gettato per ognuna delle 52 maglie e quindi un totale di 104? Grazie per questo modello che è veramente molto bello.
31.10.2024 - 00:51DROPS Design answered:
Buonasera Myl, è corretto, sono aumenti che poi vengono intrecciati. Buon lavoro!
03.11.2024 - 23:54
![]() Myl wrote:
Myl wrote:
Domanda 2 - Non capisco bene come realizzare lo scalfo e la sua forma. Se ho capito bene i 2 "buchi" saranno entrambi su di un unico giro e saranno larghi 52 maglie ciascuno (+ gli aumenti). E' corretto?
31.10.2024 - 00:50DROPS Design answered:
Buongiorno Myl, è corretto, gli intrecci per gli scalfi sono su un unico giro. Buon lavoro!
31.10.2024 - 08:56
![]() Myl wrote:
Myl wrote:
Buongiorno ho tre domande (le devo spezzare su più messaggi perché su uno unico non ci stanno): domanda 1 - Quando c'è scritto: "Continuare fino a quando il lavoro misura 38 cm di diametro totale, aggiustarlo in modo che il giro successivo sia un giro di aumenti" vuol dire che, arrivata a 38 cm (per la taglia XXL) di diametro, proseguo il lavoro seguendo il modello fino a quando non arrivo al prossimo giro di aumenti segnati sul modello stesso? (quindi magari faccio ancora altri 2 giri?)
31.10.2024 - 00:49DROPS Design answered:
Buongiorno Myl, la sua lavorazione è corretta: se il giro di aumenti è posizionato appena prima dei 38 cm, può fermarsi anche lì. Buon lavoro!
31.10.2024 - 08:55
![]() Murielle Branchtein wrote:
Murielle Branchtein wrote:
Bonjour, J'arrive presque à la fin de mon ouvrage c'est à dire aux devants. Lorsque vous indiquez "ajustez le 1er rang pour que.... L'endroit sur l'envers". Est ce que cela veut dire qu'il faut inverser toutes les mailles, les en endroit deviennent en envers et inversement. Merci.
12.07.2024 - 15:15DROPS Design answered:
Bonjour Mme Branchstein, quand on tricote le point mousse en rond, on alterne 1 tour endroit, 1 tour envers; quand on tricote le point mousse en allers et retours, on doit tricoter tous les rangs à l'endroit, ajustez bien le 1er rang du point mousse pour le tricoter soit à l'endroit sur l'endroit soit à l'endroit sur l'envers pour continuer le point mousse sans démarcation. Bon tricot!
29.07.2024 - 09:40
![]() Kirsten Karlsen wrote:
Kirsten Karlsen wrote:
Der står at a1 strikkes ind i a2, hvad menes der? Har prøvet men maskeantal passer ikke. Skal man tælle ud fra startpinden med mærket?
02.05.2024 - 16:47DROPS Design answered:
Hei Kirsten. Du stikker 8 rapporter av diagram A.1 og når du skal strikke rad 23 (raden før raden med pil), består A.1 av 14 masker + 2 kast. Så når du skal strikke raden med pil, strikker du A.1 over 15 masker og du har nå 1 maske igjen av 1. rapport av A.1. I denne masken strikker du A.2 (=1 maske). Fortsett slik (A.1 over 15 masker + A.2 over 1 maske x 8 ganger). Ved stjernen er alle maskene i A.1, bortsett fra de midterste 5, strikket inn i A.2. Klipp tråden og forskyv omgangens start 5 masker til venstre, slik at første maske i A.2 er starten på omgangen. mvh DROPS Design
06.05.2024 - 08:22
![]() Elvira Starace wrote:
Elvira Starace wrote:
Buongiorno sto provando a fare questo cardigan e sono solo al 20simo giro ma mi pare un po complesso. Potere dirmi se riesco a trovare un tutorial da qualche parte? Grazie Elvira
06.04.2024 - 00:40DROPS Design answered:
Buongiorno Elvira, non abbiamo un tutorial completo di questo modello, ma nella pagina del modello può trovare dei video delle singole tecniche utilizzate. Buon lavoro!
06.04.2024 - 09:30
![]() Gitte Holm Hjarsen wrote:
Gitte Holm Hjarsen wrote:
Strikkefastheden er 32 p = 10 cm. Der skal lukkes af til ærmer når arb måler 36 cm (L/XL). Dette giver ca 115 p inden der lukkes af. Men iflg opskrift skal der være ca 272 m, når der lukkes af. Dette opnås allerede efter ca 70 p. Så hvad skal man gå efter - 36 cm? Eller 272 m?
08.03.2024 - 14:21DROPS Design answered:
Hei Gitte. Det skal felles til ermhull når arbeidet måler 36 cm i DIAMETER, (ikke fra der omgangen startet). mvh DROPS Design
18.03.2024 - 09:07
![]() Murielle BRANCHTEIN wrote:
Murielle BRANCHTEIN wrote:
Bonsoir, J(ai déjà démonté plusieurs fois mon ouvrage et je viens d'identifier un problème. Au 23 -ème rang, on a 14 mailles et on fait 2 jetés, on devrait obtenir 16 mailles au 24 -ème rang. Malgré tout, on obtient 15 mailles. Je ne sais pas quoi faire, mon étoile est difforme. Merci beaucoup, Murielle
01.03.2024 - 20:48DROPS Design answered:
Bonjour Murielle, au 23ème tour, vous avez 16 mailles dans chaque A.1, au tour suivant (celui avec la flèche), vous tricotez A.1 sur les 15 premières mailles, A.2 sur la maille suivante (on retrouve ainsi bien les 16 mailles du tour précédent). Autrement dit, on termine la fleur au début de A.1 et on commence le point ajouré entre les pétales via A.2; le nombre de mailles de A.1 va progressivement diminuer alors que celui de A.2 va augmenter. Pensez. à mettre des marqueurs entre chaque diagramme pour mieux repérer vos mailles et les motifs correspondants. Bon tricot!
04.03.2024 - 07:26
![]() Mona O wrote:
Mona O wrote:
Virkelig flot mønster. Jeg er nået til ærmekuppel, hvor der skal lukkes masker af i hver side. Der står luk af i begyndelsen af hver pind i hver side således: 2 masker 7 gange. Er det så 7 eller 14 pinde?
10.07.2023 - 10:04DROPS Design answered:
Hei Mona. Det felles i BEGYNNELSEN av hver pinne (retten og vrangen) 7 ganger. Når det er felt 7 ganger i begynnelsen av hver pinne er det strikket 14 pinner. mvh DROPS Design
24.07.2023 - 13:36
|
|||||||||||||||||||||||||
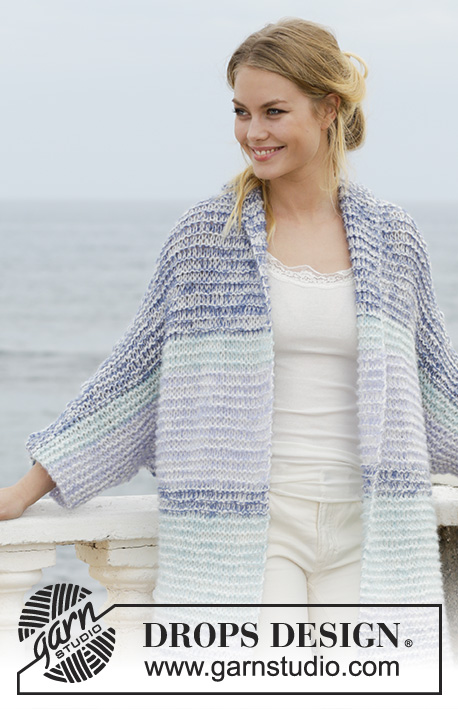
Seaside Dreamer#seasidedreamerjacket |
|||||||||||||||||||||||||
 |
 |
||||||||||||||||||||||||
Knitted circle jacket with lace pattern. Sizes S - XXXL. The piece is worked in DROPS BabyAlpaca Silk.
DROPS 191-6 |
|||||||||||||||||||||||||
|
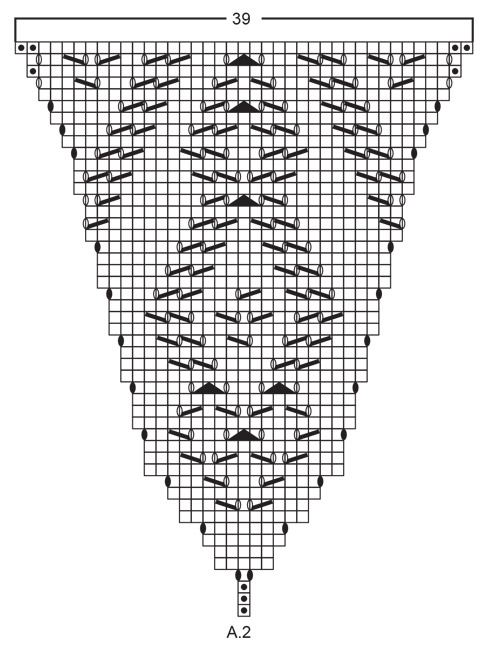
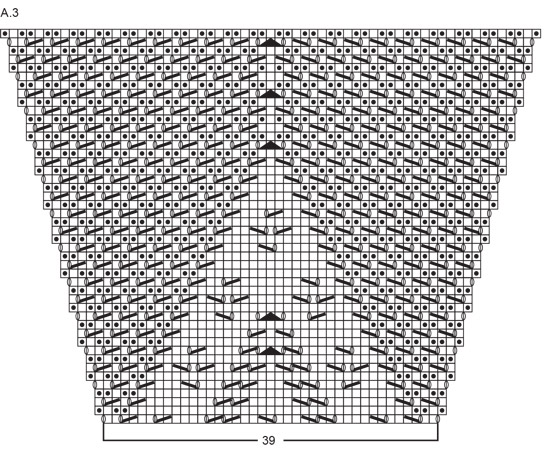
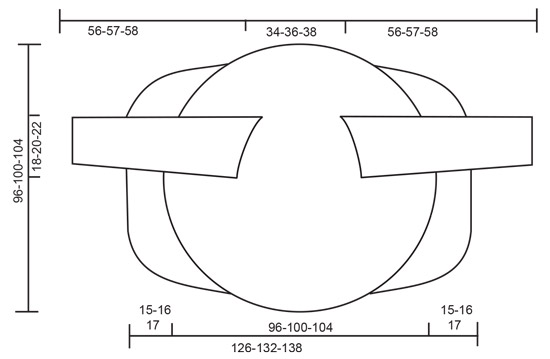
INFORMATION FOR THE PATTERN: PATTERN: See diagrams A.1 to A.4. The diagrams show all the rows in the pattern seen from the right side. RIDGE/GARTER STITCH (worked in the round): 1 ridge = 2 rounds. Knit 1 round and purl 1 round. INCREASE TIP: Start 1 stitch before the marker thread. Make 1 yarn over, knit 2 (the marker thread sits in the middle of these 2 stitches), 1 yarn over. On the next round knit the yarn overs twisted to avoid holes. ---------------------------------------------------------- CIRCLE JACKET: The jacket is worked in the round from the middle of the motif (the back), then back and forth in each side. The sleeves are worked separately and sewn on to finish. Cast on 8 stitches with BabyAlpaca Silk and divide them between 4 double pointed needles size 3 mm / US 2.5. Work according to A.1 (= 8 repeats of A.1 on the round). Insert a marker thread at the beginning of the round. Work up to and including the round before the arrow in A.1= 128 stitches on the needle. From the round with the arrow, work A.2 after each A.1 as follows: Work * A.1 over the first/next 15 stitches as before, work A.2 over the next stitch *, work from *-* a total of 8 times. Continue the pattern like this. The stitches in A.1 are worked into A.2 at the same time as you increase on each side of A.2 (the increases are drawn in the diagram). Work up to and including the round with a star in A.1. Now all the stitches in A.1, apart from the middle 5, have been worked into A.2. Cut the strand and begin the next round 5 stitches to the left, so that the first stitch in A.2 is the beginning of the round. Continue with A.1 and A.2; when A.1 has been worked 1 time in height, repeat A.1a to finished length. Change to circular needle when you have enough stitches. Continue until the piece measures a total of 34-36-38 cm / 13⅜"-14⅛"-14⅞" in diameter, adjust so that next round is a round with increases. Now work armholes as follows (there are approx. 256-272-288 stitches on the needle): Increase as before, i.e. when binding off for armholes increase over these stitches, i.e. make yarn overs that are to be bind off. On next round cast on for the armhole, cast on the same amount of stitches as where bind off for armhole (including the increases), i.e count the stitches that where bind off. Work pattern as before over the first 37-39-42 stitches, bind off the next 44-48-52 stitches for armhole (the number of stitches is without the increases, these increases come in addition to the stitches), work pattern as before until there are 81-87-94 stitches left, bind off the next 44-48-52 stitches for armhole (the number of stitches is without the increases, these increases come in addition to the stitches), work pattern over the last 37-39-42 stitches. On the next round cast on the same amount of stitches that was bind off for armhole (i.e. 44-48-52 stitches + increases that come in addition to the stitches) over the bind-off stitches. Continue with pattern as before. When A.2 has been worked 1 time in height (there are now 352 stitches on the needle), continue with A.3 over A.2 (A.1a continued as before). When A.3 has been worked 1 time in height, repeat the top 12 rounds of A.3; you increase as before every 4th round and you continue working rows of holes and garter stitch. Continue with A.3 and A.1a until the piece measures 96-100-104 cm / 37 ¾"-39⅜"-40⅞", there are approx. 672-696-720 stitches on the needle. Now divide for the front pieces as follows: bind off the first 54-56-58 stitches, work the next 162-168-174 stitches (= left front piece), bind off stitches until you have 216-224-232 stitches left, work the next 162-168-174 stitches (= right front piece), place these stitches on a thread and bind off the last 54-56-58 stitches. Cut and fasten the strand. LEFT FRONT PIECE: Continue with pattern back and forth over the 162-168-174 stitches; adjust on row 1 so that the purled stitches in the ridges are now knitted from the wrong side. AT THE SAME TIME as the first 2 stitches at the beginning of each row are bind off (= 2 stitches bind off on each row). Continue the pattern and to bind off like this until the piece measures a total of 63-66-69 cm / 24 ¾"-26"-27⅛" from the middle of the circle (i.e. the front piece measures approx. 15-16-17 cm / 5⅞"-6 ¼"-6⅝"). Bind off the remaining stitches. RIGHT FRONT PIECE: Work as for the left front piece. SLEEVE: The sleeve is worked in the round with double pointed needles/short circular needle. Cast on 48-56-64 stitches with double pointed needles size 3 mm / US 2.5 and BabyAlpaca Silk. Work 3 RIDGES – see description above, then work A.4 over all stitches (= 6-7-8 repeats in width). When A.4 has been worked 1 time in height continue with stockinette stitch over all stitches. Insert 1 marker thread at the beginning of the round (= mid under sleeve). When the piece measures 5 cm / 2" increase 1 stitch on each side of the marker thread - read INCREASE TIP. Increase every 6th round a total of 18-19-20 times = 84-94-104 stitches. When the piece measures 43-43-42 cm / 16⅞"-16⅞"-16 ½" bind off 4 stitches on each side of the marker thread and continue working back and forth on circular needle = 76-86-96 stitches. Bind off for the sleeve cap at the beginning of each row in each side as follows: 2 stitches 7-7-8 times, 1 stitch 5-7-9 times and 2 stitches in each side until the piece measures 56-57-58 cm / 22"-22⅜"-22 ¾". Bind off the remaining stitches and work the other sleeve in the same way. ASSEMBLY: Gather together the 8 stitches at the beginning of the piece. Sew in the sleeves. |
|||||||||||||||||||||||||
Diagram explanations |
|||||||||||||||||||||||||
|
|||||||||||||||||||||||||

|
|||||||||||||||||||||||||
|
|||||||||||||||||||||||||
|
|||||||||||||||||||||||||
|
|||||||||||||||||||||||||
Have you finished this pattern?Tag your pictures with #dropspattern #seasidedreamerjacket or submit them to the #dropsfan gallery. Do you need help with this pattern?You'll find 26 tutorial videos, a Comments/Questions area and more by visiting the pattern on garnstudio.com. © 1982-2025 DROPS Design A/S. We reserve all rights. This document, including all its sub-sections, has copyrights. Read more about what you can do with our patterns at the bottom of each pattern on our site. |
|||||||||||||||||||||||||


With over 40 years in knitting and crochet design, DROPS Design offers one of the most extensive collections of free patterns on the internet - translated to 17 languages. As of today we count 314 catalogs and 11822 patterns - 11812 of which are translated into English (US/in).
We work hard to bring you the best knitting and crochet have to offer, inspiration and advice as well as great quality yarns at incredible prices! Would you like to use our patterns for other than personal use? You can read what you are allowed to do in the Copyright text at the bottom of all our patterns. Happy crafting!
Post a comment to pattern DROPS 191-6
We would love to hear what you have to say about this pattern!
If you want to leave a question, please make sure you select the correct category in the form below, to speed up the answering process. Required fields are marked *.