
Popular categories
Looking for a yarn?


Comments / Questions (44)
![]() Aissela Laudo wrote:
Aissela Laudo wrote:
Mi potete consigliare, per ogni singolo pezzo (strisce del davanti, maniche ,dietro) che vivagno fare? Per l aspetto finale e per la confezione. Grazie
20.07.2019 - 08:44DROPS Design answered:
Buongiorno Aissela. Nel testo trova indicato come lavorare le maglie vivagno, sia quando sono previsti aumenti che quando non lo sono. Seguendo le indicazioni riportate, otterrà il risultato come da fotografia. Buon lavoro!
21.07.2019 - 14:34
![]() Maciej wrote:
Maciej wrote:
Mógłbym prosić o wzór graficzny?
06.07.2019 - 17:47DROPS Design answered:
Witaj Macieju, schematyczny rysunek znajduje się na dole, na samym końcu wzoru. Pozdrawiamy!
08.07.2019 - 08:41
![]() Ria Bout wrote:
Ria Bout wrote:
Bij het minderen van de voorpanden voor de heup brei je de terugbreiende naald alle steken recht cq averecht. Waarom brei je aan de andere kant de 3 steken ribbel niet meer? Staat een beetje vreemd.
25.03.2019 - 18:57DROPS Design answered:
Dag Ria,
Dankjewel, dit moet inderdaad aangepast worden in het patroon. Ik heb het doorgegeven aan design, ter controle.
10.04.2019 - 09:56
![]() Uta Fournier wrote:
Uta Fournier wrote:
Wenn ich Maschen am Ende der Reihe zunehme wird der Rand sehr unregelmässig, sieht aus, wie Schlaufen. Betreffs 9 Maschen Halsausschnitt in jeder 2. Reihe abnehmen, heisst das: abnehmen, Reihe zu Ende stricken dann einmal ohne Anahme hin und zurück und dann wieder abnehmen? Was mach ich bei der Rechnung falsch? 40 Maschen, dann -9 für Hals (=31) + 1x4+2x4(=12) heisst 43 Maschen am Ende, nicht 45
24.03.2019 - 18:40DROPS Design answered:
Liebe Frau Fournier, die neuen Maschen werden am Ende jeder Rückreihe gestrickt = an der Seite nicht gegen Hals. Sie haben 40 M und nehmen 1 Masche 9 Mal insgesamt ab und nehmen Sie gleichzeitig 1 Masche 4 M + 2 Maschen 5 x = 40 - 9 + (4+10)= 45 Maschen. Viel Spaß beim stricken!
25.03.2019 - 11:53
![]() Fuchs wrote:
Fuchs wrote:
Bonjour J'ai terminé le devant naturel pour la taille M: j'ai mesuré l'ouvrage comme dit pour arriver à 59 cm; Quand je le place sur le dos,le devant est vraiment TRES long par rapport au dos! J'ai bien respecté les mesures: je ne comprends pas . Dommage que l'on ne peut pas envoyer une photo... J'espère que vous pourrez me venir en aide? Je vous en remercie d'avance.
11.12.2018 - 20:15DROPS Design answered:
Bonjour Mme Fuchs, votre devant a-t'il bien la forme de celui du schéma? N'hésitez pas à envoyer une photo à votre magasin, ce sera plus simple pour lui de vous aider en voyant ce que vous avez fait - vous pouvez les contacter par mail ou téléphone. Bon tricot!
12.12.2018 - 08:47
![]() Fuchs wrote:
Fuchs wrote:
Bonjour Pour les devants du pull: D'où à d'où mesure t'on l'ouvrage de façon qu'il fasse 59 cm pour le taille M? A partir du début du tricot ou à partir du fil marqueur? Merci encore pour vos explications
27.11.2018 - 21:44DROPS Design answered:
Bonjour Mme Fuchs, on mesure l'ouvrage à partir du marqueur du côté droit (vu sur l'endroit), au niveau où il est indiqué "MESURER DÉSORMAIS L'OUVRAGE À PARTIR D'ICI!" jusqu'aux mailles sur l'aiguille, le long du côté avec le marqueur. Bon tricot!
28.11.2018 - 08:36
![]() Nicole Schubert wrote:
Nicole Schubert wrote:
Hallo, ich möchte dieses Modell gerne mit Safran stricken. Nun werden in der Anleitung ZWEI Fäden angegeben, Alpaca und Kid Silk. Reicht da tatsächlich ein Faden Safran (wenn ich Kid silk weglasse), oder wird die Arbeit dann zu klein?
12.11.2018 - 12:07DROPS Design answered:
Liebe Frau Schubert, dieses Modell wird mit 2 Fäden gestrickt dh 1 Faden Alpaca + 1 Faden Kid-Silk, wenn Sie mit Safran stricken möchten, sollen Sie dann auch 2 Fäden Safran stricken ( oder 1 Faden der Garngruppe C ) - hier lesen Sie mehr über die Garnalternativen. Viel Spaß beim stricken!
12.11.2018 - 12:14
![]() Fuchs wrote:
Fuchs wrote:
Bonjour Je ne comprends pas les explications ^ devant rose" Tricoter jusqu'à ce qu'il reste 5 mailles..... Côté encolure je ne vois pas ce qu'il faut faire et quand toutes les mailles sont montées il doit resté 49 mailles et moi il me reste 43..... Je vous remercie d'avance pour plus d.explications
07.11.2018 - 17:41DROPS Design answered:
Bonjour Mme Fuchs, quand il reste 5 m, tricotez ces 5 m ainsi: 2 m ens à l'end, 3 m point mousse. Continuez ensuite ainsi en jersey avec les 3 m point mousse côté encolure et diminuez ainsi sur l'endroit encore 8x 1 m tous les 2 rangs (= 9 diminutions) et montez à la fin de chaque rang sur l'envers: 4x 1 m et 4 x2 m = vous aviez 46 m en taille M - 9 m pour l'encolure + 12 m augmentées = 49 m au total. Bon tricot!
08.11.2018 - 08:55
![]() Alessia Laudo wrote:
Alessia Laudo wrote:
Buonasera, mi piacerebbe realizzare questo maglione sui toni del grigio (una fascia grigio chiara, una grigio scuro o nero) invece che panna/rosa. potreste indicarmi voi il filato e i numeri che utilizzereste voi? il consiglio è prezioso. grazie
28.10.2018 - 17:21DROPS Design answered:
Buongiorno Alessia. Per un consiglio migliore sulla scelta dei colori , può rivolgersi al suo rivenditore Drops di fiducia. Buon lavoro!
30.10.2018 - 16:40
![]() Susanne Madsen wrote:
Susanne Madsen wrote:
Som lovet på Facebook kommer her mine rettelser/erfaringer med/ til opskriften på denne fantastisk smukke trøje. Str XL strikkefasthed 18*26 Fra mærkettråd strikkes der 50 cm (ikke 68) og lukkes af som skrevet. Mål A og D måler 39 cm (ikke 31) hvilket gør at ryggen skal forlænges med 8 cm for at få det hele til at passe. Håber at dette kan bruges Mvh. Susanne Madsen
20.08.2018 - 14:57DROPS Design answered:
Tusind tak Susanne, design skal se på det så hurtigt som muligt :)
21.08.2018 - 11:21
|
||||
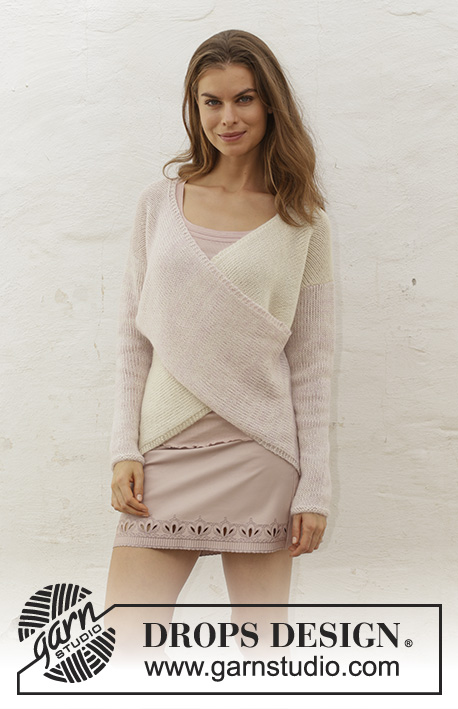
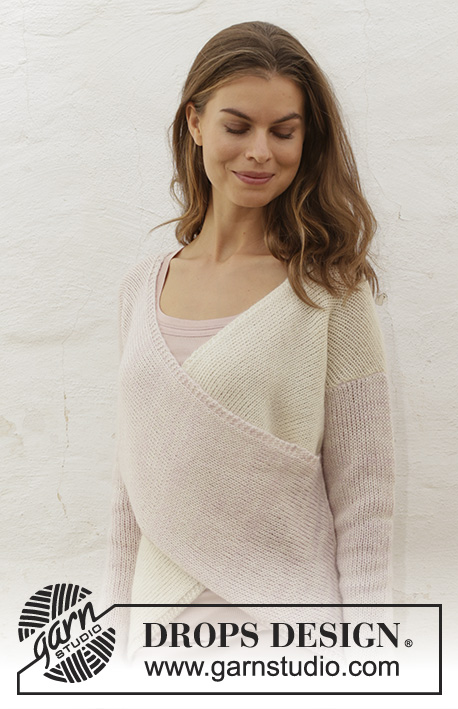
Sweet Twist#sweettwistsweater |
||||
 |
 |
|||
Knitted sweater with wrapped front pieces. Sizes S - XXXL. The piece is worked in DROPS Alpaca + DROPS Kid-Silk.
DROPS 188-10 |
||||
|
INFORMATION FOR THE PATTERN: RIDGE/GARTER STITCH (worked back and forth): 1 ridge = Knit 2 rows. DECREASE TIP (for neck): Decrease for neck inside the 3 edge stitches in garter stitch. All decreases are made from the right side! Decrease as follows before the 3 edge stitches: Knit 2 together. Decrease as follows after the 3 edge stitches: Slip 1 stitch as if to knit, knit 1, pass the slipped stitch over the knitted stitch. INCREASE TIP (for sleeves): All increases are made from the right side! Increase 1 stitch by making 1 yarn over. On the next row, purl the yarn over twisted to avoid a hole. ---------------------------------------------------------- SWEATER: The piece is worked back and forth with circular needle. The front pieces cross each other mid front. Both the front pieces are worked top down, from the one shoulder to the opposite hip. The back piece is worked bottom up. The sleeves are worked back and forth with circular needle, bottom up. PINK FRONT PIECE – WORKED FROM RIGHT SHOULDER DOWN TO LEFT HIP: Cast on 2 stitches with Alpaca and light pink Kid-Silk (= 2 strands). Work back and forth in stockinette stitch, AT THE SAME TIME as you cast on new stitches at the end of each row as follows: ROW 1 (right side): Knit all stitches, cast on 1 stitch at the end of the row. ROW 2 (wrong side): Purl all stitches, cast on 1 stitch at the end of the row. ROW 3: Knit all stitches, cast on 2 stitches at the end of the row. ROW 4: Purl all stitches, cast on 2 stitches at the end of the row. You have now increased 6 stitches and there are 8 stitches on the needle. Repeat rows 1-4 a total of 6-7-7-9-10-11 times = 38-44-44-56-62-68 stitches. Sizes XL and XXL are now finished. Continue working in sizes S, M, L and XXXL as follows: Continue with stockinette stitch and cast on 1 new stitch at the end of each row in each side 1-1-3-1 times = 40-46-50-70 stitches. All sizes: There are now 40-46-50-56-62-70 stitches on the needle. Now work from the right side as follows: Knit until there are 5 stitches left on the row, knit 2 together (= 1 stitch decreased), 3 stitches in garter stitch (= towards neck). Continue back and forth with stockinette stitch and 3 stitches in garter stitch towards the neck, AT THE SAME TIME decrease 1 stitch inside the 3 stitches in garter stitch towards the neck every 2nd row a total of 9 times and cast on stitches at the end of every row from the wrong side as follows: Cast on 1 stitch 4-4-3-5-3-1 times and 2 stitches 5-4-4-2-2-2 times. REMEMBER THE GAUGE! When all stitches have been cast on and the decreases towards the neck are finished, there are 45-49-52-56-60-66 stitches on the needle. Insert a marker thread here in the right-hand side of piece seen from the right side of work! THE PIECE IS NOW MEASURED FROM HERE! Continue back and forth with stockinette stitch and 3 stitches in garter stitch on each side of the piece. When the piece measures 40-42-45-47-51-54 cm / 15¾"-16½"-17¾"-18½"-20"-21¼" - adjust so that the next row is worked from the right side, insert a marker thread at the end of the row from the right side (used for assembly). Now bind off stitches at the beginning of each row from the wrong side as follows: ROW 1 (right side): knit all stitches. ROW 2 (wrong side): bind off 2 stitches, purl remaining stitches. ROW 3: knit all stitches. ROW 4: bind off 3 stitches, purl remaining stitches. Repeat rows 1-4 a total of 5-7-6-6-2-2 times, then bind off 2 stitches at the beginning of every row from the wrong side until all stitches have been bind off. Cut the strand and thread it through the last stitch on the needle. OFF WHITE FRONT PIECE – WORKED FROM LEFT SHOULDER DOWN TO RIGHT HIP: The piece is worked in the same way as the first front piece, but reversed. In other words, you work as follows: Cast on 2 stitches with Alpaca and off white Kid-Silk (= 2 strands). Work back and forth in stockinette stitch, AT THE SAME TIME as you cast on new stitches at the end of each row as follows: ROW 1 (right side): Knit all stitches, cast on 1 stitch at the end of the row. ROW 2 (wrong side): Purl all stitches, cast on 1 stitch at the end of the row. ROW 3: Knit all stitches, cast on 2 stitches at the end of the row. ROW 4: Purl all stitches, cast on 2 stitches at the end of the row. You have now increased 6 stitches and there are 8 stitches on the needle. Repeat rows 1-4 a total of 6-7-7-9-10-11 times = 38-44-44-56-62-68 stitches. Sizes XL and XXL are now finished Continue in sizes S, M, L and XXXL as follows: Continue with stockinette stitch and cast on 1 new stitch at the end of each row in each side 1-1-3-1 times = 40-46-50-70 stitches. All sizes: There are now 40-46-50-56-62-70 stitches on the needle. Now work from the right side as follows: Work 3 stitches in garter stitch (= towards the neck), slip 1 stitch as if to knit, knit 1, pass the slipped stitch over, knit to end of row. Continue back and forth with stockinette stitch and 3 stitches in garter stitch towards the neck, AT THE SAME TIME decrease 1 stitch inside the 3 stitches in garter stitch towards the neck every 2nd row a total of 9 times and cast on at the end of each row from the right side as follows: Cast on 1 stitch 4-4-3-5-3-1 times and 2 stitches 5-4-4-2-2-2 times. When all the stitches are cast on and the decreases are finished, there are 45-49-52-56-60-66 stitches on the needle. Insert a marker here in left-hand side of piece seen from right side of work! THE PIECE IS NOW MEASURED FROM HERE! Continue back and forth with stockinette stitch and 3 stitches in garter stitch in each side of the piece. When the piece measures 40-42-45-47-51-54 cm / 15¾"-16½"-17¾"-18½"-20"-21¼" - adjust to match the other front piece and so that the next row is worked from the right side, insert a marker thread at the beginning of the row from the right side. Now bind off stitches at the beginning of each row from the right side as follows: ROW 1 (right side): bind off 2 stitches, knit remaining stitches. ROW 2 (wrong side): purl all stitches. ROW 3: bind off 3 stitches, knit remaining stitches ROW 4: purl all stitches. Repeat rows 1-4 a total of 5-7-6-6-2-2 times, then bind off 2 stitches at the beginning of every row from right side until all stitches have been bind off. Cut the strand and thread it through the last stitch on the needle. BACK PIECE: Cast on 84-90-98-106-117-127 stitches with circular needle size 5 mm / US 8 and 1 strand Alpaca + 1 strand light pink Kid-Silk (= 2 strands). Work 2 ridges. Then work stockinette stitch with 1 edge stitch in garter stitch in each side. When the piece measures 28-29-30-31-32-34 cm / 11"-11⅜"-11 ¾"-12⅛"-12 ½"-13⅜" insert a marker in each side (used for assembly). Continue until the piece measures 40-41-42-43-44-45 cm / 15¾"-16⅛"-16½"-17"-17¼"-17¾". Insert a new marker in each side (used for assembly = marks the armhole in each side). Continue working until the piece measures 50-52-54-56-58-60 cm / 19¾"-20½"-21¼"-22"-22¾"-23⅝". Now work garter stitch over the middle 28-28-30-30-31-31 stitches on the row; the remaining stitches are continued in stockinette stitch with 1 edge stitch in garter stitch in each side. Continue like this until you have worked 2 ridges over the middle stitches. On the next row bind off the middle 24-24-26-26-27-27 stitches for the neck and each shoulder is finished separately. Then decrease 1 stitch inside the 3 stitches in garter stitch on the next row from the neck - read DECREASE TIP = 29-32-35-39-44-49 stitches on shoulder. Continue until the piece measures a total of 56-58-60-62-64-66 cm / 22"-22¾"-23⅝"-24⅜"-25¼"-26". Bind off. Work the other shoulder in the same way. SLEEVES: Cast on 38-40-41-43-44-47 stitches with circular needle size 5 mm / US 8 and 1 strand Alpaca and 1 strand light pink Kid-Silk (= 2 strands). Work 2 ridges. Then work stockinette stitch with 1 edge stitch in garter stitch in each side. When the piece measures 9-7-6-6-6-4 cm / 3 ½"-2 ¾"-2⅜"-2⅜"-2⅜"-1 ½" increase 1 stitch inside the 1edge stitch in garter stitch in each side – read INCREASE TIP. Increase like this every 10th-9th-8th-7th-6th-6th row a total of 9-10-11-12-13-13 times = 56-60-63-67-70-73 stitches. Continue working until the sleeve measures 49-48-46-45-43-41 cm / 19 ¼"-18⅞"-18"-17⅝"-16⅞"-16⅛". Bind off. Work the other sleeve in the same way. ASSEMBLY: Place the back piece on a table, with the right side facing down and the wrong side up. Assembly of the off white front piece: Place the off white front piece on top of the back piece with the wrong side towards the back piece and the right side up. The off white front piece should lie so that it slopes from the left shoulder down to the right hip - see sketch and picture! Make sure that the marker thread on the left side of the off white front piece matches the marker inserted after 28-29-30-31-32-33 cm / 11"-11⅜"-11¾"-12¼"-12½"-13" on the left side of the back piece and that the marker thread on the right side of the off white front piece matches the marker inserted after 28-29-30-31-32-33 cm / 11"-11⅜"-11¾"-12¼"-12½"-13" on the right side of the back piece. Sew inside the 1 edge stitch in garter stitch on the back piece and inside the bind-off /cast-on edge on the front piece: Sew the seam from the marker threads on the right side and all the way down to the cast-on edge on the back piece (= A – see sketch). Sew the seam from the marker thread on the left side and up to the marker thread inserted for the armhole on the back piece (= B – see sketch). There are now 16-17-18-19-20-21 cm / 6¼"-6¾"-7"-7½"-8"-8¼" left for the armhole. Sew the shoulder seams (= C – see sketch) inside the bind-off/cast-on edge. Assembly of the light pink front piece: Place the light pink front piece over the off white front piece. The pink front piece should slope from the right shoulder down to the left hip – see sketch and picture! The marker threads on the front piece should match the marker threads on the back piece in the same way as for the off white front piece, but reversed: Sew inside the 1 edge stitch in garter stitch on the back piece and inside the bind-off/cast-on edge on the front piece: Sew the seam from the marker thread on the left side and all the way down to the cast-on edge on the back piece (= D – see sketch). Sew the seam from the marker thread on the right side and up to the marker thread inserted for armhole on the back piece (= E – see sketch). There are now 16-17-18-19-20-21 cm / 6¼"-6¾"-7"-7½"-8"-8¼" left for the armhole. Sew the shoulder seams (= F – see sketch) inside the bind-off/cast-on edge. Assembly of sleeves: Sew sleeves to body. Sew the seam under the sleeves. Cut and fasten all strands. |
||||
Diagram explanations |
||||
|
||||
 |
||||
Have you finished this pattern?Tag your pictures with #dropspattern #sweettwistsweater or submit them to the #dropsfan gallery. Do you need help with this pattern?You'll find 22 tutorial videos, a Comments/Questions area and more by visiting the pattern on garnstudio.com. © 1982-2026 DROPS Design A/S. We reserve all rights. This document, including all its sub-sections, has copyrights. Read more about what you can do with our patterns at the bottom of each pattern on our site. |
||||


With over 40 years in knitting and crochet design, DROPS Design offers one of the most extensive collections of free patterns on the internet - translated to 17 languages. As of today we count 325 catalogs and 12298 patterns - 12288 of which are translated into English (US/in).
We work hard to bring you the best knitting and crochet have to offer, inspiration and advice as well as great quality yarns at incredible prices! Would you like to use our patterns for other than personal use? You can read what you are allowed to do in the Copyright text at the bottom of all our patterns. Happy crafting!
Post a comment to pattern DROPS 188-10
We would love to hear what you have to say about this pattern!
If you want to leave a question, please make sure you select the correct category in the form below, to speed up the answering process. Required fields are marked *.