
Popular categories
Looking for a yarn?


Comments / Questions (8)
![]() Jette Kock wrote:
Jette Kock wrote:
I opskrift 183-6 i afsnit Ryg - forstykke er der denne uforståelig sætning : Når arbejdet måler 21-22-22-22 cm strikkes der 4 pinde retstrik - se forklaring over, over 6-6-6-8 masker i hver side Mon I kan genfinde de manglende ord i sætningen ?
20.12.2021 - 21:35DROPS Design answered:
Hej Jette, du strikker 4 pinde retstrik over de 6-6-6-8 masker i hver side (lige før du deler arbejdet til slids). Når du strikker retstrik på rundpind, så er første omgang vrang, næste ret, næste vrang og sidste ret...
21.12.2021 - 08:08
![]() Hhhalexander wrote:
Hhhalexander wrote:
The elevation instructions are very confusing. I know very well how to work a Wrap&Turn. For those who don't, Wrap&Turn instructions should be in a separate section. What I want to know are the stitch positions of the wraps and how many there are, written as a list rather than an essay. Please kindly advise.
16.09.2021 - 12:30DROPS Design answered:
Dear Hhhalexander, please understand that we cannot rewrite our patterns for each individual request. If there is a particular question, a point you are stuck, please let us know and we will be happy to answer. Also, HERE you can find a video about how to make teh elevation on the back of sweaters. Furtermore, if you are still need advice, you can always ask (either in person, or over the phone) in the store where you bought your DROPS yarn from. Happy Stitching!
17.09.2021 - 02:28
![]() Yvonne wrote:
Yvonne wrote:
Hallo, Ik ga deze trui breien en bij het doorlezen van het patroon viel me op dat er geminderd wordt bij de hals. Waarom is dat? Bij de kleinste maat zijn er nog maar 40 steken over. Dat past niet over mijn hoofd. Daarna wordt er weer gemeerderd naar 48 steken, maar ook dat is niet erg ruim. Klopt de beschrijving wel? Vriendelijke groet, Yvonne
09.04.2020 - 16:45DROPS Design answered:
Dag Yvonne,
Het patroon klopt wel. Het minderen en meerderen wordt gedaan om de halslijn elastisch te maken. Bij 40 steken heb je een halsomtrek van 40 cm, volgens de stekenverhouding. Als dit te strak is zou je het aantal steken iets aan kunnen passen.
13.04.2020 - 10:44
![]() Alexandra Fischer wrote:
Alexandra Fischer wrote:
Guten Tag, nun für mich entsteht eine Frage bei der Zunahme Grösse XL musterreihe 1 A.1 ... NUN ICH STRICKE 4 Maschen rot 2 weiss 5 rot 2weiss und nun 2 Maschen 2 (1 zunahme) 5 rote Maschen richtig? So wird dann automatisch der Mustersatz nach dem STRICKE folgt aus sehen wen ich zunahme mit zähle 4 maschen rot 2 weiss 5 rot2 weiss 8 maschen rot. Ist das richtig? Wenn ja habichandere zjnahmen zahl... Grüsse Stricksdesignerin
18.01.2019 - 07:25DROPS Design answered:
Liebe Frau Fischer, jedes Rapport wird so gestrickt: *4 M rot, 2 M weiss, 5 M rot, 2 M weiss, 2 M rot, 1 Umschlag, 1 M rot* - zwischen 2 Blumen haben Sie dann: 2 M, 1 Umschlag, 5 M im rot. aber am besten setzen Sie Markierer zwischen jedem Rapport, so können Sie am besten die Blumen nach Diagram prüfen. Viel Spaß beim stricken!
18.01.2019 - 11:24
![]() Anna Maria wrote:
Anna Maria wrote:
Volevo Chiedere come mai finito il collo devo diminuire E dopo per lo sprone devo aumentare Sembra un contro senso O non capisco il lavoro Grazie
13.07.2018 - 08:12DROPS Design answered:
Buongiorno Anna Maria. Viene suggerito di diminuire perchè al ferro sucessivo vengono cambiati i ferri. I ferri sono grossi e lavorando sullo stesso numero di maglie il lavoro risulterebbe troppo largo. Buon lavoro!
13.07.2018 - 08:35
![]() Racheal Watmore wrote:
Racheal Watmore wrote:
Hi, I love this pattern but I want to use an alternative to wool i.e. yarn not derived from an animal. Do you have suggestions please? Thanks, Racheal
17.03.2018 - 10:49DROPS Design answered:
Dear Racheal, we don't have plant based yarn or yarn made from man made fibers in this thickness. You might try to double up the DROPS Paris yarn (which is made from cotton), but please make sure you do a gauge swatch, wash and block it and make the necessary adjustments in needle-size and/or stitch count. Happy Knitting!
17.03.2018 - 12:50
![]() Maud Eijben wrote:
Maud Eijben wrote:
Mijn dochter wil heel graag deze trui maar ik denk dat de S/M te groot voor haar is. Is het mogelijk om deze trui ook in een kleiner maat te breien is? Ze is 13 jaar. Of is dat niet te doen? Hoor graag van u! groeten Maud
20.01.2018 - 21:07DROPS Design answered:
Hallo Maud, Wat je zou kunnen doen is met een kleinere naald breien, zodat de stekenverhouding anders is. Maak even een proeflapje en bereken op basis hiervan hoe groot (breed) de trui dan wordt. Eventueel kun je ook kiezen voor een garen uit garengroep D. Maak altijd een proeflapje en bereken dan hoe het uitkomt met de maten.
23.01.2018 - 09:16
![]() Barbara wrote:
Barbara wrote:
Vielen Dank für die tolle Anleitung und die vielen Tipps! Beim Rückenteil in Zeile 3 habe ich einen Tippfehler gefunden. Es sollte heißen: 68- 72 -80-100 (statt 71) Maschen Liebe Grüße, Barbara
16.11.2017 - 14:43
|
||||||||||||||||
Julerose#julerosesweater |
||||||||||||||||
 |
 |
|||||||||||||||
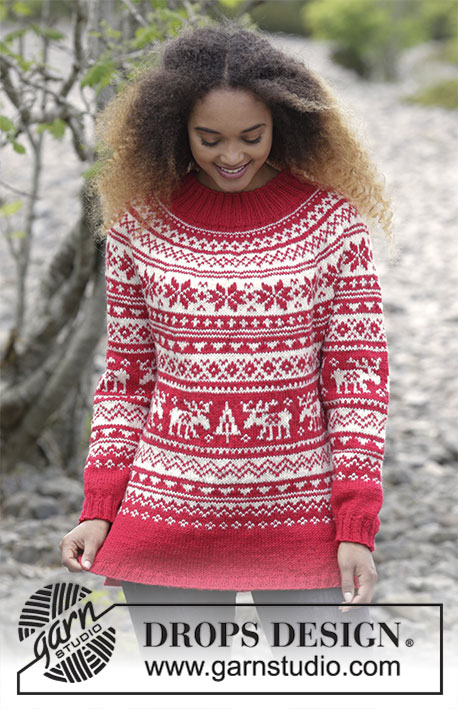
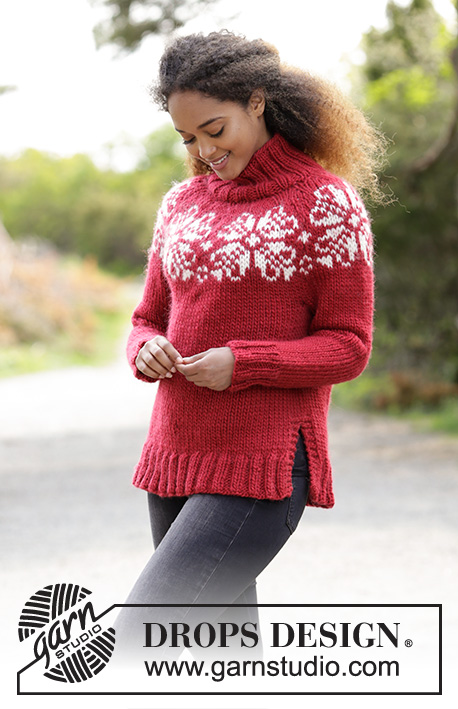
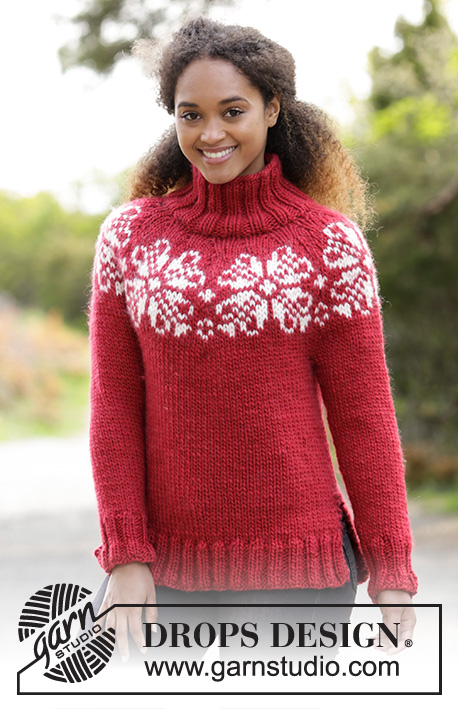
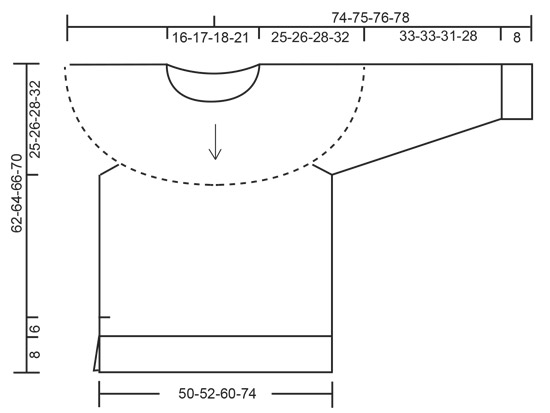
Knitted sweater with round yoke, high neck and multi-colored Nordic pattern, worked top down. Sizes S-XXXL. The piece is worked in DROPS Snow.
DROPS 183-6 |
||||||||||||||||
|
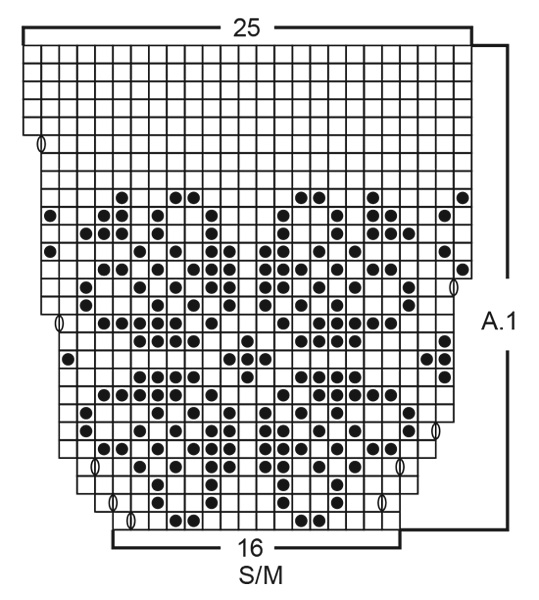
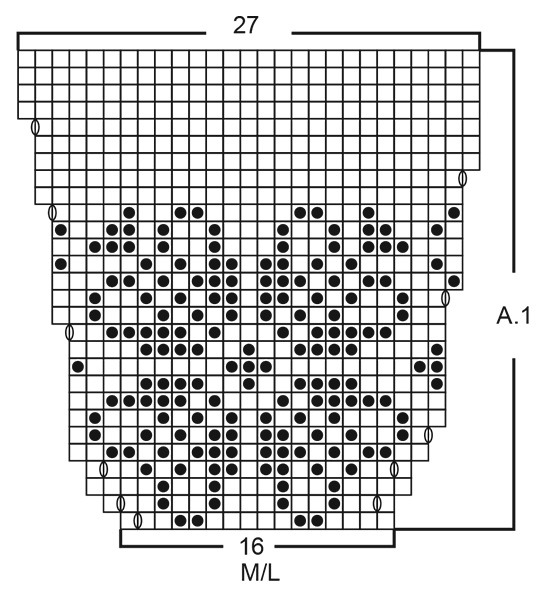
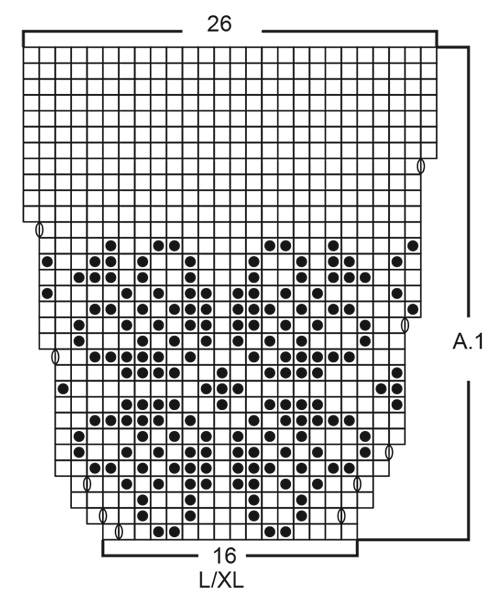
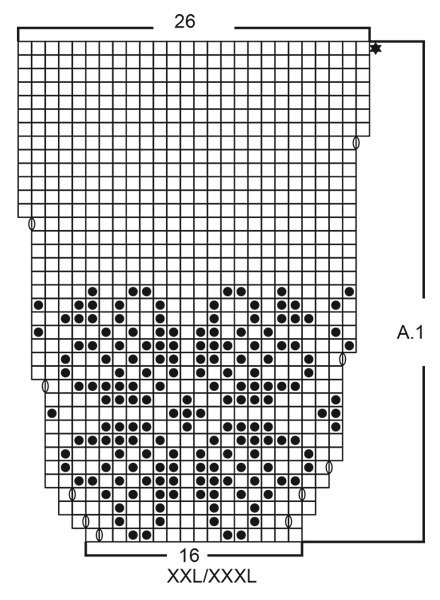
INFORMATION FOR THE PATTERN: RIDGE/GARTER STITCH (worked in the round): 1 ridge = 2 rounds. Knit 1 round and purl 1 round. RIDGE/GARTER STITCH (worked back and forth): 1 ridge = Knit 2 rows. DECREASE/INCREASE TIP (evenly spaced): To work out how to decrease/increase evenly, count the total number of stitches on needle (e.g. 60 stitches) and divide by number of decreases to be made (e.g. 20) = 3. In this example, knit together every 2nd and 3rd stitch. When increasing, make 1 yarn over after every 3rd stitch, on the next round knit the yarn overs twisted to avoid holes. PATTERN: See diagram A.1. Choose diagram for your size. The whole pattern is worked in stockinette stitch. INCREASE TIP (for rib): Increase in the purl section (from the right side) by making 1 yarn over in the transition between purl and knit. On the next row knit the yarn overs twisted to avoid holes. DECREASE TIP (for mid under sleeve): Start 3 stitches before marker thread, knit 2 together, knit 2 (the marker thread sits in the middle of these 2 stitches), slip 1 stitch as if to knit, knit 1, pass the slipped stitch over the knitted stitch (= 2 stitches decreased). ---------------------------------------------------------- SWEATER: The piece is worked in the round with circular needle from mid back, top down. You can work an elevation in the neck for a better fit; the yoke is then a little higher in the neck. You can leave out the elevation if you wish, the neck will then be the same front and back – see description for elevation further down. After the yoke, work the body in the round with circular needle down to the split, then the front and back pieces are worked back and forth separately. The sleeves are worked in the round with double pointed needles, top down. NECK: Cast on 60-64-68-72 stitches with short circular needle size 8 mm / US 11 and red. Knit 1 round. Then work rib in the round (= knit 2 / purl 2). When the piece measures 12 cm / 4¾" knit 1 round where you decrease 20-16-20-16 stitches evenly on round – read DECREASE/INCREASE TIP = 40-48-48-56 stitches. Insert 1 marker at the beginning of the round (= mid back). Change to circular needle size 9 mm / US 13 and knit 1 round. Then knit 1 round where you increase 8-0-16-8 stitches evenly on round = 48-48-64-64 stitches. Now you can work an elevation in the back of the neck or go straight to working the yoke if you do not want an elevation. ELEVATION IN BACK OF NECK: Skip this section if you do not want an elevation. Start mid back by the marker, knit 7-7-8-8 stitches, * keep the strand at the back of the piece, slip 1 stitch as if to purl, take the strand to the front of the piece between the stitches on right and left needle, pass the slipped stitch back onto the left needle, take the strand to back of piece, turn the piece (you have now created a "loop" around the turning stitch), purl 14-14-16-16 stitches from the wrong side. ** Keep strand at front of piece (i.e. towards you), slip 1 stitch as if to purl, take the strand to back of piece between stitches on right and left needle, pass the slipped stitch back onto left needle, take the strand to front of piece, turn the piece (you have now created a "loop" around the turning stitch). Knit 21-21-24-24 stitches, but over the turning stitch work as follows: Push right needle from underneath and up through the loop around the turning stitch and into the turning stitch as if to knit, pass both the loop and the turning stitch over onto the right needle. Push the left needle through both stitches from the front (towards you), and knit the 2 together, continue as before. Repeat from *, but purl 28-28-32-32 stitches back (instead of 14-14-16-16 stitches) and work as follows over the turning stitch (make sure the strand is on wrong side of piece i.e. towards you): Push the right needle into the loop around the turning stitch from underneath and up from the back (as if to purl), pass the loop over to the left needle. Purl these 2 together, continue working as before. Now work from ** before knitting 14-14-16-16 stitches to mid back. This technique is called Wrap and Turn and is used to avoid holes in the turns. NOTE: On the next round work over the turning stitch in the same way as described above. YOKE: = 48-48-64-64 stitches. ROUND 1: Knit and increase 16-16-16-16 stitches evenly on round (increase 1 stitch by making 1 yarn over after every 3rd-3rd-4th-4th stitch) = 64-64-80-80 stitches. ROUND 2: Knit and increase 0-16-0-16 stitches evenly on round (increase 1 stitch after every 0-4th-0-5th stitch) = 64-80-80-96 stitches. REMEMBER THE GAUGE! ROUND 3: Knit and increase 16-0-16-16 stitches evenly on round (increase 1 stitch after every 4th-0-5th-6th stitch) = 80-80-96-112 stitches. ROUND 4: Knit and increase 0-16-0-0 evenly on round (increase 1 stitch after every 0-5th-0-0 stitch) = 80-96-96-112 stitches. ROUND 5: Knit and increase 16-0-16-16 stitches evenly on round (increase 1 stitch after every 5th-0-6th-7th stitch) = 96-96-112-128 stitches. Continue working in the round according to A.1 (= 6-6-7-8 repeats of 16 stitches) - read PATTERN above. When A.1 has been completed, there are 150-162-182-210 stitches and the piece measures 25-26-28-32 cm / 9¾"-10¼"-11"-12½" measured mid front without the rib in neck. The next round is worked as follows with red: Work 22-23-27-33 stitches stockinette stitch (= half back piece), place the next 31-35-37-39 stitches on 1 thread for sleeve, cast on 6-6-6-8 new stitches on needle (= in side under sleeve), work 44-46-54-62 stitches stockinette stitch (= front piece), place the next 31-35-37-39 stitches on 1 thread for sleeve, cast on 6-6-6-8 new stitches on needle (= in side under sleeve) and work the remaining 22-23-27-33 stitches in stockinette stitch (= half back piece). Body and sleeves are finished separately. THE PIECE IS NOW MEASURED FROM HERE! BODY: = 100-104-120-148 stitches. Insert 1 marker thread in each side, i.e. in middle of the 6-6-6-8 stitches cast on under sleeve in each side – allow the marker threads to follow your work. Work stockinette stitch in the round. When the piece measures 21-22-22-22 cm / 8¼"-8¾"-8¾"-8¾" work 2 RIDGES - see description above, over the 6-6-6-8 stitches in each side (i.e. over 3-3-3-4 stitches on each side of marker threads – the other stitches are worked in stockinette stitch). When the 2 ridges are completed, divide the piece at the marker threads and the front and back pieces are finished separately. BACK PIECE: = 50-52-60-74 stitches. Work stockinette stitch back and forth with 3 edge stitches in garter stitch in each side (first row is worked from wrong side). When the piece measures 28-29-29-29 cm / 11"-11½"-11½"-11½" purl 1 row from the wrong side where you increase 18-20-20-26 stitches evenly on row (do not increase over the edge stitches) = 68-72-80-100 stitches on needle. Change to circular needle size 8 mm / US 11 and work the next row as follows from the right side: 3 edge stitches in garter stitch, * knit 2, purl 2 *, repeat from *-* until there are 5 stitches left on needle, knit 2 and finish with 3 edge stitches in garter stitch. Continue rib in this way. When the rib measures 5 cm / 2", increase all purl 2 (seen from the right side) to purl 3– read INCREASE TIP = 83-88-98-123 stitches. When the rib measures 8 cm / 3⅛" (the piece measures 37-38-38-38 cm / 14½"-15"-15"-15" from the separation and approx. 62-64-66-70 cm / 24½"-25¼"-26"-27½" from the shoulder down) bind off with knit over knit and purl over purl. FRONT PIECE: Work in the same way as the back piece. SLEEVE: Place the 31-35-37-39 stitches from the thread in the one side of the piece on double pointed needles size 9 mm / US 13 and, in addition, knit up 1 stitch in each of the 6-6-6-8 stitches cast on under the sleeve = 37-41-43-47 stitches on needle. Insert 1 marker thread in the middle of the 6-6-6-8 stitches which were cast on (= mid under sleeve) and allow the marker thread to follow your work. When the piece measures 3 cm / 1" from the separation decrease 2 stitches mid under sleeve – read DECREASE TIP. Decrease in this way every 5½-4½-4-2½ cm / 2¼"-1¾"-1½"-⅞" a total of 6-7-7-9 times = 25-27-29-29 stitches. When the piece measures 32-32-30-27 cm / 12½"-12½"-11¾"-10½" from the separation, knit 1 round where you increase 3-1-3-3 stitches evenly on round - remember DECREASE/INCREASE TIP = 28-28-32-32 stitches. Change to double pointed needles size 8 mm / US 11 and work rib in the round (= knit 2 / purl 2). When the rib measures 6 cm / 2⅜" increase every other purl 2 to purl 3 - remember INCREASE TIP = 32-32-36-36 stitches. When the rib measures 8 cm / 3⅛" (the sleeve measures 41-41-39-36 cm / 16"-16"-15¼"-14¼" from the separation) bind off with knit over knit and purl over purl. Work the other sleeve in the same way. |
||||||||||||||||
Diagram explanations |
||||||||||||||||
|
||||||||||||||||
 |
||||||||||||||||
 |
||||||||||||||||
 |
||||||||||||||||
 |
||||||||||||||||
 |
||||||||||||||||
Have you finished this pattern?Tag your pictures with #dropspattern #julerosesweater or submit them to the #dropsfan gallery. Do you need help with this pattern?You'll find 34 tutorial videos, a Comments/Questions area and more by visiting the pattern on garnstudio.com. © 1982-2026 DROPS Design A/S. We reserve all rights. This document, including all its sub-sections, has copyrights. Read more about what you can do with our patterns at the bottom of each pattern on our site. |
||||||||||||||||


With over 40 years in knitting and crochet design, DROPS Design offers one of the most extensive collections of free patterns on the internet - translated to 17 languages. As of today we count 324 catalogs and 12290 patterns - 12280 of which are translated into English (US/in).
We work hard to bring you the best knitting and crochet have to offer, inspiration and advice as well as great quality yarns at incredible prices! Would you like to use our patterns for other than personal use? You can read what you are allowed to do in the Copyright text at the bottom of all our patterns. Happy crafting!
Post a comment to pattern DROPS 183-6
We would love to hear what you have to say about this pattern!
If you want to leave a question, please make sure you select the correct category in the form below, to speed up the answering process. Required fields are marked *.