Clicking the ORDER button will redirect you to Wool Warehouse Direct Ltd website
The yarn cost is calculated from the pattern’s smallest size and the yarn’s cheapest product type. Looking for an even better price? You might find it on the DROPS Deals!
Feeling Serene / DROPS 184-1
Change language:
English (US/in)#feelingserenesweater
DROPS design: Pattern ai-069
-------------------------------------------------------
Alternative Yarn – See how to change yarns here
Yarn Groups A to F – Use the same pattern and change the yarn here
Yarn usage using an alternative yarn – Use our yarn converter here
-------------------------------------------------------
Clicking the ORDER button will redirect you to Wool Warehouse Direct Ltd website
The yarn cost is calculated from the pattern’s smallest size and the yarn’s cheapest product type. Looking for an even better price? You might find it on the DROPS Deals!
Each of our patterns has specific tutorial videos to help you.
These step-by-step tutorials might also help you:
Why is the knitting/crochet tension so important?
Knitting tension is what determines the final measurements of your work, and is usually measured per 10 x 10 cm. It is provided like so: number of stitches in width x number of rows in height - eg: 19 stitches x 26 rows = 10 x 10 cm.
The knitting tension is very individual; some people knit/crochet loosely while others work tightly. You adjust the knitting tension with the needle size, which is why the suggested needle size only serve as a guide! You need to adjust this (up or down) to ensure that YOUR knitting tension matches the knitting tension provided in the pattern. If you work with a different knitting tension than provided you will have a different yarn consumption, and your work will have different measurements than what the pattern suggests.
The knitting tension also determines which yarns can replace each other. As long as you achieve the same knitting tension you can replace one yarn with another.
See DROPS lesson: How to measure your tension/gauge
See DROPS video: How to make a gauge tension swatch
How do I know how many balls of yarn I need?
The required amount of yarn is provided in grams, eg: 450 g. To calculate how many balls you’ll need you first need to know how many grams are in 1 ball (25g, 50g or 100g). This information is available if you click on the individual yarn quality on our pages. Divide the amount required with the amount of each ball. For example, if each ball is 50g (the most common amount), the calculation will be as follows: 450 / 50 = 9 balls.
Can I use a different yarn than what the pattern suggests?
The important thing when changing from one yarn to another is that the knitting/crochet tension remains the same. This is so that the measurements of the finished piece will be the same as on the sketch provided. It is easier to achieve the same knitting tension using yarns from the same yarn group. It is also possible to work with multiple strands of a thinner yarn to achieve the knitting tension of a thicker one. Please try our yarn converter. We recommend you to always work a test swatch.
Please NOTE: when changing yarn the garment might have a different look and feel to the garment in the photo, due to individual properties and qualities of each yarn.
See DROPS lesson: Can I use a different yarn than the one mentioned in the pattern?
What are the yarn groups?
All our yarns are categorised into yarn groups (from A to F) according to thickness and knitting tension – group A contains the thinnest yarns and group F the thickest. This makes it easier for you to find alternative yarns to our patterns, should you wish to switch yarn. All yarns within the same group have a similar knitting tension and can easily replace each other. However, different yarn qualities have different structures and properties which will give the finished work a unique look and feel.
How do I use the yarn converter?
At the top of all our patterns you’ll find a link to our yarn converter, which is a helpful tool should you wish to use a different yarn than suggested. By filling in the yarn quality you wish to replace, the amount (in your size) and number of strands, the converter will present good alternative yarns with the same knitting tension. Additionally it will tell you how much you’ll require in the new qualities and whether you’ll need to work with multiple strands. Most skeins are 50g (some are 25g or 100g).
If the pattern is worked with multiple colours, every colour will have to be converted separately. Similarly, if the pattern is worked with several strands of different yarns (for example 1 strand Alpaca and 1 strand Kid-Silk) you will have to find alternatives for each, individually.
Why do you show discontinued yarns in the patterns?
Since different yarns have different qualities and textures we have chosen to keep the original yarn in our patterns. However, you can easily find options among our available qualities by using our yarn converter, or simply pick a yarn from the same yarn group.
It is possible that some retailers still have discontinued yarns in stock, or that someone has a few skeins at home that they would like to find patterns for.
The yarn converter will provide both alternative yarn as well as required amount in the new quality.
What size should I knit?
If you think it's hard to decide what size to make, it can be a good idea to measure a garment you own already and like the size of. Then you can pick the size by comparing those measures with the ones available in the pattern's size chart.
You'll find the size chart at the bottom of the pattern.
See DROPS lesson: How to read size chart
Why do I get the wrong knitting tension with the suggested needle size?
The needle size provided in the pattern serves only as a guide, the important thing is to follow the knitting tension. And since knitting tension is very individual, you will have to adjust the needle size to ensure that YOUR tension is the same as in the pattern – maybe you’ll have to adjust 1, or even 2 needle sizes, up or down to achieve the correct tension. For this, we recommend that you work test swatches.
Should you work with a different knitting tension than the one provided, the measurements of the finished garment might deviate from the measurement sketch.
See DROPS lesson: How to measure your tension/gauge
See DROPS video: How to make a gauge tension swatch
Why is the pattern worked top-down?
Working a garment top-down provides more flexibility and room for personal adjustment. For example it is easier to try the garment on while working, as well as making adjustments to length of yoke and shoulder caps.
The instructions are carefully explaining every step, in the correct order. Diagrams are adjusted to the knitting direction and are worked as usual.
How do I work according to a knitting diagram?
The diagram depicts all rows/rounds, and every stitch seen from the right side. It is read from bottom to top, from right to left. 1 square = 1 stitch.
When working back and forth, every other row is worked from the right side and every other row is worked from the wrong side. When working from the wrong side, the diagram will have to be worked reversed: from left to right, knit stitches are purled, purl stitches are knit etc.
When working in the round every round is worked from the right side and the diagram are worked from right to left on all rounds.
See DROPS lesson: How to read knitting diagrams
How do I work according to a crochet diagram?
The diagram depicts all rows/rounds, and every stitch seen from the right side. It is worked from bottom to top, from right to left.
When working back and forth every other row is worked from the right side: from right to left and every other row is worked from the wrong side: from left to right.
When working in the round, every row in the diagram are worked from the right side, from right to left.
When working a circular diagram you start in the middle and work your way outwards, counter clockwise, row by row.
The rows usually start with a given number of chain stitches (equivalent to the height of the following stitch), this will either be depicted in the diagram or explained in the pattern.
See DROPS lesson: How to read crochet diagrams
How do I work several diagrams simultaneously on the same row/round?
Instructions for working several diagrams after each other on the same row/round, will often be written like so: “work A.1, A.2, A.3 a total of 0-0-2-3-4 times". This means you work A.1 once, then A.2 is worked once, and A.3 is repeated (in width) the number of times provided for your size – in this case like so: S = 0 times, M = 0 times, L=2 times, XL= 3 times and XXL = 4 times.
The diagrams are worked as usual: begin with the first row in A.1, then work the first row in A.2 etc.
See DROPS lesson: How to read knitting diagrams
See DROPS lesson: How to read crochet diagrams
Why are the sleeves shorter in larger sizes?
The total width of the garment (from wrist-to-wrist) will be larger in the larger sizes, despite the actual sleeves being shorter. The larger sizes have longer sleeve caps and wider shoulders, so there will be a good fit in all sizes.
Where on the garment is the length measured?
The measurement sketch/schematic drawing provides information regarding the full length of the garment. If it’s a jumper or a jacket the length is measured from the highest point on the shoulder (usually closest to the neckline), and straight down to the bottom of the garment. It is NOT measured from the tip of shoulder. Similarly, the length of yoke is measured from the highest point on the shoulder and down to where yoke is split into body and sleeves.
See DROPS lesson: How to read a schematic drawing
What is a repeat?
Diagrams are often repeated on the round or in height. 1 repeat is the diagram the way it appears in the pattern. If it says to work 5 repeats of A.1 in the round, then you work A.1 a total of 5 times after/next to each other in the round. If it says to work 2 repeats of A.1 vertically/in height you work the entire diagram once, then begin again at the start and work the entire diagram one more time.
Why does the piece start with more chain stitches than it’s worked with?
Chain stitches are slightly narrower than other stitches and to avoid working the cast-on edge too tight, we simply chain more stitches to begin with. The stitch count will be adjusted on the following row to fit the pattern and measurement sketch.
Why increase before the rib edge when the piece is worked top-down?
The rib edge is more elastic and will contract slightly compared to, for example, stocking stitch. By increasing before the rib edge, you avoid a visible difference in width between the rib edge and the rest of the body.
Why increase in the cast-off edge?
It’s very easy to cast off too tightly, and by making yarn overs while casting off (and simultaneously casting these off) you avoid a too tight cast off edge.
See DROPS video: How to bind off with yarn overs (yo)
How do I increase/decrease on every 3rd and 4th row/round alternately?
To achieve an even increase (or decrease) you can increase on, for example: every 3rd and 4th row alternately, like so: work 2 rows and increase on the 3rd row, work 3 rows and increase on the 4th. Repeat this until the increase is complete.
See DROPS lesson: Increase or decrease 1 st on every 3rd and 4th row alternately
How can I work a jacket in the round instead of back and forth?
Should you prefer to work in the round instead of back and forth, you may of course adjust the pattern. You’ll need to add steeks mid-front (usually 5 stitches), and follow the instructions. When you would normally turn and work from the wrong side, simply work across the steek and continue in the round. At the end you’ll cut the piece open, pick up stitches to work bands, and cover the cut edges.
See DROPS video: How to knit steeks and cut open
Can I work a jumper back and forth instead of in the round?
Should you prefer to work back and forth instead of in the round, you may of course adjust the pattern so you work the pieces separately and then assemble them at the end. Divide the stitches for the body in 2, add 1 edge stitch in each side (for sewing) and work the front and back pieces separately.
See DROPS lesson: Can I adapt a pattern for circular needles into straight needles?
Why is the pattern slightly different than what I see in the photo?
Pattern repeats can vary slightly in the different sizes, in order to get the correct proportions. If you’re not working the exact same size as the garment in the photo, yours might deviate slightly. This has been carefully developed and adjusted so that the complete impression of the garment is the same in all sizes.
Make sure to follow instructions and diagrams for your size!
How do I make a women’s size garment into a men’s size one?
If you have found a pattern you like which is available in women’s size it’s not very difficult to convert it to men’s size. The biggest difference will be the length of sleeves and body. Start working on the women size that you think would fit across the chest. The additional length will be worked right before you cast off for the armhole/sleeve cap. If the pattern is worked top-down you can add the length right after the armhole or before the first decrease on sleeve.
Regarding additional yarn amount, this will depend on how much length you add, but it is better with a skein too many than too few.
How do I prevent a hairy garment from shedding?
All yarns will have excess fibres (from production) that might come off as lint or shedding. Brushed yarns (ie hairier yarns) have more of these loose, excess fibres, causing more shedding.
Shedding also depends on what is worn under or over the garment, and whether this pulls at the yarn fibres. It’s therefore not possible to guarantee that there will be no shedding
Below are some tips on how to get the best result when working with hairier yarns:
1. When the garment is finished (before you wash it) shake it vigorously so the looser hairs come off. NOTE: do NOT use a lint roller, brush or any method that pulls at the yarn.
2. Place the garment in a plastic bag and put it in your freezer - the temperature will cause the fibres to become less attached to each other, and excess fibres will come off easier.
3. Leave in the freezer for a few hours before taking it out and shaking it again.
4. Wash the garment according to the instructions on the yarn label.
Why does my garment pill?
Pilling is a natural process that happens to even the most exclusive of fibers. It's a natural sign of wear and tear that is hard to avoid, and that is most visible in high friction areas of your garment like a sweater's arms and cuffs.
You can make your garment look as new by removing the pilling, using a fabric comb or a pill/lint remover.
Juel Hess wrote:
How do I figure out sizing with only X's to instruct?
04.09.2017 - 02:31DROPS Design answered:
Dear Mrs Hess, you will find at the bottom of the page a measurement chart with all measurements for each size. Compare these to a similar garment you have and like the shape to find out the matching size. Read more about sizing here. Happy knitting!
04.09.2017 - 11:06
Elke wrote:
Bei einer Maschenprobe von 12 Maschen/15 Reihen mit Nadelstärke 9 soll die Air hier doch bestimmt doppelfädig verstrickt werden? Aber damit sind die Angaben zum Verbrauch dann sicher auch nicht korrekt?
18.08.2017 - 13:53DROPS Design answered:
Liebe Elke, der Pullover wird nur mit 1 Faden Air gestrickt. Viel Spaß beim stricken!
08.09.2017 - 14:02
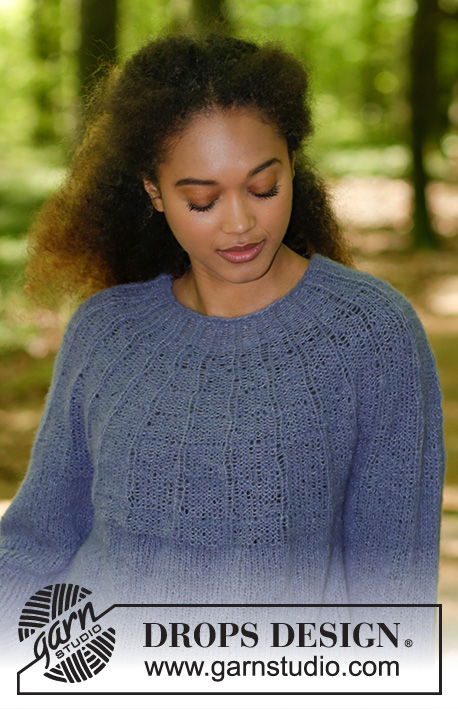
Feeling Serene#feelingserenesweater |
|
![]() |
![]() |
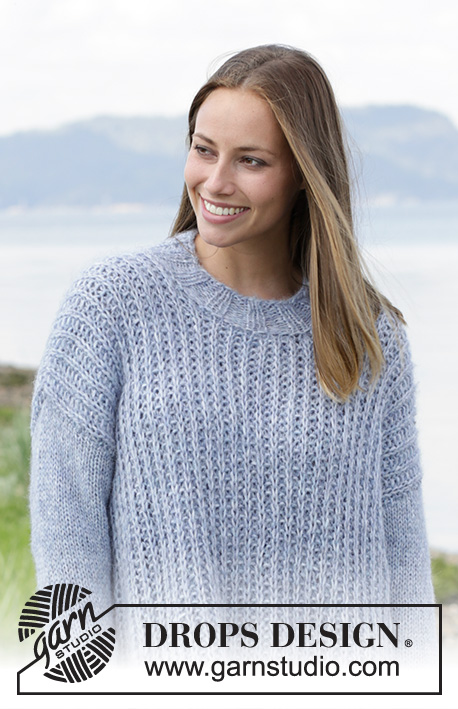
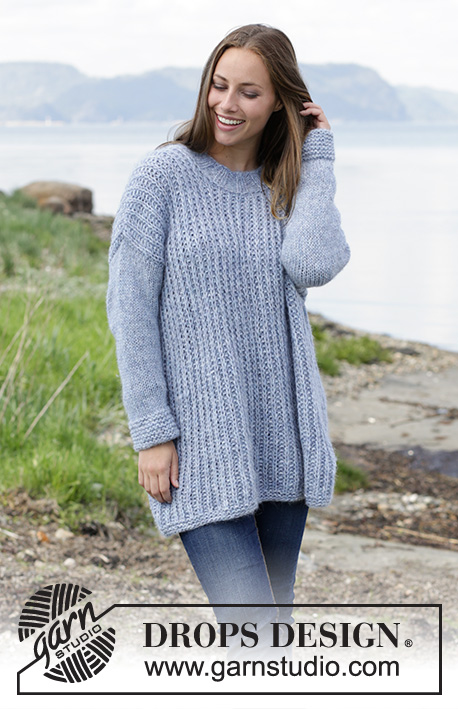
Knitted jumper with false English rib. Size: S - XXXL Piece is knitted in DROPS Air.
DROPS 184-1 |
|
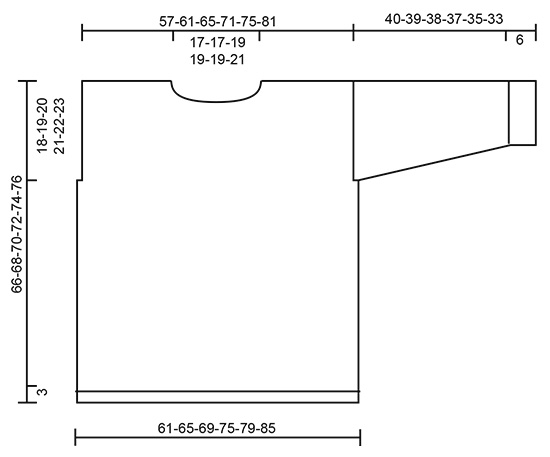
INFORMATION FOR PATTERN: GARTER STITCH (worked in the round): 1 ridge = 2 rounds. Knit 1 round and purl 1 round. GARTER STITCH (back and forth): 1 ridge = knit 2 rows. DECREASE TIP-1: To calculate how to decrease evenly, use the total number of stitches on row (e.g. 146 stitches) and divide stitches by number of decreases to be done (e.g. 24) = 6.1. In this example knit approx. every 5th and 6th stitch together. FALSE ENGLISH RIB (worked in the round): ROUND 1: Work * 1 stitch in garter stitch, make 1 yarn over, slip 1 stitch purlwise *, work from *-* the entire round. ROUND 2: Work * 1 stitch in garter stitch, knit yarn over and slipped stitch from previous round together *, work from *-* the entire round. Repeat rounds 1 and 2. FALSE ENGLISH RIB (worked back and forth): ROW 1 (= right side): Work * 1 stitch in garter stitch, make 1 yarn over, slip 1 stitch purlwise *, work from *-* until 1 stitch remains, finish with 1 stitch in garter stitch. ROW 2 (= wrong side): Work 1 stitch in garter stitch, * purl yarn over and slipped stitch from previous row together, work 1 stitch in garter stitch *, work from *-* the entire row. Repeat rows 1 and 2. BIND OFF TIP-2: When decreasing over false English rib, the yarn overs on 1st round/row are not counted as stitches but casted off together with stitch on 2nd round/row. INCREASE TIP (applies to mid under sleeve): Work until 2 stitches remain before marker thread, make 1 yarn over, knit 4 (marker thread is in the middle of these 4 stitches), make 1 yarn over (= 2 stitches increased). On next round knit yarn overs twisted to avoid holes. BIND-OFF TIP: To avoid a tight bind-off edge you may use a needle 1 size larger. ---------------------------------------------------------- JUMPER: Worked in the round on circular needle up to armholes. Then work front and back piece back and forth on circular needle separately. Work sleeves in the round on double pointed needles. BODY: Cast on 146-156-166-180-190-204 stitches on circular needle size 9 mm / US 13 with Air. Work 3 ridges in GARTER STITCH - see explanation above. Knit 1 round and decrease 24-26-28-30-32-34 stitches evenly - read DECREASE TIP-1 above = 122-130-138-150-158-170 stitches. Insert 1 marker at beginning of round and 1 marker after 61-65-69-75-79-85 stitches (= the sides). Then work FALSE ENGLISH RIB - see explanation above. Continue like this and move the markers upwards when working. REMEMBER THE GAUGE! When piece measures 48-49-50-51-52-53 cm / 19"-19¼"-19¾"-20"-20½"-21", bind off 4 stitches in each side for armholes (2 stitches on each side of both marker treads) - read BIND OFF TIP-2. Finish front and back piece separately. BACK PIECE: = 57-61-65-71-75-81 stitches. Continue in false English rib but now work back and forth on circular needle - read FALSE ENGLISH RIB. Continue to work until piece measures 64-66-68-70-72-74 cm / 25¼"-26"-26¾"-27½"-28⅜"-29⅛". Now bind off the middle 15-15-17-17-17-19 stitches for neck and finish each shoulder separately. Continue pattern as before and bind off 1 stitch on next row from the neck = 20-22-23-26-28-30 stitches remain on shoulder. Continue until piece measures 66-68-70-72-74-76 cm / 26"-26¾"-27½"-28⅜"-29⅛"-30" and bind off - read BIND-OFF TIP above. Work the other shoulder the same way. FRONT PIECE: = 57-61-65-71-75-81 stitches. Continue in false English rib but now work back and forth on circular needle. Continue to work until piece measures 60-62-64-66-68-70 cm / 23⅝"-24⅜"-25¼"-26"-26¾"-27½". Now slip the middle 11-11-13-13-13-15 stitches on 1 stitch holder for neck and finish each shoulder separately. Continue pattern as before and bind off for neck at the beginning of every row from neck as follows: bind off 1 stitch 3 times = 20-22-23-26-28-30 stitches remain on shoulder. Continue until piece measures 66-68-70-72-74-76 cm / 26"-26¾"-27½"-28⅜"-29⅛"-30" and bind off. Work the other shoulder the same way. SLEEVE: Work sleeve in the round on double pointed needles. Cast on 25-26-28-29-29-31 stitches on circular needle size 9 mm / US 13 and work 7 ridges in GARTER STITCH – see explanation above. Insert 1 marker at beginning of round = mid under sleeve. Then work in stockinette stitch in the round. When piece measures 8-8-9-8-8-10 cm / 4", increase 2 stitches mid under sleeve - READ INCREASE TIP above. Increase like this every 3½-3-2½-2½-2-1½ cm / 1¼"-1⅛"-⅞"-⅞"-¾"-½" 9-10-10-11-12-12 times in total = 43-46-48-51-53-55 stitches. When piece measures 38-37-36-36-33-31 cm / 15"-14½"-14¼"-14¼"-13"-12¼" (shorter measurements in the larger sizes because of wider shoulders), bind off the middle 4 stitches mid under sleeve and work a small sleeve cap back and forth on circular needle. Work in stockinette stitch and bind off at beginning of every row in each side as follows: bind off 6-6-6-7-7-7 stitches 2 times, then bind off the remaining stitches. Sleeve measures approx. 40-39-38-37-35-33 cm / 15¾"-15¼"-15"-14½"-13¾"-13" (when garment is worn the shoulder will stretch approx. 5 cm / 2" out to the side because of pattern, and the sleeve will stop approx. at the wrist). Work another sleeve the same way. ASSEMBLY: Sew shoulder seams inside bind-off edge. Sew in sleeves. NECK EDGE: Pick up from right side approx. 48 to 56 stitches around the neck (including stitches on stitch holder at the front) on a double pointed needles size 9 mm / US 13. Purl 1 round while adjusting number of stitches to 48-52-52-52-52-56. Work rib = knit 2/purl 2 for 5 cm / 2". Bind off stitches with knit over knit and purl over purl. |
|
![]() |
|
Have you finished this pattern?Tag your pictures with #dropspattern #feelingserenesweater or submit them to the #dropsfan gallery. Do you need help with this pattern?You'll find 30 tutorial videos, a Comments/Questions area and more by visiting the pattern on garnstudio.com. © 1982-2025 DROPS Design A/S. We reserve all rights. This document, including all its sub-sections, has copyrights. Read more about what you can do with our patterns at the bottom of each pattern on our site. |
With over 40 years in knitting and crochet design, DROPS Design offers one of the most extensive collections of free patterns on the internet - translated to 17 languages. As of today we count 314 catalogs and 11824 patterns - 11814 of which are translated into English (US/in).
We work hard to bring you the best knitting and crochet have to offer, inspiration and advice as well as great quality yarns at incredible prices! Would you like to use our patterns for other than personal use? You can read what you are allowed to do in the Copyright text at the bottom of all our patterns. Happy crafting!
Post a comment to pattern DROPS 184-1
We would love to hear what you have to say about this pattern!
If you want to leave a question, please make sure you select the correct category in the form below, to speed up the answering process. Required fields are marked *.