
Popular categories
Looking for a yarn?


Comments / Questions (116)
![]() Lisa wrote:
Lisa wrote:
Zu meiner gerade gestellten Frage: Bilder sind auf meiner ravel ry Seite lisaknitknit
29.08.2019 - 23:18
![]() Myriam wrote:
Myriam wrote:
Bonjour, Concernant le dos et le devant, il est mentionné de tricoter 3 mailles de bordures au point mousse. Faut- il donc tricoter les deux mailles ajoutées sous les manches plus 1 prise sur le devant et/ou le dos? Merci de votre réponse
26.07.2019 - 16:54DROPS Design answered:
Bonjour Myriam, apres la separation de votre ouvrage, le devant et le dos sont travailles séparément, avec 3 mailles de chaque cote de chaque piece en point mousse (regardez la photo). Bon travail!
26.07.2019 - 23:41
![]() Sophie wrote:
Sophie wrote:
Bonjour, lorsque le diagramme A2 s'élargit, faut il rajouter 2m envers à l'intérieur de A2 de chaque côté (soit une augmentation de 4m) en plus des augmentations à l'extérieur de A2 (1m de chaque côté ) soit une augmentation totale de 6m tous les 2 rangs ?
16.06.2019 - 23:55DROPS Design answered:
Bonjour Sophie, pour l'arrondi des manches, on augmente 1 m avant et 1 m après chaque A.2, on va augmenter 4 m par tour pour l'arrondi des manches. En fonction de la taille, vous augmentez d'abord 1 à 6 fois tous les tours puis 25 à 38 fois tous les 2 tours. Quand A.2 va s'agrandir, on tricote comme dans le diagramme pour avoir toujours au moins 2 m env au début et à la fin de A.2. Bon tricot!
17.06.2019 - 08:49
![]() Su wrote:
Su wrote:
Hallo,bei der Zunahme für die Schultern schreiben Sie das zwischen 4u1 Markierer(Rückenteil) u 2u3 Markierer zugenommen werden soll. Wo denn genau? Ist damit gemeint,dass Maschen wie in der Schulter- Zunahme 1 Masche beschrieben, zugenommen werden sollen vor jedem Markierer? Dann soll danach 1 Maschen zugenommen werden pro seite (vorder-Hinterteil)wo nehme ich diese zu ?Ich hoffe sie verstehen meine Frage :)
16.04.2019 - 15:17DROPS Design answered:
Liebe Su, es wird zugenommen, wie unter SCHULTER beschrieben, dh zuerst 2 M zwischen den 1. und 3. Markierer und zwischen den 2. und 4. Markierer (jeweils 4 M zugenommen) und dann 1 M zwischen den 1. und 3. Markierer und zwischen den 2. und 4. Markierer (jeweils 2 M zugenommen). Viel spaß beim stricken!
23.04.2019 - 10:36
![]() Sylvana wrote:
Sylvana wrote:
Bon, entretemps, je crois avoir compris à quoi correspondent les 21 m. Ce sont les mailles de chaque côté de A3 qui doivent être tricotées à l'endroit et non à l'envers (comme indiqué dans le correctif). Ai-je bien compris ? Merci de votre réponse.
17.03.2019 - 13:19DROPS Design answered:
Bonjour Sylvana, les augmentations pour l'arrondi des manches se fait de chaque côté de A.2 comme expliqué précédemment - (d'abord à l'endroit puis les suivantes à l'envers). Bon tricot!
18.03.2019 - 10:36
![]() Sylvana wrote:
Sylvana wrote:
… et je ne comprends pas à quoi correspondent les "21 premières augmentations" à l'endroit et les mailles restantes à l'envers ? ARRONDI DES MANCHES: … tricoter les 21 premières augmentations à l'endroit, tricotez les mailles restantes à l'envers.
15.03.2019 - 18:29DROPS Design answered:
Bonjour Sylvana, en fonction de la taille vous augmentez pour l'arrondi des manches 1-4-6-4-4-2 fois tous les tours et 25-26-28-32-34-38 fois tous les 2 tours, soit 26-30-34-36-38-40 fois au total, les 21 premières fois, vous tricoterez les augmentations à l'endroit, puis vous les tricoterez à l'envers jusqu'à ce qu'elles soient toutes faites. Bon tricot!
18.03.2019 - 08:35
![]() Sylvana wrote:
Sylvana wrote:
Bonjour Les augmentations pour l'arrondi manche, vous les collez à A2 ou bien vous les placez à côté du marqueur ? Merci
15.03.2019 - 16:24DROPS Design answered:
Bonjour Sylvana! Pour l'arrondie des manches, on augmente 1 maille de chaque côté de A.2 à chaque épaule/manche (= on augmente 4 mailles). Bon tricot!
18.03.2019 - 07:44
![]() Claudine FAUQUE wrote:
Claudine FAUQUE wrote:
Bonjour, Après en avoir bien bavé, je suis en train de terminer ce joli pull. Merci pour ce modèle. Il faudrait peut-être ajouter un commentaire : "Tricoter le dernier rang jersey avant les côtes mousse (bas du devant et du dos) en mailles TORSES endroit afin d'éviter que le bas ne roulotte. C'est beaucoup plus joli."
09.01.2019 - 18:10
![]() Tribout Valérie wrote:
Tribout Valérie wrote:
Bonjour quand on augmente les mailles dessous les manches on a 69 mailles mais sur A 3 il y 61 case j aimerais savoir comment fait pour continuer.j ai bien mis le marqueur au milieu .merci beaucoup
16.12.2018 - 21:57DROPS Design answered:
Bonjour Mme Tribout, les premières augmentations de l'arrondi des manches se tricotent à l'endroit, les suivantes se tricotent à l'envers. Bon tricot!
17.12.2018 - 10:18
![]() Tribout Valérie wrote:
Tribout Valérie wrote:
Bonjour comment augmenter les 4 mailles en dessous la manche ?merci
26.11.2018 - 15:46DROPS Design answered:
Bonjour Mme Tribout, montez les 4 m comme le montre cette vidéo, tricotez les mailles du devant, montez les 4 m du dessous de l'autre manche de la même façon et tricotez à suivre les mailles du dos jusqu'au début du tour. Cette vidéo montre comment on tricote un pull de haut en bas, on y voit également cette partie des explications (à la fin du raglan). Bon tricot!
26.11.2018 - 16:00
|
||||||||||||||||||||||
Vanilla Kiss#vanillakisssweater |
||||||||||||||||||||||
 |
 |
|||||||||||||||||||||
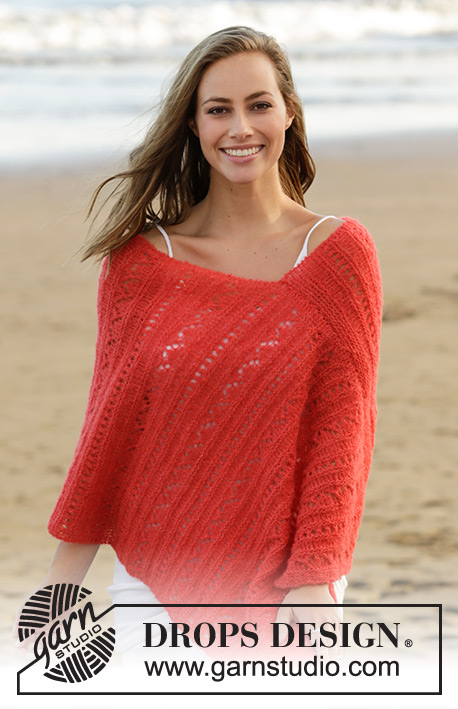
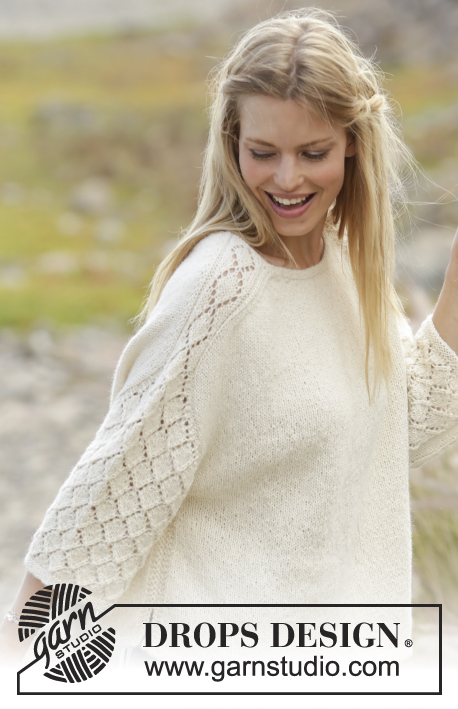
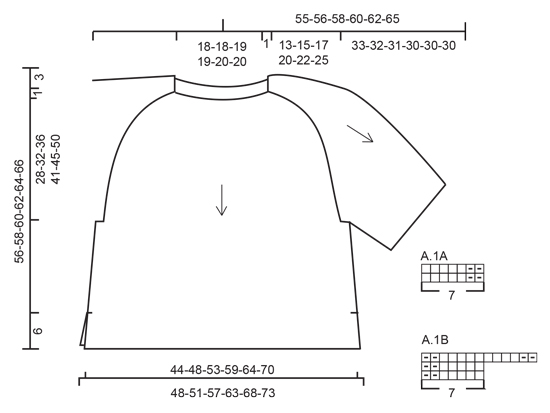
Knitted sweater with lace pattern on shoulders and sleeves, worked top down. Sizes S - XXXL. The piece is worked in DROPS Puna.
DROPS 178-16 |
||||||||||||||||||||||
|
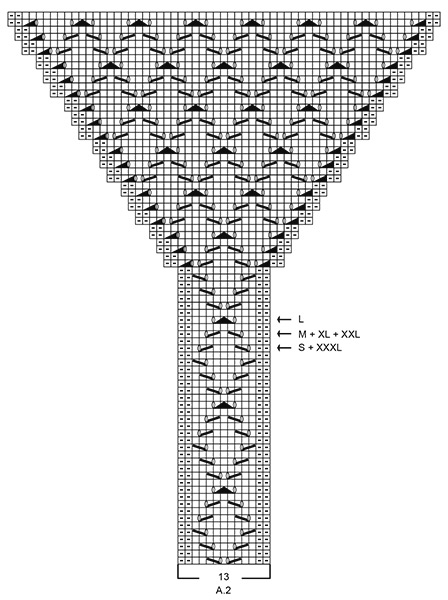
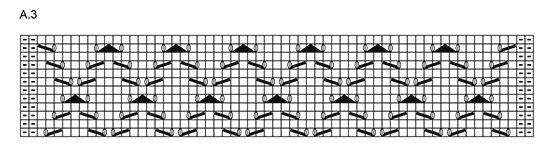
RIDGE/GARTER STITCH (worked in the round): 1 ridge = 2 rounds. Knit 1 round and purl 1 round. RIDGE/GARTER STITCH (worked back and forth): 1 ridge = Knit 2 rows. PATTERN: See diagrams A.1 to A.3. The diagrams show all rows in pattern seen from the right side. SHOULDER: NOTE: All increases worked from right side! On next row work yarn overs twisted to avoid holes. Increase 2 stitches as follows: INCREASE 2 STITCHES BEFORE MARKERS 1 AND 3: Start 3 stitches before marker, 1 yarn over, knit 2, 1 yarn over, knit 1, (= 2 stitches increased). INCREASE 2 STITCHES AFTER MARKERS 2 AND 4: Knit 1, 1 yarn over, knit 2, 1 yarn over (= 2 stitches increased). Increase 1 stitch as follows: INCREASE 1 STITCH BEFORE MARKERS 1 AND 3: Start 1 stitch before marker, 1 yarn over, knit 1 (= 1 stitch increased). INCREASE 1 STITCH AFTER MARKERS 2 AND 4: Knit 1, 1 yarn over (= 1 stitch increased). SLEEVE CAP: Increase 1 stitch by making 1 yarn over (make sure the yarn over is not too loose). On next round: purl yarn over twisted to avoid holes – knit the first 21 stitches increased, purl the remaining stitches. INCREASE TIP (for sides of front and back pieces): Increase on inside of the 4 outermost stitches in each side (i.e. 3 edge stitches in garter stitch + 1 stitch in stockinette stitch). Increase 1 stitch by making 1 yarn over, on next row work yarn over twisted to avoid a hole (the increased stitch is worked in stockinette stitch). DECREASE TIP (for mid under sleeve): Start 3 stitches before marker mid under sleeve, purl 2 together, knit 2 (the marker sits in the middle of these 2 stitches), purl 2 together (= 2 stitches decreased). ---------------------------------------------------------- SWEATER The piece is worked in the round with circular needle, top down, as far as below the sleeves. Then the front and back pieces are worked separately back and forth. The sleeves are worked in the round. The photo deviates somewhat from pattern regarding increases in sleeve caps (A.2) – the fit has been improved. YOKE: Cast on 102-102-106-106-110-110 stitches with short circular needle size 3 mm / US 2.5 and Puna. The round starts mid back. Insert a marker here which will follow your work onwards. Work 2 RIDGES in the round – see description above. Insert 4 new markers in the piece as follows (without working the stitches): Insert marker 1 after the first 19-19-20-20-21-21 stitches (= ½ back piece), marker 2 after the next 13 stitches (= shoulder/sleeve), marker 3 after the next 38-38-40-40-42-42 stitches (= front piece), marker 4 after the next 13 stitches (= shoulder/sleeve), there are now 19-19-20-20-21-21 stitches left after the last marker (= ½ back piece). Change to circular needle size 4 mm / US 6. Now work short rows over the stitches in the neck for a better fit, AT THE SAME TIME as you increase stitches to shoulder and work pattern on shoulders/sleeves (= 13 stitches) as follows: ROW 1 (from right side): Knit until 3 stitches before the marker 1, increase 2 stitches to SHOULDER – see description above, work A.1A (= 7 stitches), turn piece and tighten strand. ROW 2 (from wrong side): Work A.1A, purl as far as marker 4, A.1B (= 7 stitches –you read the diagram from left to right when working from the wrong side), turn the piece and tighten strand. ROW 3: Work A.1B, increase 2 stitches to shoulder, knit to 3 stitches before marker 1 and increase 2 stitches to shoulder, work A.2 (= 13 stitches), marker 2 is here, turn the piece and tighten strand. ROW 4: Work A.2, purl to marker 4, work A.2 – start on row 2 in the diagram, marker 3 is here, turn the piece and tighten strand. ROW 5: Work A.2, increase 2 stitches to shoulder, knit to 3 stitches before marker 1, increase 2 stitches to shoulder, continue A.2 and increase 2 stitches to shoulder on front piece, (i.e. you work as follows after marker 2: Knit 1, 1 yarn over, knit 2, 1 yarn over), knit 1, (= 4 stitches + 2 yarn overs on front piece), turn the piece and tighten strand. ROW 6: Purl to marker 2 (= purl 6 stitches on front piece), continue A.2, purl to marker 4, continue A.2, purl 4 stitches on front piece (= 4 stitches past marker 3) turn the piece and tighten strand. REMEMBER THE GAUGE! ROW 7: Knit 1, increase 2 stitches to shoulder (= 4 stitches + 2 yarn overs on front piece), continue A.2, increase 2 stitches to shoulder, knit to 3 stitches before marker 1, increase 2 stitches to shoulder, continue A.2, increase 2 stitches to shoulder on front piece and knit over 2 more stitches than on previous row on front piece (= 8 stitches + 2 yarn overs on front piece), turn the piece and tighten the strand. ROW 8: Purl to marker 2 (= 10 purled stitches on front piece), continue A.2, purl to marker 4, continue A.2 and purl over 2 stitches more than on the previous row on front piece (= 8 stitches on front piece), turn the piece and tighten strand. ROW 9: Knit to 3 stitches before the marker, increase 2 stitches to shoulder (= 8 knitted stitches + 2 yarn overs on front piece), continue A.2, increase 2 stitches to shoulder, knit to 3 stitches before marker 1, increase 2 stitches to shoulder, continue A.2, increase 2 stitches to shoulder on front piece, Knit over 2 stitches more than on the previous row on front piece (= 12 stitches + 2 yarn overs on front piece), turn piece and tighten strand. ROW 10: Purl to marker 2 (= 14 purled stitches on front piece), continue A.2, purl to marker 4, continue A.2 and purl over 2 stitches more than on previous row on front piece (= 12 stitches on front piece), turn the piece and tighten strand. ROW 11: Knit to 3 stitches before the marker, increase 2 stitches to shoulder (= 12 knitted stitches + 2 yarn overs on front piece), continue A.2, increase 2 stitches to shoulder, knit to 3 stitches before marker 1, increase 2 stitches to shoulder, continue A.2, increase 2 stitches to shoulder on front piece, knit over 2 more stitches than on the previous row on front piece (= 16 stitches + 2 yarn overs on front piece), turn the piece and tighten strand. ROW 12: Purl to marker 2 (= 18 purled stitches on front piece), continue A.2, purl to marker 4, continue A.2 and purl over 2 stitches more than on previous row on front piece (= 16 stitches on front piece), turn piece and tighten strand. ROW 13: Knit to 3 stitches before marker, increase 2 stitches to shoulder (= 18 stitches before next marker), continue A.2, increase 2 stitches to shoulder, knit to mid back (= start of the round). Continue with pattern but without increasing as far as marker 2. Now you have worked 11 rows of A.2. Cut the strand. You have now increased 2 stitches to shoulder in each side of the front piece 4 times and 2 stitches to shoulder in each side of the back piece 6 times = 142-142-146-146-150-150 stitches (= 54-54-56-56-58-58 stitches on front piece and 62-62-64-64-66-66 stitches on back piece). The short rows are now finished and you continue in the round with circular needle. Start at marker mid back. On the next round continue the increases to shoulder (= work the increased stitches on front and back piece in stockinette stitch) and work A.2 as before, AT THE SAME TIME on round with arrow in A.2 (i.e. before the increases to shoulder are finished) start the increases to sleeve cap (= work the first 21 increased stitches knit. AT THE SAME TIME work the new stitches into A.2 as A.2 expands outwards). When A.2 has been completed in height, repeat A.3 over A.2 to finished length. Increase to shoulder and to sleeve cap as described below: INCREASE TO SHOULDER AS FOLLOWS: NOTE: You increase differently on front and back pieces and, on the rounds after increases, the yarn overs are knitted twisted to avoid holes - Remember SHOULDER! INCREASE ON BACK PIECE (= between markers 4 and 1): Increase 2 stitches every 2nd round a total of 2-3-5-7-8-10 times, then increase 1 stitch every 2nd round a total of 9-11-12-14-16-18 times. INCREASE ON FRONT PIECE (= between markers 2 and 3): Increase 2 stitches every 2nd round a total of 6-7-9-11-12-14 times, then increase 1 stitch every 2nd round a total of 5-7-8-10-12-14 times. After all increases to shoulder there are 88-96-108-120-130-142 stitches on both front and back pieces. INCREASE TO SLEEVE CAP AS FOLLOWS: On the round with an arrow in diagram A.2 start increasing to SLEEVE CAP – see description above. Increase 1 stitch on each side of A.2 on every shoulder/sleeve (= 4 stitches increased on round). Increase in this way every round a total of 1-4-6-4-4-2 times and then every 2nd round a total of 25-26-28-32-34-38 times. There should always be 2 purled stitches on each side of the lace pattern A.2 on sleeves. (These purl stitches are included in the diagram). A.2 expands outwards as diagram is worked, so that more and more stitches are included in the lace pattern. When all increases to sleeve cap are finished, there are 65-73-81-85-89-93 stitches on each sleeve. After all increases to shoulder and sleeve cap there are 306-338-378-410-438-470 stitches on the needle and piece measures 31-33-35-37-38-41 cm / 12¼"-13"-13¾"-14½"-15"-16" (measured from shoulder down). There are now 4-8-12-14-16-18 purled stitches on each side of the lace pattern (including the 2 stitches in each side of A.2/A.3). The next round is worked as follows: Work 44-48-54-60-65-71 stitches stockinette stitch (= ½ back piece), place the next 65-73-81-85-89-93 stitches on 1 thread (= sleeve), cast on 4 new stitches on needle (= in side under sleeve), work 88-96-108-120-130-142 stitches stockinette stitch (= front piece), place the next 65-73-81-85-89-93 stitches on 1 thread (= sleeve), cast on 4 new stitches on needle (= in side under sleeve) and work the remaining 44-48-54-60-65-71 stitches in stockinette stitch (= ½ back piece). BODY: = 184-200-224-248-268-292 stitches. THE PIECE IS NOW MEASURED FROM HERE! Now divide the piece in the middle of the 4 new stitches under each sleeve and the front and back pieces are worked separately, back and forth on circular needle to finished length. BACK PIECE: = 92-100-112-124-134-146 stitches. Work stockinette stitch with 3 edge stitches in GARTER STITCH – see description above, in each side. When piece measures 3 cm / 1" from the division, increase 1 stitch in each side – read INCREASE TIP (= 2 stitches increased). Increase in this way every 14th-14th-14th-14th-14th-14th row a total of 4 times in each side = 100-108-120-132-142-154 stitches. When piece measures 24-24-24-24-25-24 cm / 9½"-9½"-9½"-9½"-9¾"-9½" from the division, change to circular needle size 3 mm / US 2.5. Work 3 ridges, change back to circular needle size 4 mm / US 6 and loosely bind off. The sweater measures approx. 56-58-60-62-64-66 cm / 22"-22¾"-23⅝"-24⅜"-25¼"-26" from top of shoulder down. FRONT PIECE: = 92-100-112-124-134-146 stitches. Work in the same way as the back piece. SLEEVE: Place the 65-73-81-85-89-93 stitches from the thread in one side of the piece onto short circular needle/double pointed needles size 4 mm / US 6 and, in addition, knit up 1 stitch in each of the 4 stitches cast on under the sleeve = 69-77-85-89-93-97 stitches on needle. Insert 1 marker in the middle of the 4 new stitches mid under sleeve and allow the marker to follow your work onwards. Continue A.3 as before, knit 1 stitch on each side of the marker mid under sleeve and purl the remaining stitches on the round. When piece measures 3 cm / 1" from the division, decrease 2 stitches mid under sleeve – read DECREASE TIP. Repeat the decrease when piece measures 8-8-7-7-6-6 cm / 3"-3"-2¾"-2¾"-2¼"-2¼" = 65-73-81-85-89-93 stitches. Continue working until piece measures 14-12-11-11-11-12 cm / 5½"-4¾"-4½"-4½"-4½"-4¾" from the division. Change to double pointed needles size 3 mm / US 2.5. Work 3 ridges over all stitches, change back to double pointed needles size 4 mm / US 6 and bind off. Work the other sleeve in the same way. ASSEMBLY: Sew side seams in outermost loop of outermost stitch so that the seam is flat, but stop when there is 6 cm / 2⅜" left in each side (= split). |
||||||||||||||||||||||
Diagram explanations |
||||||||||||||||||||||
|
||||||||||||||||||||||
 |
||||||||||||||||||||||
 |
||||||||||||||||||||||
 |
||||||||||||||||||||||
Have you finished this pattern?Tag your pictures with #dropspattern #vanillakisssweater or submit them to the #dropsfan gallery. Do you need help with this pattern?You'll find 33 tutorial videos, a Comments/Questions area and more by visiting the pattern on garnstudio.com. © 1982-2026 DROPS Design A/S. We reserve all rights. This document, including all its sub-sections, has copyrights. Read more about what you can do with our patterns at the bottom of each pattern on our site. |
||||||||||||||||||||||


With over 40 years in knitting and crochet design, DROPS Design offers one of the most extensive collections of free patterns on the internet - translated to 17 languages. As of today we count 325 catalogs and 12298 patterns - 12288 of which are translated into English (US/in).
We work hard to bring you the best knitting and crochet have to offer, inspiration and advice as well as great quality yarns at incredible prices! Would you like to use our patterns for other than personal use? You can read what you are allowed to do in the Copyright text at the bottom of all our patterns. Happy crafting!
Post a comment to pattern DROPS 178-16
We would love to hear what you have to say about this pattern!
If you want to leave a question, please make sure you select the correct category in the form below, to speed up the answering process. Required fields are marked *.