
Popular categories
Looking for a yarn?


Comments / Questions (52)
![]() Janine Stüssi wrote:
Janine Stüssi wrote:
Meiner Ansicht nach, werden beim Muster A8 / A9 und A10 nur die Hin-Reihen angezeigt. Wenn ich dir Rückreihen so stricken würde wie angegeben, dann würde ich mit dem Muster auf der Rück-Reihe beginnen. Beim A10 ebenfalls. Besten Dank im Voraus für die Antwort.
16.05.2017 - 06:38DROPS Design answered:
Liebe Frau Stüssi, die Hin- sowie die Rückreihen sind in A.8, A.9 und A.10 gezeigt. Viel Spaß beim stricken!
16.05.2017 - 09:13
![]() Antonia Von Stumpff wrote:
Antonia Von Stumpff wrote:
Hallo Zusammen, soll für Rückteil wirklich in RUNDEN oder in Reihen gestrickt werden? Das macht für mich keinen Sinn. Vielen Danke für eine Antwort.
24.04.2017 - 23:52DROPS Design answered:
Liebe Frau Von Stumpff, Rückenteil wird in der Runde gestrickt bis Sie 572-620-668 M haben, dann noch 2 Krausrippen (in runden) stricken, und dann Maschen abketten/stilllegen. Viel Spaß beim stricken!
25.04.2017 - 08:11
![]() Anette Svensson wrote:
Anette Svensson wrote:
Hej! Jag saknar mönsterdiagram A8 A-C, A9 A-C, och A10 A-C. Ser inte dom på er sida. MVH Anette Svensson, Borås, Sverige
03.04.2017 - 08:12DROPS Design answered:
Hej Anette, Jo det är diagrammet längst ner till höger. Lycka till!
03.04.2017 - 14:25
![]() Hanne Hammersholt wrote:
Hanne Hammersholt wrote:
Der mangler forklaring til diagram a 1. Nogen af felterne har I ikke forklaret. Så man ved ikke hvad de forskellige tegn i diagrammet betyder. Suk.
31.03.2017 - 16:22DROPS Design answered:
Hei Hanne. Alle diagramsymboler skal være forklart under selve oppskriften og over alle diagrammene. Usikker på hvilken du mener som ikke er forklart, men kan det være der 2 ikoner står sammen? F.eks der du skal gjøre et kast og strikke 2 masker sammen?
03.04.2017 - 14:46
![]() Kate Mortensen wrote:
Kate Mortensen wrote:
Opskrift 176-26 mønster A9 er der 21 masker mellem I 9 række mellem 2 masker og slå om så kommer det skævt med 1. Række håber på hurtigt svar
15.03.2017 - 15:17DROPS Design answered:
Hej Kate. Jeg kan ikke helt fölge dig, men du gentager B i A.9 over B i A.8, saa efter A (4 m), saa gentager du B delen (12 m), saa er der 10 m imellem hver gang du strikker slaa om / 2 r sammen.
16.03.2017 - 13:44
![]() Patrcja wrote:
Patrcja wrote:
Jak rozumiem ze schematu początkowego kwadratu, wszystkie narzuty, spuszczanie oczek itp. są robione w rzędach przerabianych na lewo (parzystych), czyli po lewej stronie robótki, dlaczego więc wszędzie jest mowa o przerabianiu na prawo? Czy naprawdę mam przerabiać dwa na prawo i zdejmować oczka jak do przerabiania na prawo i przerabiać następne na prawo, a potem przeciągać itd.?
20.02.2017 - 22:34DROPS Design answered:
Cześć Patrycjo! Kwadrat początkowy jest przerabiamy na okrągło, w związku z tym przerabiamy cały czas na prawej stronie robótki. Jak czytać schematy znajdziesz TUTAJ. Jak wykonywać symbole umieszczone w schematach znajdziesz w instrukcjach video (patrz wzór, pod tytułem jest zakładka video). Powodzenia!
21.02.2017 - 19:06
![]() Coutarel wrote:
Coutarel wrote:
Il n'y a pas d'erreur je finis A2 A3 et A4 j'ai 372 m mais si on monte 42 m à chaque emmanchures cela ne peut pas faire 380 m
16.02.2017 - 17:01DROPS Design answered:
Bonjour Mme Coutarel, au dernier rang de A.2 et de A.4, on augmente 1 m dans chacun de ces diagrammes, soit 8 augmentations au total: 372 m au tour précédent + 8 m = 380 m. Bon tricot!
17.02.2017 - 09:23
![]() Coralie wrote:
Coralie wrote:
Jeune , frais et actuel
28.01.2017 - 19:48
![]() Kris wrote:
Kris wrote:
This is beautiful, cannot wait for it to be released. So pretty
28.01.2017 - 02:54
![]() Heather wrote:
Heather wrote:
When is this one going to be released....is BEAUTIFUL
24.01.2017 - 16:12
|
||||||||||||||||||||||
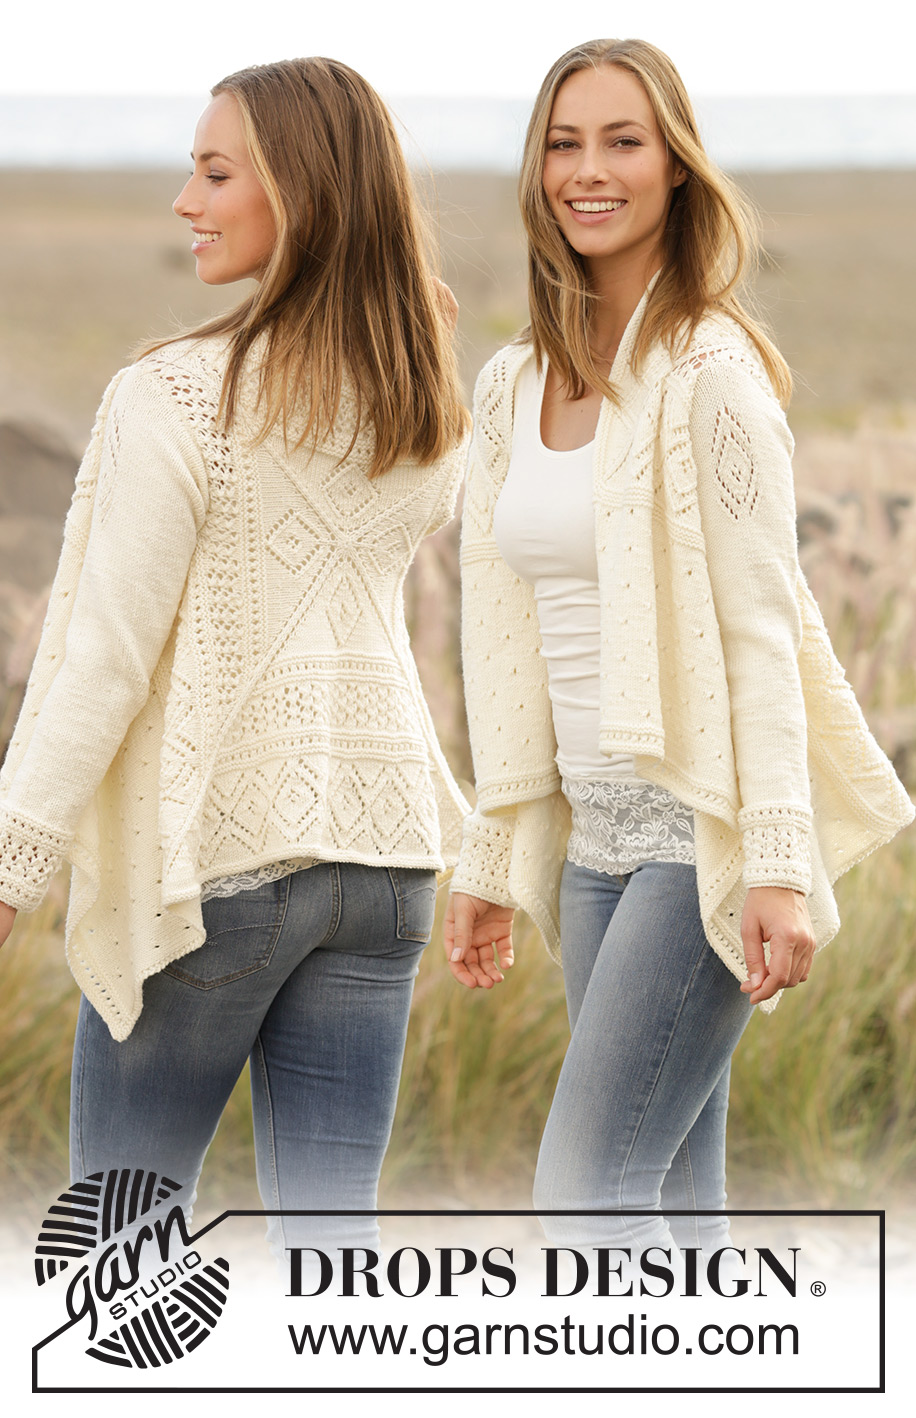
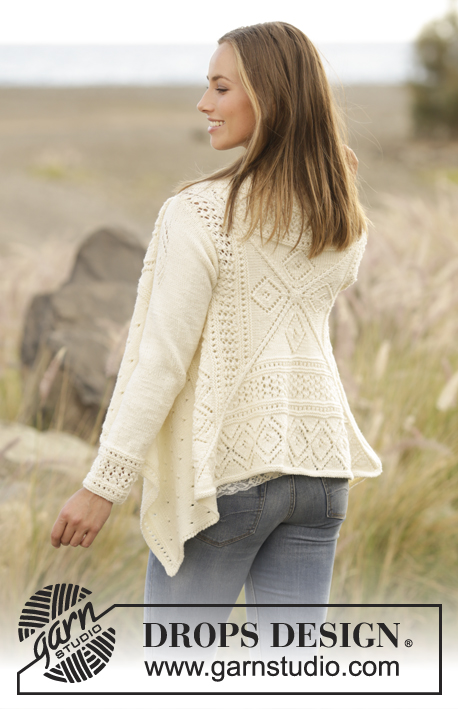
Sunny Date#sunnydatecardigan |
||||||||||||||||||||||
 |
 |
|||||||||||||||||||||
Knitted jacket with lace pattern, worked in square in DROPS Merino Extra Fine. Sizes S - XXXL.
DROPS 176-26 |
||||||||||||||||||||||
|
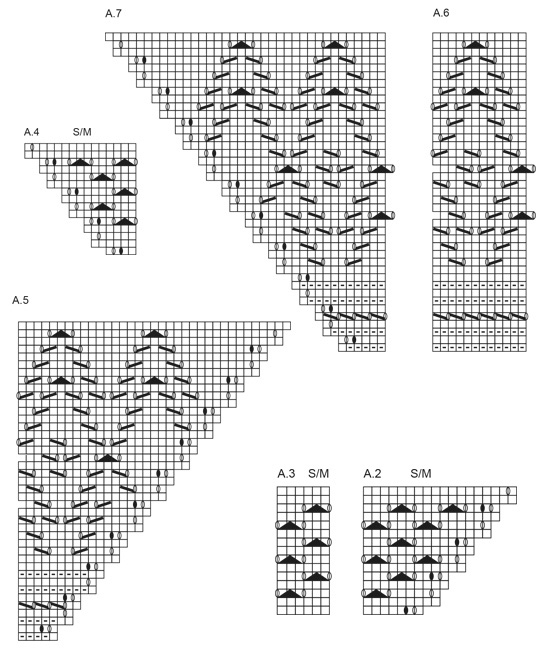
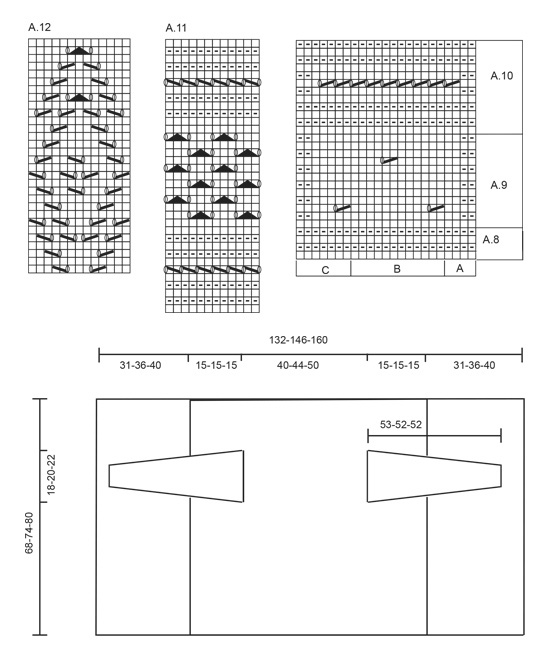
RIDGE/GARTER STITCH (worked in the round): 1 ridge = 2 rounds. Knit 1 round and purl 1 round. PATTERN: See diagrams A.1 to A.12. The diagrams show the pattern seen from the right side. Choose the diagram needed for the right size when you are working according to A.2, A.3 and A.4. INCREASE TIP (for the sleeves): Increase 1 stitch by making 1 yarn over, on the next round knit the yarn overs twisted to prevent holes. Start 1 stitch before the marker thread, make 1 yarn over, knit 3 (the stitch with the marker thread sits in the middle of these 3 stitches), make 1 yarn over. --------------------------------------------------------- JACKET: The piece is worked in square on double pointed needles/circular needle, from the middle of the back and outwards. Then work the front pieces back and forth in each side. BACK PIECE: Cast on 12 stitches in all sizes with double pointed needles size 4 mm / US 6 and Merino Extra Fine. Work according to A.1 (= 4 repeats on the round) and switch to circular needle when there is increase enough stitches. When A.1 is finished 1 time in height there are 236 stitches on the round. Continue working as follows: * A.2 (= 7 stitches), A.3 over the next 48 stitches (= 8 repeats in width), A.4 over the next 4 stitches *, work from *-* in total 4 times. NOTE! Choose the diagram for the right size. On the next to last round in A.2, A.3 and A.4 (there are now 324-372-420 stitches on the round) work as follows: Work the first 83-95-107 stitches, bind off the next 38-42-46 stitches (= armhole), work the next 163-191-219 stitches, bind off the next 38-42-46 stitches (= armhole) and work the last 2 stitches. On the next round (= the last round in A.2, A.3 and A.4) cast on 38-42-46 new stitches over the bind-off stitches = 332-380-428 stitches. Continue to work as follows: * A.5 (= 5 stitches), A.6 over the next 72-84-96 stitches (= 6-7-8 repeats in width), A.7 (= 6 stitches) *, work from *-* in total 4 times. Continue with A.5, A.6 and A.7 until the diagrams are worked 1 time in height = 572-620-668 stitches on the round. Work 2 RIDGES – see description above, over all the stitches (without increases), then bind off the first 143-155-167 stitches, place the next 143-155-167 stitches on a thread (knit them first), bind off the next 143-155-167 stitches, keep the last 143-155-167 stitches on the needle and continue working back and forth over these stitches (= right front piece). RIGHT FRONT PIECE: The piece is worked back and forth without increases in the side. Work as follows, from the right side: A.8 A (= 4 stitches), A.8 B over the next 132-144-156 stitches (= 11-12-13 repeats in width), A.8 C (= 7 stitches). Work A.8 1 time in height, then work A.9 A-C over A.8 A-C. When A.9 has been worked 6-7-8 times in height, work A.10 A-C over A.9 A-C. Bind off with knit. LEFT FRONT PIECE: Place the stitches from the thread in the other side back on the needle. Work in the same way as the right front piece, but the first row in A.8 has already been worked, start from the wrong side on the 2nd row in the diagram. SLEEVE: The sleeve is worked in the round with double pointed needles. Cast on 48-48-54 stitches with double pointed needles size 4 mm / US 6 and Merino Extra Fine. Work A.11 over all stitches. When A.11 has been worked 1 time in height continue working stockinette stitch, on the first round adjust the number of stitches to 45-49-55 stitches. Insert 1 marker thread in the first stitch on the round = mid under the sleeve. When the piece measures 10 cm / 4" increase 1 stitch on each side of the marker thread – READ INCREASE TIP. Increase every 2½-2-2 cm/7/8"-¾"-¾" in total 16-18-19 times = 77-85-93 stitches. AT THE SAME TIME when the piece measures 41-40-40 cm / 16"-15¾"-15¾" work A.12 over the middle 13 stitches on the round (= mid on top of the sleeve). Bind off when the sleeve measures 53-52-52 cm / 21"-20½"-20½". Work 1 more sleeve. ASSEMBLY: Sew in the sleeves. Use a needle to sew and close up the hole mid back (= cast-on edge). |
||||||||||||||||||||||
Diagram explanations |
||||||||||||||||||||||
|
||||||||||||||||||||||
 |
||||||||||||||||||||||
 |
||||||||||||||||||||||
 |
||||||||||||||||||||||
 |
||||||||||||||||||||||
Have you finished this pattern?Tag your pictures with #dropspattern #sunnydatecardigan or submit them to the #dropsfan gallery. Do you need help with this pattern?You'll find 26 tutorial videos, a Comments/Questions area and more by visiting the pattern on garnstudio.com. © 1982-2026 DROPS Design A/S. We reserve all rights. This document, including all its sub-sections, has copyrights. Read more about what you can do with our patterns at the bottom of each pattern on our site. |
||||||||||||||||||||||


With over 40 years in knitting and crochet design, DROPS Design offers one of the most extensive collections of free patterns on the internet - translated to 17 languages. As of today we count 325 catalogs and 12298 patterns - 12288 of which are translated into English (US/in).
We work hard to bring you the best knitting and crochet have to offer, inspiration and advice as well as great quality yarns at incredible prices! Would you like to use our patterns for other than personal use? You can read what you are allowed to do in the Copyright text at the bottom of all our patterns. Happy crafting!
Post a comment to pattern DROPS 176-26
We would love to hear what you have to say about this pattern!
If you want to leave a question, please make sure you select the correct category in the form below, to speed up the answering process. Required fields are marked *.