
Popular categories
Looking for a yarn?


Comments / Questions (41)
![]() Asta Istola wrote:
Asta Istola wrote:
Mycket rolig och intressant mönster :) 👍🏽
29.01.2019 - 23:43
![]() Jenny Crawley wrote:
Jenny Crawley wrote:
You said " only 1 stitch towards bottom edge (marker B) every other row until piece measures 37-57 cm (see size) from. . . " how can this reduce the stitch count by 2? I have already worked out I need to decrease by 2 and am progressing, but the instructions are confusing.
08.10.2018 - 20:35
![]() Jenny Crawley wrote:
Jenny Crawley wrote:
But the pattern says: ". Continue like this by working 1 stitch less towards marker thread B on every turn until piece measures approx. 37-41-45-49-53-57 cm from marker (finish after 1 row from wrong side). Put all stitches on left front piece on a stitch holder. " How do you decrease by 2 stitches when the pattern says 1 stitch less, not 2?
08.10.2018 - 11:20DROPS Design answered:
Dear Mrs Crawley, you first slip 1 st 1 time, then 2 sts then only 1 stitch towards bottom edge (marker B) every other row until piece measures 37-57 cm (see size) from marker. Happy knitting!
08.10.2018 - 14:12Jenny Crawley wrote:
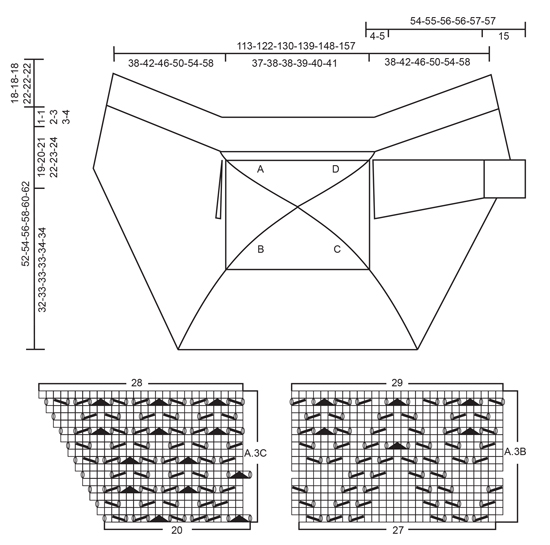
I'm sorry but your reply to my question does not help. The diagram clearly show the side pieces getting narrower but the instructions will keep a constant number of stitches on the needle and produces a rectangle, not the shape on the diagram. The lower edge needs to decrease more than one stitch every other row to get that shape.
05.10.2018 - 19:22DROPS Design answered:
Dear Mrs Crawley, you will continue increasing as before but at the same time work short rows (= leaving 2 ss unworked towards bottom edge of the jacket), so that you should get the shape as shown in the chart = less rows worked towards the bottom of the jacket and more rows worked towards the top of the jacket. Happy knitting!
08.10.2018 - 07:55
![]() Jenny Crawley wrote:
Jenny Crawley wrote:
How can I achieve the shape for the side pieces (which appear to get narrower) when the instructions state to increase 1stitch at one end and turn the work 1stitch before the end of the row, which, surely keeps the number of stitches being worked constant?
04.10.2018 - 00:41DROPS Design answered:
Dear Mrs Crawley, you continue increasing on the corner as before, but at the same time, work 2 sts then only 1 st less toward marker-B every other row, this way you will get the shape shown in the chart. You willl then work later an edge in garter stitch along right front piece, bottom of back piece and left piece. Happy knitting!
04.10.2018 - 10:17
![]() Paula wrote:
Paula wrote:
Hallo! Ich habe ein Problem: Wie breit in cm ist die Breite des Rückens zw. den beiden Armlöchern, damit ich die richtige Größe auswählen kann. Meine Maschenprobe für (‚Safran‘) stimmt entw. bei den Maschen od. den Reihen. Das Foto zeigt überschnittene Schultern, doch z.B. 37 cm Viereck + etwas glatt rechts an beiden Rändern erscheinen mir viel zu schmal dafür. Wo ist mein Denkfehler?
15.02.2018 - 12:46DROPS Design answered:
Liebe Paula, Rückenteil ist - wie in der Skizze - oben zwischen Ärmel 37 cm in der 1. Größe (von Schulter bis Schulter). Viel Spaß beim stricken!
15.02.2018 - 16:08
![]() Alicja wrote:
Alicja wrote:
Witam, w schemacie A.3B jest błąd, w ostatnim rzędzie wyrabiania splotu, na brzegach schematu: początek rzędu powinien być 1 o. prawe, narzut, zdjąć 1 oczko jak do przerobienia na prawo, 1 oczko prawe, przełożyć oczko zdjęte nad przerobionym oczkiem. Na końcu rzędu: 2 o. razem na prawo, narzut, 1 o. prawe. pozdrawiam Alicja
02.10.2017 - 18:26DROPS Design answered:
Witaj Alicjo! Bardzo dziękujemy, korekta zgłoszona :) Pozdrawiamy!
15.12.2020 - 08:44
![]() Anne wrote:
Anne wrote:
Venstre forstykke: Arbeidet måles fra merket. Men måles det i høyden ved å følge maskene rett opp, eller langs kanten der en øker? Blir forskjellige mål siden det skrår fordi man øker. Noen cm forskjell blir det etter hvordan en måler.
09.09.2017 - 21:08DROPS Design answered:
Hei Anne, Du måler rett opp ikke langs kanten du øker på. God fornøyelse!
11.09.2017 - 10:33
![]() Sonja wrote:
Sonja wrote:
Fort: Når man øker 6 masker på annen hver pinne er det enkel matte som sier at dette ikke går opp. Med en strikkefasthet på 32 omganger på 10 cm er 2 omganger bare 0,625 cm. 2 cm i høyden med økning på 6 masker annen hver omgang gir ca 36 masker. Derfor forskyver feilen seg. Jeg har strikket etter antall cm. Så får jeg se når jeg er ferdig. Men ellers, en nydelig jakke som jeg gleder meg til å bli ferdig med!
07.09.2017 - 17:26
![]() Sonja Marie wrote:
Sonja Marie wrote:
Tror ikke dere skjønte hva jeg mente. Jeg strikker med riktig garn og strikkefastheten er riktig. Men det står at arbeidet skal måle 53 cm i str M og det da er ca 373 masker på pinnen. Samtidig skal str L måle 55 cm og da være ca 379 masker på pinnen. Altså 2 cm mer, men bare 6 masker mer.
07.09.2017 - 17:07DROPS Design answered:
Hei Sonja Marie, Antall masker gir forskjell i bredden. Lengden er endret ved antall rader/omganger, så forskjell i lengden har ingenting med antall masker å gjøre. Håper dette hjelper og god fornæyelse!
08.09.2017 - 08:57
|
||||||||||||||||||||||||||||
Altair#altaircardigan |
||||||||||||||||||||||||||||
 |
 |
|||||||||||||||||||||||||||
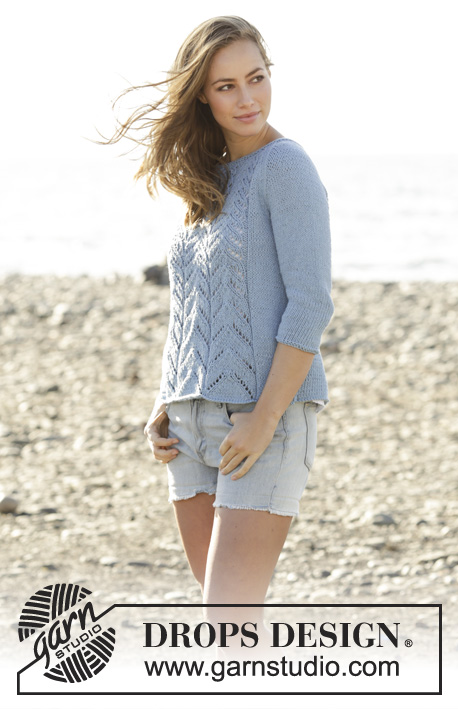
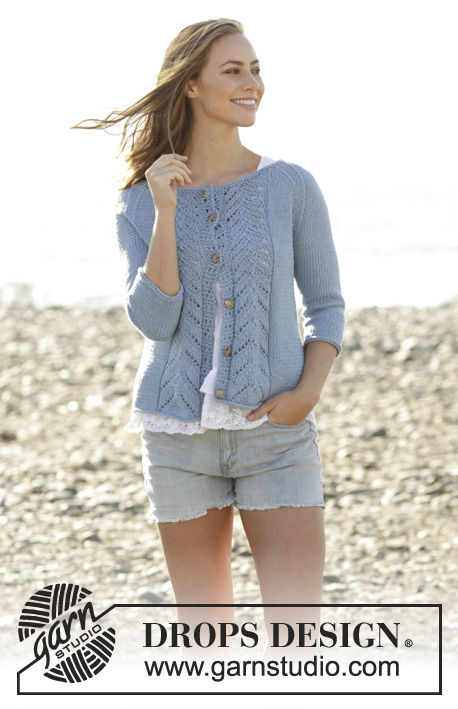
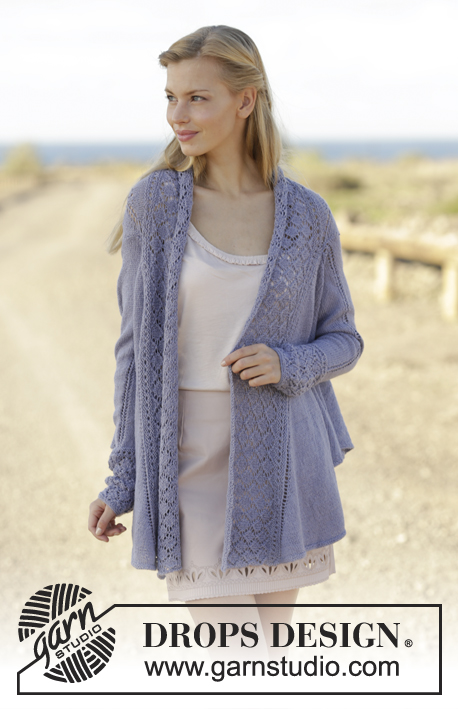
Knitted jacket worked in a square with lace pattern on the back in DROPS BabyAlpaca Silk. Size: S - XXXL
DROPS 177-32 |
||||||||||||||||||||||||||||
|
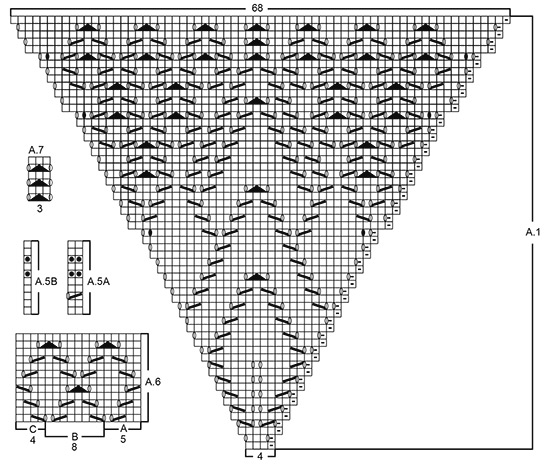
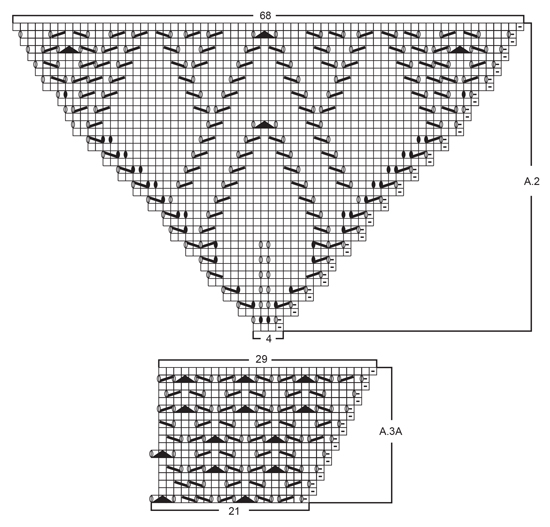
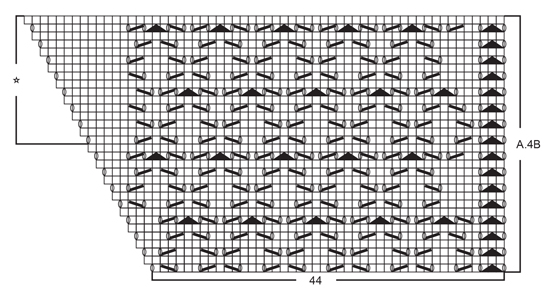
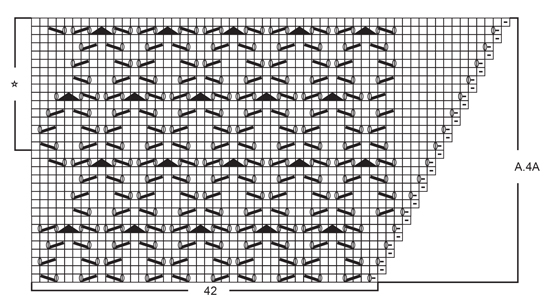
GARTER STITCH (back and forth): 1 ridge = knit 2 rows. GARTER STITCH (worked in the round): 1 ridge = 2 rounds. Knit 1 round and purl 1 round. PATTERN: See diagrams A.1 to A.7. Diagrams show all rows in pattern seen from the right side. INCREASE TIP-1: To calculate how to increase evenly, use the total number of stitches on row (e.g. 49 stitches) and divide stitches by number of increases to be done (e.g. 3) = 16.3. In this example increase after approx. every 16th stitch. Increase 1 stitch by making 1 yarn over, on next row work yarn over twisted to avoid holes. INCREASE TIP-2 (applies to mid under sleeve): Increase on each side of the 5 middle stitches under sleeve as follows: Begin 1 stitch before A.7, make 1 yarn over, knit 1, A.7, knit 1, make 1 yarn over (= 2 stitches increased). On next round knit yarn overs twisted to avoid holes. ---------------------------------------------------------- BODY: Work jacket as a square from mid back on the back and outwards. Work in the round on double pointed needles. Switch to circular needle when needed. When square has been worked, work down the back piece and outwards in each side for front pieces. Finish with a continuous neck edge/band before sleeves are worked. SQUARE: Cast on 8 stitches on 1 double pointed needle size 3 mm / US 2.5 with BabyAlpaca Silk (let the yarn end be approx. 20 cm / 8"; used for assembly). ROW 1 (= wrong side): Purl all stitches. ROW 2 (= right side): * Knit 1 twisted, make 1 yarn over, knit 1, make 1 yarn over *, repeat from *-* 4 times in total = 16 stitches. Distribute stitches on 4 double pointed needles size 3 mm / US 2.5 with 4 stitches on each needle (this is done without working the stitches). Insert 1 marker thread in first stitch on first double pointed needle (= marker thread A = beginning of round), insert in addition 1 marker thread in first stitch on each of the 3 next double pointed needles (= marker thread B, marker thread C and marker thread D). There is now 1 marker thread in each corner - move the marker threads upwards when working. Work in the round as follows: A.1 (= 4 stitches), A.2 (= 4 stitches), A.1 (= 4 stitches) and A.2 (= 4 stitches). Continue pattern like this and increase as shown in diagrams. REMEMBER THE KNITTING GAUGE When A.2 has been worked, work as follows over stitches between marker thread B and C and marker thread D and A. Work A.3A (= 21 stitches), A.3B (= 27 stitches) and then A.3C (= 20 stitches). When A.3 has been worked, A.1 is also done vertically and there are 308 stitches on needle in all sizes (67 stitches between marker thread A and B and between marker thread C and D, 85 stitches between marker thread B and C and between marker thread D and A and 4 corner stitches). Then work in the round in stockinette stitch with A.4 only between marker thread B and C as follows: Knit corner stitch twisted, increase with 1 yarn over, work in stockinette stitch until marker thread B, increase with 1 yarn over, work A.4A (= 42 stitches – increase after corner stitch is shown in diagram), work A.4B (= 44 stitches – increase before corner stitch is shown in diagram), knit corner stitch twisted, increase with 1 yarn over, work in stockinette stitch until marker thread D, increase with 1 yarn over, knit corner stitch twisted, increase with 1 yarn over, work in stockinette stitch until marker thread A and increase 1 yarn over = 316 stitches on needle in all sizes. Continue to increase at the corner stitches on every 2nd round until 2-4-6-8-10-12 rounds have been worked in total in A.4 (work all of the increased stitches in stockinette stitch). There are now 316-324-332-340-348-356 stitches on needle. ARMHOLES: Then work back and forth on circular needle but do not work stitches up towards the neck (i.e. between marker thread D and A). Begin from right side at marker thread A (= left shoulder back), knit corner stitch twisted as before, LOOSELY bind off the next 46-48-50-52-56-58 stitches for armhole, work in stockinette stitch until marker thread B, increase before corner stitch as before, continue A.4A and A.4B between marker thread B and C as before, knit corner stitch twisted, increase after corner stitch as before, work in stockinette stitch until 46-48-50-52-56-58 stitches remain before marker thread D, loosely bind off the next 46-48-50-52-56-58 stitches for armhole and knit corner stitch twisted as before. The remaining 87-89-91-93-95-97 stitch between marker thread D and marker thread A (= up towards the neck) are resting on the needle or slipped on a stitch holder. Cut the yarn used to work with and then slip the corner stitch at marker thread A and marker thread D on separate safety pins = 139-141-143-145-143-145 stitches remain on needle. Begin from wrong side and work back and forth as before over these stitches in stockinette stitch, A.4A and A.4B between marker thread B and C down at the back and increase on each side of the 2 corner stitches (on every row from right side) until 7 rows in total have been worked after decrease for armhole and last row is worked from wrong side, cut the yarn – NOTE: Work lace pattern in A.4 as shown in diagram, and repeat it down the back until finished measurements, i.e.. the pattern itself goes over the same number of stitches the entire time, but there are more and more stitches in stockinette stitch in each side towards corner stitches. Slip stitch from safety pin at marker thread A back on needle. Knit this stitch twisted, increase after corner stitch as before, cast on 46-48-50-52-56-58 new stitch on needle for armhole, work in stockinette stitch until marker B, increase before corner stitch as before, continue A.4A and A.4B between marker thread B and C as before, increase after corner stitch as before, work in stockinette stitch over the remaining stitches, cast on 46-48-50-52-56-58 new stitches for armhole, increase before corner stitch as before, slip stitch on safety pin back on needle and knit this stitch twisted = 251-257-263-269-275-281 stitches on needle. Work from wrong side and AT THE SAME TIME cast on 1 new stitch in each side (= edge stitch) = 253-259-265-271-277-283 stitches on needle. FRONT AND BACK PIECE: Continue back and forth on circular needle as before, i.e. work next row as follows from right side: 1 edge stitch in GARTER STITCH – see explanation above, knit corner stitch twisted, increase after corner stitch, work in stockinette stitch until corner stitch at marker thread B, increase before corner stitch, continue A.4A and A.4B between marker thread B and C (with increases as before), increase after corner stitch, work in stockinette stitch until corner stitch at marker thread D, increase before corner stitch, knit corner stitch twisted and finish with 1 edge stitch in garter stitch. Purl from wrong side but knit edge stitch in each side and purl the 4 corner stitches twisted as before. Continue back and forth like this until piece measures approx. 51-53-55-57-59-61 cm / 20"-21"-21⅝"-22½"-23¼"-24" from the neck down - finish after 1 row from wrong side. If the knitting gauge is correct vertically there are now 349-373-379-385-409-415 stitches on needle. Slip stitches between marker thread B and C (including corner stitches) on a stitch holder (= approx. 129-139-141-143-151-153 stitches along bottom edge on jacket). Slip the remaining stitches between marker thread C and to and with marker thread D on another stitch holder (= approx. 110-117-119-121-129-131 stitches on right front piece). LEFT FRONT PIECE: Insert 1 marker, NOW MEASURE PIECE FROM HERE! Work as follows over stitch from and with marker thread A and until marker thread B (first row = right side): 1 edge stitch in garter stitch, knit corner stitch twisted, increase after corner stitch as before, work in stockinette stitch until 1 stitch remains on row, turn piece, tighten yarn and work in stockinette stitch from wrong side, purl corner stitch twisted and 1 edge stitch in garter stitch. Turn piece, work as before until 2 stitches remain on row, turn piece, tighten yarn and work from wrong side as before. Continue like this by working 1 stitch less towards marker thread B on every turn until piece measures approx. 37-41-45-49-53-57 cm / 14½"-16"-17¾"-19¼"-21"-22½" from marker (finish after 1 row from wrong side). Put all stitches on left front piece on a stitch holder. RIGHT FRONT PIECE: Slip stitch from stitch holder between marker thread C and D back on circular needle size 3 mm / US 2.5. Insert 1 marker - NOW MEASURE PIECE FROM HERE and work as follows (first row = right side). Work in stockinette stitch until corner stitch, increase before corner stitch as before, knit corner stitch twisted and finish with 1 edge stitch in garter stitch. Turn piece, work from wrong side with 1 edge stitch in garter stitch, purl corner stitch twisted and work in stockinette stitch until 1 stitch remain on row, turn piece, tighten yarn and work from right side with stockinette stitch, increase before corner stitch, knit corner stitch twisted and 1 edge stitch in garter stitch. Turn, work from wrong side until 2 stitches remain on row, turn piece, tighten yarn and work from right side as before. Continue like this by working 1 stitch less towards marker thread C on every turn until piece measures approx. 37-41-45-49-53-57 cm / 14½"-16"-17¾"-19¼"-21"-22½" from marker (finish after 1 row from wrong side). EDGE IN GARTER STITCH: Slip stitches along right front piece, bottom edge and left front piece onto same circular needle size 2.5 mm / US 1.5 = approx. 467-505-523-541-579-597 stitches. Work 2 ridges back and forth over all stitches. Switch to circular needle size 3 mm / US 2.5 and bind off but to avoid a tight bind-off edge make 1 yarn over after every 6th stitch while binding off (bind off yarn overs as stitches). NECK EDGE AND BANDS: Work an edge at the top of garment up along right front piece, over stitches in the back of neck and down along left front piece as follows: Pick up from right side inside 1 edge stitch in garter stitch approx. 307-331-355-379-403-427 stitches on circular needle size 3 mm / US 2.5 (if you pick up more/fewer stitches adjust to correct number of stitch on first row). Knit 3 rows back and forth. Work next row as follows from right side: 1 edge stitch in garter stitch, work A.5A until 2 stitches remain on row, work A.5B (= 1 stitch) and finish with 1 edge stitch in garter stitch. When A.5 has been worked vertically, work next row as follows from right side: 1 edge stitch in garter stitch, A.6A (= 5 stitches), repeat A.6B until 5 stitches remain on row (= 37-40-43-46-49-52 repetitions of 8 stitches), work A.6C (= 4 stitches) and finish with 1 edge stitch in garter stitch. Continue pattern like this until entire edge measures approx. 18-18-18-22-22-22 cm / 7"-7"-7"-8¾"-8¾"-8¾", finish after one whole repetition vertically. Work 1 ridge back and forth over all stitches and bind off but to avoid a tight bind-off edge make 1 yarn over after every 4th stitch while binding off (bind off yarn overs as stitches). SLEEVE: Worked in the round on double pointed needles. Switch to a short circular needle when needed. Cast on 49-49-49-57-57-57 stitches on double pointed needles size 2.5 mm / US 1.5 with BabyAlpaca Silk. Work 2 ridges in GARTER STITCH in the round - see explanation above. Switch to double pointed needles size 3 mm / US 2.5 and work as follows: A.6A (= 5 stitches), repeat A.6B over the next 40-40-40-48-48-48 stitches (= 5-5-5-6-6-6 repetitions of 8 stitches) and finish with A.6C (= 4 stitches). Continue pattern like this. When piece measures approx. 12 cm / 4¾", adjust after one whole repetition vertically, knit 1 round while increasing 3-5-7-1-3-5 stitches evenly - READ INCREASE TIP-1 = 52-54-56-58-60-62 stitches on needle. Switch to double pointed needles size 2.5 mm / US 1.5 and work 2 ridges in the round. Then work A.5A in the round. When A.5 has been worked, switch back to double pointed needles size 3 mm / US 2.5. Work next round as follows: Work A.7 (= 3 stitches), 23-24-25-26-27-28 stitches in stockinette stitch, A.7 (= 3 stitches) and 23-24-25-26-27-28 stitches in stockinette stitch. Continue pattern like this with stockinette stitch and A.7 mid on top and mid under sleeve. AT THE SAME TIME when piece measures 16 cm / 6¼", increase 2 stitches mid under sleeve - READ INCREASE TIP-2. Increase 17-19-20-20-22-23 times in total in S: Every 2 cm / ¾", in M, L and XL: Alternately every 2 and 1½ cm / ¾" ½" and in XXL and XXXL: Every 1½ cm / ½" = 86-92-96-98-104-108 stitches on row. When piece measures 50-51-52-51-52-52 cm / 19¾"-20"-20½"-20"-20½"-20½", work sleeve cap back and forth on a short circular needle AT THE SAME TIME bind off at the beginning of every row in each side as follows: 3 stitches 1 time, 2 stitches 1 time and 1 stitch 2 times. Then bind off 2 stitches in each side until piece measures 53-54-55-55-56-56 cm / 21"-21¼"-21½"-21½"-22"-22", then bind off 3 stitches 1 time in each side. Bind off the remaining stitches, sleeve measures approx. 54-55-56-56-57-57 cm / 21¼"-21½"-22"-22"-22½"-22½". Work another sleeve the same way. ASSEMBLY: Sew in sleeves. Use yarn end from beginning of piece to sew small stitches up and down around the hole in the middle of square. Pull the yarn to tighten the hole and fasten. |
||||||||||||||||||||||||||||
Diagram explanations |
||||||||||||||||||||||||||||
|
||||||||||||||||||||||||||||
 |
||||||||||||||||||||||||||||
 |
||||||||||||||||||||||||||||
 |
||||||||||||||||||||||||||||
 |
||||||||||||||||||||||||||||
 |
||||||||||||||||||||||||||||
Have you finished this pattern?Tag your pictures with #dropspattern #altaircardigan or submit them to the #dropsfan gallery. Do you need help with this pattern?You'll find 32 tutorial videos, a Comments/Questions area and more by visiting the pattern on garnstudio.com. © 1982-2026 DROPS Design A/S. We reserve all rights. This document, including all its sub-sections, has copyrights. Read more about what you can do with our patterns at the bottom of each pattern on our site. |
||||||||||||||||||||||||||||


With over 40 years in knitting and crochet design, DROPS Design offers one of the most extensive collections of free patterns on the internet - translated to 17 languages. As of today we count 324 catalogs and 12290 patterns - 12280 of which are translated into English (US/in).
We work hard to bring you the best knitting and crochet have to offer, inspiration and advice as well as great quality yarns at incredible prices! Would you like to use our patterns for other than personal use? You can read what you are allowed to do in the Copyright text at the bottom of all our patterns. Happy crafting!
Post a comment to pattern DROPS 177-32
We would love to hear what you have to say about this pattern!
If you want to leave a question, please make sure you select the correct category in the form below, to speed up the answering process. Required fields are marked *.