
Popular categories
Looking for a yarn?


Comments / Questions (84)
![]() Anita wrote:
Anita wrote:
Hallo liebes Team, Ich habe nun angefangen zu stricken aber ich verstehe die Abnahmen nicht. Einerseits steht nach 4 cm 2 Maschen vor dem Markierer 2 M zusammenstricken und 2 nach dem Markierer stricken und darüberziehen. Das ist mir noch klar aber dan steht in jeder 8. Reihe abnehmen insgesamt 8 M. Das wäre ja dann nur 2x? Und dann steht noch was vom im Zopf abnehmen, wann kommt den das und was ist mit linksseitig gemeint?
13.02.2018 - 01:23DROPS Design answered:
Liebe Anita, diese Abnahmen sind auf beiden Seite der Markierer (Seite = unter den Ärmel), es werden 2 M auf beiden Seite der 2 Markierer abgennommen = 4 M pro Abnahmerreihe x 2 = 8 M werden an beiden Seiten abgenommen: 1 x 4 M nach 4 cm + 1 x 4 M nach 8 Reihen. (siehe nächste Antwort für die andere Abnahme)
13.02.2018 - 09:38
![]() Anita wrote:
Anita wrote:
Liebes Team, Vielen Dank für die Erklärungen. Ich habenunangefangen. Ich finde es schon super, dass ihr uns hier so tolle Hilfe leistet. Liebe Grüsse Anita
05.02.2018 - 00:12
![]() Anita Bregy Sakouid wrote:
Anita Bregy Sakouid wrote:
Guten Tag, Ich habe ein paar Fragen. Es steht: Krausrippen (rd) 1 Krausrippe =2 rd kraus rechts = 1 rd re und 1 rd li Steht rd für runde? Kraus rechts ist doch alles rechts, wie geht das dann mit 1rd re und 1 rd li? Wenn ich oben anfange, strickt man dann die Ärmel auch gleich mit? Vielen Dank für Ihra Hilfe. Liebe Grüsse Anita
27.01.2018 - 09:38DROPS Design answered:
Liebe Anita, wenn man kraus rechts in der Runde strickt, muß man abwechselnd 1 rd re, 1 rd li stricken, siehe Video. Die Jacke wird von oben nach unten, dh mit der Passe angefangen, Sie werden für den Raglan neue Maschen für Rücken-, beiden Vorderteilen sowie für die Ärmel zunehmen (= vor oder/und nach A.2). Viel Spaß beim stricken!
29.01.2018 - 09:03
![]() Tina wrote:
Tina wrote:
Liebes Team, Vielen Dank für die Erklärung. Nun geht es auch auf und ich komme gut voran.
10.09.2017 - 15:16
![]() Tina wrote:
Tina wrote:
Hallo Liebes Team, Es ist mein erster Versuch etwas nach Muster zu stricken. In der Anleitung steht, das Diagramm A.1 = 4 Maschen. In der Erklärung hat sie aber 5 Maschen. Oder lese ich das falsch?
12.08.2017 - 09:10DROPS Design answered:
Liebe Tina, A.1 ist über 4 M gestrickt, dh an der 1. Reihe: 1 M li, 1 M re, 1 Umschlag, 1 M re, 1 M links, so bekommen Sie 5 M an der 2. und 3. Reihe. Bei der 4. Reihe sind es wieder nur 4 M. Viel Spaß beim stricken!
28.08.2017 - 09:54
![]() Begoña Albeniz Arteagoitia wrote:
Begoña Albeniz Arteagoitia wrote:
Cuando comienzan los aumentos después de conseguir los 166 puntos para la talla mediana, me indica que debo aumentar un punto del revés después de cada torsada, según el patrón son 18 puntos aumentados, a mí solo me salen 12, uno a cada lado de la torsada
24.03.2017 - 23:55DROPS Design answered:
Hola Begoña. Los 18 pts aumentados después de las dos filas de los aumentos, es decir, en la primera fila con los aumentos, aumentamos 6 puntos y en la 2ª fila con aumentos - otros 12 puntos = un total de 18 puntos aumentados.
30.03.2017 - 22:14
![]() Mirja Kraack wrote:
Mirja Kraack wrote:
Liebes Drops-Team, nun ist meine Jacke endlich fertig und sieht im oberen Bereich toll aus und paßt auch gut. Leider steht sie aber unten am Ende ganz schlimm ab. Sie ist viel zu weit und die Weite steht hoch bzw. rollt sich vorne ein. Wie kann ich das ändern oder was ist falsch gelaufen? Ich würde mich sehr über Hilfe freuen. Viele Grüße Mirja
14.12.2016 - 12:06DROPS Design answered:
Liebe Frau Kraack, die Jacke können Sie dann mit der Hilfe der Schnittübersicht spannen bzw blocken - gerne wird Ihr DROPS Laden mit weiteren persönnlichen Tips helfen. Viel Spaß beim stricken!
14.12.2016 - 14:13
![]() Elsa wrote:
Elsa wrote:
Hallo, Ik ben net klaar met het apart zetten van de mouw, en wil beginnen aan het lijf, maar ik weet niet goed wat ik moet doen met de paar steken van het A2 patroon die nog wel op de naald staan maar onder de mouw zitten. (1r, 2av, 1r , 6 nieuwe steken 1r, 2av, 1r). Worden die op het lijf verder gebreid in het A2 patroon, of veranderen ze allemaal in rechte steken? En lopen de raglangaatjes door onder de mouw?
11.12.2016 - 19:11DROPS Design answered:
Hoi Elsa. Ik zou zeggen dat je breit door in het patroon tot alle minderingen zijn gedaan. Daarna lijkt het dat de zijkanten in tricotsteken worden gebreid. Zo lees ik het in het patroon, en ik kan het helaas niet goed zien op de foto.
12.12.2016 - 14:53
![]() Mirja Kraack wrote:
Mirja Kraack wrote:
Hallo liebes Drops-Team, vielen lieben Dank für die Hilfe. Nun klappt es mit den Zunahmen und sieht toll aus. Nach 2 Reihen konnte ich auch sehen, warum das so gestrickt wird. Herzliche Grüße Mirja
07.12.2016 - 09:30
![]() Mirja Kraack wrote:
Mirja Kraack wrote:
Hallo, ich beginne diese schöne nun schon zum 7.Mal und komme nicht über die erste Reihe, in der die Raglanzunahmen Rumpfteil und Ärmel beginnen ( also ganz oben ). Ich verstehe einfach nicht, wo welche Zunahme ( Ärmel oder Rumpf ) ist. Zwischen Vorderseite und Ärmel doppelt? Vielleicht kann man mir da weiterhelfen. Ich würde mich sehr freuen. Viele Grüße Mirja
05.12.2016 - 15:54DROPS Design answered:
Liebe Frau Kraack, die Raglanzunahmen werden unterschiedlich an Rumpfteil und Ärmel bearbeitet, dh: Rumpfteil: zuerst 2 M an jedem Vorderteil + beidseitig am Rückenteil (= 8 Zunahmen) und dann nur 1 M an jedem Vorderteil + beidseitig am Rückenteil (= 4 Zunahmen) - Ärmel: 1 M am Anfang + am Ende jeder Ärmel (= 2 Zunahmen/Ärmel). Siehe "RAGLANZUNAHMEN ÄRMEL bzw RUMPFTEIL". Viel Spaß beim stricken!
05.12.2016 - 16:09
|
|||||||||||||||||||
Lobelia#lobeliacardigan |
|||||||||||||||||||
 |
 |
||||||||||||||||||
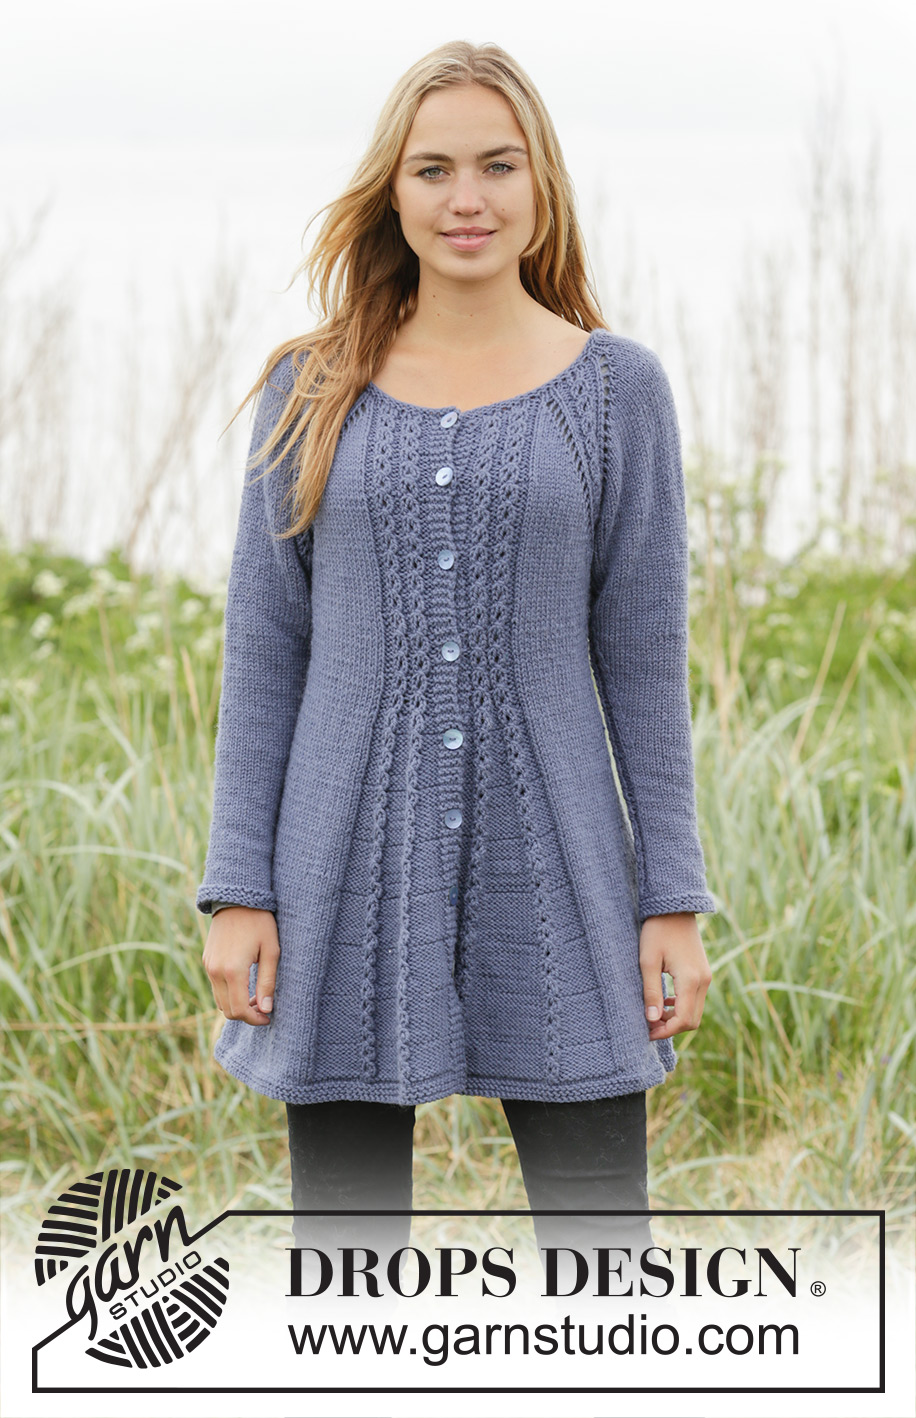
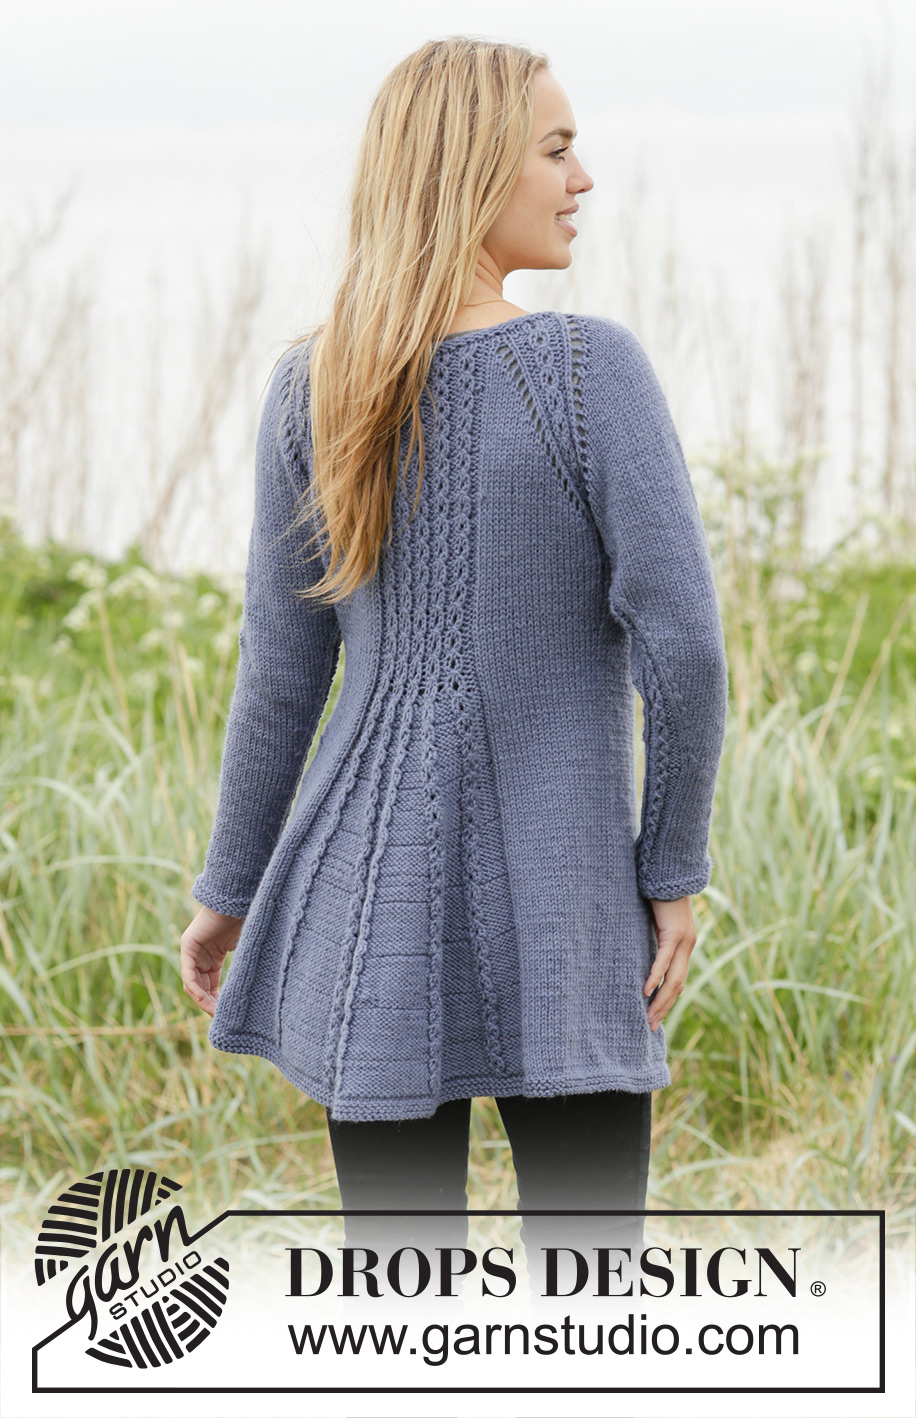
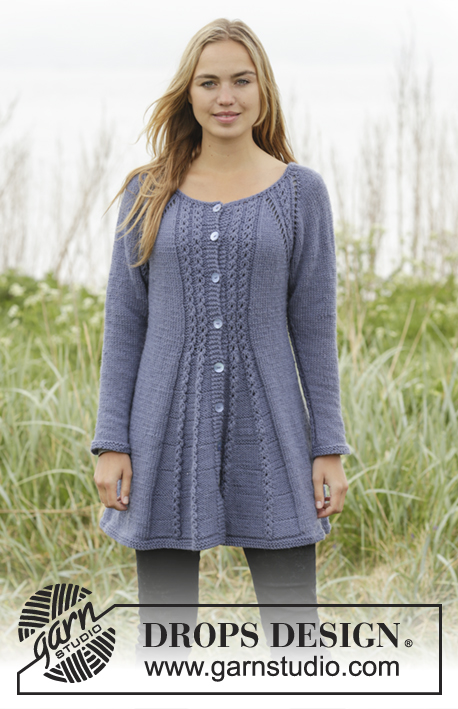
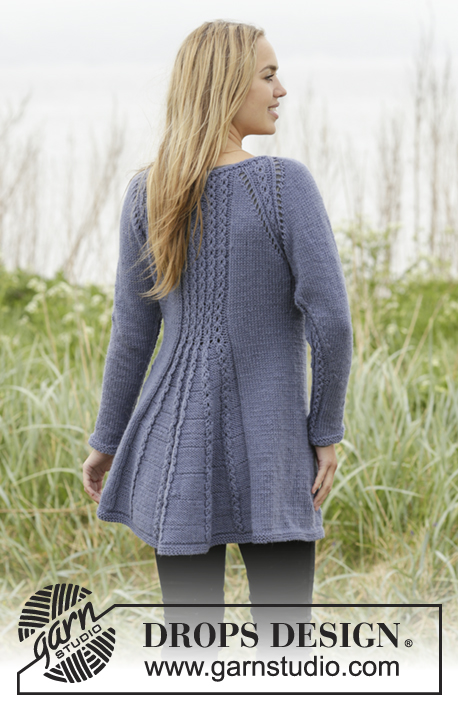
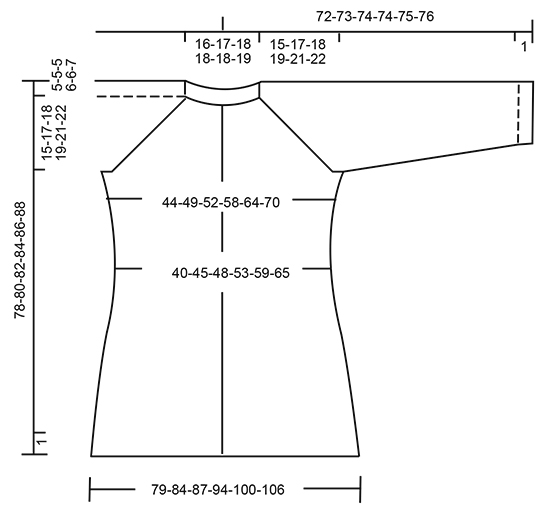
Knitted DROPS jacket with raglan and cables, worked top down in ”Nepal”. Size S-XXXL.
DROPS 171-14 |
|||||||||||||||||||
|
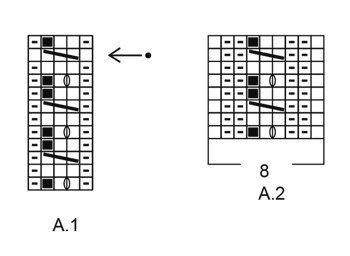
GARTER ST (worked in the round): 1 ridge = 2 rounds. * K 1 round and P 1 round *, repeat from *-*. GARTER ST (back and forth): K all rows. 1 ridge = K2 rows. PATTERN: See diagrams A.1 and A.2. The diagrams show all rows in pattern seen from RS. INCREASE TIP-1 (evenly spaced): To calculate how often inc should be done, use the total no of sts on row (e.g. 97 sts), minus bands (e.g. 8 sts) and divide the remaining sts by no of inc to be done (e.g. 20) = 4.4. I.e. in this example inc 1 st alternately for every 4th and 5th st (and do not inc over bands). INCREASE TIP-2 (body): All inc are done from RS. Inc 1 st P by making a YO. On next row K YO twisted to avoid holes. RAGLAN SLEEVE: Inc 1 st after/before A.2 on sleeve by making a YO (= 2 sts inc on each sleeve). On next row P YOs to make holes. RAGLAN BODY: Inc first 2 sts before/after A.2 on front and back piece (= 8 sts inc in total), then inc 1 st before/after A.2 on front and back piece (= 4 sts inc in total). Inc 2 sts before A.2 as follows: Work until 1 st remains before A.2, 1 YO, K 1, 1 YO. Inc 2 sts after A.2 as follows: 1 YO, K 1, 1 YO. NOTE: On next row P YOs closest A.2 to make holes. P the other YOs twisted to avoid holes. Inc 1 st before/after A.2 as follows: Inc 1 st by making a YO. On next row P YOs to make holes. DECREASE TIP-1 (body): Work until 4 sts remain before marker, K 2 tog, K 4 (marker is between these sts), slip next st as if to K, K 1, psso. Repeat in the other side (= 4 sts dec). DECREASE TIP-2 (sleeve): Work until 2 sts remain before A.2, K 2 tog, A.2, slip next st as if to K, K 1, psso (= 2 sts dec). BUTTONHOLES: Dec for buttonholes on right band. I.e. band at the end of row seen from RS. 1 buttonhole = K tog third and fourth st from edge and make 1 YO. Dec for buttonholes when piece measures (from cast-on edge and along the band): SIZE S: 2, 11, 20, 29, 38 and 47 cm. SIZE M: 2, 11, 20, 29, 38 and 47 cm. SIZE L: 2, 12, 21, 31, 40 and 50 cm SIZE XL: 2, 12, 21, 31, 40 and 50 cm SIZE XXL: 2, 12, 22, 32, 42 and 52 cm SIZE XXXL: 2, 12, 22, 32, 42 and 52 cm Conversion to inch - see page 4. BIND-OFF TIP: To avoid a tight bind-off edge you may use a needle ½ size larger. ---------------------------------------------------------- JACKET: Worked back and forth on circular needle, top down. YOKE: Cast on 97-99-103-109-111-117 sts (includes 4 band sts in garter st in each side) on circular needle size 4.5 mm / US 7. Work 2 ridges in GARTER ST - see explanation above and inc 17-19-19-25-27-25 sts evenly on last row from RS - READ INCREASE TIP-1 = 114-118-122-134-138-142 sts. Switch to circular needle size 5 mm / US 8. Now work an elevation in stockinette st in the back of neck as follows: Work the first 61-63-67-73-77-79 sts, turn and work 16-16-20-20-24-24 sts, turn and work 20-20-24-24-28-28 sts, turn and work 24-24-28-28-32-32 sts, turn and work the rest of row. Then P 1 row with 4 band sts in garter st in each side. REMEMBER BUTTONHOLES! Now work pattern as follows from RS: 4 band sts in garter st, P 1, A.1 (= 4 sts) 2-2-2-3-3-3 times, P 1, K 1-2-2-1-2-3 (= left front piece), A.2 (= 8 sts on 1st row), K 14-14-16-16-16-16 (= sleeve), A.2, K 1-2-2-1-2-3, P 1, A.1 5-5-5-7-7-7 times, P 1, K 1-2-2-1-2-3, (= back piece) A.2, K 14-14-16-16-16-16 (= sleeve), A.2, K 1-2-2-1-2-3, P 1, A.1 2-2-2-3-3-3 times, P 1, 4 band sts in garter st. Work 1 row from WS the same way. REMEMBER THE KNITTING GAUGE On next row from RS, beg inc for RAGLAN BODY and RAGLAN SLEEVE – see explanation above. NOTE: Inc differently on sleeves and body. BODY: Inc 2 sts every other row 4-4-5-6-7-9 times and 1 st every other row 11-14-14-14-15-14 times (= 15-18-19-20-22-23 times in total). SLEEVES: Inc like this every other row 15-18-19-20-22-23 times in total. When all inc are done there are 250-278-294-318-342-362 sts on needle. Now work as follows from WS: Work the first 38-42-44-49-53-57 sts (= right front piece), slip the next 52-58-62-64-68-70 sts on a stitch holder (= sleeve), cast on 6-6-8-8-10-12 sts under sleeve, work the next 70-78-82-92-100-108 sts (= back piece), slip the next 52-58-62-64-68-70 sts on a stitch holder (= sleeve), cast on 6-6-8-8-10-12 sts under sleeve, work the remaining 38-42-44-49-53-57 sts (= left front piece). Piece measures approx. 15-17-18-19-21-22 cm / 6"-6¾"-7"-7½"-8¼"-8¾" along band. BODY: There are now 158-174-186-206-226-246 sts for body. NOW MEASURE THE PIECE FROM HERE. Continue pattern back and forth as before and insert a marker in the middle of the new sts under sleeve in each side. Then dec in each side and in pattern as follows: DECREASE IN THE SIDES: When piece measures 4 cm / 1½", dec 1 st on each side of marker in each side - READ DECREASE TIP-1 (body). Repeat dec every 8th row 2 times in total = 8 sts dec in total. DECREASE IN PATTERN: When piece measures 6 cm / 2⅜", dec 1 st P by P 2 tog in every section with P between 2 cables = 6-6-6-10-10-10 sts dec (i.e. dec 1-1-1-2-2-2 sts on each front piece and 4-4-4-6-6-6 sts on back piece). When all dec are done, there are 144-160-172-188-208-228 sts on needle. When piece measures 15-15-16-16-16-16 cm / 6"-6"-6¼"-6¼"-6¼"-6¼"", inc 1 st P in every section where P sts were dec – READ INCREASE TIP-2 (= 6-6-6-10-10-10 sts inc) = 150-166-178-198-218-238 sts. On next row from RS inc 1 st P on each side of each cable = 18-18-18-26-26-26 sts inc on needle. Inc like this every 10th-10th-10th-14th-14th-14th row (= every 5th-5th-5th-7th-7th-7th row from RS) 7-7-7-5-5-5 times in total = 276-292-304-328-348-368 sts. When all inc are done, continue back and forth in pattern. When piece measures 56-56-57-57-57-57 cm / 22"-22"-22½"-22½"-22½"-22½" – adjust to finish after 4th or 8th row in pattern, work 2 rows in stockinette st inside 4 band sts in garter st in each side. Switch to circular needle size 4.5 mm / US 7 and work 2 ridges. Bind off - READ BIND-OFF TIP. SLEEVE: Work sleeves in the round on double pointed needles. Slip the 52-58-62-64-68-70 sts from stitch holder on double pointed needles size 5 mm / US 8 and pick up 1 st in each of the 6-6-8-8-10-12 new sts cast on under sleeves = 58-64-70-72-78-82 sts. Insert a marker in the middle of the new sts. NOW MEASURE THE PIECE FROM HERE. Now work A.2 (= 8 sts on 1st row) mid under sleeve (i.e. there are 4 sts of A.2 on each side of marker), work the remaining sts on round in stockinette st. When piece measures 4 cm / 1½", dec 1 st on each side of A.2 - READ DECREASE TIP-2 (sleeve). Dec like this every 8th-6th-5th-4th-4th-4th round 11-14-15-19-18-19 times in total = 36-36-40-40-42-44 sts. When sleeve measures 48-47-46-45-44-44 cm / 19"-18½"-18"-17¾"-17¼"-17¼", switch to double pointed needles size 4.5 mm / US 7. Work 2 ridges. Bind off. Make another sleeve the same way. ASSEMBLY: Sew the buttons on to left band. |
|||||||||||||||||||
Diagram explanations |
|||||||||||||||||||
|
|||||||||||||||||||
 |
|||||||||||||||||||
 |
|||||||||||||||||||
Have you finished this pattern?Tag your pictures with #dropspattern #lobeliacardigan or submit them to the #dropsfan gallery. Do you need help with this pattern?You'll find 30 tutorial videos, a Comments/Questions area and more by visiting the pattern on garnstudio.com. © 1982-2026 DROPS Design A/S. We reserve all rights. This document, including all its sub-sections, has copyrights. Read more about what you can do with our patterns at the bottom of each pattern on our site. |
|||||||||||||||||||


With over 40 years in knitting and crochet design, DROPS Design offers one of the most extensive collections of free patterns on the internet - translated to 17 languages. As of today we count 325 catalogs and 12298 patterns - 12288 of which are translated into English (US/in).
We work hard to bring you the best knitting and crochet have to offer, inspiration and advice as well as great quality yarns at incredible prices! Would you like to use our patterns for other than personal use? You can read what you are allowed to do in the Copyright text at the bottom of all our patterns. Happy crafting!
Post a comment to pattern DROPS 171-14
We would love to hear what you have to say about this pattern!
If you want to leave a question, please make sure you select the correct category in the form below, to speed up the answering process. Required fields are marked *.