
Popular categories
Looking for a yarn?


Comments / Questions (93)
![]() Mary Holmes wrote:
Mary Holmes wrote:
Sorry but your answer to my question does NOT make sense! Help please. Mary Holmes
17.12.2018 - 21:37DROPS Design answered:
Hi Mary. Because you continue to increase mid-front/mid-back and at the same time continue to decrease in each side the piece will naturally become more pointy where you constantly increase, compared to where you constantly decrease. You will not see this change immediately, but it will happen as you continue to work. Happy knitting.
18.12.2018 - 08:37
![]() Mary Holmes wrote:
Mary Holmes wrote:
How is the point achieved at the end of the pattern? I have run my own knitting business and this is the only pattern I have never completed. Help please.
14.12.2018 - 19:47DROPS Design answered:
Dear Mrs Holmes, after division for sleeve you continue increasing mid front and mid back with A.5a/A.6a and at the same time decrease mid under each sleeve to avoid the bottom of piece being too wide. Then you finish each piece separately (front and back) for vents on the side repeating same rows as before (8 rows with dec on row 2 only and inc on row 2 and 8). Happy knitting!
17.12.2018 - 09:07
![]() Emilie wrote:
Emilie wrote:
Bonjour, J'en suis à la 25ème ligne du diagramme A2a/A3a. À cette endroit il faut diminuer 2 mailles avec un surjet double, on a donc une maille au lieu de 3. Cependant au tour suivant du diagramme il n'y a qu'une case noircie au lieu de 2... Je ne comprends pas comment faire un jeté entre 2 mailles alors qu'il n'y en plus qu'une.
06.12.2018 - 07:33DROPS Design answered:
Bonjour Émilie, les cases avec le triangle noir (= 7ème symbole du diagramme) ne sont pas des surjets doubles mais une petite torsade ajourée (combinée avec le jeté du rang suivant): on glisse 1 m à l'end, on tricote les 2 m suivantes et on passe la m glissée par-dessus la m tricotée = il reste 2 m que l'on tricote ainsi au tour suivant: 1 m end, 1 jeté, 1 m end. Cette vidéo montre comment réaliser ce motif. Bon tricot!
06.12.2018 - 10:07
![]() Ingrid Höjer wrote:
Ingrid Höjer wrote:
Vad betyder rmt? se 4-4-6-6-10-10 rmt, Tacskam för svar!
21.07.2018 - 16:05DROPS Design answered:
Hei Ingrid. Her er det visst en skrivefeil; det skal stå "4-4-6-6-10-10 rm". Dette skal vi få korrigert med en gang. Takk for beskjed, god fornøyelse
26.07.2018 - 13:16
![]() Ked wrote:
Ked wrote:
Why isn't this sweater listed as a raglan when that is what it is?
19.07.2018 - 10:55DROPS Design answered:
Dear Ked, fixed now, thank you! Happy knitting!
19.07.2018 - 11:52
![]() Jade wrote:
Jade wrote:
A magyar fordításban az első háta közepe szemnél hiányzik a leírásból egy fordított szem, úgyhogy most bontani kell. Kérem javítani, hogy más ne járjon pórul!
11.04.2018 - 17:46DROPS Design answered:
Kedves Jade! Köszönjük, hogy felhívta a figyelmünket a hibára, ami javításra is került. Sajnáljuk, ha a hibával kellemetlenséget okoztunk. Sikeres kézimunkázást!
12.04.2018 - 02:24
![]() Ingvill Anita Skår wrote:
Ingvill Anita Skår wrote:
Får ikke svar på mitt spørsmål, 18 sm under armen, blir en veldig kort tunika, jeg strikker størrelse large
19.01.2018 - 15:24DROPS Design answered:
Hvis du følger opskriften og holder strikkefastheden så vil du få de mål du ser i måleskitsen nederst i opskriften. God fornøjelse!
30.01.2018 - 11:01
![]() Ingvill wrote:
Ingvill wrote:
Hva skjer etter 18. Cm 18+13 cm er passelig langt for meg som er 161cm lang, det står at man skal dele til flippene foran og bak etter 18 cm, altfor kort, på diagrammet står det 13 cm ekstra, hva skal man strikke der, jeg prøver å fortsette å strikke videre 13 cm.
13.01.2018 - 05:30DROPS Design answered:
Hei Ingvild. Når arbeidet måler 18 cm fra merketråden under ermet, deles arbeidet slik at det blir en splitt i hver side. Forstykke og bakstykket strikkes ferdig hver for seg (dvs det strikkes videre frem og tilbake). Det fortsettes med mønster som før, men de ytterste maskene i hver side strikkes i riller til arbeidet måler 30 cm fra merketråden under ermet, da strikkes det 2 riller over alle maskene (= ca 13 cm splitt). Siden genseren er strikket ovenfra og ned kan man evt fortsette mønsteret til ønsket lengde, om man ønsker en lengre eller kortere variant:) God strikking!
26.02.2018 - 13:15
![]() Juliane wrote:
Juliane wrote:
Bonjour, j'ai commencé le modèle 172-1 en taille M. Je comprends bien les explications des points fantaisies et la marche à suivre, sauf les explications des augmentations du raglan. Quand faut-il augmenter et où? Faut-il augmenter 23 mailles de suite? Merci d'avance d'éclairer ma sombre lanterne :)
27.12.2017 - 13:51DROPS Design answered:
Bonjour Julianne, les augmentations du raglan pour le dos et le devant sont incluses dans les diagrammes, pour les manches, augmentez comme indiqué sous RAGLAN = après le 1er/avant le 2ème marqueur + après le 3ème/avant le 4ème marqueur, en taille M: 2 fois tous les tours + 23 fois tous les 2 tours. Bon tricot!
02.01.2018 - 08:53
![]() Siorat wrote:
Siorat wrote:
Bonjour Je souhaite imprimer les explications, mais seule la première page s'imprime. Mon imprimante indique qu'il n'y a qu'une page. Y-a-t-il un problème ? Merci
06.12.2017 - 16:55DROPS Design answered:
Bonjour Mme Siorat, nous avons réussi à imprimer les 10 pages de ce modèle, actualisez la page, vérifiez bien les paramètres de votre imprimante pour qu'elle imprime bien toutes les pages. Bon tricot!
07.12.2017 - 10:13
|
||||||||||||||||||||||||||||||||||||||||
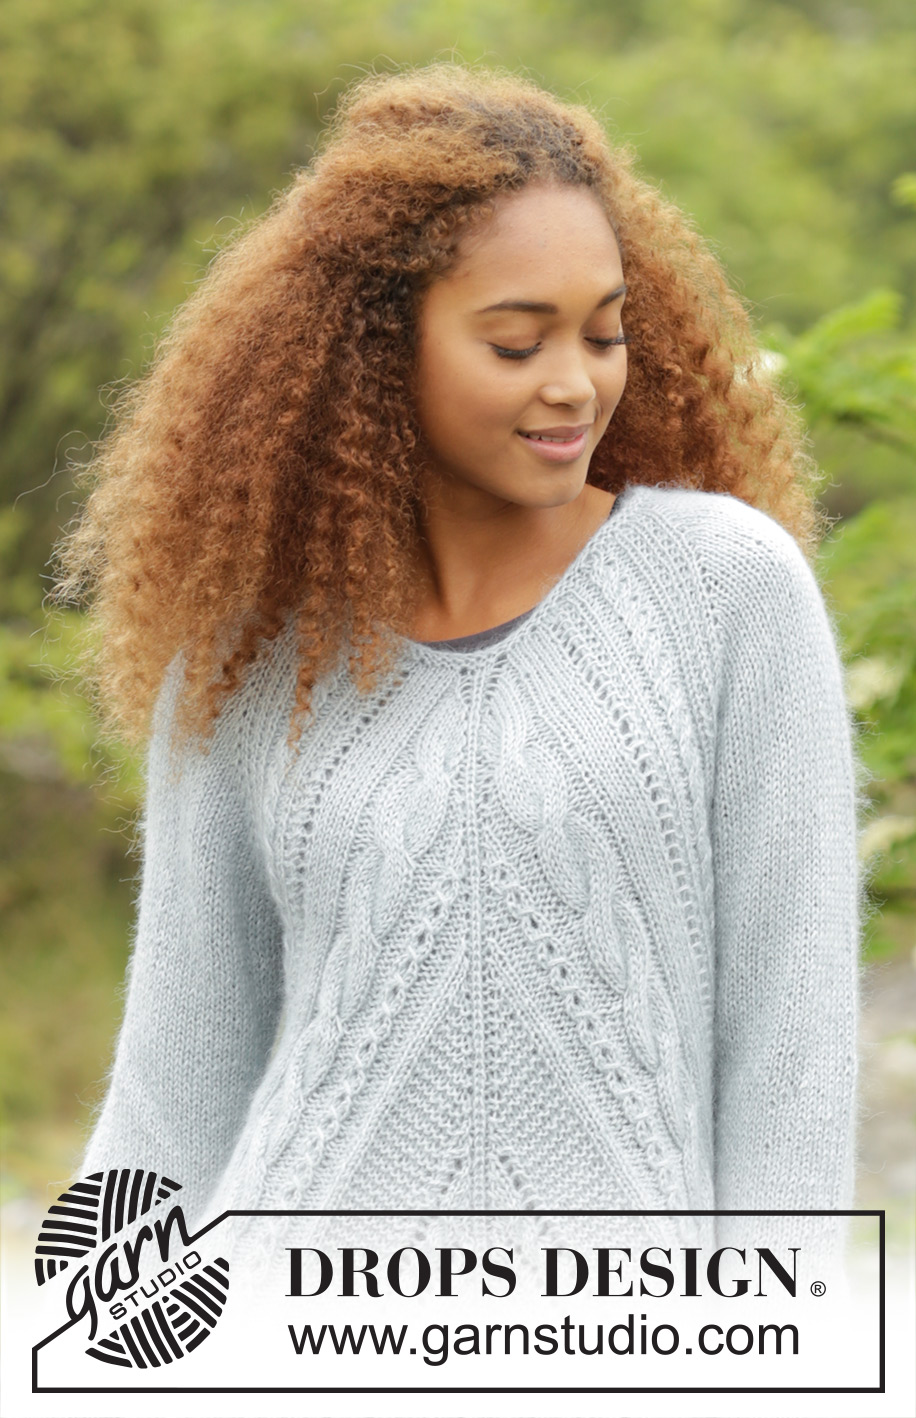
Winter Flair#winterflairtunic |
||||||||||||||||||||||||||||||||||||||||
 |
 |
|||||||||||||||||||||||||||||||||||||||
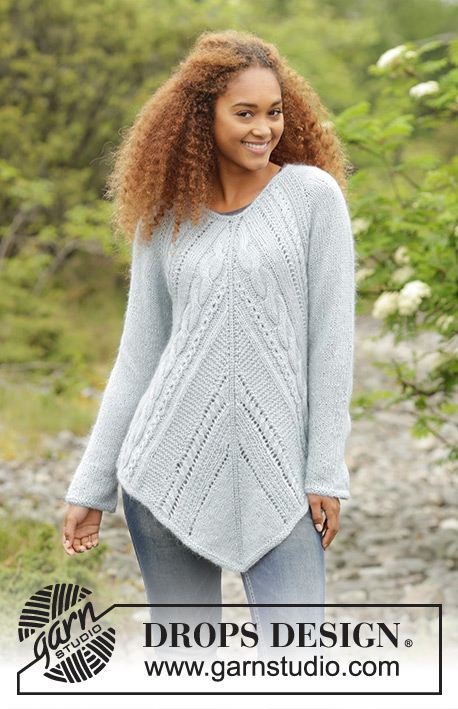
Knitted DROPS tunic with cables, garter st and lace pattern, worked top down in ”Alpaca” and ”Kid-Silk”. Size: S - XXXL.
DROPS 172-1 |
||||||||||||||||||||||||||||||||||||||||
|
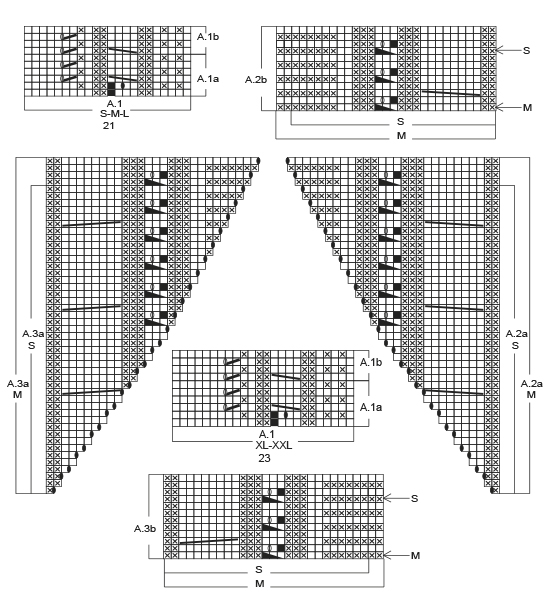
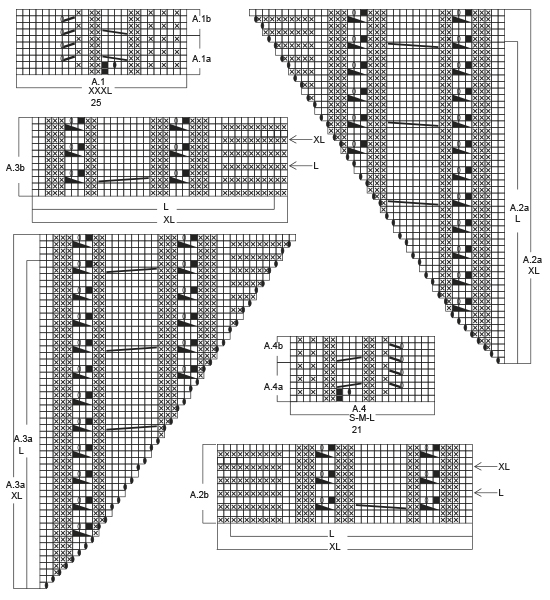
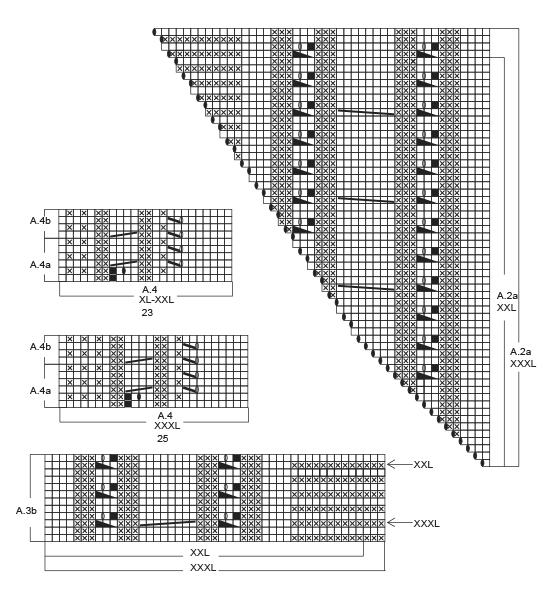
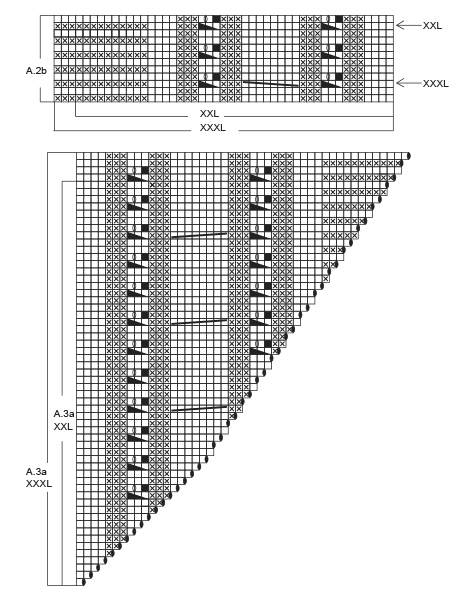
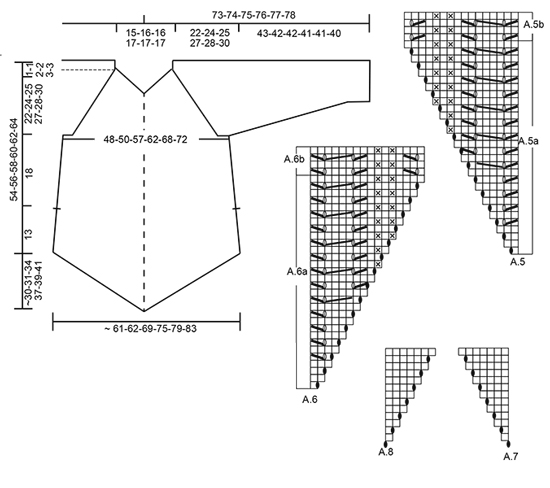
GARTER ST (worked in the round): 1 ridge = 2 rounds. * K 1 round and P 1 round *, repeat from *-*. GARTER ST (back and forth): K all rows. 1 ridge = K2 rows. RAGLAN: On sleeves inc for raglan with YO K twisted on next round, they should not make holes. Inc as follows: Inc with 1 YO after 1st and 3rd marker and before 2nd and 4th marker as follows: Inc every round 0-2-4-0-0-0 times in total. Inc every other round 22-23-23-27-24-26 times in total. Inc every 4th round, 0-0-0-0-2-2 times in total (= 22-25-27-27-26-28 times in total) = 48-54-60-60-62-66 sts in total on each sleeve. PATTERN: See diagrams A.1 to A.8. See diagram for correct size. DECREASE TIP-1: When working in the round, dec as follows: Dec as follows at each marker: Work until 3-3-3-5-6-6 sts remain before marker, K 2 tog (= 1 st dec), 2-2-2-6-8-8 sts in garter st (marker is in the middle of these sts), slip 1 st as if to K, K 1, psso (= 1 st dec). When working back and forth, dec as follows: All dec are done from RS. Work 3-3-3-3-4-4 sts in garter st, slip 1 st as if to K, K 1, psso (= 1 st dec), work pattern as before until 5-5-5-5-6-6 sts remain, K 2 tog (= 1 st dec), finish with 3-3-3-3-4-4 sts in garter st. DECREASE TIP-2 (applies to sleeve): Dec as follows at marker: Work until 3 sts remain before marker, K 2 tog (= 1 st dec), K 2 (marker is in the middle of these sts), slip 1 st as if to K, K 1, psso (= 1 st dec). BIND-OFF TIP: To avoid a tight bind-off edge you may use a needle ½-1 size larger. ---------------------------------------------------------- TUNIC: Worked in the round, top down. Cast on 80-84-86-92-96-102 sts on circular needle size 4.5 mm / US 7 with 1 strand Alpaca and 1 strand Kid-Silk. Work 2 ridges in GARTER ST - see explanation above. Switch to circular needle SIZE 5.5 mm/US 9 / US 9. K 1 round while AT THE SAME TIME inc 22-18-20-22-26-28 sts evenly = 102-102-106-114-122-130 sts. On next round work pattern and inc for RAGLAN - see explanation above, as follows: Work A.1a over the first 21-21-21-23-23-25 sts, A.2a over next st, P 1, K 1 (= mid back), P 1, A.3a over next st, A.4a over the next 21-21-21-23-23-25 sts (= back piece), insert 1st marker, K 4-4-6-6-10-10, insert 2nd marker (= sleeve), A.1a over the next 21-21-21-23-23-25 sts, A.2a over next st, P 1, K 1 (= mid front), P 1, A.3a over next st, A.4a over the next 21-21-21-23-23-25 sts (= front piece), insert 3rd marker, K 4-4-6-6-10-10, insert 4th marker (= sleeve). Continue pattern like this. REMEMBER THE KNITTING GAUGE When A.1a and A.4a have been worked 1 time vertically, repeat A.1b and A.4b vertically. When A.2a and A.3a have been worked 1 time vertically, there are 298-318-362-378-402-430 sts on needle. Piece measures approx. 22-24-25-27-28-30 cm / 8¾"-9½"-9¾"-10½"-11"-11¾" on the shortest part of piece. Work next round as follows: Continue with A.1b over the first 22-22-22-24-24-26 sts as before, A.2b over the next 27-29-37-39-44-47 sts, 1 YO, P 1, K 1 (= mid back), P 1, 1 YO, A.3b over the next 27-29-37-39-44-47 sts, A.4b over the next 22-22-22-24-24-26 sts, slip the next 48-54-60-60-62-66 sts on a stitch holder for sleeve, cast on 6-6-6-10-12-12 sts under sleeve, insert 1 marker in the middle of the new sts (= side marker), A.1b over the next 22-22-22-24-24-26 as before, A.2b over the next 27-29-37-39-44-47 sts, 1 YO, P 1, K 1 (= mid front), P 1, 1 YO, A.3b over the next 27-29-37-39-44-47 sts, A.4b over the next 22-22-22-24-24-26 sts, slip the next 48-54-60-60-62-66 sts on a stitch holder for sleeve, cast on 6-6-6-10-12-12 sts under sleeve, insert 1 marker in the middle of the new sts (= side marker) = 218-226-258-282-306-326 sts. Work 1 round pattern, K YOs twisted mid front and mid back, they should not make holes. Work next round as follows: Continue with * A.1b over the first 22-22-22-24-24-26 sts as before, A.2b over the next 27-29-37-39-44-47 sts, A.5a over next st (inc 1 st in A.5a), P 1, K 1 (= mid back/front), P 1, A.6a over next st (inc 1 st in A.6a), A.3b over the next 27-29-37-39-44-47 sts, A.4b over the next 22-22-22-24-24-26 sts as before, K 2 tog (= 1 st dec), 2-2-2-6-8-8 sts in garter st, slip 1 st as if to K, K 1, psso (= 1 st dec) *, repeat from *-* 2 times in total. On this round inc 2 sts mid front and mid back and dec 2 sts in each side of piece, i.e. no of sts is the same. Insert 1 marker in piece, NOW MEASURE PIECE FROM HERE. Continue in the round as follows: Round/row 1: Work 1 round/row with pattern as before (= 1 round/row without YO in diagram). Round/row 2: Work pattern as before and dec 1 st on each side of each side marker – READ DECREASE TIP-1. On this round/row inc 2 sts mid front and mid back and dec 2 sts in each side of piece, i.e. no of sts is the same. Round/row 3: Work as 1st round/row. Round/row 4: Work as 2nd round/row. Round/row 5: Work as 1st round/row. Round/row 6: Work as 2nd round/row. Round/row 7: Work as 1st round/row. Round/row 8: Work pattern as before. On this round/row inc 2 sts mid front and mid back = 4 sts inc in total. Do not dec before and after side markers. Repeat 1st to 8th round/row until finished measurements. When A.5a and A.6a have been worked 1 time vertically, work A.5b and A.6b vertically. Now work A.7 after A.5b and A.8 before A.6a mid front and mid back until finished measurements, i.e. work inc sts mid front/back in stockinette st. When piece measures 18 cm / 7" from marker under sleeve, adjust so that last round is 1 round with YO, divide piece at side markers, work front piece and back piece separately until finished measurements. FRONT PIECE: (Beg at left side marker. First row = from WS). Work pattern and repeat 1st to 8th round/row as before, but work the outermost 3-3-3-3-4-4 sts in each side of piece in GARTER ST – see explanation above. When piece measures 30 cm / 11¾" from marker under sleeve, switch to circular needle size 4.5 mm / US 7. Work 2 ridges over all sts AT THE SAME TIME on first row dec 2 sts over each cable. Bind off - READ BIND-OFF TIP. BACK PIECE: Work as front piece. SLEEVE: = 48-54-60-60-62-66 sts. Work sleeve in stockinette st in the round on double pointed needles. Slip sts from stitch holder back on double pointed needles SIZE 5.5 mm/US 9 / US 9 and cast on 6-6-6-10-12-12 sts under sleeve = 54-60-66-70-74-78 sts. Work in stockinette st in the round and insert a marker in the middle of the new sts under sleeve (i.e. 3-3-3-5-6-6 new sts on each side of marker). NOW MEASURE THE PIECE FROM HERE. When piece measures 4 cm / 1½", dec 1 st on each side of marker - READ DECREASE TIP-2. Dec like this approx. every 3½-2½-2-2-2-1½ cm / 1¼"-⅞"-¾"-¾"-¾"-½" 9-12-14-15-16-17 times in total = 36-36-38-40-42-44 sts. When sleeve measures 43-42-42-41-41-40 cm / 17"-16½"-16½"-16"-16"-15 ¾" (NOTE: Shorter measurements in the larger sizes because of longer yoke) switch to double pointed needles size 4.5 mm / US 7. Work 2 ridges. Bind off. Work the other sleeve the same way. ASSEMBLY: Sew the opening under the sleeve. |
||||||||||||||||||||||||||||||||||||||||
Diagram explanations |
||||||||||||||||||||||||||||||||||||||||
|
||||||||||||||||||||||||||||||||||||||||
 |
||||||||||||||||||||||||||||||||||||||||
 |
||||||||||||||||||||||||||||||||||||||||
 |
||||||||||||||||||||||||||||||||||||||||
 |
||||||||||||||||||||||||||||||||||||||||
 |
||||||||||||||||||||||||||||||||||||||||
Have you finished this pattern?Tag your pictures with #dropspattern #winterflairtunic or submit them to the #dropsfan gallery. Do you need help with this pattern?You'll find 27 tutorial videos, a Comments/Questions area and more by visiting the pattern on garnstudio.com. © 1982-2026 DROPS Design A/S. We reserve all rights. This document, including all its sub-sections, has copyrights. Read more about what you can do with our patterns at the bottom of each pattern on our site. |
||||||||||||||||||||||||||||||||||||||||


With over 40 years in knitting and crochet design, DROPS Design offers one of the most extensive collections of free patterns on the internet - translated to 17 languages. As of today we count 324 catalogs and 12290 patterns - 12280 of which are translated into English (US/in).
We work hard to bring you the best knitting and crochet have to offer, inspiration and advice as well as great quality yarns at incredible prices! Would you like to use our patterns for other than personal use? You can read what you are allowed to do in the Copyright text at the bottom of all our patterns. Happy crafting!
Post a comment to pattern DROPS 172-1
We would love to hear what you have to say about this pattern!
If you want to leave a question, please make sure you select the correct category in the form below, to speed up the answering process. Required fields are marked *.