
Popular categories
Looking for a yarn?


Comments / Questions (67)
![]() Susan Sørensen wrote:
Susan Sørensen wrote:
Ok det giver bare ingen mening for mig at se brystmålet ud fra den skitse
17.11.2023 - 17:21
![]() Susan Sørensen wrote:
Susan Sørensen wrote:
Hvad er brystmålene i de forskellige størrelser? På denne opskrift DROPS 173-5 DROPS Design: Model nr ne-217 Garngruppe C eller A + A
16.11.2023 - 11:45DROPS Design answered:
Hej Susan, du finder målene på blusen i måleskitsen nederst i opskriften :)
17.11.2023 - 10:39
![]() Karine wrote:
Karine wrote:
Kuidas kududa passet? Kui ma koon käeaugu viimased 3 silma maha kuidas siis edasi kududa? Kas ma pean võtma uue lõnga ,et ühendada varrukad kehaosaga ja kumma varruka pean enne kuduma? Kuhu marker panna kus nüüd algab?
24.09.2023 - 17:35DROPS Design answered:
Tere Karin! DROPSi mustritel on tavaliselt ringi algus passel seljaosa keskel. Märkige ära, kumb on esiosa, kumb seljaosa. Alustage seljaosa keskel, kuduge pool seljaosa, siis vasaku varruka silmused, siis esiosa, siis parema varruka silmused, siis pool seljaosa. Jätkake mustriga! Mahakootud silmused küljel ja varruka siseküljel (ava kaenlaaugus) õmmeldakse pärast valmimist kokku. Head kudumist!
11.10.2023 - 22:46
![]() Ghislaine wrote:
Ghislaine wrote:
Re-bonjour, Un grand merci pour votre explication. Je faisais les aller-retour entre les 2 marqueurs et non de chaque côté du marqueur du devant. Encore merci 🙂
07.03.2023 - 14:16
![]() Ghislaine wrote:
Ghislaine wrote:
Bonjour, Je suis rendue à l'augmentation au dos de l'encolure. Les instructions disent de placer un marqueur au milieu devant et de débuter au milieu dos. Si je fais les aller-retour de cette façon, l'augmentation se fait au dessus d'une épaule !! Ne devrait-on pas placer les marqueurs au milieu des épaules ? Merci de m'éclaircir ce mystère :)
06.03.2023 - 17:50DROPS Design answered:
Bonjour Ghislaine, vous placez le marqueur au milieu dos pour commencer les rangs raccourcis de l'encolure (réhausse), et vous placez un marqueur au milieu devant pour vous repérer sur le nombre de mailles à tricoter avant ce marqueur, autrement dit, vous tricotez sur l'endroit jusqu'à ce qu'il reste par ex 10 m (1ère + 2ème taille) avant le milieu devant, tournez et tricotez sur l'envers jusqu'à ce qu'il reste 10 m avant le milieu devant , tournez et continuez ainsi en laissant 10 m de plus non tricotées à la fin de chaque rang de chaque côté. Bon tricot!
07.03.2023 - 09:59
![]() Sylvia Donaldson wrote:
Sylvia Donaldson wrote:
Hallo, leider schaffe ich das mit den Zunahmen im Muster am Ärmel nicht. Bei meiner maschenzahl habe ich eine mustermitte unten, aber es funktioniert dann mit der nächsten Zunahme schon nicht mehr. Vielen Dank
05.03.2023 - 07:47DROPS Design answered:
Liebe Frau Donaldson, die neuen Maschen am Ende der Runde werden wie die nächste Masche vom Muster sein (lesen Sie das Diagram rechts nach links = nächste Masche wird die Masche nach dem letzten Maschen im Diagram) und die neuen Maschen am Anfang der Runde werden wie die vorrige Masche vom Muster (die neue Masche stricken Sie wie die Masche vor der 1. Masche der Runde) gestrickt werden. Viel Spaß beim stricken!
06.03.2023 - 09:37
![]() Alexandra wrote:
Alexandra wrote:
Hallo, auf dem Bild sieht es aus als wäre der Rippenhals eher 15 -20 cm, aber es wird angegeben, dass nur 8 cm Ripp gestrickt wird.
27.11.2022 - 18:10DROPS Design answered:
Liebe Alexandra, dieser Pullover wird von unten nach oben gestrickt; hier strickt man die Halsblende bis sie 22-22-22-24-24-24 cm misst (siehe HALSBLENDE. Viel Spaß beim stricken!
28.11.2022 - 09:51
![]() Susan Holm Jensen wrote:
Susan Holm Jensen wrote:
Hvad er brystmålene på de forskellige størrelser, på denne opskrift? MVH Susan
18.10.2022 - 10:31DROPS Design answered:
Hej Susan, du finder målene i måleskitsen nederst i opskriften. Her finder du også "Således læser du en måleskitsen" (du ganger helt enkelt bredden med 2 for at få brystmålet i din størrelse)
25.10.2022 - 11:15
![]() Anna Fedel wrote:
Anna Fedel wrote:
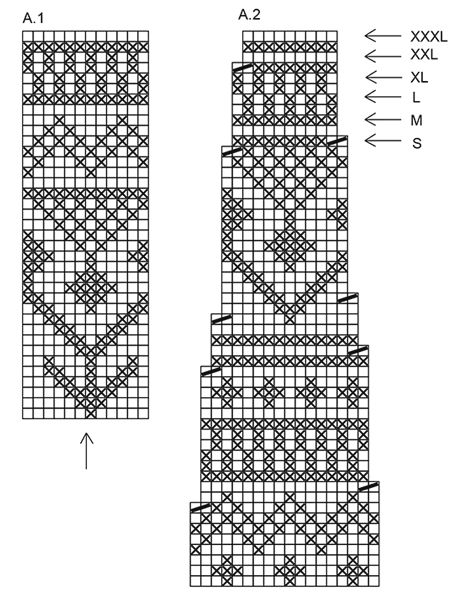
Oh wow , on the picture, the sleeves , they look so perfect...I've started the pattern A1 , with two markers placed , middle of sleeve and connecting row...I've only reached (medium size) the 5th increase and started the A1 pattern but by the 5 row in the A1 pattern...it is way off... I'm so confused... Is it ever going to match at all? I get that center sleeve will never change but A1 seems way off....HELP
28.07.2022 - 04:45DROPS Design answered:
Dear Anna, you can see an arrow in the diagram, marking the center of the sleeve. You need to work on each side of this arrow. When increasing stitches, you need to take into account that the pattern must remain in the middle, so the increased stitches are worked inside the pattern towards the right or left (not the center). Happy knitting!
31.07.2022 - 18:10
![]() Simone wrote:
Simone wrote:
Hvorfor er det ikke nævnt, hvordan ryg og forstykke sys sammen i siderne for neden? Under montering er det kun nævnt, at åbningerne under ærmet sys. Er der noget, jeg overser? På forhånd tak for svar.
04.03.2022 - 14:08DROPS Design answered:
Hei Simone. Det skal ikke sys sammen, det er en høy splitt i sidene. Om du ser på bildet, ser du rillekanten og etter den strikkes bolen rundt. mvh DROPS Design
07.03.2022 - 14:39
|
||||||||||
Black Ice#blackicesweater |
||||||||||
|
|
||||||||||
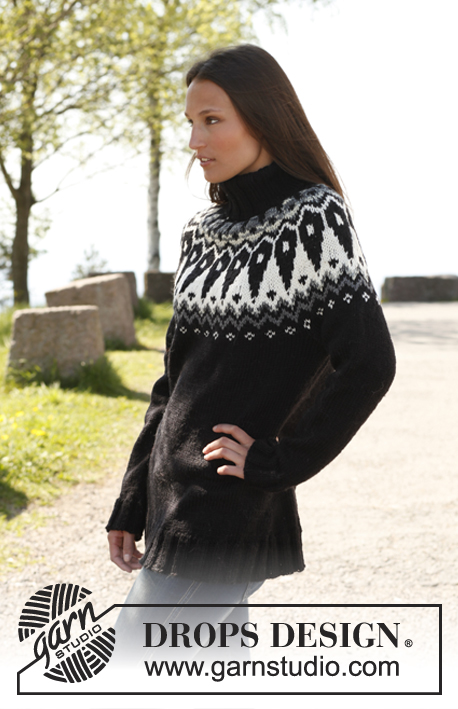
Knitted DROPS jumper with round yoke and Nordic pattern in "Nepal". Size: S - XXXL.
DROPS 173-5 |
||||||||||
|
GARTER ST (back and forth): K all rows. 1 ridge = K2 rows. GARTER ST (worked in the round): 1 ridge = 2 rounds. * K 1 round and P 1 round *, repeat from *-*. DECREASE TIP: To calculate how often dec should be done, use the total no of sts on row (e.g. 148 sts) and divide by no of dec to be done (e.g. 34) = 4.3. I.e. in this example K approx. every 3rd and 4th st tog. INCREASE TIP (applies to sleeve): Inc on each side of marker as follows: Beg 1 sts before marker and make 1 YO, K 2 sts (marker is in the middle of these 2 sts), make 1 YO (= 2 sts inc). On next round K YOs twisted to avoid holes. PATTERN: See diagrams A.1 to A.2. Work entire pattern in stockinette st. KNITTING TIP: To avoid the knitting gauge to tighten when working pattern, it is important not to tighten the strands on back side of piece. Switch to a higher needle no when working pattern if the pattern is somewhat tight. ---------------------------------------------------------- BODY: First work back and forth on circular needle in 2 parts, then put piece tog and work in the round on circular needle. BACK PIECE: Cast on 92-100-112-124-132-148 sts on circular needle size 4.5 mm / US 7 with off white. P 1 row from WS, then work as follows from RS: 3 sts in GARTER ST - see explanation above, K 2, rib (= P 2/K 2) until 3 sts remain, finish with 3 sts in garter st. When rib measures 8 cm / 3⅛", switch to circular needle SIZE 5.5 mm/US 9 / US 9, K 1 row while dec 20-22-28-28-30-34 sts evenly = 72-78-84-96-102-114 sts - READ DECREASE TIP. Continue in stockinette st with 3 sts in garter st in each side until piece measures 18 cm / 7". Put piece aside and knit front piece the same way. BODY: Slip the 2 parts tog on to same circular needle size 5,5 then work in the round over all sts = 144-156-168-192-204-228 sts. Continue in stockinette st. REMEMBER THE KNITTING GAUGE When piece measures 21-22-23-24-25-26 cm / 8¼"-8¾"-9"-9½"-9¾"-10¼", work A.1 over all sts (= 12-13-14-16-17-19 repetitions in width) - READ KNITTING TIP. When 1 round remains in A.1 (piece measures approx. 40-41-42-43-44-45 cm / 15¾"-16⅛"-16½"-17"-17¼"-17¾"), work next round as follows (= last round in A.1): bind off 3-3-4-4-5-5 sts for armhole, work 66-72-76-88-92-104 sts (= front piece), bind off 6-6-8-8-10-10 sts for armhole, work 66-72-76-88-92-104 sts (= back piece) and bind off the last 3-3-4-4-5-5 sts for armhole. Put piece aside and knit the sleeves. SLEEVE: Worked in the round on double pointed needles. Switch to a short circular needle when enough sts have been inc. Cast on 52-52-52-56-56-56 sts on double pointed needle size 4.5 mm / US 7 with off white. K 1 round. Then work rib = K 2/P 2 for 6 cm / 2⅜". K 1 round while dec 12 sts evenly in all sizes = 40-40-40-44-44-44 sts. Insert 1 marker at the beg of round. Switch to double pointed needles SIZE 5.5 mm/US 9 / US 9 and work in stockinette st with off white. When piece measures 11-11-13-13-10-12 cm / 4½"-4½"-5"-5"-4"-4¾", inc 2 sts mid under sleeve - READ INCREASE TIP. Inc like this every 3½-3-2½-2½-2½-2 cm / 1¼"-1⅛"-⅞"-⅞"-⅞"-¾" 10-11-12-12-13-15 times in total = 60-62-64-68-70-74 sts. AT THE SAME TIME when piece measures 24-24-23-23-23-22 cm / 9½"-9½"-9"-9"-9"-8¾", work A.1, arrow in A.1 shows middle of sleeve, count outwards from arrow and work so that pattern is the same in both sides, work the inc sts in pattern, NOTE: Pattern will not fit one whole repetition. On last round in A.1 (piece measures 43-43-42-42-42-41 cm / 17"-17"-16½"-16½"-16½"-16", NOTE: Shorter measurements in the larger sizes because of wider shoulders), bind off the middle 6-6-8-8-10-10 sts mid under sleeve = 54-56-56-60-60-64 sts remain on needle. Put piece aside and make another sleeve. YOKE: Slip sleeves on to same circular needle SIZE 5.5 mm/US 9 / US 9 as body where armholes were bound off = 240-256-264-296-304-336 sts. Work first round in A.2 AT THE SAME TIME adjust no of sts to 234-252-270-288-306-324. Continue pattern and dec as shown in A.2 (= 13-14-15-16-17-18 repetitions). READ KNITTING TIP! When A.2 has been worked - see arrow for your size, there are 130-140-150-160-153-162 sts on round. K 1 round while at the same time dec 34-44-50-56-49-54 sts evenly = 96-96-100-104-104-108 sts. ELEVATION AT THE BACK: Insert 1 marker mid front. Beg mid back and work an elevation at the back on circular needle SIZE 5.5 mm/US 9 / US 9 with off white as follows: K until 10-10-12-12-14-16 sts remain before marker at the front, turn and P until 10-10-12-12-14-16 sts remain before marker in the other side. Turn and K until 20-20-22-22-24-26 sts remain before marker at the front, turn and P until 20-20-22-22-24-26 sts remain before marker in the other side. Turn and K until 30-30-32-32-34-36 sts remain before marker, turn and P until 30-30-32-32-34-36 sts remain before marker in the other side. Turn and K until mid back. Piece measures 66-68-70-73-75-77 cm / 26"-26¾"-27½"-28¾"-29½"-30½" from bottom edge to shoulder. NECK: = 96-96-100-104-104-108 sts. Work 1 ridge in GARTER ST – see explanation above, switch to a short circular needle size 6 mm / US 10, then work rib in the round (K 2/P 2). Continue with rib until piece measures 22-22-22-24-24-24 cm / 8¾"-8¾"-8¾"-9½"-9½"-9½". Bind off sts with K over K and P over P. ASSEMBLY: Sew the openings under the sleeves. |
||||||||||
Diagram explanations |
||||||||||
|
||||||||||
 |
||||||||||
 |
||||||||||
Have you finished this pattern?Tag your pictures with #dropspattern #blackicesweater or submit them to the #dropsfan gallery. Do you need help with this pattern?You'll find 30 tutorial videos, a Comments/Questions area and more by visiting the pattern on garnstudio.com. © 1982-2026 DROPS Design A/S. We reserve all rights. This document, including all its sub-sections, has copyrights. Read more about what you can do with our patterns at the bottom of each pattern on our site. |
||||||||||


With over 40 years in knitting and crochet design, DROPS Design offers one of the most extensive collections of free patterns on the internet - translated to 17 languages. As of today we count 324 catalogs and 12290 patterns - 12280 of which are translated into English (US/in).
We work hard to bring you the best knitting and crochet have to offer, inspiration and advice as well as great quality yarns at incredible prices! Would you like to use our patterns for other than personal use? You can read what you are allowed to do in the Copyright text at the bottom of all our patterns. Happy crafting!
Post a comment to pattern DROPS 173-5
We would love to hear what you have to say about this pattern!
If you want to leave a question, please make sure you select the correct category in the form below, to speed up the answering process. Required fields are marked *.