
Popular categories
Looking for a yarn?


Comments / Questions (168)
![]() Therese Neukomm wrote:
Therese Neukomm wrote:
Wo kann ich die Anleitung zu "Butterfly Heart" kaufen? Danke für Ihre Antwort.
15.07.2023 - 13:58DROPS Design answered:
Liebe Therese. Drops Design-Vorlagen sind kostenlos. Sie können drucken oder als PDF speichern, indem Sie „Drucken“ aktivieren. Viel Spass beim stricken!
20.07.2023 - 11:01
![]() Kamilla wrote:
Kamilla wrote:
Dzień dobry Przerabiam rozmiar XXL. Skończyłam przerabiać rzędy skrócone na lewej stronie. Skończyłam na 2 oczka wcześniej niż poprzednio, obróciłam i jestem na prawej stronie i nie wiem co dalej. Czy mam na prawej stronie przerobić do końca rzędu czy tylko do momentu ostatniego obrotu rzędu skróconego. I czy "zaczynać od ramienia" oznacza od początku rzędu Pozdrawiam
09.07.2023 - 11:51DROPS Design answered:
Witaj Kamilo, ostatni rząd skrócony ( na lewej stronie robótki) przerabiasz do końca rzędu, czyli do góry ramienia. Od ramienia oznacza od początku rzędu. Pozdrawiamy!
09.07.2023 - 21:52
![]() Rita Van Der Zalm wrote:
Rita Van Der Zalm wrote:
Hallo, ik brei maat L Klopt het dat ik na het breien van de verkorte toeren 2x6 en 3x4st bij A5 en A8 aan weerszijden 10 st gemeerderd heb. Volg namelijk volgens mij exact het patroon. Ik kom namelijk niet uit op de in totaal 48 st (begin en einde vd naald) die ik volgens patroon miet breien excl 4 st meerderen Begrijp niet wat ik verkeerd doe. Heb deze naalden nu voor de 4e keer uitgehaald. Alvast bedankt voor je hulp
20.04.2023 - 21:56DROPS Design answered:
Dag Rita,
Ik begrijp niet goed waar je 48 steken zou moeten hebben in maat L na de verkorte toeren. Als je verder gaat onder het kopje 'alle maten' zie ik staan dat je 46 ribbelsteken moet breien het begin en einde van de naald en daar tegelijkertijd over moet moet meerderen.
27.04.2023 - 08:24
![]() Irene Gadhi wrote:
Irene Gadhi wrote:
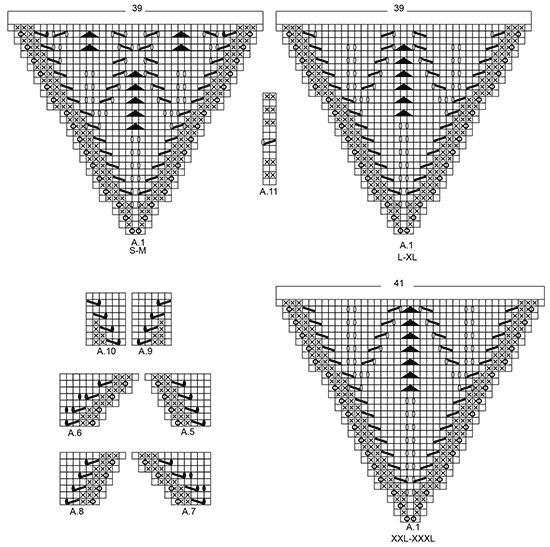
Dans le modèle Drops 170-3 pour le point ajouré du bas il n'y a pas le diagramme A 11 comme indiqué,Pouriez vous me le communiquer, merci
18.04.2023 - 19:30DROPS Design answered:
Bonjour Mme Gadhi, vous trouverez le diagramme A.11 juste entre les 2 diagrammes A.1 des tailles S-M (à gauche) et L-XL (à droite). Bon tricot!
19.04.2023 - 07:49
![]() Rita wrote:
Rita wrote:
Hallo, ben begonnen met maat L/XL. Begrijpt het volgende niet helemaal. Verkorte toeren: Brei 6 st minder voor elk keerpunt 1-2 keer aan elke kant brei dan 4 st minder ........ Brei ik deze 6 of 4 steken helemaal niet ( wel op de naald laten) of moet ik deze echt minderen en dan na het keren de verkorte toeren breien. Hoeveel verkorte toeren brei ik in totaal. Alvast dank je wel
17.04.2023 - 19:25DROPS Design answered:
Dag Rita,
Klopt, je laat de steken op de naald staan en je breit ze niet. In plaats daarvan keer je het werk en brei je terug. Brei je maat L of XL? Voor maat L m brei je 1 keer 6 steken minder aan elke kant van het werk en dan 3 keer 4 steken minder aan elke kant van het werk. Voor maat XL brei je 2 keer 6 steken minder aan elke kant van het werk en dan 2 keer 4 steken minder aan elke kant van het werk.
17.04.2023 - 20:49
![]() Cristina wrote:
Cristina wrote:
Problema su taglia s: quando arrivo alla sezione dei ferri accorciati sul davanti, dopo aver lavorato i primi due ferri con A5-A8, mi trovo a dritto e lavoro fino a che rimangono 26 maglie, poi giro a rovescio e lavoro fino a che rimangono 26 maglie. Poi giro il lavoro e mi trovo a dritto, qui cosa devo fare? Seguo la sezione "tutte le taglie" ma mi dice che devo lavorare sul rovescio, ma se io ho il lavoro a dritto cosa devo fare? Proseguo a dritto fino in fondo o mi fermo prima e poi giro?
20.03.2023 - 17:18
![]() Angelika Mühlberg wrote:
Angelika Mühlberg wrote:
Die Anleitung ist für mich ungewöhnlich. Ich stricke schon mein ganzes Leben (bin 68 Jahre alt), ich habe schon bei der Strickschrift A1 Probleme mit der Darstellung der Hin- und Rückreihen. Warum so umständlich?? Die vielen Fragen der anderen Strickerinnen zeigt mir, dass ich nicht allein bin. Der Pulli ist soooooo schön, warum macht Ihr es uns so kompliziert ihn nachzustricken?? Sorry, aber ich tu mich hier schwer und bin bestimmt nicht ungeübt im Stricken.
27.02.2023 - 10:39DROPS Design answered:
Liebe Frau Mühlberg, vielleicht kann Ihnen diese Lektion helfen, wir erklären wie Diagramme gelesen werden - und in diesem Video zeigen wir, wie A.1 (in S/M) gestrickt wird. Viel Spaß beim stricken!
27.02.2023 - 11:29
![]() Angelika Mühlberg wrote:
Angelika Mühlberg wrote:
Die Anleitung ist für mich ungewöhnlich. Ich stricke schon mein ganzes Leben (bin 68 Jahre alt), ich habe schon bei der Strickschrift A1 Probleme mit der Darstellung der Hin- und Rückreihen. Warum so umständlich?? Die vielen Fragen der anderen Stricjerinnen zeigt mir, dass ich nicht allein bin. Der Pulli ist soooooo schön, warum macht Ihr es uns so kompliziert ihn nachzustricken?? Sorry, aber ich tu mich hier schwer und bin bestimmt nicht ungeübt im Stricken.
27.02.2023 - 10:38
![]() Hanne Jones wrote:
Hanne Jones wrote:
Strikker bagstykke str. L... Er færdig med A.12/A.3/A.13, har 183 masker, og arbejdet måler 17 cm. Opskriften siger " Nu strikkes rygstk videre som forstk". Hvor skal jeg starte fra når jeg læser instruktionerne for forstykket?
22.11.2022 - 01:07DROPS Design answered:
Hei Hanne. Når du strikket forstykket og hadde strikket A.2 til A.4 1 gang i høyden hadde du også 183 masker på pinnen og arbeidet målte 17 cm, og det er herfra du strikker det sammen på bakstykket. mvh DROPS Design
28.11.2022 - 08:39
![]() Chris wrote:
Chris wrote:
I am doing size M. after short row, did garter stich from RS in each side with +2 inc on each side, then 3 more rows with garter/stocking &pattern/garter from WS then RS then WS, so the next row is RS, but the pattern says from WS K knit first 44. Was I mean5 to do only 3 rows of garter stitch, rather than Row with increase +2?
03.07.2022 - 13:20DROPS Design answered:
Dear Chris, after the last short row, work the next row from RS to the end of the row, turn and work the next row from WS to the end of the row (= all stitches are now worked). Now start from RS from the beg of the row and work all stitches on needle as explained. Happy knitting!
04.07.2022 - 08:10
|
|||||||||||||||||||||||||||||||
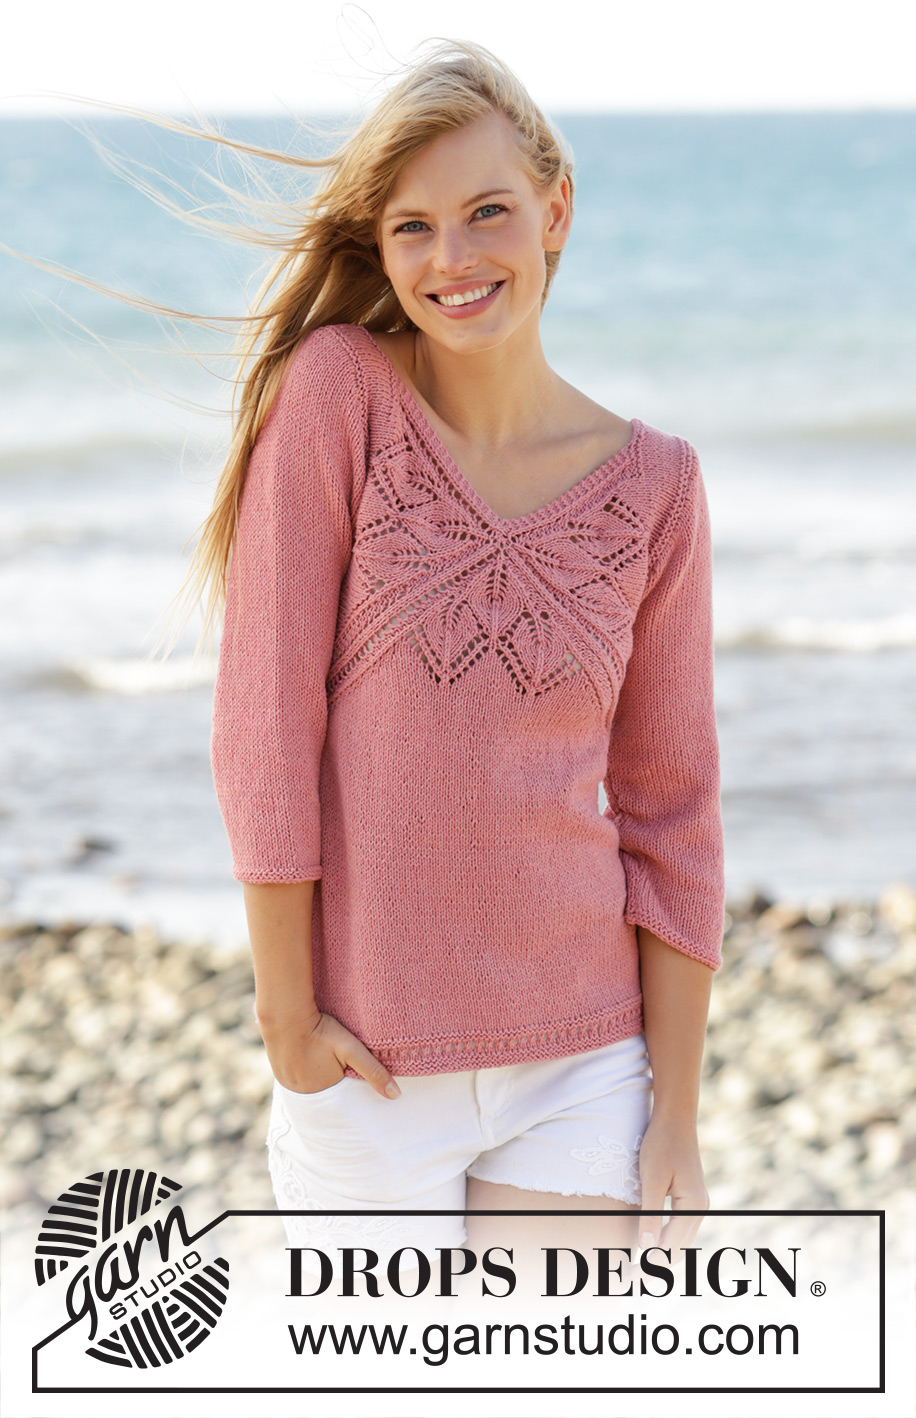
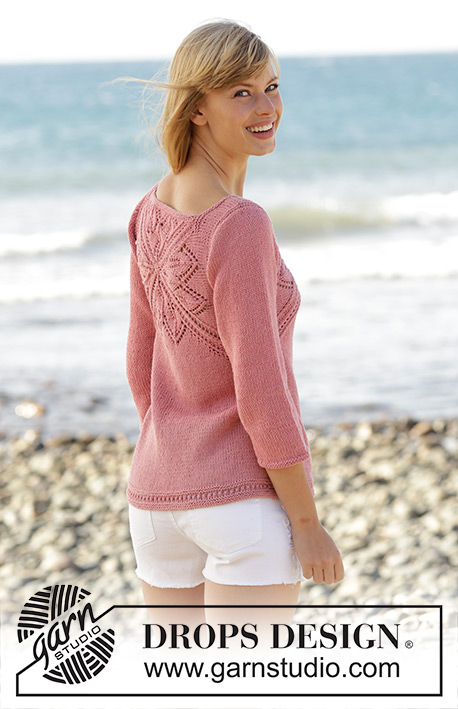
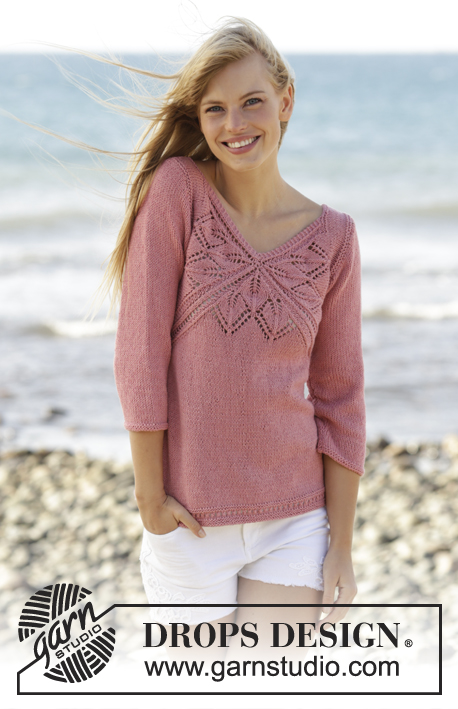
Butterfly Heart#butterflyheartsweater |
|||||||||||||||||||||||||||||||
 |
 |
||||||||||||||||||||||||||||||
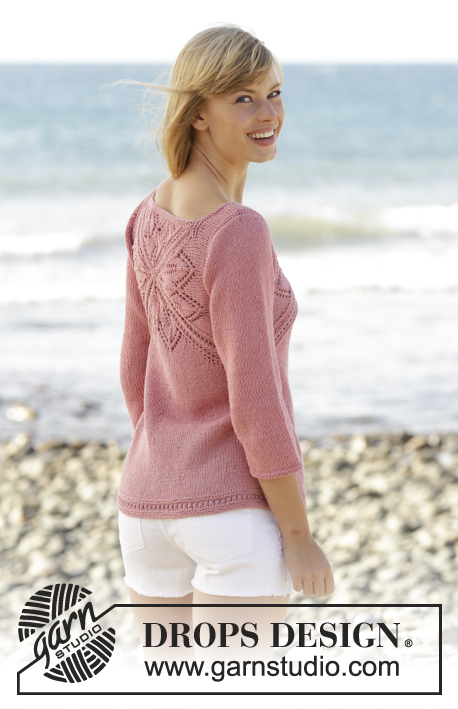
Knitted DROPS jumper with lace pattern and V-neck in ”Belle”. Worked top down. Size: S - XXXL.
DROPS 170-3 |
|||||||||||||||||||||||||||||||
|
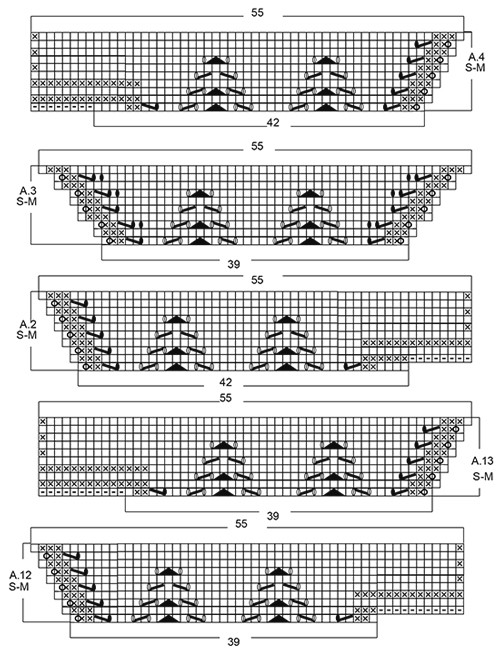
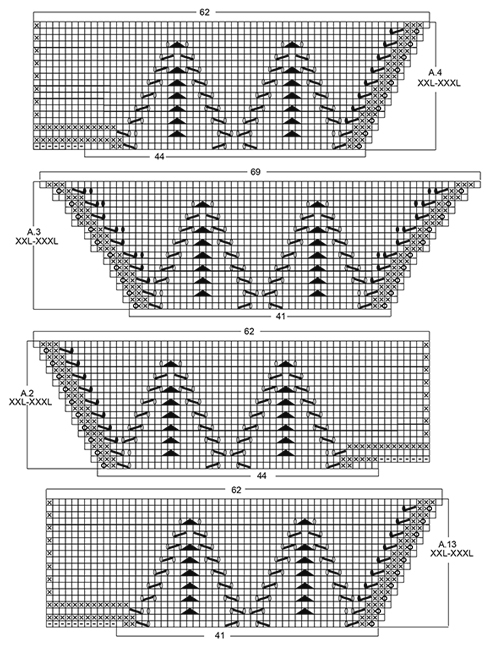
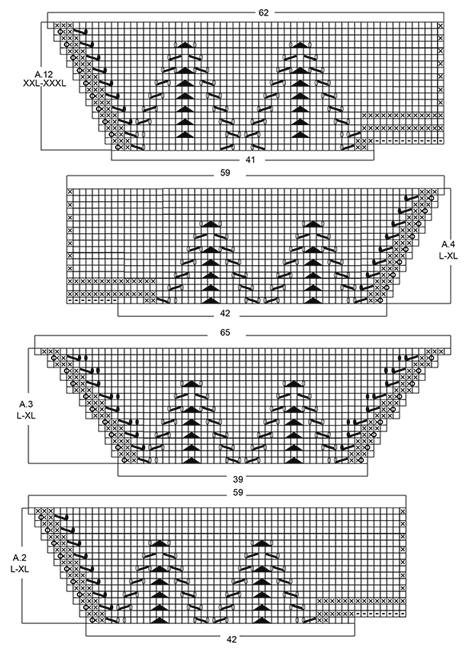
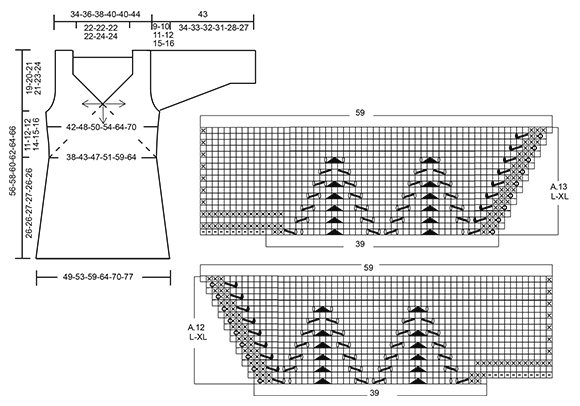
GARTER ST (back and forth): K all rows. 1 ridge = K2 rows. PATTERN: See diagrams A.1 to A.13. The diagrams show all rows in pattern seen from RS. See diagram for correct size. SHORT ROWS: When turning in short rows, slip first st as if to K. Tighten thread and make sure to avoid big holes. INCREASE TIP: All inc are done from RS. Inc 1 st by making 1 YO, on next row P YO twisted to avoid holes. DECREASE TIP: All dec are done from RS! Dec 1 st at beg of row as follows: K 1, slip 1 st as if to K, K 1, psso Dec 1 st at end of row as follows: Work until 3 sts remain (includes the 2 new sts worked for the first time), K 2 tog. ---------------------------------------------------------- JUMPER: Work from the middle of V-neck and out in 3 triangles on front piece and 4 triangles on back piece, then work downwards. FRONT PIECE: Work back and forth from neck and down. Cast on 8 sts on circular needle size 4 mm / US 6 with Belle. K 1 row. On next row inc as follows: * K 1, 1 YO *, repeat from *-* until 1 st remains and finish with K 1 = 15 sts on needle. Work next row as follows (from RS): Work YOs from previous row twisted, they should not make holes. Work 3 sts in GARTER ST - see explanation above, A.1, insert 1st marker, A.1, insert 2nd marker, A.1 (= repeat A.1 3 times in total on row), finish with 3 sts in garter st. REMEMBER THE KNITTING GAUGE When A.1 has been worked 1 time vertically, there are 123-123-123-123-129-129 sts on needle. Piece measures approx. 11-11-11-11-12-12 cm / 4½"-4½"-4½"-4½"-4¾"-4¾" from cast-on edge. Work next row as follows from RS: Work A.2 over the first 42-42-42-42-44-44 sts, A.3 over the next 39-39-39-39-41-41 sts and A.4 over the last 42-42-42-42-44-44 sts, after A.4 cast on 8 sts at the end of row for shoulder (see diagram). Work A.4 to A.2 on next row, after A.2 cast on 8 sts at the end of row for shoulder (see diagram). When A.2 to A.4 have been worked 1 time vertically, there are 165-165-183-183-193-193 sts on needle. Piece measures approx. 15-15-17-17-19-19 cm / 6"-6"-6¾"-6¾"-7½"-7½" from cast-on edge. READ ALL OF THE FOLLOWING SECTION BEFORE CONTINUING! WORK PATTERN AS BEFORE WHILE AT THE SAME TIME WORKING SHORT ROWS IN EACH SIDE OF PIECE. PATTERN: Work next row as follows from RS: Work 1 st in garter st, 48-48-52-52-55-55 sts in stockinette st, work A.5 over the next 6 sts, (marker), A.6 over the next 6 sts, 43-43-53-53-57-57 sts in stockinette st, A.7 over the next 6 sts, (marker), A.8 over the next 6 sts, 48-48-52-52-55-55 sts in stockinette st, finish with 1 st in garter st. Repeat A.5 to A.8 over the 6 sts on each side of each marker 2-3-2-3-4-5 times in total, then repeat the first 0-0-6-4-4-4 rows of A.5 to A.8 1 more times. SHORT ROWS: AT THE SAME TIME when 2-6-0-2-0-6 rows of A.5 to A.8 have been worked, work SHORT ROWS - see explanation above - in each side of piece as follows: Work until 26-26-24-23-18-18 sts remain on row (work A.5 to A.8 as before), turn and work until 26-26-24-23-18-18 sts remain, turn piece. Then work short rows in the different sizes as follows: SIZE M: Work 6 sts less for every turn 2 times in each side of piece. SIZE L-XL: Work 6 sts less for every turn 1-2 times in each side of piece, then work 4 sts less on every turn 3-2 times in each side of piece. SIZE XXL-XXXL: Work 6 sts less for every turn 1-1 time in each side of piece, then work 4 sts less for every turn 4-4 times in each side of piece, then work 2 sts less on every turn 4-5 times in each side of piece. ALL SIZES: When the short rows have been worked, work last row from WS, so that next row beg from shoulder. Then work over all sts from RS as follows: Work in garter st over the first 42-44-46-48-50-52 sts AT THE SAME TIME inc 0-2-4-4-6-6 sts evenly, work as before (i.e. A.5 to A.8 and stockinette st) until 42-44-46-48-50-52 sts remain, work in garter st over the last sts AT THE SAME TIME inc 0-2-4-4-6-6 sts evenly (= 42-46-50-52-56-58 sts in garter st in each side of piece). Work 3 rows in garter st over the outermost 42-46-50-52-56-58 sts in garter st in each side of piece, pattern and stockinette st over the remaining sts. On next row from WS work as follows: K the first 40-44-48-50-54-56 sts and slip them on a stitch holder for sleeve, work 2 sts in garter st, work in stockinette st and pattern as before until 42-46-50-52-56-58 sts remain, 2 sts in garter st, K the next 40-44-48-50-54-56 sts and then slip them on a stitch holder for sleeve. Cut the yarn. 8-8-8-12-12-12 rows of A.5 to A.8 remain. Beg next row from RS. Continue to work in garter st over the first and last 2 sts in each side of piece. When A.5 to A.8 have been worked, there are 23-25-26-27-32-34 sts before 1st marker, 79-91-99-107-123-135 sts between 1st and 2nd marker and 23-25-26-27-32-34 sts after 2nd marker = 125-141-151-161-187-203 sts in total on row. Piece measures approx. 21-24-25-27-32-35 cm / 8¼"-9½"-9¾"-10½"-12½"-13¾" on the widest measured from cast-on edge. Insert 1 marker in piece, NOW MEASURE PIECE FROM HERE. On next row from RS loosely bind off the first 22-24-25-26-31-33 sts knitwise, work 1 edge st in garter st, (marker), work A.9 over the first 6 sts after marker, stockinette st over the next 67-79-87-95-111-123 sts, A.10 over the last 6 sts before second marker, (marker ), 1 edge st in garter st, loosely cast of the last 22-24-25-26-31-33 sts knitwise = 81-93-101-109-125-137 sts remain on row. Cut the yarn. Work next row from WS over the remaining sts as follows: 1 edge st in garter st, A.10 as before, stockinette st over the next 67-79-87-95-111-123 sts, A.9 as before, 1 edge st in garter st. When A.9 and A.10 have been worked 1 time vertically, continue in stockinette st with 1 edge st in garter st in each side of piece. When piece measures 3 cm / 1" from marker, inc 1 st in each side of piece inside 1 edge st (= 2 sts inc) - READ INCREASE TIP. Repeat inc every 1½-1½-1½-1-1-1 cm / ½"-½"-½"-⅜"-⅜"-⅜" 12-10-12-14-12-13 times in total = 105-113-125-137-149-163 sts on needle. When piece measures 23-23-24-24-23-23 cm / 9"-9"-9½"-9½"-9"-9" from marker (piece measures 53-55-57-59-61-63 cm / 21"-21⅝"-22½"-23¼"-24"-24¾" in total from shoulder), adjust so that next row is from RS, switch to circular needle size 3.5 mm / US 4. Work next row from RS as follows: Work 1 edge st in garter st, work A.11 (= 2 sts) until 2 sts remain, work first st in A.11, finish with 1 edge st in garter st. On row with holes (i.e. 7th row) work next to last st K. Bind off when A.11 has been worked 1 time vertically. Piece measures 56-58-60-62-64-66 cm / 22"-22¾"-23⅝"-24⅜"-25¼"-26" in total from shoulder. BACK PIECE: Piece is first worked in the round, then worked as front piece. Cast on 6 sts on double pointed needles size 4 mm / US 6 with Belle, switch to circular needle when needed. K 1 row. On next row inc as follows: * K 1, 1 YO *, repeat from *-* = 12 sts on row, K YOs twisted on next row, they should not make holes. Work A.1 4 times in total, insert 1 marker between each A.1 (= 4 markers). When A.1 has been worked 1 time vertically, there are 156-156-156-156-164-164 sts on needle. Continue as follows: A.12 over the first 39-39-39-39-41-41 sts, work A.3 over the next 39-39-39-39-41-41 sts and A.13 over the last 39-39-39-39-41-41 sts, slip the remaining sts on a stitch holder for neck edge (= 39-39-39-39-41-41 sts), after A.13 cast on 11 sts at the end of row for shoulder (see diagram). Then work back and forth on needle. Work A.13/A.3/A.12 on next row, after A.12 cast on 11 sts at the end of row for shoulder (see diagram). When A.12/A.3/A.13 have been worked 1 time vertically, there are 165-165-183-183-193-193 sts on needle. Piece measures approx. 15-15-17-17-19-19 cm / 6"-6"-6¾"-6¾"-7½"-7½" from cast-on edge. Now continue back piece as front piece. NECK EDGE: Worked back and forth on needle. Slip sts from stitch holder for neck edge on back piece back on circular needle size 3.5 mm / US 4. Work 2 ridges. Fasten ridges where sts were cast on for shoulder. Fasten off. ASSEMBLY: Sew the side seams inside 1 edge st in garter st. Sew shoulder seams inside 1 edge st in garter st. Tighten tog the middle (i.e. cast-on edge) on both front and back piece. SLEEVE: Worked back and forth on circular needle in stockinette st. Slip sts from the 2 stitch holders (on front and back piece) in one side of piece back on circular needle size 4 mm / US 6 = 80-88-96-100-108-112 sts. Work short rows for sleeve cap as follows: Beg to work in the 25th-29th-31st-35th-43rd-45th st (i.e. 24-28-30-34-42-44 sts in one side are not worked). Work from RS 34-34-38-34-26-26 sts in stockinette st, turn piece (= 22-26-28-32-40-42 sts remain on needle). Work in stockinette st over the 36-36-40-36-28-28 sts, turn piece. Work 2 sts more on every turn in each side of piece until all sts have been worked. AT THE SAME TIME dec 1 st in each side of piece (= 2 sts dec), inside 1 st on every 4th-4th-2nd-4th-4th-4th row 4-6-8-8-10-10 times in total – READ DECREASE TIP = 72-76-80-84-88-92 sts on needle. Work 8-8-8-12-12-12 rows in stockinette st over all sts, insert 1 marker in piece (sew side seam on sleeve up to here later). NOW MEASURE THE PIECE FROM HERE. Cast on 1 edge st at the end of the next 2 rows = 74-78-82-86-90-94 sts. Work edge sts in garter st until finished measurements. On next row from RS dec 1 st inside 2 sts in each side of piece (= 2 sts dec). Repeat dec every 2½-2-2-1½-1-1 cm / ⅞"-¾"-¾"-½"-⅜"-⅜" 9-10-11-12-13-13 more times = 54-56-58-60-62-66 sts on needle. When sleeve measures 31-30-29-27-24-23 cm / 12¼"-11¾"-11½"-10½"-9½"-9", switch to circular needle size 3.5 mm / US 4. Work 2 ridges. Bind off. Slip sts from stitch holders in the other side of piece on circular needle size 4 mm / US 6 and work the same way. ASSEMBLY: Sew sleeve seams up to where 1 edge st in garter st was cast on in each side of piece. Sew the under arm seam. |
|||||||||||||||||||||||||||||||
Diagram explanations |
|||||||||||||||||||||||||||||||
|
|||||||||||||||||||||||||||||||
 |
|||||||||||||||||||||||||||||||
 |
|||||||||||||||||||||||||||||||
 |
|||||||||||||||||||||||||||||||
 |
|||||||||||||||||||||||||||||||
 |
|||||||||||||||||||||||||||||||
Have you finished this pattern?Tag your pictures with #dropspattern #butterflyheartsweater or submit them to the #dropsfan gallery. Do you need help with this pattern?You'll find 28 tutorial videos, a Comments/Questions area and more by visiting the pattern on garnstudio.com. © 1982-2026 DROPS Design A/S. We reserve all rights. This document, including all its sub-sections, has copyrights. Read more about what you can do with our patterns at the bottom of each pattern on our site. |
|||||||||||||||||||||||||||||||


With over 40 years in knitting and crochet design, DROPS Design offers one of the most extensive collections of free patterns on the internet - translated to 17 languages. As of today we count 325 catalogs and 12298 patterns - 12288 of which are translated into English (US/in).
We work hard to bring you the best knitting and crochet have to offer, inspiration and advice as well as great quality yarns at incredible prices! Would you like to use our patterns for other than personal use? You can read what you are allowed to do in the Copyright text at the bottom of all our patterns. Happy crafting!
Post a comment to pattern DROPS 170-3
We would love to hear what you have to say about this pattern!
If you want to leave a question, please make sure you select the correct category in the form below, to speed up the answering process. Required fields are marked *.