
Popular categories
Looking for a yarn?


Comments / Questions (168)
![]() Hella Eble wrote:
Hella Eble wrote:
Ich suche verzweifelt die vorlage A 11,A1-10 ist vorhanden und A12-13.laut text soll ich im moment bei A11 weiterstricken,wie geht das ohne vorlage?vielen dank für ihre mühe und einen schönen gruss h.eble
21.05.2016 - 21:20DROPS Design answered:
Liebe Hella, A.11 ist etwas versteckt zwischen den beiden Diagrammen von A.1
23.05.2016 - 10:21
![]() Loltje Kampen wrote:
Loltje Kampen wrote:
...brei in tricotst en patroon als hiervoor tot er 42-46-50-52-56-58 st over zijn, 2 st in ribbelst, brei de volgende 40-44-48-50-54-56 st recht en zet ze dan op een hulpdraad voor de mouw. Knip de draad af. Er zijn 8-8-8-12-12-12 nld van A.5 tot en met A.8 over. Begin de volgende nld aan de goede kant. Hier brei je de teruggaande nld volgens mij niet
20.05.2016 - 09:14DROPS Design answered:
Hoi Loltje. Jawel, er staat in het patroon: Brei in de volgende nld aan de verkeerde kant als volgt: brei de eerste 40-44-48-50-54-56 st recht en zet ze op een hulpdraad voor de mouw, brei 2 st in ribbelst, brei in tricotst en patroon als hiervoor tot er 42-46-50-52-56-58 st over zijn, 2 st in ribbelst, brei de volgende 40-44-48-50-54-56 st recht en zet ze dan op een hulpdraad voor de mouw. Knip de draad af. Er zijn 8-8-8-12-12-12 nld van A.5 tot en met A.8 over. Begin de volgende nld aan de goede kant.
20.05.2016 - 10:53Reju Venu wrote:
I am from India ...loved your site and subscribed just now..I have joined for the meadow CAL.can I use my own ideas for the floral granny square or have to follow your tutorial? PleAse I firm so that I can start the cal as I am already late. ....thanking you...
20.05.2016 - 08:19DROPS Design answered:
Dear Mrs Venu, feel free to make your own square if you like to, but remember materials and instructions have been made for the flowers we have made. Happy crocheting!
20.05.2016 - 10:44
![]() Loltje Kampen wrote:
Loltje Kampen wrote:
Voor het voorpand zou je na de verkorte toeren steken op een hulpvraag moeten zetten en dan de draad afknippen. Als je dan zoals het patroon voorschrijft aan de goede kant weer begint mis je de teruggaande toer. Klopt dit?
18.05.2016 - 16:53DROPS Design answered:
Hoi Loltje. Er staat na het breien van de verkorte toeren onder ALLE MATEN: Als de verkorte toeren klaar zijn, brei dan de laatste nld aan de verkeerde kant zodat de volgende nld begint bij de schouder. Dan zou je daarna weer moeten beginnen op de goede kant en mis je geen teruggaande nld. Als dit niet je vraag beantwoord, geef dan graag aan welke maat je breit en waar in het patroon je bent. Dan kan ik vanaf daar meekijken :-)
19.05.2016 - 13:31
![]() Elisabeth wrote:
Elisabeth wrote:
Qu'encore spontanée taille pour M Tour de poitrine? Tour de taille? Merci
17.05.2016 - 21:57DROPS Design answered:
Bonjour Elisabeth, vous trouverez à la fin des explications un schéma avec toutes les mesures pour chaque taille prises à plat, d'un côté à l'autre. Comparez ces mesures à un vêtement similaire que vous avez et dont vous aimez la forme pour trouver la taille à faire. Voir aussi ici. Bon tricot!
18.05.2016 - 09:07
![]() Lisa wrote:
Lisa wrote:
Ich komme leider auch nicht mit der Anleitung zurecht. Ich bin gerade bei den verkürzten Reihen und Diagrammen 5-8 angelangt. Ich stricke Größe S und habe nun nach 2 Reihen des Muster 5-8 die erste verkürzte Reihe gestrickt. Wie nun weiter? Weiter verkürzte Reihen stricken (immer 26M vor Schluss) bis das Muster beendet ist (8R in der Höhe)? Und wie soll das ganze 2x gestrickt werden? Entschuldigen Sie die vielen Fragen, aber momentan komme ich einfach nicht weiter.
16.05.2016 - 09:19
![]() Åsne wrote:
Åsne wrote:
Hei! Hvordan strikkes de forkortede pinnene i str S? Det står kun videre forklaring for de andre str. Hvis det er slik at man kun skal strikke den første delen som står beskrevet for alle str, vil man jo bare ende med å snu 1 gang i str S, kun i den ene siden? Takk for svar!
09.05.2016 - 09:55DROPS Design answered:
Hei Åsne. Som jeg forstaar det saa er der ingen forkortede pinde for str S og gaar du direkte videre til ALLE STR:
10.05.2016 - 15:44
![]() Betsabé Gutierrez Rodriguez wrote:
Betsabé Gutierrez Rodriguez wrote:
Hola. Estoy realizando las mangas. El patrón me dice que a la hora de ensamblar las mangas, solo uno hasta el punto de orillo (donde anteriormente habíamos colocado un marcador). Mi pregunta es la siguiente: ¿Qué ocurre con el resto de la manga? No la uno? No se puede quedar abierta no? Muchas gracias por ayudarme!
06.05.2016 - 17:36DROPS Design answered:
Hola Betsabé. Después de hacer la costura de la manga hasta el MP, hacemos la costura bajo la manga, uniendo el resto de la manga con la parte del cuerpo (bajo la manga) que quedaba sin coser.
07.05.2016 - 09:41
![]() Marianne wrote:
Marianne wrote:
Hei (igjen) :) Når man er ferdig med A12, A3 og A13 på ryggen skal man strikke videre som forstykket, men hvor i oppskriften skal man starte da? Der teksten begynner med "les hele avsnittet før det strikkes videre"?
03.05.2016 - 05:56DROPS Design answered:
Hej Marianne, Ja det stemmer, du begynder med "les hele avsnittet.... God fornøjelse!
06.05.2016 - 10:28
![]() DEBORA wrote:
DEBORA wrote:
Buongiorno, vorrei gentilmente spiegazioni su quando effettuare il giro manica... io ho lavorato tutto il "decoro" ma non ho capito quando devo iniziare a "stringere" per il giro della manica. grazie mille Debora
30.04.2016 - 10:19DROPS Design answered:
Buongiorno Debora. Le maglie delle maniche sono le 40-44-48-50-54-56 m (a seconda della taglia) che vengono messe in attesa sui fermamaglie ai due lati del davanti e del dietro e che verranno riprese dopo aver completato il davanti e il dietro. Buon lavoro!
30.04.2016 - 13:17
|
|||||||||||||||||||||||||||||||
Butterfly Heart#butterflyheartsweater |
|||||||||||||||||||||||||||||||
 |
 |
||||||||||||||||||||||||||||||
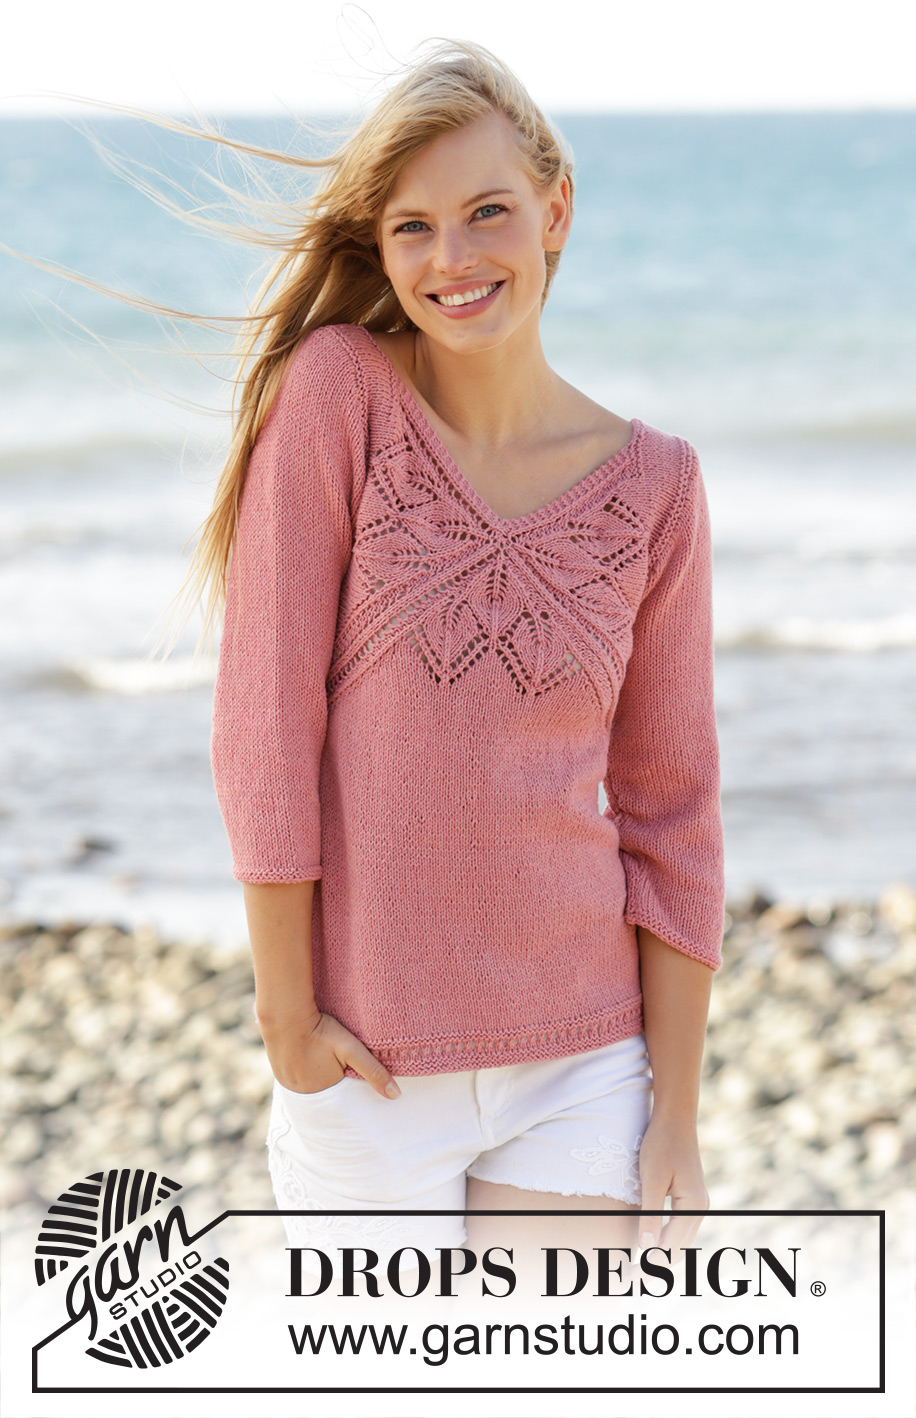
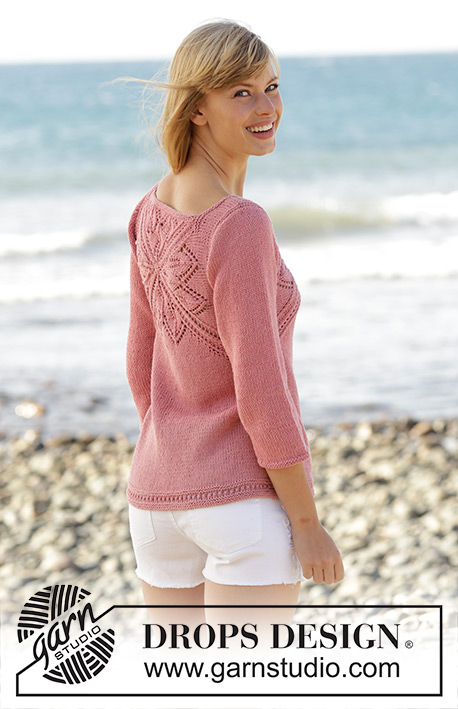
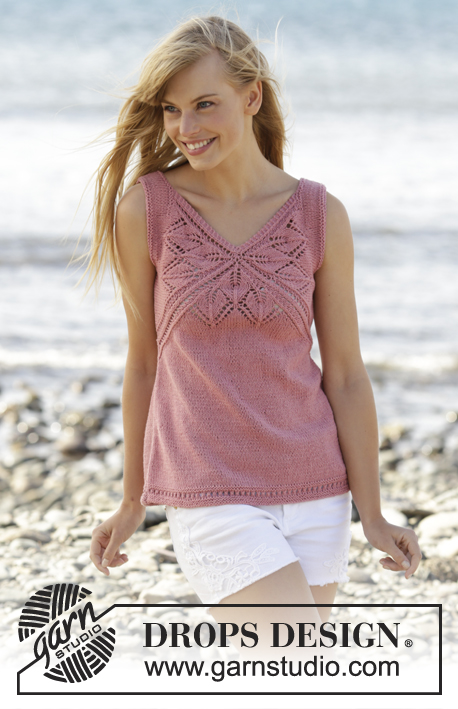
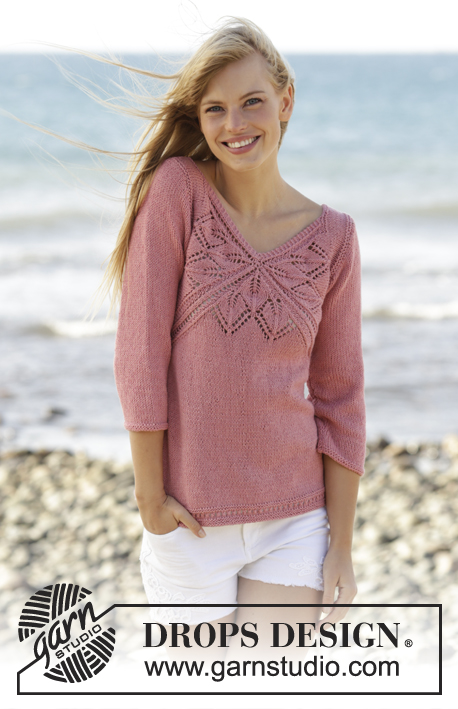
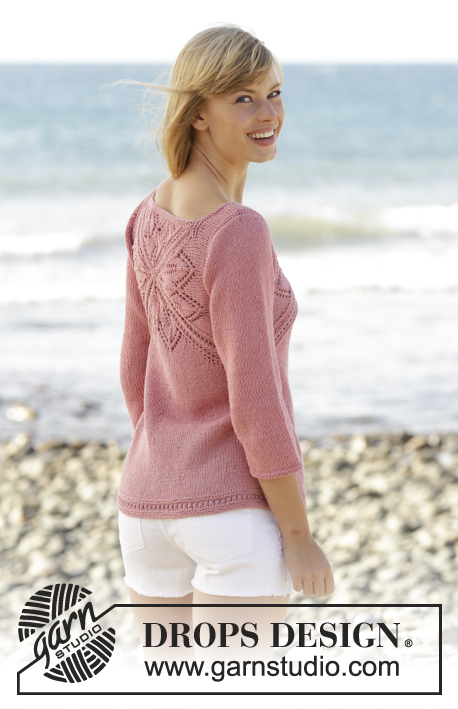
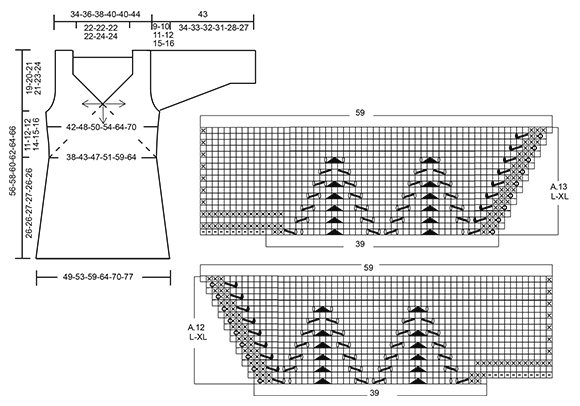
Knitted DROPS jumper with lace pattern and V-neck in ”Belle”. Worked top down. Size: S - XXXL.
DROPS 170-3 |
|||||||||||||||||||||||||||||||
|
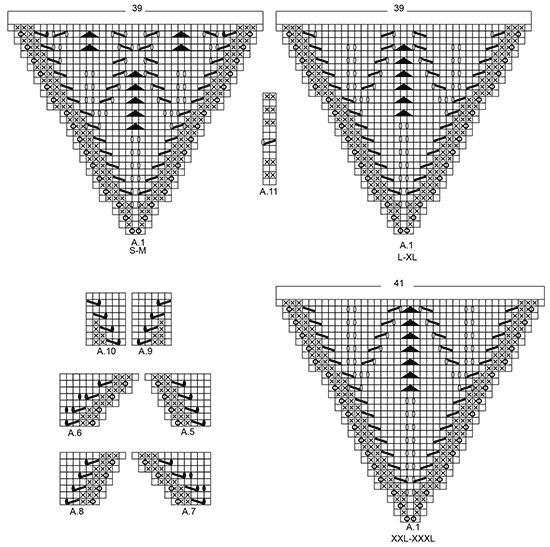
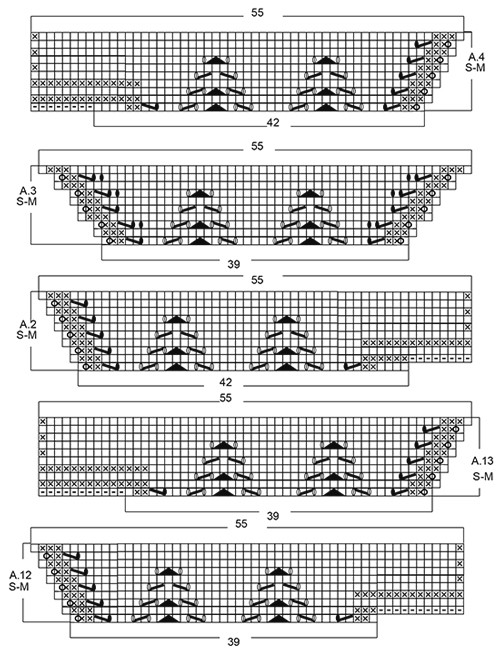
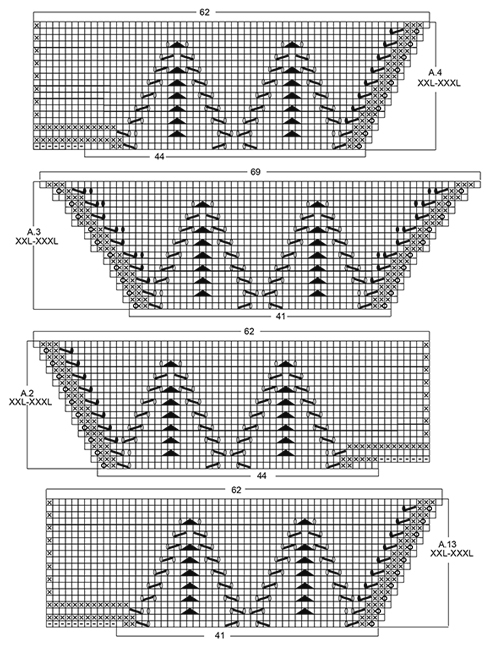
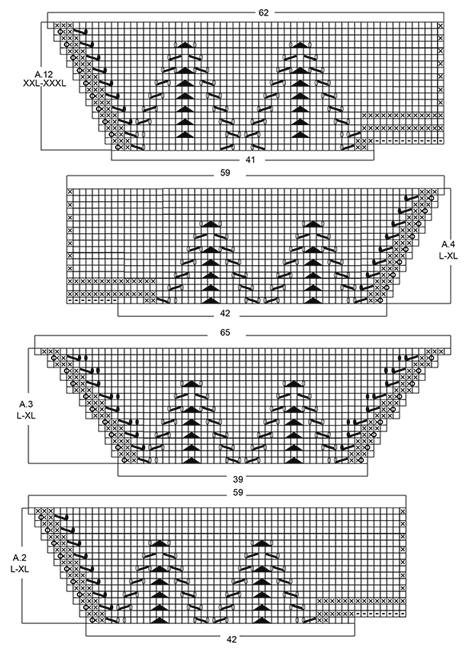
GARTER ST (back and forth): K all rows. 1 ridge = K2 rows. PATTERN: See diagrams A.1 to A.13. The diagrams show all rows in pattern seen from RS. See diagram for correct size. SHORT ROWS: When turning in short rows, slip first st as if to K. Tighten thread and make sure to avoid big holes. INCREASE TIP: All inc are done from RS. Inc 1 st by making 1 YO, on next row P YO twisted to avoid holes. DECREASE TIP: All dec are done from RS! Dec 1 st at beg of row as follows: K 1, slip 1 st as if to K, K 1, psso Dec 1 st at end of row as follows: Work until 3 sts remain (includes the 2 new sts worked for the first time), K 2 tog. ---------------------------------------------------------- JUMPER: Work from the middle of V-neck and out in 3 triangles on front piece and 4 triangles on back piece, then work downwards. FRONT PIECE: Work back and forth from neck and down. Cast on 8 sts on circular needle size 4 mm / US 6 with Belle. K 1 row. On next row inc as follows: * K 1, 1 YO *, repeat from *-* until 1 st remains and finish with K 1 = 15 sts on needle. Work next row as follows (from RS): Work YOs from previous row twisted, they should not make holes. Work 3 sts in GARTER ST - see explanation above, A.1, insert 1st marker, A.1, insert 2nd marker, A.1 (= repeat A.1 3 times in total on row), finish with 3 sts in garter st. REMEMBER THE KNITTING GAUGE When A.1 has been worked 1 time vertically, there are 123-123-123-123-129-129 sts on needle. Piece measures approx. 11-11-11-11-12-12 cm / 4½"-4½"-4½"-4½"-4¾"-4¾" from cast-on edge. Work next row as follows from RS: Work A.2 over the first 42-42-42-42-44-44 sts, A.3 over the next 39-39-39-39-41-41 sts and A.4 over the last 42-42-42-42-44-44 sts, after A.4 cast on 8 sts at the end of row for shoulder (see diagram). Work A.4 to A.2 on next row, after A.2 cast on 8 sts at the end of row for shoulder (see diagram). When A.2 to A.4 have been worked 1 time vertically, there are 165-165-183-183-193-193 sts on needle. Piece measures approx. 15-15-17-17-19-19 cm / 6"-6"-6¾"-6¾"-7½"-7½" from cast-on edge. READ ALL OF THE FOLLOWING SECTION BEFORE CONTINUING! WORK PATTERN AS BEFORE WHILE AT THE SAME TIME WORKING SHORT ROWS IN EACH SIDE OF PIECE. PATTERN: Work next row as follows from RS: Work 1 st in garter st, 48-48-52-52-55-55 sts in stockinette st, work A.5 over the next 6 sts, (marker), A.6 over the next 6 sts, 43-43-53-53-57-57 sts in stockinette st, A.7 over the next 6 sts, (marker), A.8 over the next 6 sts, 48-48-52-52-55-55 sts in stockinette st, finish with 1 st in garter st. Repeat A.5 to A.8 over the 6 sts on each side of each marker 2-3-2-3-4-5 times in total, then repeat the first 0-0-6-4-4-4 rows of A.5 to A.8 1 more times. SHORT ROWS: AT THE SAME TIME when 2-6-0-2-0-6 rows of A.5 to A.8 have been worked, work SHORT ROWS - see explanation above - in each side of piece as follows: Work until 26-26-24-23-18-18 sts remain on row (work A.5 to A.8 as before), turn and work until 26-26-24-23-18-18 sts remain, turn piece. Then work short rows in the different sizes as follows: SIZE M: Work 6 sts less for every turn 2 times in each side of piece. SIZE L-XL: Work 6 sts less for every turn 1-2 times in each side of piece, then work 4 sts less on every turn 3-2 times in each side of piece. SIZE XXL-XXXL: Work 6 sts less for every turn 1-1 time in each side of piece, then work 4 sts less for every turn 4-4 times in each side of piece, then work 2 sts less on every turn 4-5 times in each side of piece. ALL SIZES: When the short rows have been worked, work last row from WS, so that next row beg from shoulder. Then work over all sts from RS as follows: Work in garter st over the first 42-44-46-48-50-52 sts AT THE SAME TIME inc 0-2-4-4-6-6 sts evenly, work as before (i.e. A.5 to A.8 and stockinette st) until 42-44-46-48-50-52 sts remain, work in garter st over the last sts AT THE SAME TIME inc 0-2-4-4-6-6 sts evenly (= 42-46-50-52-56-58 sts in garter st in each side of piece). Work 3 rows in garter st over the outermost 42-46-50-52-56-58 sts in garter st in each side of piece, pattern and stockinette st over the remaining sts. On next row from WS work as follows: K the first 40-44-48-50-54-56 sts and slip them on a stitch holder for sleeve, work 2 sts in garter st, work in stockinette st and pattern as before until 42-46-50-52-56-58 sts remain, 2 sts in garter st, K the next 40-44-48-50-54-56 sts and then slip them on a stitch holder for sleeve. Cut the yarn. 8-8-8-12-12-12 rows of A.5 to A.8 remain. Beg next row from RS. Continue to work in garter st over the first and last 2 sts in each side of piece. When A.5 to A.8 have been worked, there are 23-25-26-27-32-34 sts before 1st marker, 79-91-99-107-123-135 sts between 1st and 2nd marker and 23-25-26-27-32-34 sts after 2nd marker = 125-141-151-161-187-203 sts in total on row. Piece measures approx. 21-24-25-27-32-35 cm / 8¼"-9½"-9¾"-10½"-12½"-13¾" on the widest measured from cast-on edge. Insert 1 marker in piece, NOW MEASURE PIECE FROM HERE. On next row from RS loosely bind off the first 22-24-25-26-31-33 sts knitwise, work 1 edge st in garter st, (marker), work A.9 over the first 6 sts after marker, stockinette st over the next 67-79-87-95-111-123 sts, A.10 over the last 6 sts before second marker, (marker ), 1 edge st in garter st, loosely cast of the last 22-24-25-26-31-33 sts knitwise = 81-93-101-109-125-137 sts remain on row. Cut the yarn. Work next row from WS over the remaining sts as follows: 1 edge st in garter st, A.10 as before, stockinette st over the next 67-79-87-95-111-123 sts, A.9 as before, 1 edge st in garter st. When A.9 and A.10 have been worked 1 time vertically, continue in stockinette st with 1 edge st in garter st in each side of piece. When piece measures 3 cm / 1" from marker, inc 1 st in each side of piece inside 1 edge st (= 2 sts inc) - READ INCREASE TIP. Repeat inc every 1½-1½-1½-1-1-1 cm / ½"-½"-½"-⅜"-⅜"-⅜" 12-10-12-14-12-13 times in total = 105-113-125-137-149-163 sts on needle. When piece measures 23-23-24-24-23-23 cm / 9"-9"-9½"-9½"-9"-9" from marker (piece measures 53-55-57-59-61-63 cm / 21"-21⅝"-22½"-23¼"-24"-24¾" in total from shoulder), adjust so that next row is from RS, switch to circular needle size 3.5 mm / US 4. Work next row from RS as follows: Work 1 edge st in garter st, work A.11 (= 2 sts) until 2 sts remain, work first st in A.11, finish with 1 edge st in garter st. On row with holes (i.e. 7th row) work next to last st K. Bind off when A.11 has been worked 1 time vertically. Piece measures 56-58-60-62-64-66 cm / 22"-22¾"-23⅝"-24⅜"-25¼"-26" in total from shoulder. BACK PIECE: Piece is first worked in the round, then worked as front piece. Cast on 6 sts on double pointed needles size 4 mm / US 6 with Belle, switch to circular needle when needed. K 1 row. On next row inc as follows: * K 1, 1 YO *, repeat from *-* = 12 sts on row, K YOs twisted on next row, they should not make holes. Work A.1 4 times in total, insert 1 marker between each A.1 (= 4 markers). When A.1 has been worked 1 time vertically, there are 156-156-156-156-164-164 sts on needle. Continue as follows: A.12 over the first 39-39-39-39-41-41 sts, work A.3 over the next 39-39-39-39-41-41 sts and A.13 over the last 39-39-39-39-41-41 sts, slip the remaining sts on a stitch holder for neck edge (= 39-39-39-39-41-41 sts), after A.13 cast on 11 sts at the end of row for shoulder (see diagram). Then work back and forth on needle. Work A.13/A.3/A.12 on next row, after A.12 cast on 11 sts at the end of row for shoulder (see diagram). When A.12/A.3/A.13 have been worked 1 time vertically, there are 165-165-183-183-193-193 sts on needle. Piece measures approx. 15-15-17-17-19-19 cm / 6"-6"-6¾"-6¾"-7½"-7½" from cast-on edge. Now continue back piece as front piece. NECK EDGE: Worked back and forth on needle. Slip sts from stitch holder for neck edge on back piece back on circular needle size 3.5 mm / US 4. Work 2 ridges. Fasten ridges where sts were cast on for shoulder. Fasten off. ASSEMBLY: Sew the side seams inside 1 edge st in garter st. Sew shoulder seams inside 1 edge st in garter st. Tighten tog the middle (i.e. cast-on edge) on both front and back piece. SLEEVE: Worked back and forth on circular needle in stockinette st. Slip sts from the 2 stitch holders (on front and back piece) in one side of piece back on circular needle size 4 mm / US 6 = 80-88-96-100-108-112 sts. Work short rows for sleeve cap as follows: Beg to work in the 25th-29th-31st-35th-43rd-45th st (i.e. 24-28-30-34-42-44 sts in one side are not worked). Work from RS 34-34-38-34-26-26 sts in stockinette st, turn piece (= 22-26-28-32-40-42 sts remain on needle). Work in stockinette st over the 36-36-40-36-28-28 sts, turn piece. Work 2 sts more on every turn in each side of piece until all sts have been worked. AT THE SAME TIME dec 1 st in each side of piece (= 2 sts dec), inside 1 st on every 4th-4th-2nd-4th-4th-4th row 4-6-8-8-10-10 times in total – READ DECREASE TIP = 72-76-80-84-88-92 sts on needle. Work 8-8-8-12-12-12 rows in stockinette st over all sts, insert 1 marker in piece (sew side seam on sleeve up to here later). NOW MEASURE THE PIECE FROM HERE. Cast on 1 edge st at the end of the next 2 rows = 74-78-82-86-90-94 sts. Work edge sts in garter st until finished measurements. On next row from RS dec 1 st inside 2 sts in each side of piece (= 2 sts dec). Repeat dec every 2½-2-2-1½-1-1 cm / ⅞"-¾"-¾"-½"-⅜"-⅜" 9-10-11-12-13-13 more times = 54-56-58-60-62-66 sts on needle. When sleeve measures 31-30-29-27-24-23 cm / 12¼"-11¾"-11½"-10½"-9½"-9", switch to circular needle size 3.5 mm / US 4. Work 2 ridges. Bind off. Slip sts from stitch holders in the other side of piece on circular needle size 4 mm / US 6 and work the same way. ASSEMBLY: Sew sleeve seams up to where 1 edge st in garter st was cast on in each side of piece. Sew the under arm seam. |
|||||||||||||||||||||||||||||||
Diagram explanations |
|||||||||||||||||||||||||||||||
|
|||||||||||||||||||||||||||||||
 |
|||||||||||||||||||||||||||||||
 |
|||||||||||||||||||||||||||||||
 |
|||||||||||||||||||||||||||||||
 |
|||||||||||||||||||||||||||||||
 |
|||||||||||||||||||||||||||||||
Have you finished this pattern?Tag your pictures with #dropspattern #butterflyheartsweater or submit them to the #dropsfan gallery. Do you need help with this pattern?You'll find 28 tutorial videos, a Comments/Questions area and more by visiting the pattern on garnstudio.com. © 1982-2026 DROPS Design A/S. We reserve all rights. This document, including all its sub-sections, has copyrights. Read more about what you can do with our patterns at the bottom of each pattern on our site. |
|||||||||||||||||||||||||||||||


With over 40 years in knitting and crochet design, DROPS Design offers one of the most extensive collections of free patterns on the internet - translated to 17 languages. As of today we count 325 catalogs and 12298 patterns - 12288 of which are translated into English (US/in).
We work hard to bring you the best knitting and crochet have to offer, inspiration and advice as well as great quality yarns at incredible prices! Would you like to use our patterns for other than personal use? You can read what you are allowed to do in the Copyright text at the bottom of all our patterns. Happy crafting!
Post a comment to pattern DROPS 170-3
We would love to hear what you have to say about this pattern!
If you want to leave a question, please make sure you select the correct category in the form below, to speed up the answering process. Required fields are marked *.