
Popular categories
Looking for a yarn?


Comments / Questions (48)
![]() Ellinor wrote:
Ellinor wrote:
Jag har fastnat vid raglanminskningarna Hittade detta svar: A.2 måste stickas vid varje övergång mellan fram- och bakstycke och ärmar, men det minskas inte i A.2, det stickas bara några öljetter vid varje övergång av raglanen; ... Vad menas med att sticka öljetter i A2
30.09.2025 - 21:48
![]() Yvonne Bengtsson wrote:
Yvonne Bengtsson wrote:
Hej igen! Löste problemet genom att läsa, läsa och läsa igen..... det står inte i beskrivningen att man skall göra A2 tills alla intagningar i raglan. Men, så är det förstår jag nu....
16.05.2022 - 08:44DROPS Design answered:
Hei hei. God fornøyelse videre med koftan. mvh DROPS Design
16.05.2022 - 10:30
![]() Yvonne Bengtsson wrote:
Yvonne Bengtsson wrote:
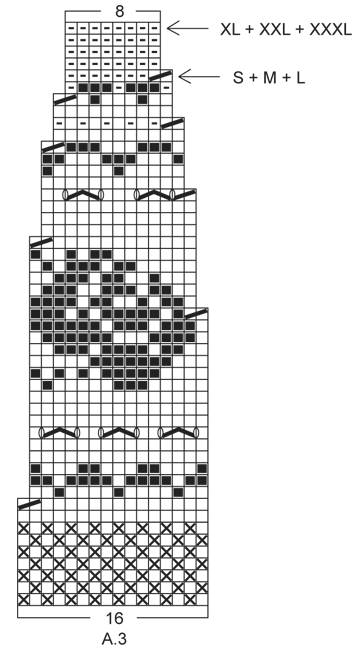
Hej! Ang raglan: Det står minska vart 4:e varv (d v s på vartannat v från rätsidan) totalt 7 ggr (gäller min storlek). Då har jag alltså minskat 3 ggr och jag är klar med A2. Men då återstår det 4 minskningar för att få rätt antal. Ser på bilden att mönstret A3 kommer direkt efter A2. Skulle jag alltså ha minskat 7 ggr i A2? Alltså varje rätt varv i stället för vartannat rätt varv?
15.05.2022 - 11:22DROPS Design answered:
Hei Yvonne. Så bra at du fant ut av det selv. Da ble det ingen stopp i strikkingen i helgen. mvh DROPS Design
16.05.2022 - 10:30
![]() Christine wrote:
Christine wrote:
Hi,I have joined the sleeves and have started the yoke. I think I understand that A2 and decrease for the raglan have to be done in the same row. Then it says decrease for raglan every 4 rows but A2 is 2 row repeat. Please explain where the every 4 row decrease for the raglan is required. I have looked at the photo and worked out the number of stitches but can't understand.
10.02.2022 - 17:14DROPS Design answered:
Dear Christine, A.2 has to be worked at each transition between body and sleeves, but you don't decrease in A.2 you just work some eyelets at each transition of the raglan; then you decrease for the raglan on each side of A.2 - see RAGLAN on every 4th row, ie every other row from RS (= every other row with a lace pattern in A.2). You will then decrease evenly and now work A.3. Happy knitting!
11.02.2022 - 08:59
![]() Martine Fournière wrote:
Martine Fournière wrote:
Bonjour, super merci beaucoup pour vos explications, j'ai enfin compris je vais pouvoir faire mes jolies mitaines. Cordialement Martine
07.09.2021 - 10:33
![]() Martine Fournière wrote:
Martine Fournière wrote:
Bonjour, je vous remercie pour la réponse, mais cela ne répond pas à ma question... Hors mis le 3 mailles de départ du pouce, Je n'ai que 44 mailles pour mon dessin alors qu'il en faut 45 ! Alors dois-je rajouter une maille ? Merci pour votre réponse. Cordialement Martine
06.09.2021 - 21:39DROPS Design answered:
Bonjour Martine, vous ne rajoutez pas de mailles, vous tricotez le motif comme avant, mais sur ces 44 mailles, Autrement dit, vous avez 44 mailles en jacquard absolument comme avant et la 45ème m (= l'avant-dernière maille du tour) en jersey pour le pouce. Dans le dernier motif du tour, vous allez donc tricoter les 13 premières mailles en jacquard (la 14ème m = celle du pouce; la 15ème = la dernière m du tour à tricoter soit en jacquard, soit en jersey si vous le préférez), autrement dit, cette dernière rose ne sera pas complète. Bon tricot!
07.09.2021 - 08:22
![]() Martine Fournière wrote:
Martine Fournière wrote:
Bonjour, pour les mitaines lorsque l'on commence les augmentations du pouces j'ai'l'avant dernière mail plus une augmentation de chaque côté, donc 3 mailles il me reste donc 44 mailles pour mon dessin et la ça tombe pas juste car le diagramme A5 se fait sur 45 mailles. Merci pour votre aide. Cordialement Martine
05.09.2021 - 22:33DROPS Design answered:
Bonjour Mme Fournière, les augmentations pour le pouce se tricotent en jersey gris perle clair, pas en jacquard, autrement dit, vous continuez votre jacquard comme avant sur les autres mailles, mais les mailles du pouce vont se tricoter elles toujours à l'endroit, sans jacquard. Bon tricot!
06.09.2021 - 08:05
![]() Camilla Nyholm wrote:
Camilla Nyholm wrote:
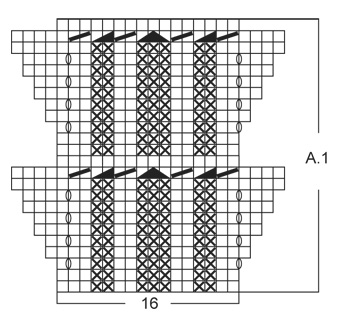
Hej! Hittar ingen beskrivning i diagramförklaringen vad tecknet tjockt snedstreck från vänster nedre hörn upp till höger övre hörn över 2 maskor, vad det betyder. Hur skall detta tecken läsas? Hittar inget omslagstecken där heller. Detta streck finns i diagram A.1 och här fastnar jag. Tacksam för svar.
10.11.2020 - 07:31DROPS Design answered:
Hej Camilla. Det är den 4:e symbolen i symbolförklaringen som betyder "2 m räta tills med bottenfärgen i mönstret". Mvh DROPS Design
10.11.2020 - 11:25
![]() Ricci wrote:
Ricci wrote:
Bonjour, j ai fini le pull Vintage Rose, tres sympa à réaliser malgré quelques hésitations, mais vous m avez bien guidé et conseillé et surtout éclairé. Merci encore ! Je voudrais me lancer dans les mitaines mais je souhaiterais les faire en gants plutôt. Est-ce possible ? Si oui pourriez-vous m orienter vers un modèle de gants que je pourrais adapter à ce modèle pour faire les doigts ! Je vous remercie de vos conseils toujours tres précieux.
31.01.2020 - 14:31DROPS Design answered:
Bonjour Mme Ricci et merci. Vous pouvez probablement les transformer en gants, pensez à ajuster les rayures de la fin des mitaines en conséquence (si vous souhaitez les conserver ou non), vous pouvez vous inspirer d'un modèle avec la même tension (24 m = 10 cm). Bon tricot!
31.01.2020 - 14:48
![]() Agathe wrote:
Agathe wrote:
Bonjour, Lorsqu'il est indiqué "tricoter ensuite les 15 premières m de A.1 (pour que le motif soit identique de chaque côté)" dans les instructions du corps, est-ce qu'il faut lire le diagramme à l'envers (de gauche à droite)? Ou plutôt tricoter les 15 dernières mailles de A1. J'ai l'impression que le motif ne serait pas symétrique si on commence toujours au début (à droite) de A1. J'espère que ma question est compréhensible! Merci pour votre aide
21.07.2019 - 17:15DROPS Design answered:
Bonjour Agathe, vous allez lire le diagramme tous les rangs de droite à gauche (sur l'endroit) et de gauche à droite (sur l'envers), et tricoter ainsi: répétez les 16 m de A.1 et terminez par les 15 premières mailles de A.1 seulement, autrement dit, dans le dernier A.1 sur l'endroit, on va terminer par 2 m end au lieu de 3 au premier rang (= ainsi on a 2 m end de chaque côté des bordures des devants). Bon tricot!
06.08.2019 - 09:06
|
||||||||||||||||||||||||||||
Vintage Rose Cardigan#vintagerosecardigan |
||||||||||||||||||||||||||||
 |
 |
|||||||||||||||||||||||||||
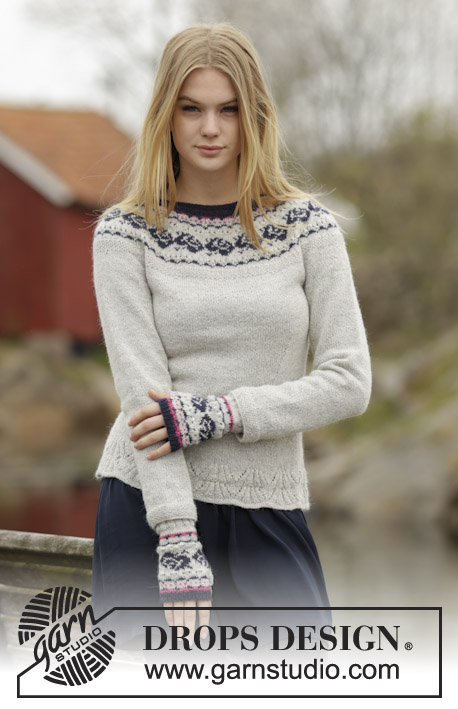
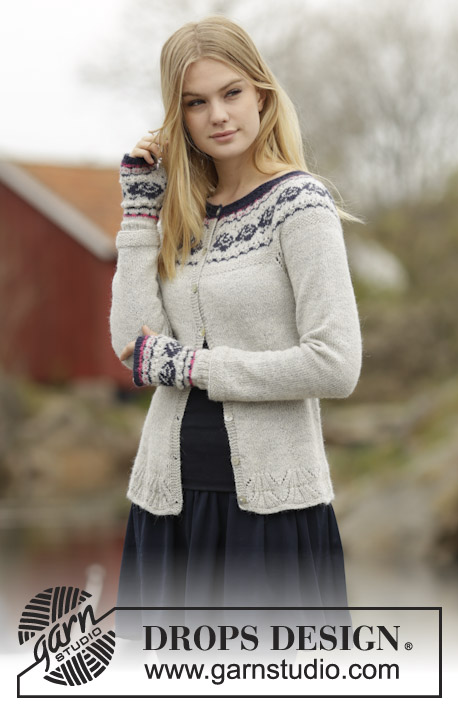
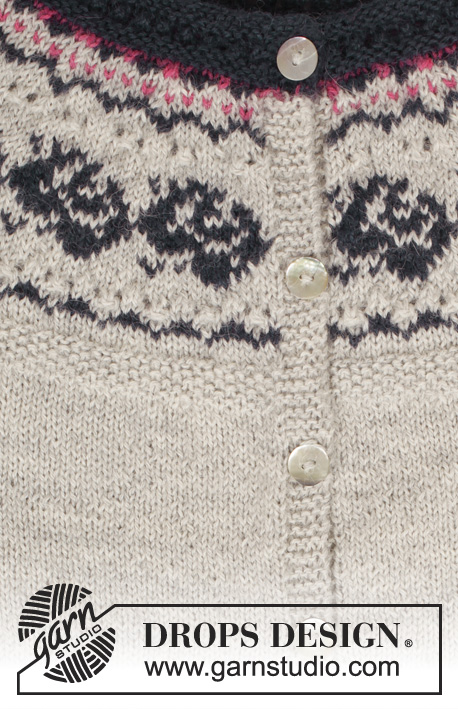
Set consists of: Knitted DROPS jacket with round yoke and rose pattern and wrist warmers with rose pattern in "Alpaca". Size: S - XXXL.
DROPS 165-10 |
||||||||||||||||||||||||||||
|
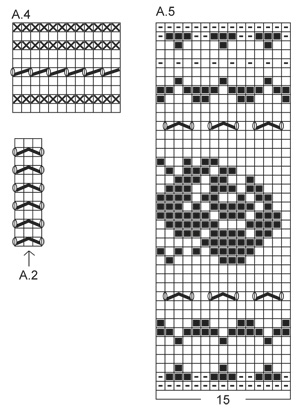
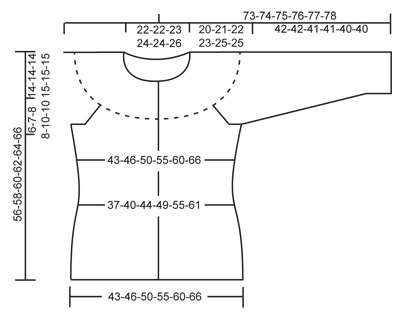
JACKET: GARTER ST (back and forth): K all rows. 1 ridge = K2 rows. PATTERN: See diagrams A.1 to A.4. The diagrams show all rows in pattern seen from RS. BUTTONHOLES: Dec for buttonholes on right band. 1 buttonhole = bind off third and fourth st from edge and cast on 2 new sts on next row over these sts. Dec for buttonholes when piece measures: SIZE S: 2, 10, 18, 26, 34, 41, 48 and 55 cm / 3/4",4",7",10 1/4",13½",16",19",21½" SIZE M: 2, 10, 18, 26, 34, 42, 50 and 57 cm / 3/4",4",7",10 1/4",13½",16½",19 3/4",22½'' SIZE L: 2, 10, 18, 26, 34, 42, 50 and 59 cm / 3/4",4",7",10 1/4",13½",16½",19 3/4",23 1/4" SIZE XL: 2, 10, 19, 27, 36, 44, 53 and 61 cm / 3/4",4",7½",10½",14 1/4",17 1/4",21",24" SIZE XXL: 2, 11, 20, 29, 38, 47, 55 and 63 cm / 3/4",4½",8",11½",15",18½",21½",24 3/4" SIZE XXXL: 2, 11, 20, 29, 38, 47, 56 and 65 cm / 3/4",4½",8",11½",15",18½",22",25½" DECREASE TIP: Dec for waist at the 4 markers. All dec are done from RS! Dec as follows before 1st and 3rd marker: Beg 2 sts before marker, slip 1 st as if to K, K 1, psso. Dec as follows after 2nd and 4th marker: K 2 tog. INCREASE TIP: Inc at the 4 markers. All inc are done from RS. Inc as follows: Make 1 YO before 1st and 3rd marker and after 2nd and 4th marker. On next row P YO twisted to avoid holes. SEED ST: ROUND 1: * K 1, P 1 *, repeat from *-*. ROUND 2: P over K and K over P. Repeat 2nd round. RAGLAN: Dec for raglan on each side of A.2 in every transition between sleeves and body. All dec are done from RS! Dec as follows after A.2: Slip 1 st as if to K, K 1, psso. Dec as follows before A.2: Beg 2 sts before A.2 and K 2 tog. ---------------------------------------------------------- JACKET: BODY: Worked back and forth on circular needle from mid front. Cast on 217-233-249-281-297-329 sts (includes 5 band sts in each side towards mid front) on circular needle size 2.5 mm / US 1.5 with light pearl gray. K 3 rows, switch to circular needle size 3 mm / US 2.5 and P 1 row from WS but K the outermost 5 band sts in each side. Work next row as follows from RS: 5 band sts in GARTER ST - see explanation above, work pattern according to diagram A.1 until 20 sts remain on row, work the first 15 sts in A.1 (so that pattern is the same in each side towards mid front) and finish with 5 band sts in garter st. Continue pattern like this. When A.1 has been worked, K 1 row from RS while adjusting no of sts to 215-231-251-275-299-327 (do not inc/dec over the band sts). Then work in stockinette st with 5 band sts in garter st in each side towards mid front. REMEMBER THE KNITTING GAUGE and remember BUTTONHOLES on band - see explanation above. When piece measures 10-10-10-10-12-12 cm / 4"-4"-4"-4"-4 3/4"-4 3/4", insert 4 markers in piece as follows: Insert 1st marker after the first 31-32-34-35-35-36 sts, 2nd marker after the next 50-56-62-72-84-96 sts, 3rd marker after the next 53-55-59-61-61-63 sts and 4th marker after the next 50-56-62-72-84-96 sts (31-32-34-35-35-36 sts remain on needle after last marker). On next row from RS, dec at the 4 markers – READ DECREASE TIP (= 4 sts dec). Repeat dec every 4th row (i.e. every other row from RS) 7-7-7-7-6-6 times in total = 187-203-223-247-275-303 sts. When piece measures 24 cm / 9½'' in all sizes, inc at the 4 markers - READ INCREASE TIP (= 4 sts inc). Repeat inc every 4th-4th-4th-4th-6th-6th row 7-7-7-7-6-6 times in total = 215-231-251-275-299-327 sts. Continue to work until piece measures 36-37-38-39-39-41 cm / 14 1/4"-14½"-15"-15 1/4"-15 1/4"-16". Work next row as follows from WS: Work 51-55-60-65-71-78 sts (= left front piece), bind off 10-10-10-12-12-12 sts for armhole, work 93-101-111-121-133-147 sts in stockinette st (= back piece), bind off 10-10-10-12-12-12 sts for armhole and work the last 51-55-60-65-71-78 sts (= right front piece). Put piece aside and knit the sleeves. SLEEVE: Worked in the round on double pointed needles. Cast on 56-56-58-60-62-62 sts on double pointed needles size 2.5 mm / US 1.5 with light pearl gray. K 1 round. Then work SEED ST - see explanation above for 3-3-3-4-4-4 cm / 1 1/8''-1 1/8''-1 1/8''-1½''-1½''-1½''. Switch to double pointed needles size 3 mm / US 2.5. Insert 1 marker at beg of round (= mid under sleeve) and work in stockinette st. When piece measures 8-10-10-10-10-10 cm / 4'', inc 2 sts mid under sleeve. Repeat inc every 9th-7th-7th-6th-6th-5th round 12-14-14-16-16-18 times in total = 80-84-86-92-94-98 sts. When piece measures 42-42-41-41-40-40 cm / 16½''-16½''-16 1/8''-16 1/8''-15¾''-15¾'' (NOTE: Shorter measurements in the larger sizes because of wider shoulders), bind off the middle 10-10-10-12-12-12 sts under sleeve (i.e. Bind off 5-5-5-6-6-6 sts on each side of marker) = 70-74-76-80-82-86 sts remain on needle. Put piece aside and make another sleeve. YOKE: Slip sleeves on to same circular needle as body as follows: Beg from RS with light pearl gray and work sts from right front piece, then work sts from first sleeve AT THE SAME TIME insert 1 marker in first st and 1 marker in last st on sleeve, work sts from back piece, work sts from the other sleeve AT THE SAME TIME insert 1 marker in first st and 1 marker in last st on sleeve and finally work sts from left front piece = 335-359-383-411-439-475 sts on needle and 4 markers in piece. Then work in stockinette st back and forth with 5 band sts in garter st in each side towards mid front and A.2 in every transition between body and sleeves (arrow in diagram shows st with marker, 1st row in A.2 beg on next row from RS). AT THE SAME TIME on next row from RS dec for RAGLAN on each side of A.2 in every transition between body and sleeves – see explanation above (= 8 sts dec). Repeat dec for raglan every 4th row (i.e. every other row from RS) 5-6-7-7-8-8 times in total = 295-311-327-355-375-411 sts. After last dec, P 1 row from WS (continue bands in garter st) while dec 13-13-13-9-13-17 sts evenly (do not dec over bands) = 282-298-314-346-362-394 sts on needle. Work next row as follows from RS: Work 5 band sts as before, work pattern according to diagram A.3 until 5 sts remain on row (= 17-18-19-21-22-24 repetitions of 16 sts) and finish with 5 band sts as before. Continue pattern like this and dec as shown in diagram. When A.3 has been worked (finish after row marked with arrow for correct size), there are 146-154-162-178-186-202 sts on needle. P 1 row from WS with pink (continue bands in garter st) while AT THE SAME TIME dec 22-28-30-42-50-56 sts evenly (do not dec over bands) = 124-126-132-136-136-146 sts remain on needle. ELEVATION IN BACK OF NECK: Beg from RS with dark indigo and K until 18-18-20-22-22-24 sts remain on needle, turn and P back until 18-18-20-22-22-24 sts remain in the other side. Turn and K until 28-28-30-32-32-34 sts remain on needle, turn and P back until 28-28-30-32-32-34 sts remain in the other side. Turn and K until 38-38-40-42-42-44 sts remain on needle, turn and P back until 38-38-40-42-42-44 sts remain in the other side. Turn and K until 48-48-50-52-52-54 sts remain on needle, turn and P back until 48-48-50-52-52-54 sts remain in the other side. Turn piece and K the rest of the row. NECK EDGE: Switch to circular needle size 2.5 mm / US 1.5 and K 1 row from WS with dark indigo while dec 10-10-10-12-12-12 sts evenly (do not dec over band sts) = 114-116-122-124-124-134 sts. Work next row as follows from RS: Work 5 band sts in garter st, work pattern according to diagram A.4 until 5 sts remain, and finish with 5 band sts in garter st. When A.4 has been worked, loosely bind off with K from RS. ASSEMBLY: Sew the openings under the sleeves. Sew on buttons. ---------------------------------------------------------- WRIST WARMERS: PATTERN: See diagram A.5. INCREASE TIP: Inc 1 st by making 1 YO. To avoid holes K YO twisted on next round. ---------------------------------------------------------- RIGHT WRIST WARMER: Worked in the round on double pointed needles. Cast on 65-70 sts on double pointed needles size 2.5 mm / US 1.5 with light pearl gray. K 1 round. Then work rib = K 2/P 3. After 4 rounds rib dec all 3 P to 2 P by P the first 2 sts in every P-section tog = 52-56 sts. Continue rib K 2/P 2 until piece measures 5-6 cm / 2''-2 3/8''. K 1 round while dec 7-11 sts evenly = 45-45 sts. Switch to double pointed needles size 3 mm / US 2.5 and work in stockinette st with light pearl gray. REMEMBER THE KNITTING GAUGE When piece measures 10-11 cm / 4"-4½", work pattern in the round according to diagram A.5 (= 3 repetitions on round in both sizes). When piece measures 14-14 cm / 5½"-5½", beg inc for thumb gusset. Inc 1 st on each side of next to last st on round (i.e. on inside of hand) – READ INCREASE TIP (work the inc sts in light pearl gray). Repeat inc on each side of the last inc sts every 3rd round a total of 6-7 times = 13-15 thumb sts and 57-59 sts in total. When piece measures 19-20 cm / 7½"-8", slip the thumb sts + 1 st on each side of these on 1 stitch holder (= 15-17 sts on stitch holder). Cast on 3 new sts behind thumb on next round = 45-45 sts on needle. Finish A.5. Then K 1 round with pink while inc 11-15 sts evenly = 56-60 sts. Switch to double pointed needles size 2.5 mm / US 1.5 and indigo. Work 6-8 rounds rib = K 1/P 1. Bind off sts with K over K and P over P. Wrist warmer measures approx. 25-26 cm / 9 3/4"-10 1/4". THUMB: Work entire thumb in light pearl gray. Slip sts from stitch holder back on double pointed needles size 3 mm / US 2.5 and pick in addition up 5-7 sts along the edge behind thumb sts = 20-24 sts. Work 3 rounds in stockinette st. Switch to double pointed needles size 2.5 mm / US 1.5 and work 6 round rib = K 1/P 1. Bind off sts with K over K and P over P. LEFT WRIST WARMER: Work as right but inc for thumb on each side of second st on round (instead of each side of next to last st on round). |
||||||||||||||||||||||||||||
Diagram explanations |
||||||||||||||||||||||||||||
|
||||||||||||||||||||||||||||
 |
||||||||||||||||||||||||||||
 |
||||||||||||||||||||||||||||
 |
||||||||||||||||||||||||||||
 |
||||||||||||||||||||||||||||
Have you finished this pattern?Tag your pictures with #dropspattern #vintagerosecardigan or submit them to the #dropsfan gallery. Do you need help with this pattern?You'll find 34 tutorial videos, a Comments/Questions area and more by visiting the pattern on garnstudio.com. © 1982-2026 DROPS Design A/S. We reserve all rights. This document, including all its sub-sections, has copyrights. Read more about what you can do with our patterns at the bottom of each pattern on our site. |
||||||||||||||||||||||||||||


With over 40 years in knitting and crochet design, DROPS Design offers one of the most extensive collections of free patterns on the internet - translated to 17 languages. As of today we count 324 catalogs and 12290 patterns - 12280 of which are translated into English (US/in).
We work hard to bring you the best knitting and crochet have to offer, inspiration and advice as well as great quality yarns at incredible prices! Would you like to use our patterns for other than personal use? You can read what you are allowed to do in the Copyright text at the bottom of all our patterns. Happy crafting!
Post a comment to pattern DROPS 165-10
We would love to hear what you have to say about this pattern!
If you want to leave a question, please make sure you select the correct category in the form below, to speed up the answering process. Required fields are marked *.