
Popular categories
Looking for a yarn?


Comments / Questions (37)
![]() Lena wrote:
Lena wrote:
Kan ikke få dette til at passe: Man skal have 106 masker, 29 masker forstykker og 48 masker til ryg, men hvis jeg tager 2 x 3 Masker ud på hver side af mærketråden, har jeg 51 masker på ryggen. Rygstk står der, at man har 48 masker til at starte med, hvor jeg så har 51?
07.11.2015 - 08:05DROPS Design answered:
Hej. Du börjar med 119 m (32+55+32). Sen tages det in 1 m på var sida av var märketråd 2 gånger, dvs 8 m totalt tages in = 111 m (30+51+30). Sen tages det in 5 maskor jämt fördelat = 106 m som då sen fördelas 29+48+29. Lycka till!
11.11.2015 - 11:32
![]() Sarah wrote:
Sarah wrote:
What are the size measurements for this pattern? S, M, L etc.
27.08.2015 - 14:02DROPS Design answered:
Hi Sarah. Look at the bottom of the pattern, here you find all measurements per size in cm's
27.08.2015 - 16:17
![]() Lineke Siteur Den Houdijker wrote:
Lineke Siteur Den Houdijker wrote:
Een mooi patroon en heerlijk garen om mee te breien, in een woord geweldig.👍🏻
18.08.2015 - 12:40
![]() Birgit Platz Platz wrote:
Birgit Platz Platz wrote:
Hvordan læser jeg A.1 (0/0) får en maske for meget :1omslag mellem 2 masker det forstår jeg ikke m.v.h. Birgit Platz
09.06.2015 - 08:39DROPS Design answered:
Hej. På p 7 i A.1 stickar du: kast, 1 m løst av p, 1 m rett og løft den løse over, kast, 1 m løst av p, 1 m rett og løft den løse over... osv pinnen ut. Lycka till!
29.06.2015 - 13:52
![]() Tina wrote:
Tina wrote:
Hallo, ich würde gerne wissen, wie man im Perlmuster zunimmt? Dann stimmt doch das Muster nicht mehr....
31.05.2015 - 08:10DROPS Design answered:
Sie können die Zunahmen an der Seite direkt nacheinander machen, sodass der Markierer dann genau zwischen den Zunahmen liegt, dafür stricken Sie einfach aus der M vor dem Markierer 2 M heraus (also 1 Zunahme, 1x von vorne und 1x von hinten in die M einstechen, beide M rechts, optisch sieht das dann aus wie 1 M re und 1 M li) und bei der nächsten M machen Sie das ebenso, dann bleibt Ihnen das Perlmuster ohne "Sprung" direkt erhalten.
31.05.2015 - 09:33
![]() Veronika Leipold wrote:
Veronika Leipold wrote:
Hallo, Ich finde diese Jacke sehr schön und wollte wissen ob die Wolle die hier verwendet wird leicht verfilzt?
08.04.2015 - 17:00DROPS Design answered:
Liebe Frau Leipold, Cloud ist ein weiches Garn und damit naturgemäss nicht ganz so strapazierfähig wie beispielsweise ein fest gesponnenes Superwashgarn. Wenn Sie sich an die Waschanleitung halten, verfilzt Cloud aber nicht.
13.04.2015 - 13:34
![]() Marianne wrote:
Marianne wrote:
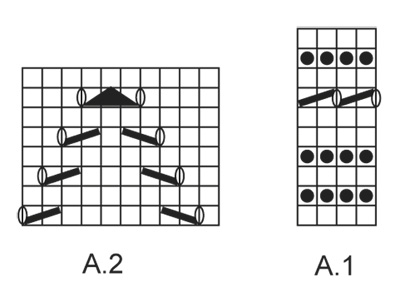
Lurte på om diagrammet viser alle pinner å ses fra retten
29.03.2015 - 21:42DROPS Design answered:
Hej Marianne. Mönstret er set fra retten, men alle pinner vises i diagrammet. Pind 1, 3, 5 osv er retten og 2, 4, 6 er vrangen.
16.04.2015 - 15:54
![]() Marité wrote:
Marité wrote:
Gros coup de coeur pour cette veste magnifique !! J'attends avec impatience les explications pour me mettre à mes aiguilles. Merci !
24.02.2015 - 14:49
![]() Pauline Hietkamp wrote:
Pauline Hietkamp wrote:
Hele mooie vest, leuke details maar toch simpel, ben er erg enthousiast erover.
24.02.2015 - 14:39
![]() Petitjean wrote:
Petitjean wrote:
Magnifique modèle très simple mais très féminin. Vivement les explications il me tarde de faire ce modèle.
24.02.2015 - 10:22
|
|||||||||||||||||||
After Eight#aftereightcardigan |
|||||||||||||||||||
 |
 |
||||||||||||||||||
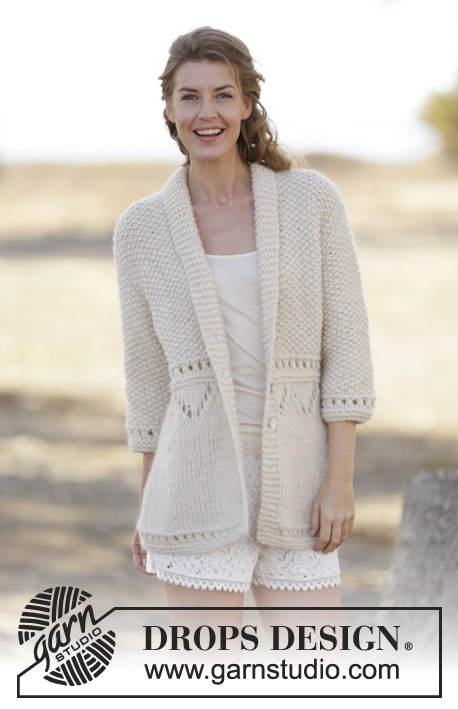
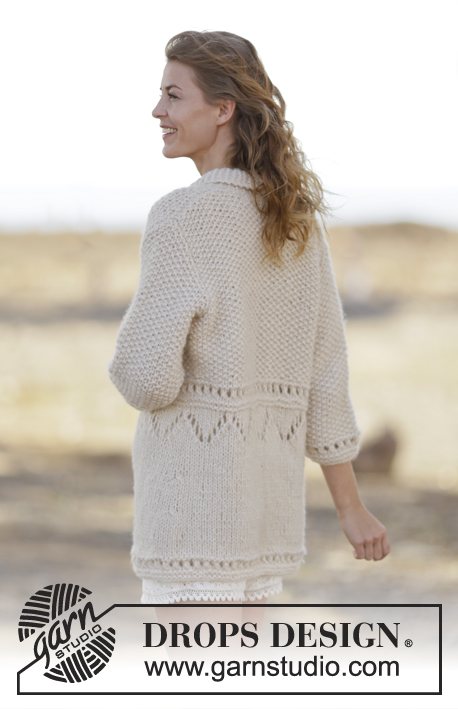
Knitted DROPS jacket in seed st with lace pattern and shawl collar in 1 thread Cloud or 2 threads Air. Size: S - XXXL.
DROPS 159-21 |
|||||||||||||||||||
|
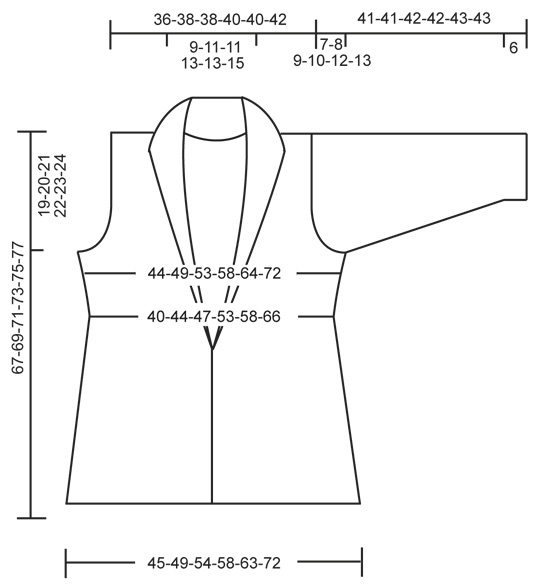
GARTER ST (back and forth on needle): K all rows. 1 ridge = K2 rows. SEED ST: Row 1: * K 1, P 1 *, repeat from *-*. Row 2: K over P and P over K. Repeat 2nd row. PATTERN: See diagrams A.1 and A.2. In diagram A.1 make sure not to work more YOs than sts worked tog, otherwise the no of sts will not fit. BUTTONHOLES: Dec for buttonholes on right band: 1 buttonhole = K tog 3rd and 4th st and make a YO, K YO on next row. Dec for buttonholes in all sizes when piece measures: approx. 26, 32 and 38 cm / 10¼", 12½", 15" INCREASE TIP (applies to collar): Inc inside 1 band st as follows: Make 1 YO, on next row K YO twisted (work st twisted by working in back loop of st instead of front loop). Work all the inc sts in garter st. ---------------------------------------------------------- BODY: Worked back and forth on circular needle. Cast on 109-119-129-139-149-169 sts (includes 5 band sts in each side) on circular needle size 8 mm / US 11 with 1 thread Cloud or 2 threads Air. Work diagram A.1 with 5 band sts in GARTER ST - see explanation above, in each side, work diagram 1 time vertically. REMEMBER THE KNITTING GAUGE Then work in stockinette st but work the outermost 5 sts in each side (= band) in garter st until finished measurements. AT THE SAME TIME insert 2 markers in the piece as follows: 1 marker after 30-32-35-37-40-45 sts (= 1st front piece) and 1 after the next 49-55-59-65-67-79 sts (= back piece), there is 30-32-35-37-40-45 sts left for 2nd front piece. When piece measures 15 cm / 6", dec 1 st on each side of each marker, repeat dec when piece measures 22 cm / 8¾" = 101-111-121-131-141-161 sts. When piece measures approx. 26 cm / 10¼", work according to diagram A.2 with 5 band sts in garter st as before, AT THE SAME TIME beg dec for BUTTONHOLES - see explanation above. After diagram A.2 work diagram A.1. Then work in SEED ST - see explanation above - continue band in GARTER ST - AT THE SAME TIME dec on first row from RS 3-5-7-5-3-5 sts evenly = 98-106-114-126-138-156 sts. Move the markers in the side so that there are 27-29-31-34-37-41 sts on each front piece and 44-48-52-58-64-74 sts on back piece. READ ALL OF THE FOLLOWING SECTION BEFORE CONTINUING! COLLAR INC: When piece measures 34-35-36-37-38-39 cm / 13⅜"-13¾"-14¼"-14½"-15"-15¼", inc for collar - read INCREASE TIP - in each side, inc 1 st every 7-10-10-18-18-18 cm / 2¾"-4"-4"-7"-7"-7" 4-3-3-2-2-2 times in total. At the same time when piece measures 34-35-36-37-38-39 cm / 13⅜"-13¾"-14¼"-14½"-15"-15¼", work 1 st in garter st into band (i.e. no of sts stays the same but no of sts in garter st inc while no of sts in seed st dec) every 7-6-6-5-5-5 cm / 2¾"-2½"-2½"-2"-2"-2" 5-6-6-7-7-7 times in total. SIDE INC: When piece measures 37 cm / 14½", inc 1 st on each side of each marker every 5-3-3-3-3-3 cm / 2"-1"-1"-1"-1"-1" 2-3-3-3-3-3 times in total. When piece measures 48-49-50-51-52-53 cm / 19"-19¼"-19¾"-20"-20½"-21", bind off 3 sts on each side of each marker for armhole and finish each part separately. BACK PIECE: = 42-48-52-58-64-74 sts. Bind off for armholes in each side on every other row as follows: 2 sts 0-1-1-2-3-5 times and 1 st 1-1-3-3-4-4 times = 40-42-42-44-44-46 sts. When piece measures 65-67-69-71-73-75 cm / 25½"-26⅜"-27⅛"-28"-28¾"-29½", bind off the middle 8-10-10-12-12-14 sts for neck. Then bind off 1 st on next row towards the neck = 15 sts remain on each shoulder. Bind off when piece measures 67-69-71-73-75-77 cm / 26⅜"-27⅛"-28"-28¾"-29½"-30⅜". RIGHT FRONT PIECE: Continue inc for collar. Bind off for armholes as on back piece. After all inc and dec, 29 sts remain on needle. When piece measures 67-69-71-73-75-77 cm / 26⅜"-27⅛"-28"-28¾"-29½"-30⅜", bind off the outermost 15 sts for shoulder = 14 sts for collar. Insert 1 marker. Continue to work in garter st over collar as follows: * 1 ridge over all sts, 1 ridge over the outermost 7 sts towards mid front *, repeat from *-* until collar measures 4½-5½-5½-6½-6½-7½ cm / 1¾"-2¼"-2¼"-2½"-2½"-2⅞" from marker on the shortest side. Loosely bind off. LEFT FRONT PIECE: Work as right but reversed. SLEEVE: Worked back and forth on circular needle. Cast on 30-30-32-32-34-34 sts (includes 1 edge st each side) on needle size 8 mm / US 11 with Cloud. Then work pattern A.1 1 time vertically. Then work in seed st. READ ALL OF THE FOLLOWING SECTION BEFORE CONTINUING! AT THE SAME TIME when piece measures 6 cm / 2⅜", inc 1 st in each side every 8-5½-4½-3½-3-2½ cm / 3⅛"-2¼"-1¾"-1¼"-1⅛"-⅞" 4-5-6-7-8-9 times in total = 38-40-44-46-50-52 sts. When piece measures 34-33-33-32-31-30 cm / 13½"-13"-13"-12½"-12¼"-11¾", bind off for sleeve cap in each side on every other row: 3 sts 1 time, 2 sts 1 time, 1 st 1-2-3-4-5-6 times, then bind off 2 sts in each side until piece measures approx. 40-40-41-41-42-42 cm / 15¾"-15¾"-16⅛"-16⅛"-16½"-16½", then bind off 3 sts 1 time in each side. Bind off the remaining sts, piece measures approx. 41-41-42-42-43-43 cm / 16⅛"-16⅛"-16½"-16½"-17"-17". ASSEMBLY: Sew the shoulder seams. Sew sleeve seams and sew in sleeves. Sew collar tog mid back. Sew collar along the back of the neck, sew edge to edge to avoid a chunky seam. Sew the buttons on to left front piece. |
|||||||||||||||||||
Diagram explanations |
|||||||||||||||||||
|
|||||||||||||||||||
 |
|||||||||||||||||||
 |
|||||||||||||||||||
Have you finished this pattern?Tag your pictures with #dropspattern #aftereightcardigan or submit them to the #dropsfan gallery. Do you need help with this pattern?You'll find 23 tutorial videos, a Comments/Questions area and more by visiting the pattern on garnstudio.com. © 1982-2026 DROPS Design A/S. We reserve all rights. This document, including all its sub-sections, has copyrights. Read more about what you can do with our patterns at the bottom of each pattern on our site. |
|||||||||||||||||||


With over 40 years in knitting and crochet design, DROPS Design offers one of the most extensive collections of free patterns on the internet - translated to 17 languages. As of today we count 325 catalogs and 12298 patterns - 12288 of which are translated into English (US/in).
We work hard to bring you the best knitting and crochet have to offer, inspiration and advice as well as great quality yarns at incredible prices! Would you like to use our patterns for other than personal use? You can read what you are allowed to do in the Copyright text at the bottom of all our patterns. Happy crafting!
Post a comment to pattern DROPS 159-21
We would love to hear what you have to say about this pattern!
If you want to leave a question, please make sure you select the correct category in the form below, to speed up the answering process. Required fields are marked *.