
Popular categories
Looking for a yarn?


Comments / Questions (65)
![]() Annick Houssin wrote:
Annick Houssin wrote:
Beste, Al een tijdje zou ik graag garen kopen bij jullie. Vele voorbeelden lijken me leuk en betaalbaar! helaas met een rondbreinaald kan ik niet werken. kan men ook de patronen krijgen of hoe moet je dat berekenen om met gewonen naalden te breien en de trui, bvb in delen af te werken? Vele dank Annick
20.12.2015 - 12:09DROPS Design answered:
Beste Annick. Modellen zoals deze worden heen en weer gebreid op de rondbreinaald, dus u kunt hier dan ook rechte naalden gebruiken. Dit is ook vaak het geval bij veel van de andere modellen waar er heen en weer worden gebreid. Wilt u een model aanpassen van rondbreinaald naar rechte naalden, kijk hier
21.12.2015 - 15:53
![]() Florence Kazi Tani wrote:
Florence Kazi Tani wrote:
Bonjour, je ne comprends pas bien l'assemblage dos/devant. Le dos semble donc plus long que le devant mais sur le schéma ce n'est pas clair. Pourriez vous s'il vous plait nous faire le schéma complet? Je rejoins le commentaire de Marie33! Pour le montage je pense que la vidéo va nous aider... Merci d'avance
28.10.2015 - 08:46DROPS Design answered:
Bonjour Mmem Kazi Tani, le dos est effectivement plus long que le devant, posez les 2 pièces côte à côte et assemblez-les comme dans la vidéo, jusqu'au bord point mousse de la bordure devant (le "supplément" du dos dépassera en bas). Bon tricot!
28.10.2015 - 11:45
![]() Faure wrote:
Faure wrote:
Bonjour, je suis en train de tricoter Cozy afternoon et pense avoir trouvé une erreur dans la taille XL : Pour le devant, il faut faire des augmentations tous les 4 rangs et non une fois 2 et une fois 4 comme vous le prescrivez pour obtenir une hauteur totale de 54 cm. Je suppose que l'erreur est semblable pour le dos. Je précise que mon échantillon en 5,5 est tout à fait correct. Merci de vérifier. Bravo pour vos laines si belles et vos modèles !! Marie
11.10.2015 - 21:48
![]() Monika wrote:
Monika wrote:
Pytanie o wymiar/ilość oczek przodu swetra rozmiar S. W opisie podano: dół robótki powinien mieć 48 oczek = ok. 50 cm. Nie zgadzają mi się te dane - pamiętając o próbce 16 oczek = 10 cm z tego wynika, że 48 oczek powinno dać 30 cm. Porównuję z opisem tyłu: dolna krawędź robótki wynosi 104 oczka czyli ok. 57 cm. Które dane dotyczące przodu są wiążące: ilość oczek czy cm?
08.10.2015 - 13:26DROPS Design answered:
Przód jest węższy i krótszy niż tył. Dane są prawidłowe. Obwód swetra na dole wyniesie: (104 :16) x 10 cm + (48:16) x 10 cm= 65+30=95 cm. POWODZENIA!
08.10.2015 - 18:22
![]() Kody Doisy wrote:
Kody Doisy wrote:
Bonsoir petite question je fais du 42 j'aimerai savoir a quelle taille correspond exactement le M et le L de vos modeles SVP ? merci et bonne soiree .
23.06.2015 - 18:42DROPS Design answered:
Bonjour Mme Kody Doisy, vous trouverez à la fin des explications un schéma avec toutes les mesures pour chaque taille, ouvrage posé à plat (d'un côté à l'autre). Comparez ces mesures avec celle d'un vêtement analogue dont vous aimez la forme pour trouver la taille adéquate. Bon tricot!
23.06.2015 - 19:36
![]() Carina wrote:
Carina wrote:
Er staat: Zet bij een hoogte van 19 cm 2 nieuwe st op aan het einde van de volgende 2 nl. (incl. 1 st aan elke kant). Betekent dit: 2 st erbij, maar deze verdelen aan elke kant? Dan staat er: Plaats 1 markeerde aan elke zijkant voor de afwerking. Wat is dit en hoe doe je dat? Ik hoor graag.
01.05.2015 - 00:03DROPS Design answered:
Hoi Carina. Je zet 2 nieuwe st op aan beide kanten + 4 st in totaal. De markeerder kan een draadje in een andere kleur zijn of een stekenmarkeerder - dit is om de hoogte voor de mouwen aan te geven (Lees ook AFWERKING).
01.05.2015 - 15:17
![]() Christiane wrote:
Christiane wrote:
Erfolgen die Abnahmen am Vorderteil bzw. die Zunahmen am Rückteil in jeder vierten und zweiten Hinrunde (Rechts) oder sollen die Rückrunden in links mitgezählt werden?
10.04.2015 - 08:35DROPS Design answered:
Die Rückreihen werden mitgezählt. Das bedeutet, dass Sie die Abnahmen bzw. Zunahmen in jeder Hin-R bzw. in jeder 2. Hin-R machen (= jede 2. R bzw. jede 4. R).
11.04.2015 - 08:08
![]() Bloch Cléa wrote:
Bloch Cléa wrote:
Bonjour, Je souhaite réaliser un pull pour la première fois avec ce modèle. Mais dans les explications, je ne comprends pas ce que signifie "Monter pour l'épaule". Pourriez-vous m'aider ? Merci d'avance, Cléa Bloch
05.03.2015 - 20:59DROPS Design answered:
Bonjour Mme Bloch, on commence le devant par l'épaule gauche que l'on met ensuite en attente. On tricote ensuite l'épaule droite de la même façon (en vis à vis), puis on tricote l'épaule droite, on monte les mailles pour l'encolure et on tricote les mailles de l'épaule gauche. Bon tricot!
06.03.2015 - 09:07
![]() Runa wrote:
Runa wrote:
P.S. det ser ud til at Marie33 fra frankrig har stillet et spørgsmål under "kommentarer".... "Bonjour, est-il possible de mettre en ligne une photographie de l'ouvrage de dos ainsi qu'un gros plan du montage du corps ? Que voulez-vous dire par 'point de croix' et 3 mailles en hauteur ? Merci !"
16.02.2015 - 09:34DROPS Design answered:
Thank you Runa !
16.02.2015 - 13:30
![]() Runa wrote:
Runa wrote:
Det ser ud som om, blusen er lidt længere bagpå, end foran. Er det rigtigt? I så fald ku det være godt med et billede af blusen set fra siden... :-)
16.02.2015 - 09:31DROPS Design answered:
Hej Runa, Ja det stemmer, du finder målene i opskriften. Vi har desværre ikke et billede af siden. Men god fornøjelse!
18.02.2015 - 15:39
|
||||
Cozy Afternoon#cozyafternoonsweater |
||||
 |
 |
|||
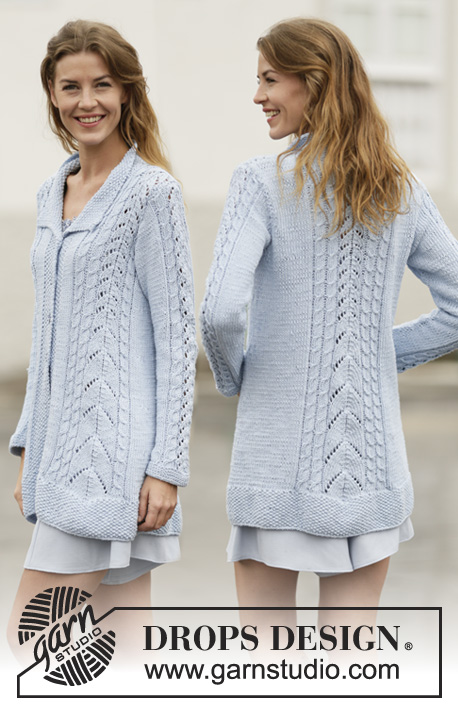
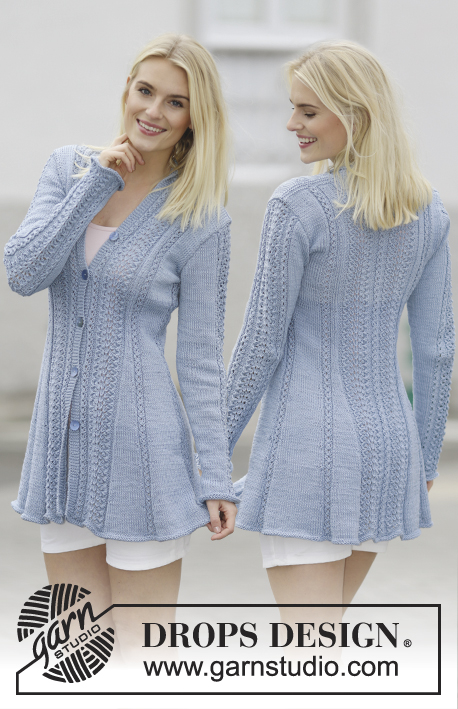
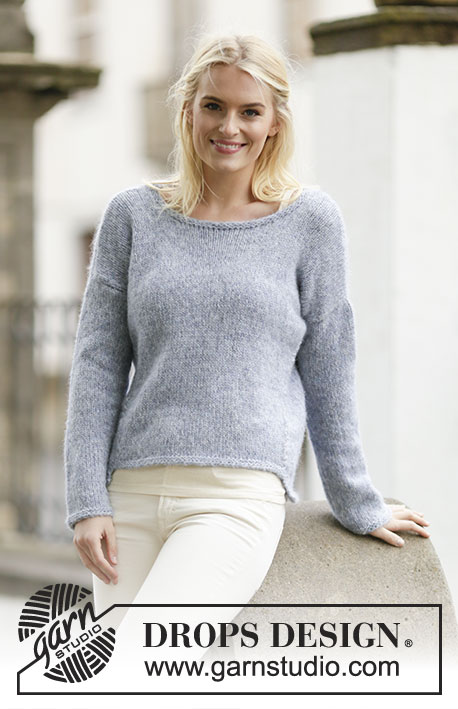
Knitted DROPS jumper, worked top down in ”Air”. Size S – XXXL
DROPS 161-4 |
||||
|
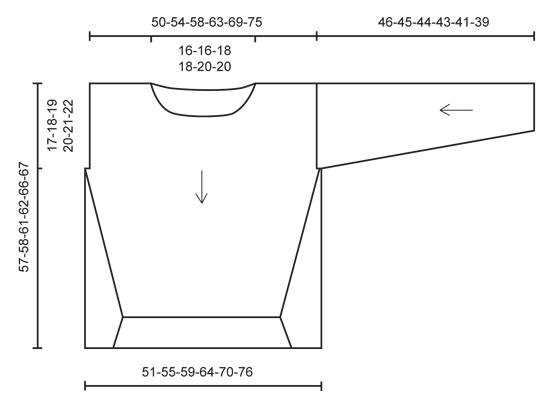
GARTER ST (back and forth): K all rows. 1 ridge = K2 rows. GARTER ST (worked in the round): * K 1 round and P 1 round *, repeat from *-*. 1 ridge = 2 rounds. ---------------------------------------------------------- JUMPER: Worked top down, back and forth on circular needle. FRONT PIECE: Cast on 26-29-31-35-39-44 sts on circular needle size 5.5 mm / US 9 with Air and work in stockinette st. When piece measures 2-2-3-3-4-4 cm / ¾"-¾"-1⅛"-1⅛"1½"-1½", inc at beg on every row from RS as follows: Inc 1 st 2 times, then cast on 2 sts 2 times = 32-35-37-41-45-50 sts (= left shoulder). Slip the sts on 1 stitch holder. Cast on and work right shoulder the same way but inc at beg of every row from WS = 32-35-37-42-45-50 sts (work next row from RS). Work 1 row over all sts, cast on 16-16-18-18-20-20 sts for neck at the end of row and work the 32-35-37-41-45-50 sts from stitch holder = 80-86-92-100-110-120 sts. Continue in stockinette st. REMEMBER THE KNITTING GAUGE When piece measures 17-18-19-20-21-22 cm / 6¾"-7"-7½"-8"-8¼"-8¾", cast on 2 new sts at the end of the next 2 rows = 84-90-94-104-114-124 sts (includes 1 edge st in each side). Insert 1 marker in each side for assembly. Work in stockinette st with 1 edge st in GARTER ST - see explanation above, in each side – AT THE SAME TIME dec on 2nd row as follows: Dec 1 st inside 1 edge st in garter st in each side. Repeat dec alternately on 4th and 2nd row 17-17-18-18-19-19 more times = 48-54-56-66-74-84 sts. Insert 1 marker in each side for assembly. Work 2 rows. Switch to circular needle size 4.5 mm / US 7 and work 2 ridges, bind off. Piece measures approx. 50-51-53-54-57-58 cm / 19¾"-20"-21"-21¼"-22½"-22¾". BACK PIECE: Cast on 26-29-31-35-39-44 sts on circular needle size 5.5 mm / US 9 with Air and work in stockinette st. When piece measures 3 cm / 1", inc 1 st at beg of next row from RS = 27-30-32-36-40-45 sts (= right shoulder). Slip the sts on 1 stitch holder. Cast on and work left shoulder the same way but inc at beg of row from WS (work next row from RS) = 27-30-32-36-40-45 sts. Work 1 row over all sts, cast on 26-26-28-28-30-30 sts for neck at the end of row and work the 27-30-32-36-40-45 sts from stitch holder = 80-86-92-100-110-120 sts. Continue in stockinette st. When piece measures 17-18-19-20-21-22 cm / 6¾"-7"-7½"-8"-8¼"-8¾", cast on 2 new sts at the end of the next 2 rows = 84-90-96-104-114-124 sts (includes 1 edge st in each side). Insert 1 marker in each side for assembly. Work in stockinette st with 1 edge st in garter st in each side – AT THE SAME TIME inc on 2nd row as follows: Inc 1 st inside 1 edge st in garter st in each side. Repeat inc alternately on every 4th and 2nd row 17-17-18-18-19-19 more times = 120-126-134-142-154-164 sts on needle. Insert 1 marker in each side for assembly. Then work in stockinette st with 3 edge sts in garter st in each side, work 2 rows, then dec on next row from RS as follows: Dec 1 st inside 3 sts in garter st in each side. Repeat dec on every other row 7-7-8-8-9-9 more times = 104-110-116-124-134-144 sts. Switch to circular needle size 4.5 mm / US 7 and work 2 ridges, bind off. Piece measures approx. 57-58-61-62-66-67 cm / 22½"-22¾"-24"-24½"-26"-26½". SLEEVE: Worked back and forth on circular needle. Cast on 34-36-37-38-40-42 sts (includes 1 edge st in each side) on circular needle size 4.5 mm / US 7 with Air. Work 2 ridges. Switch to circular needle size 5.5 mm / US 9 and work in stockinette st with 1 edge st in garter st in each side of piece. When piece measures 7-7-6-7-8-7 cm / 2¾"-2¾"-2½"-2¾"-3"-2¾", inc 1 st inside 1 edge st in each side of piece. Repeat inc every 3½-3-3-2½-2-2 cm / 1¼"-1⅛"-1⅛"-⅞"-¾"-¾" 10-11-12-13-14-14 more times = 56-60-63-66-70-72 sts. Work in stockinette st until piece measures 46-45-44-43-41-39 cm / 18"-17¾"-17¼"-17"-16⅛"-15¼" (shorter measurements in the larger sizes because of wider shoulders). Bind off. Make another sleeve. ASSEMBLY: Sew the shoulder seams. Sew in sleeves - make sure that markers meet on front and back piece. Sew the sleeve seams inside 1 edge st. Sew the side tog as follows: Place front and back piece edge to edge. Sew them tog with cross stitches over 3 sts in width (i.e. in the mid of st inside edge st in each piece) and 3 sts vertically. Sew down to edge to and with ridges on front piece (make sure that the markers meet). NECK EDGE: Pick up 67-83 sts on a short circular needle size 4.5 mm / US 7 with Air around the neck. Work 2 ridges in GARTER ST in the round on circular needle - see explanation above. Bind off. |
||||
Diagram explanations |
||||
|
||||
 |
||||
Have you finished this pattern?Tag your pictures with #dropspattern #cozyafternoonsweater or submit them to the #dropsfan gallery. Do you need help with this pattern?You'll find 22 tutorial videos, a Comments/Questions area and more by visiting the pattern on garnstudio.com. © 1982-2026 DROPS Design A/S. We reserve all rights. This document, including all its sub-sections, has copyrights. Read more about what you can do with our patterns at the bottom of each pattern on our site. |
||||


With over 40 years in knitting and crochet design, DROPS Design offers one of the most extensive collections of free patterns on the internet - translated to 17 languages. As of today we count 324 catalogs and 12290 patterns - 12280 of which are translated into English (US/in).
We work hard to bring you the best knitting and crochet have to offer, inspiration and advice as well as great quality yarns at incredible prices! Would you like to use our patterns for other than personal use? You can read what you are allowed to do in the Copyright text at the bottom of all our patterns. Happy crafting!
Post a comment to pattern DROPS 161-4
We would love to hear what you have to say about this pattern!
If you want to leave a question, please make sure you select the correct category in the form below, to speed up the answering process. Required fields are marked *.