
Popular categories
Looking for a yarn?


Comments / Questions (56)
![]() Rosario wrote:
Rosario wrote:
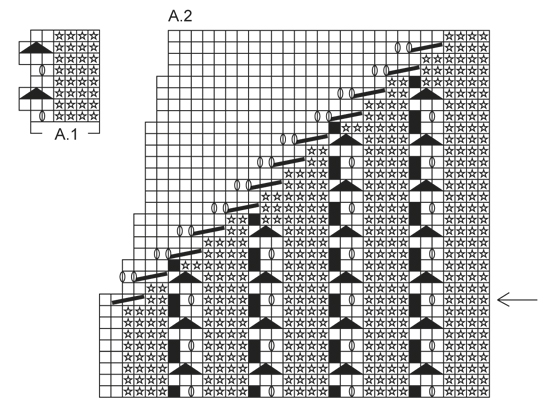
I am 3 rows before finishing A2, have watched the videos, and I still do not know how to proceed. Finishing A2 does not make any sense, and I do not know in which row I must start A2 again. As it is, the sweater is still too short. It is a pity that the pattern is so badly explained. Any help,please?
28.03.2020 - 22:27DROPS Design answered:
Dear Rosario, you should continue the stitches in A.1 as before and continue to displace the stocking stitch as shown in A.2 as you did in A.2, ie you should decrease the pattern with K3 tog, YO, K1, YO exaclty as you worked before until all stitches are worked in stocking stitch. Happy knitting!
30.03.2020 - 10:07
![]() Jeannette wrote:
Jeannette wrote:
Ik heb heel veel patronen van jullie op Pinterest. Nu worden ze plotseling geblokkeerd omdat ze spam zouden veroorzaken. Weet u hier meer over?
02.03.2020 - 18:51DROPS Design answered:
Dag Jeannette,
Oh dat is erg vervelend. We hebben hier verder geen andere meldingen over gehad. Kan het zijn dat pop-ups in de browser geblokkeerd worden? Dit kan via instellingen in de browser aangepast worden (even op internet opzoeken :) Probeer het anders even op een andere computer om te kijken of het dan wel lukt.
04.03.2020 - 16:13
![]() Elena wrote:
Elena wrote:
Se puede tejer con agujas normales?? Cuáles serían los tamaños??
08.06.2019 - 18:40DROPS Design answered:
Hola Elena. Se puede trabajar este modelo con agujas rectas, pero tienes que hacer algunos cálculos, como, por ejemplo, dividir el numero total de puntos por la mitad y añadir los puntos de orillo, que se utilizan para coser las partes al finalizar la labor.
08.06.2019 - 19:51
![]() Willy V S wrote:
Willy V S wrote:
Intussen heb ik begrepen dat de teruggaande naald ook op het telpatroon staat.
27.03.2019 - 18:33
![]() Willy V S wrote:
Willy V S wrote:
Nog even ter aanvulling: ik brei dit truitje op gewone breinaalden, dus niet op rondbreinaalden.
26.03.2019 - 12:43DROPS Design answered:
Dag Willy,
Als je ervoor zort dat je steeds de even naalden op de verkeerde kant breit, is dit geen probleem.
28.03.2019 - 13:07
![]() Willy V S wrote:
Willy V S wrote:
Ik ga dit truitje breien en heb het patroon goed bekeken. Enkel rijst bij mij de vraag of de teruggaande naald volgens telpatroon gebreid moet worden of zoals de steken zich voordoen?
26.03.2019 - 12:41DROPS Design answered:
Dag Willy,
Zowel de heengaande als de teruggaande naalden zijn weergegeven in het telpatroon en bij de symbolen staat hoe je alle steken breit (zowel op de goede als op de verkeerde kant.
28.03.2019 - 13:06
![]() Suzanne Bourque wrote:
Suzanne Bourque wrote:
Est-ce que je peux faire ce modèle avec Drops Cotton Light? J’ai 350 grammes.
08.01.2019 - 19:34DROPS Design answered:
Bonjour Mme Bourque, ce top est réalisé en DROPS Paris, un fil du groupe C, or DROPS Cotton Light appartient au groupe B et n'est donc pas une alternative (plus d'infos sur les alternatives ici), vous pouvez en revanche l'utiliser pour des tops réalisés dans des fils du groupe B - utilisez le convertisseur pour vérifier la quantité si besoin. Bon tricot!
09.01.2019 - 08:31
![]() So wrote:
So wrote:
Bonjour, je ne comprends pas le debut deA2( à la flèche) pourquoi a t’on seulement 2m de moins que pour le dos alors que nous reproduisons le motif 3 fois pour aller jusqu’au marqueur et donc 6 m de moins? Merci 😊
10.07.2018 - 20:56DROPS Design answered:
Bonjour So, au rang avec la flèche dans A.2, on diminue 2 m (= 3 m ens à l'end) à la fin de A.2 sur le côté sans faire aucun jeté pour compenser la diminution, on a ainsi 2 m en moins pour le devant - le devant se tricote en côtes ajourées qui vont être "mangées" progressivement par le jersey. Bon tricot!
11.07.2018 - 07:48
![]() Leah Vallance wrote:
Leah Vallance wrote:
When the pattern diagram shows "no stitch, skip this square", if you skip the stitch, what happens when I get to that stitch on the next row? I'm a new knitter, thanks
23.06.2017 - 19:32DROPS Design answered:
Dear Leah, this stitch doesn't exist in the piece, it only exists in the diagram. This stitch would appear in the next rows when we do a YO.
24.06.2017 - 12:26
![]() Badette 81 wrote:
Badette 81 wrote:
Merci, j'ai compris, ça fait un point très joli. Je fais ce modèle avec un coton bleu, pour l'été il sera très bien. Merci pour tous vos modèles.
05.04.2017 - 06:43
|
|||||||||||||||||||
Light Breeze#lightbreezetop |
|||||||||||||||||||
 |
 |
||||||||||||||||||
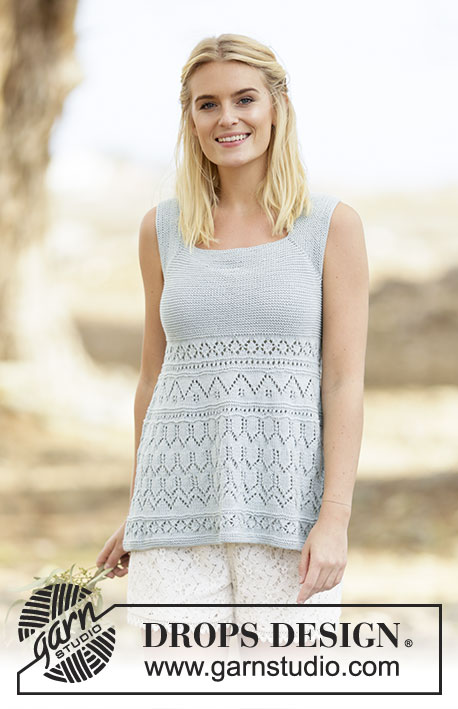
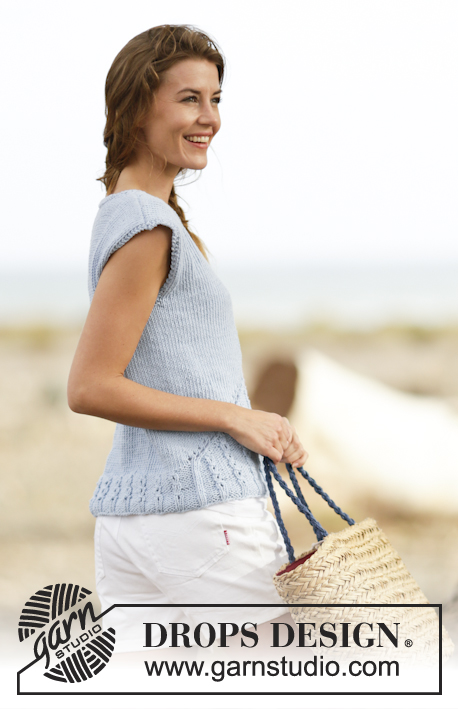
Knitted DROPS top with lace pattern and diagonal line in ”Paris”. Size: S - XXXL.
DROPS 161-28 |
|||||||||||||||||||
|
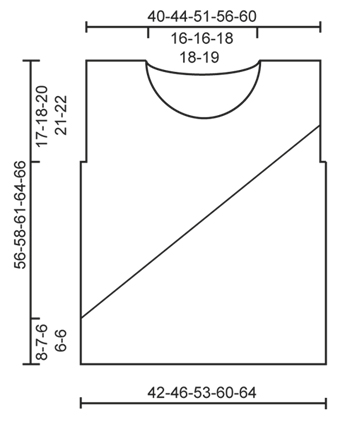
GARTER ST (worked in the round): * K 1 round and P 1 round *, repeat from *-*. 1 ridge = 2 rounds. GARTER ST (back and forth): K all rows. 1 ridge = K2 rows. RIB: * P 4, K 2 *, repeat from *-*. PATTERN: See diagrams A.1 and A.2. The diagrams show all rows in pattern seen from RS. ---------------------------------------------------------- BODY: Worked in the round on circular needle. Cast on 144-156-180-204-216 sts on circular needle size 4.5 mm / US 7 with Paris. K 1 round. Then work RIB - see explanation above. When rib measures 2 cm / ¾", switch to circular needle size 5 mm / US 8. Insert 1 marker at beg of round and 1 marker after 72-78-90-102-108 sts (= the sides). Then work pattern in the round according to diagram A.1 (pattern should fit over rib) BUT K the last 2 sts before both markers on every round onwards. REMEMBER THE KNITTING GAUGE When piece measures approx. 8-7-6-6-6 cm / 3"-2¾"-2½"-2½"-2½" (finish after 4th or 8th round in A.1), continue as follows: Beg on round marked with arrow in A.2 and work pattern according to diagram A.2 until 2nd marker (= front piece – NOTE: Diagram shows how eyelet rows goes over into stockinette st), then work in stockinette st over the remaining sts (= back piece). After 1st round in A.2 there are now 2 sts less on front piece than on back piece. Continue pattern according to A.2 on front piece and stockinette st on back piece until all P sts and eyelet row sts have been worked into stockinette st (pattern will finish approx. 2-2-6-9-11 cm / ¾"-¾"-2½"-3½"-4½" after bind off for armholes). AT THE SAME TIME when piece measures 38-39-40-42-43 cm / 15"-15¼"-15¾"-16½"-17", work 2 ridges over the middle 8-8-8-10-10 sts in each side (work the other sts as before). On next round after the 2 ridges, bind off the middle 4-4-4-6-6 sts in each side for armhole and finish front and back piece separately. BACK PIECE: = 68-74-86-96-102 sts. Continue in stockinette st but work the outermost 2 sts in each side in garter st (= sleeve edge). When piece measures 54-56-59-62-64 cm / 21¼"-22"-23¼"-24½"-25¼", bind off the middle 26-26-28-28-30 sts for neck and finish each shoulder separately. Then bind off 1 st on next row from neck = 20-23-28-33-35 sts remain on shoulder. Bind off when piece measures 56-58-61-64-66 cm / 22"-22¾"-24"-25¼"-26". Repeat on the other shoulder. FRONT PIECE: = 66-72-84-94-100 sts. Continue in stockinette st and A.2 as before but work the outermost 2 sts in each side in garter st (= sleeve edge). After A.2 continue in stockinette st with 2 sts in garter st in each side. When piece measures 46-48-49-51-53 cm / 18"-19"-19¼"-20"-21", slip the middle 10-10-12-12-14 sts on 1 stitch holder for neck and finish each shoulder separately. Then bind off at beg of every row from neck as follows: bind off 2 sts 3 times and 1 st 2 times = 20-23-28-33-35 sts remain on shoulder. Bind off when piece measures 56-58-61-64-66 cm / 22"-22¾"-24"-25¼"-26". Repeat on the other shoulder. ASSEMBLY: Sew the shoulder seams. NECK EDGE: Pick up approx. 74 to 92 sts around the neck (includes sts on stitch holder at the front) on circular needle size 4.5 mm / US 7 with Paris. P 1 round, K 1 round and P 1 round, then loosely bind off with K. |
|||||||||||||||||||
Diagram explanations |
|||||||||||||||||||
|
|||||||||||||||||||
 |
|||||||||||||||||||
 |
|||||||||||||||||||
Have you finished this pattern?Tag your pictures with #dropspattern #lightbreezetop or submit them to the #dropsfan gallery. Do you need help with this pattern?You'll find 25 tutorial videos, a Comments/Questions area and more by visiting the pattern on garnstudio.com. © 1982-2026 DROPS Design A/S. We reserve all rights. This document, including all its sub-sections, has copyrights. Read more about what you can do with our patterns at the bottom of each pattern on our site. |
|||||||||||||||||||


With over 40 years in knitting and crochet design, DROPS Design offers one of the most extensive collections of free patterns on the internet - translated to 17 languages. As of today we count 324 catalogs and 12290 patterns - 12280 of which are translated into English (US/in).
We work hard to bring you the best knitting and crochet have to offer, inspiration and advice as well as great quality yarns at incredible prices! Would you like to use our patterns for other than personal use? You can read what you are allowed to do in the Copyright text at the bottom of all our patterns. Happy crafting!
Post a comment to pattern DROPS 161-28
We would love to hear what you have to say about this pattern!
If you want to leave a question, please make sure you select the correct category in the form below, to speed up the answering process. Required fields are marked *.