
Popular categories
Looking for a yarn?


Comments / Questions (74)
![]() Margreet wrote:
Margreet wrote:
In mijn vorige bericht zei ik dat ik 25 steken gemeerderd had, zie nu dat het er 4 keer 2 steken zijn. Maar volgens mij blijft het probleem hetzelfde. Ik heb aan het begin en eind van elke naald een steek recht gebreid, dus als ik nu met die 2 extra steken begin, dan brei ik de eerste steek recht en ga ik dan verder met patroon A1,maar dan maakt de eerste steek van de oorspronkelijke steken er deel vanuit waardoor mi het patroon niet meer boven elkaar komt.
07.06.2013 - 17:55DROPS Design answered:
Hoi Margreet. Ik ga vanuit dat je maat XXL breit. Je zet dan op voor de mouwen: 4 keer 2 st, 1 keer 4 st en 1 keer 6 st aan beide kanten: 18 st aan beide kanten of 36 in totaal = 114 st op de nld. Je breit aan beide kanten 5 ribbelst (= mouwst), dus je breit A.1 over de overige 104 st. A.1 is deelbaar door 2, dus het zou goed uitkomen, de vroegere recht steken wordt nu samen gebreid in het patroon. Tel goed uit zo dat het patroon klopt.
11.06.2013 - 15:32
![]() Margreet wrote:
Margreet wrote:
Ik heb nu 25 steken opgezet voor de mouw. Maar als ik nu verder brei in patroon A1 dan kom ik toch niet uit doordat er aan iedere kant een rechte kantsteek zit. Nu zou het betekenen dat deze kantsteek de eerste is van A1. Ik snap het dus niet meer. Is de eerste steek van de 25 nu een rechte en brei ik daarna in patroon? Zo ja, dan verschuift volgens mij het patroon op het rugpand. Uit het patroon word ik niets wijzer.
07.06.2013 - 17:27Cora wrote:
From this point, at the back of the piece: "When piece measures 43-45-47-49-51-53 cm - adjust so that next row is worked from RS, switch to circular needle size 4 mm. Work in garter st back and forth over all sts..." untill the cast off all the rows are worked in garter st, not in diagram A1 any more?
14.05.2013 - 18:33DROPS Design answered:
Dear Cora, you are correct, from this measure you continue in garter st until finished measurement = for 3 more cm. Happy knitting!
15.05.2013 - 07:39Nashwaahmed wrote:
I want to ask a question what is the difference between vivaldi yarn and kid-silk yarn in the thickness of the thread ?
23.04.2013 - 02:47DROPS Design answered:
Dear Mrs Nashwaahmed, Vivaldi is group C with approx. 280 m / 50 g the ball and Kid-Silk is group A with approx 200 m / 25 g the ball. You may use 2 strands of Kid-Silk to get the same tension as Vivaldi. Happy knitting!
23.04.2013 - 09:09Maryam wrote:
How many balls do we need for this pattern?
14.03.2013 - 06:42DROPS Design answered:
Dear Maryam, Vivaldi is 50 g balls, so that you will need either 2 balls (first 4 sizes) or 3 balls (2 larger sizes). Happy knitting!
14.03.2013 - 13:45
![]() Pirjo Luopa wrote:
Pirjo Luopa wrote:
Kaunis, kesäinen pitsiluomus.
01.02.2013 - 08:27FARIDA wrote:
PLEASE, PLEASE, PLEASE ADD THE PATTERN!!!!
27.01.2013 - 12:58
![]() Monique wrote:
Monique wrote:
La couleur de ce gilet mais en valeur ce joli modèle... J'aime beaucoup !
21.01.2013 - 22:51
![]() Reija wrote:
Reija wrote:
Todella kaunis ja hyvän värinen
17.01.2013 - 13:29Marion Aigner wrote:
Muster sehr schön, Farbe etwas zu grell aber interessant
14.01.2013 - 14:03
|
|||||||||||||||||||
Cutie#cutiecardigan |
|||||||||||||||||||
 |
 |
||||||||||||||||||
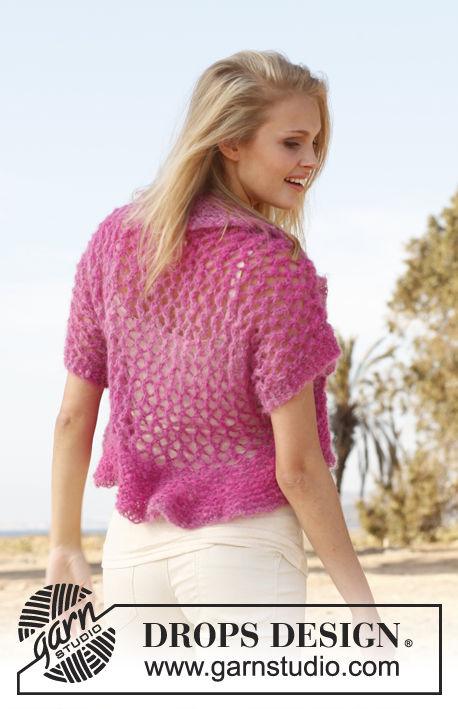
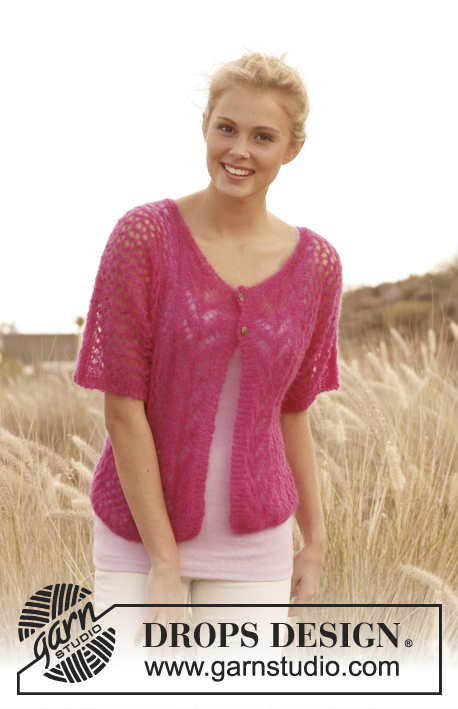
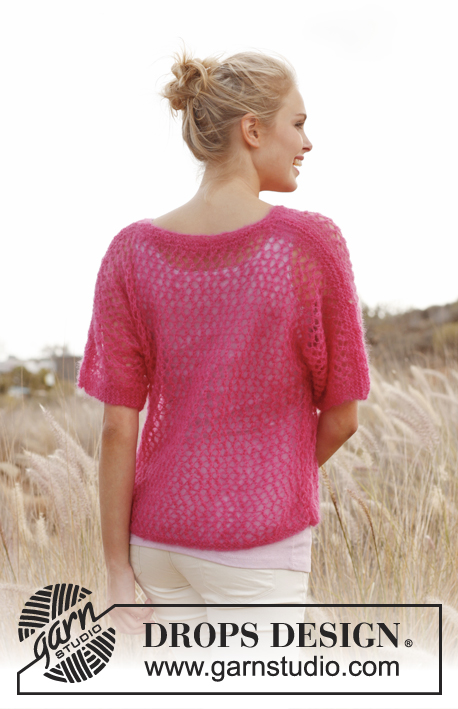
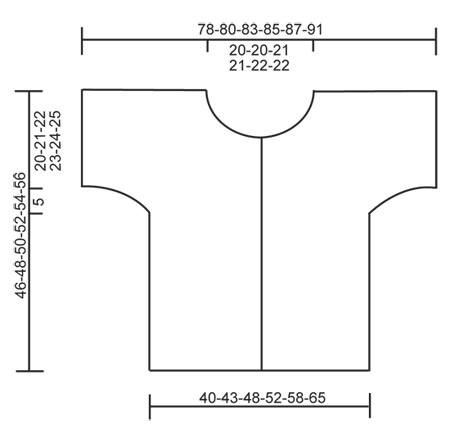
Knitted DROPS jacket with lace pattern in ”Vivaldi”. Size: S - XXXL.
DROPS 147-12 |
|||||||||||||||||||
|
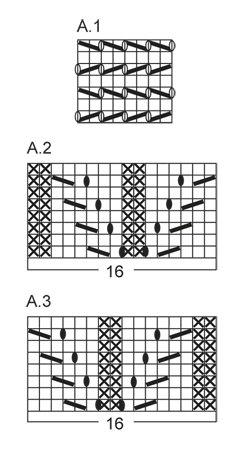
GARTER ST (back and forth on circular needle): K all rows. 1 ridge = 2 rows K. PATTERN: See diagrams A.1 to A.3. Diagrams show all rows in pattern seen from RS. BUTTONHOLE: Dec for buttonholes on right band. 1 buttonhole = K tog second and third st from edge and make 1 YO. Dec for buttonholes when piece measures: SIZE S: 29 and 35 cm / 11½" and 13¾" SIZE M: 31 and 37 cm / 12¼" and 14½" SIZE L: 32 and 39 cm / 12½" and 15¼" SIZE XL: 32 and 39 cm / 12½" and 15¼" SIZE XXL: 33 and 41 cm / 13" and 16⅛" SIZE XXXL: 35 and 43 cm / 13¾" and 17" ---------------------------------------------------------- JACKET: BACK PIECE: To avoid a tight cast on edge place circular needle size 4mm and 5mm / US 6 and 8 tog and cast on 54-58-64-70-78-86 sts (includes 1 edge st in each side) over both needles with Vivaldi. Pull out circular needle size 4 mm / US 6 and with circular needle size 5 mm / US 8 work 2 ridges in GARTER ST - see explanation above. On next row after ridges (= RS) work pattern according to diagram A.1 with 1 edge st in garter st in each side. Continue pattern like this. REMEMBER THE GAUGE! When piece measures 21-22-23-24-25-26 cm / 8¼"-8¾"-9"-9½"-9¾"-10¼", cast on new sts for sleeves at the end of every row in each side as follows: 2 sts 3-3-3-3-4-5 times, 4 sts 2-2-2-2-1-0 times and then 10-8-8-6-6-6 sts 1 time = 102-102-108-110-114-118 sts on needle – NOTE: Work the inc sts in the pattern A.1. After last inc continue pattern as before but work the outermost 5 sts in each side in garter st (= sleeve edges). When piece measures 43-45-47-49-51-53 cm / 17"-17¾"-18½"-19¼"-20"-21" - make sure that next row is worked from RS, switch to circular needle size 4 mm / US 6. Work in garter st back and forth over all sts while AT THE SAME TIME on 1st row (= RS) inc 46-50-50-52-52-54 sts evenly = 148-152-158-162-166-172 sts. When piece measures 44-46-48-50-52-54 cm / 17¼"-18"-19"-19¾"-20½"-21¼", bind off the middle 34-34-36-36-38-38 sts for neck and finish each shoulder separately. Continue to bind off 2 sts on next row from neck = 55-57-59-61-62-65 sts remain on the shoulder. Loosely bind off when piece measures 46-48-50-52-54-56 cm / 18"-19"-19¾"-20½"-21¼"-22". RIGHT FRONT PIECE: Place circular needle size 4mm and 5mm / US 6 and 8 tog and cast on 34-36-40-42-46-52 sts (includes 5 band sts towards mid front and 1 edge st in the side) over both needles. Pull out circular needle size 4 mm / US 6 and with circular needle size 5 mm / US 8 work 2 ridges in garter st (1st row = RS). Work next row as follows from RS: 5 band sts in garter st, work diagram A.2 (= 16 sts), then work pattern according to diagram A.1 until 1 st remains on row, finish with 1 edge st in garter st. Continue pattern like this. When piece measures 21-22-23-24-25-26 cm / 8¼"-8¾"-9"-9½"-9¾"-10¼", cast on new sts at the end of every row towards the side as on back piece = 58-58-62-62-64-68 sts - NOTE: Work the inc sts in the pattern A.1. After last inc continue pattern as before but work the outermost 5 sts towards the side in garter st (= sleeve edge). Remember BUTTONHOLES on band - see explanation above. On first row from RS after last buttonhole, slip the first 11-11-11-11-13-15 sts at beg of row on 1 stitch holder for neck (work sts before slipping them on stitch holder). Continue to bind off for neck at beg of every row from neck as follows: 2 sts 3 times and 1 st 3 times = 38-38-42-42-42-44 sts remain on shoulder. Continue pattern as before with 1 edge st in garter st towards the neck and 5 sts in garter st towards the sleeve. When piece measures 43-45-47-49-51-53 cm / 17"-17¾"-18½"-19¼"-20"-21" - make sure that next row is worked from RS, switch to circular needle size 4 mm / US 6. Work in garter st back and forth over all sts while AT THE SAME TIME inc 17-19-17-19-20-22 sts evenly on 1st row = 55-57-59-61-62-66 sts. Loosely bind off when piece measures 46-48-50-52-54-56 cm / 18"-19"-19¾"-20½"-21¼"-22". LEFT FRONT PIECE: Cast on and work 2 ridges as on right front piece. Work next row as follows from RS: 1 edge st in garter st, work pattern according to diagram A.1 until 21 sts remain, work A.3 (= 16 sts) and finish with 5 band sts in garter st. Continue pattern like this and continue as on right front piece but reversed. NOTE: Do not dec for buttonholes on left front piece, i.e. slip sts on a stitch holder for neck when piece measures 36-38-40-40-42-44 cm / 14¼"-15"-15¾"-15¾"-16½"-17¼". ASSEMBLY: Sew shoulder seams inside bind off edge. Sew underarm and side seams in one inside 1 edge st. Sew on buttons. NECK: Pick up approx. 105 to 115 sts around the neck (number includes sts on stitch holders at the front) on circular needle size 4 mm / US 6 with Vivaldi. K 1 row from WS and K 1 row from RS. Bind off with K from WS. |
|||||||||||||||||||
Diagram explanations |
|||||||||||||||||||
|
|||||||||||||||||||
 |
|||||||||||||||||||
 |
|||||||||||||||||||
Have you finished this pattern?Tag your pictures with #dropspattern #cutiecardigan or submit them to the #dropsfan gallery. Do you need help with this pattern?You'll find 16 tutorial videos, a Comments/Questions area and more by visiting the pattern on garnstudio.com. © 1982-2026 DROPS Design A/S. We reserve all rights. This document, including all its sub-sections, has copyrights. Read more about what you can do with our patterns at the bottom of each pattern on our site. |
|||||||||||||||||||


With over 40 years in knitting and crochet design, DROPS Design offers one of the most extensive collections of free patterns on the internet - translated to 17 languages. As of today we count 325 catalogs and 12298 patterns - 12288 of which are translated into English (US/in).
We work hard to bring you the best knitting and crochet have to offer, inspiration and advice as well as great quality yarns at incredible prices! Would you like to use our patterns for other than personal use? You can read what you are allowed to do in the Copyright text at the bottom of all our patterns. Happy crafting!
Post a comment to pattern DROPS 147-12
We would love to hear what you have to say about this pattern!
If you want to leave a question, please make sure you select the correct category in the form below, to speed up the answering process. Required fields are marked *.