
Popular categories
Looking for a yarn?


Comments / Questions (94)
![]() Morgana wrote:
Morgana wrote:
Negli aumenti della manica dovendo passare da 53 maglie (comprensive dei vivagni) a 71 maglie eseguendo il diagramma A.2 con contestuali aumenti, la prima maglia è sempre una maglia di vivagno? quindi le maglie finali (71) sarebbero 69 maglie + le 2 di vivagno? Grazie
14.03.2016 - 18:37DROPS Design answered:
Buonasera Morgana. Quando aumenta, la prima e l'ultima m sul ferro sono m vivagno. Quindi, alla fine degli aumenti, avrà 2 m vivagno + 69 m lavorate seguendo il motivo. Buon lavoro!
14.03.2016 - 21:21
![]() Barbara Martini wrote:
Barbara Martini wrote:
Un'ultimissima domanda: La manica non si potrebbe lavorare in circolo con i ferri circolari per non effettuare le cuciture? In tal caso, come si dovrebbero considerare le maglie di vivagno ed eventualmente avete suggerimenti o indicazioni per l'esecuzione degli schemi della manica? Ringrazio ancora.
07.03.2016 - 21:40DROPS Design answered:
Buonasera Barbara, se preferisce può lavorare le maniche in tondo, facendo attenzione poi alla confezione del capo: può eliminare le m di vivagno e lavorare i motivi come se fosse sempre sul davanti del lavoro. Se ad esempio è indicato di lavorare a rovescio sul rovescio, deve lavorare a diritto. Buon lavoro!
07.03.2016 - 23:00
![]() BARBARA MARTINI wrote:
BARBARA MARTINI wrote:
Ancora una domanda (chiedo scusa ma è il mio secondo lavoro a maglia, il primo elaborato), mi scrive "ogni 4,5 cm", saprebbe indicarmi all'incirca quanti ferri sono 4,5 cm.? Grazie ancora
07.03.2016 - 10:42DROPS Design answered:
Buongiorno Barbara, può ricavare il n° di ferri approssimativo per arrivare a 4,5 cm dal suo campione iniziale, altrimenti misuri semplicemente a partire dall'ultimo ferro di aumenti, cercando di mantenere lo stesso numero di ferri tra gli aumenti. Ci riscriva se ha altri dubbi. Buon lavoro!
07.03.2016 - 10:56
![]() BARBARA MARTINI wrote:
BARBARA MARTINI wrote:
Grazie mille ... siente gentilissimi e velocissimi oltre che utilissimi ... sono molto molto contenta ... ancora grazie !!!
07.03.2016 - 10:09
![]() BARBARA MARTINI wrote:
BARBARA MARTINI wrote:
Salve, non riesco a capire come bisogna effettuare gli aumenti nella manica; io devo passare da 51 a 63 maglie. Come devo eseguire gli aumenti nel diagramma A.2? non mi è chiaro neanche come si ripetono. Grazie, attendo vostre istuzioni più dettagliate.
07.03.2016 - 01:54DROPS Design answered:
Buongiorno Barbara. Per passare da 51 m a 63 m, deve aumentare 1 m dopo la prima m sul ferro e 1 m prima dell’ultima m sul ferro, ogni 4,5 cm in tutto 6 volte (quindi 12 m aumentate). Quando ci sono sufficienti maglie aumentate, lavora le m come indicato nel diagramma A2. Buon lavoro!
07.03.2016 - 08:57
![]() BARBARA MARTINI wrote:
BARBARA MARTINI wrote:
Mi sono approcciata da un paio di mesi alla maglia con i ferri circolari e vorrei realizzare questo modello, ho letto in un commento precedente che c'è una sezione che insegna come leggere i diagrammi, ma non ho trovato nessuna istruzione in tal senso, potreste cortesemente indicarmi il link? Ho molta difficoltà a capire le istruzioni ... Grazie
03.03.2016 - 15:14DROPS Design answered:
Buongiorno Barbara. Al seguente link trova spiegato come leggere i diagrammi. Le ricordiamo anche che tutti i nostri modelli sono accompagnati da una serie di video che possono aiutarla nella lavorazione del modello. Li trova, cliccando sulla scritta Video, sulla striscia grigia alla destra della fotografia del modello. Ci riscriva se ancora in difficoltà. Buon lavoro!
03.03.2016 - 15:31
![]() Iris wrote:
Iris wrote:
Bonjour, ce boléro est magnifique, j'aimerais beaucoup le réaliser ! Juste une question : "monter 57m y compris 1 m lis de chaque côté" Faut-il comprendre 59m=57+2 ? Merci
06.02.2016 - 11:56DROPS Design answered:
Bonjour Iris, les mailles lisières sont comptées dans le nombre de mailles à monter, vous aurez ainsi 55 m + 1 m lis de chaque côté = 57 m au total. Bon tricot!
08.02.2016 - 11:15
![]() Lisa Ford wrote:
Lisa Ford wrote:
Hi, I'm currently knitting this pattern. I have just finished the first RS row for the sleeve. For the next row should I be continuing in stockinette stitch, so the P4 from the RS become K4 on the wrong side? Thanks, Lisa
28.03.2015 - 18:34DROPS Design answered:
Dear Mrs Ford, the sts in A.5 will be worked P from WS (and K from RS) and the 4 sts purled from RS will be K from WS. Happy knitting!
30.03.2015 - 15:08Sara Benetti wrote:
Buongiorno non capisco come leggere le misure dei maglioni stile norvegese fatti con ferri circolari ... la larghezza 71 vuol dire 71 cm davanti e 71 dietro ossia una circonferenza di 142 oppure 71 finita ? Grazie Sara
27.10.2014 - 20:08DROPS Design answered:
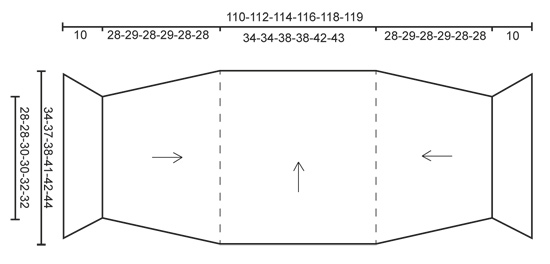
Buongiorno Sara, il modello a cui fa riferimento è un bolero, aperto davanti, quindi lavorato avanti e indietro sui ferri, non in tondo, quindi può essere lavorato anche con i ferri dritti. 71 corrisponde al n° di maglie da avviare per la taglia XXXL, non ai cm. Se scorre la pagina, verso il fondo può trovare lo schema delle misure, per scegliere la taglia corretta. Ci riscriva se qualcosa non è chiaro. Buon lavoro!!
28.10.2014 - 11:24Brita wrote:
Det finns inget framstycke, det ingår i övrigt mönster!
24.08.2014 - 15:18
|
||||||||||||||||
Midnight laces#midnightlacesbolero |
||||||||||||||||
 |
 |
|||||||||||||||
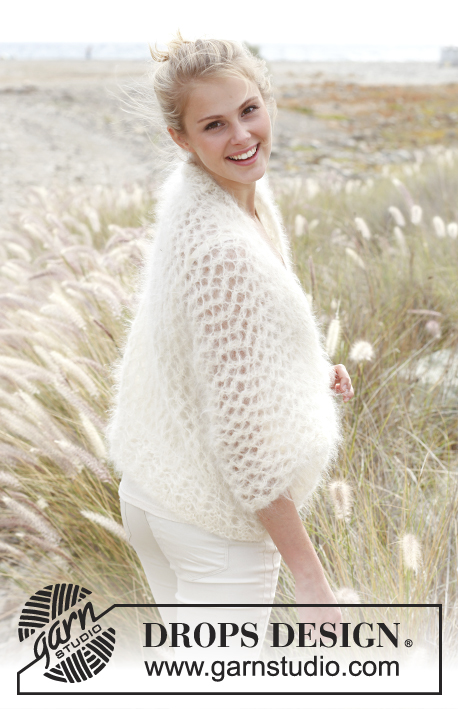
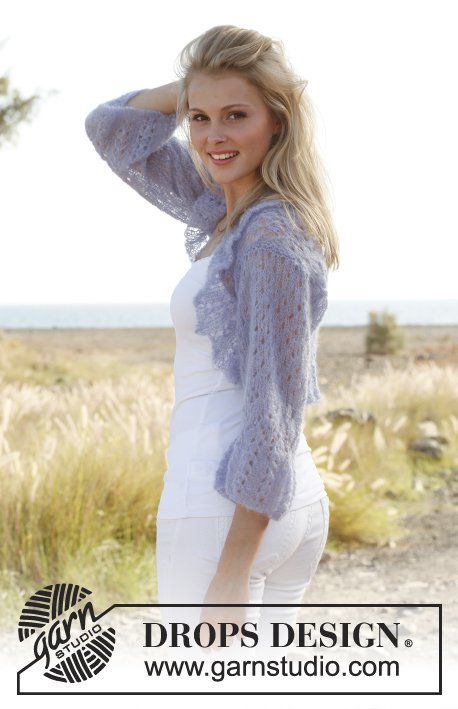
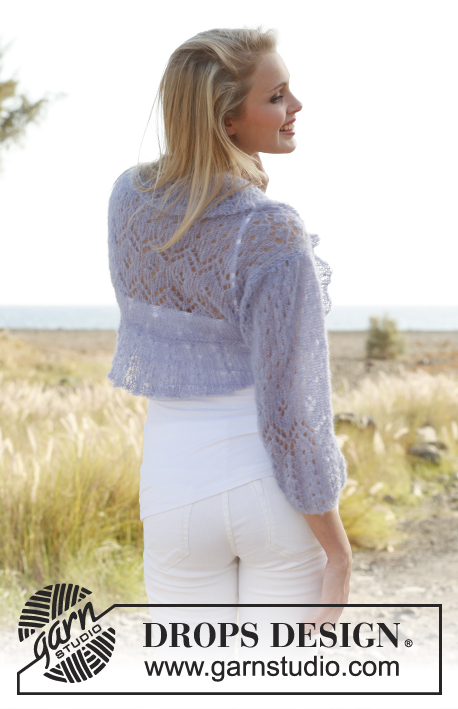
Knitted DROPS bolero with lace pattern in ”Vivaldi”. Size: S - XXXL.
DROPS 148-15 |
||||||||||||||||
|
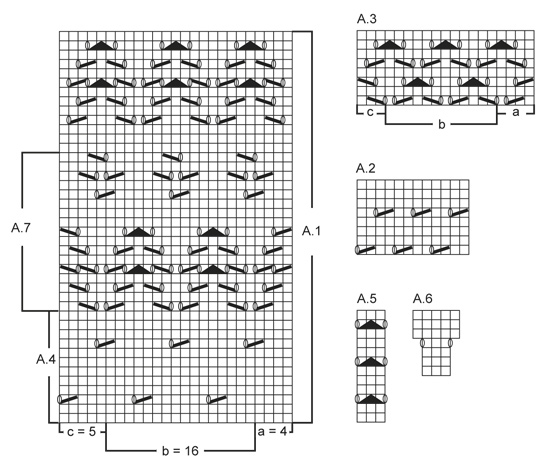
GARTER ST (back and forth on needle): K all rows. 1 ridge = 2 K rows. PATTERN: See diagrams A.1 to A.7. Diagrams show all rows in pattern seen from RS. INCREASE TIP (applies to edge in rib): Inc 1 st by making 1 YO. On next row work YO twisted to avoid holes. ---------------------------------------------------------- BOLERO: The piece is worked in several parts. BACK PIECE: Cast on 57-61-63-63-69-71 sts (includes 1 edge st each side) on 2 circular needles size 5 mm / US 8 with Vivaldi (to avoid a tight cast-on edge). Pull out one circular needle and work 1 ridge in GARTER ST - see explanation above (1st row = RS). Work next row as follows from RS: 1 edge st in garter st, 3-5-2-2-1-2 sts in stockinette st, work A.1a (= 4 sts), repeat A.1b (= 8 sts - diagram shows 2 repetitions) until 9-11-8-8-7-8 sts remain, finish with A.1c (= 5 sts), 3-5-2-2-1-2 sts in stockinette st and 1 edge st in garter st. Continue pattern like this. REMEMBER THE GAUGE! When A.1 has been worked vertically, work 4 rows in stockinette st (work edge st in garter st), then work next row as follows from RS: 1 edge st in garter st, 4-6-1-1-4-5 sts in stockinette st, work pattern according to A.2 (= 12 sts) until 4-6-1-1-4-5 sts remain, finish with 3-5-0-0-3-4 sts in stockinette st and 1 edge st in garter st. Continue pattern like this. When piece measures approx. 24-24-24-25-25-27 cm / 9½"-9½"-9½"-9¾"-9¾"-10½" - make sure that 3 rows in stockinette st have been worked after 1 row with holes, work 2 more rows in stockinette st. Then work next row as follows from RS: 1 edge st in garter st, 3-2-0-0-0-1 st in stockinette st, work A.3a (= 4 sts), repeat A.3b (= 6 sts - diagram shows 2 repetitions) until 7-6-4-4-4-5 sts remain, finish with A.3c (= 3 sts), 3-2-0-0-0-1 st in stockinette st and 1 edge st in garter st. Continue pattern like this until piece measures approx. 34-37-38-41-42-44 cm / 13½"-14½"-15"-16"-16½"-17¼" - make sure that last row in A.3 remains. K 1 row from WS, then very loosely bind off. SLEEVE: Cast on 58-65-65-72-72-79 sts (includes 1 edge st each side) on 2 circular needles size 5 mm / US 8 with Vivaldi (to avoid a tight cast-on edge). Pull out one of the needles and P 1 row from WS. Work next row as follows from RS: 1 edge st in garter st, * A.5 (= 3 sts), P 4 *, repeat from *-* and finish with 1 edge st in garter st. Continue pattern like this. When piece measures 8 cm / 3⅛", dec all 4 P sts to 3 P sts by P tog the first 2 sts in every P-section = 50-56-56-62-62-68 sts. When piece measures 10 cm / 4", P 1 row from WS while AT THE SAME TIME dec 3-9-5-11-9-15 sts evenly = 47-47-51-51-53-53 sts remain on needle. Work next row as follows from RS: 1 edge st in garter st, 2-2-0-0-1-1 st in stockinette st, work A.7a (= 4 sts), repeat A.7b (= 8 sts) until 8-8-6-6-7-7 sts remain, finish with A.7c (= 5 sts), 2-2-0-0-1-1 st in stockinette st and 1 edge st in garter st. Continue pattern like this. When A.7 has been worked vertically, work 5 rows in stockinette st, then work pattern according to A.2 until finished measurements. AT THE SAME TIME when piece measures 12 cm / 4¾", inc 1 st in each side. Repeat inc every 5½-4-4½-3½-3½-3 cm / 2¼"-1½"-1¾"-3¼"-3¼"-1⅛" 4-6-5-7-7-8 more times = 57-61-63-67-69-71 sts - NOTE: Work inc sts in stockinette st until they can be worked in pattern. When piece measures 38-39-38-39-38-38 cm / 15"-15¼"-15"-15¼"-15"-15", K 1 row from WS before very loosely casting/binding off with K from RS. Insert 1 marker at the top in each side on sleeve. Make another sleeve. ASSEMBLY: Sew 1 sleeve in each side on back piece – it is important to sew so that the edge is elastic and nice and even as the seam is both visible and very high up on sleeve (it is important that the garments is agile). Sew in front loop of sts in garter st on back piece and inside cast-off edge on sleeve – see our technique video – assembly – mattress stitches - on our home page. Fold the entire piece double in the middle so that the long sides of bolero is towards each other. Sew sleeve seams inside 1 edge st until markers (or desired length), repeat on the other sleeve. EDGE IN RIB: Pick up from RS approx. 100 to 140 sts around the entire opening of bolero on circular needle size 5 mm / US 8. Then work in the round on circular needle. P 1 round, then K 1 round while AT THE SAME TIME adjusting no of sts to 168-174-180-180-186-186 (divisible by 6). Work next round as follows: * A.5 (= 3 sts), P 3 *, repeat from *-* the entire round. Continue pattern like this. When edge measures 3 cm / 1⅛", inc all 3 P sts to 4 P sts - READ INCREASE TIP = 196-203-210-210-217-217 sts. When edge measures 6-6-7-7-8-8 cm / 2⅜"-2⅜"-2¾"-2¾"-3⅛"-3⅛" – make sure that after 1 round with holes in A.5, A.6 is worked instead of A.5 (P the other sts as before). When A.6 has been worked, there are 252-261-270-270-279-279 sts on needle. Loosely bind off with K over K and P over P. Fasten off. |
||||||||||||||||
Diagram explanations |
||||||||||||||||
|
||||||||||||||||
 |
||||||||||||||||
 |
||||||||||||||||
Have you finished this pattern?Tag your pictures with #dropspattern #midnightlacesbolero or submit them to the #dropsfan gallery. Do you need help with this pattern?You'll find 14 tutorial videos, a Comments/Questions area and more by visiting the pattern on garnstudio.com. © 1982-2026 DROPS Design A/S. We reserve all rights. This document, including all its sub-sections, has copyrights. Read more about what you can do with our patterns at the bottom of each pattern on our site. |
||||||||||||||||


With over 40 years in knitting and crochet design, DROPS Design offers one of the most extensive collections of free patterns on the internet - translated to 17 languages. As of today we count 324 catalogs and 12291 patterns - 12281 of which are translated into English (US/in).
We work hard to bring you the best knitting and crochet have to offer, inspiration and advice as well as great quality yarns at incredible prices! Would you like to use our patterns for other than personal use? You can read what you are allowed to do in the Copyright text at the bottom of all our patterns. Happy crafting!
Post a comment to pattern DROPS 148-15
We would love to hear what you have to say about this pattern!
If you want to leave a question, please make sure you select the correct category in the form below, to speed up the answering process. Required fields are marked *.