
Looking for a yarn?


Comments / Questions (95)
![]() Barbora wrote:
Barbora wrote:
Hi! I Don’t understand how am I supposed to sew the sleeves! I already sewed the sleeves to the back piece but what next ?? It doesn’t seem big enough to go around my armpit, I’m a size XS and I am knitting size M because it’s not for me and it seems way to small. Maybe it will get bigger after blocking but I am not sure
16.07.2024 - 12:03DROPS Design answered:
Dear Barbora, have you checked the measurements in the schematic? A size M armhole diameter/ opening for the sleeve should measure 37 cm. You can measure the opening for the sleeve for your usual garment or that of the the recipient and check if the opening would be enough for them. Remember that, when taking measurements, you need to leave the piece in a flat surface without stretching the piece, so that the measurements are the most correct. After blocking, the piece can be slightly bigger but not such a difference as two more sizes. Happy knitting!
21.07.2024 - 18:06
![]() Heike wrote:
Heike wrote:
Warum werden die Ärmel nicht direkt seitlich angestrickt? Das wäre doch viel sauberer und auch einfacher, anstatt sie anzunähen.
11.01.2022 - 10:34
![]() Chris wrote:
Chris wrote:
J’ai réalisé ce modèle en taille L (cotes exactes) avec 3 pelotes soit 75g et il le reste encore pas mal de fil sur la troisième pelote.
16.06.2020 - 22:11
![]() Thea wrote:
Thea wrote:
Waarom wordt er zo vaak gebruik gemaakt van rondbreinaalden? Als ik het patroon zo lees kan het prima op normale breinaalden
03.03.2017 - 09:19DROPS Design answered:
Hoi Thea. Rondbreinaalden wordt vooral gebruikt in Scandinavië - ook bij heen en weer breien. En dit zijn van oorsprong Noorse patronen. Ook kan je veel meer steken kwijt op een rondbreinaald dan op een rechte naald :) Maar vaak kan je ook heen en weer breien op rechte naalden als je denkt dat je de st kwijt kan.
06.03.2017 - 13:46
![]() Mich42 wrote:
Mich42 wrote:
Bonjour, Pourquoi faut il utiliser des aiguilles circulaires pour réaliser les dos et les manches de ce modèle? Les aiguilles circulaires ne sont elles pas préconisées pour un travail en rond? Merci pour votre réponse.
26.01.2017 - 08:36DROPS Design answered:
Bonjour Mich42, on tricote le dos et les manches en allers et retours sur l'aiguille circulaire (voir vidéo), puis on termine par la bordure, en rond autour de l'ouverture. Bon tricot!
26.01.2017 - 09:42
![]() Marie wrote:
Marie wrote:
Bonjour, Au tout début des manches on doit tricoter sur l'endroit A.5 (= 3 m), 4 m env. Mais il n'est pas dit comment on doit tricoter les 4 m env. sur l'envers. Merci d'avance. Cordialement, Marie
29.09.2016 - 08:46DROPS Design answered:
Bonjour Marie, ces 4 m env sur l'endroit se tricotent à l'end sur l'envers (= jersey env). Bon tricot!
29.09.2016 - 09:17
![]() Marie wrote:
Marie wrote:
Bonjour, En ce qui concerne les manches on parle d'un rang envers sur l'envers après le montage des mailles mais comment devons-nous tricoter le premier rang à l'endroit ? Pour votre info, je tricote avec des aiguilles droites et non circulaires. Merci d'avance. Cordialement, Marie
25.09.2016 - 18:56DROPS Design answered:
Bonjour Marie, pour les manches, le 1er rang (après le montage) se tricote sur l'envers, et le 2ème rang sera fait sur l'endroit. Bon tricot!
26.09.2016 - 10:52
![]() Barbara Martini wrote:
Barbara Martini wrote:
Buonasera, mi è sorto un dubbio, nei SUGGERIMENTO PER GLI AUMENTI (per i bordi a coste), ci sono indicazioni per come lavorare la maglia gettata, ma non capisco se vale solo per il bordo a coste da fare dopo la confezione o se tutte le maglie gettate (anche quelle del dietro e delle maniche) vanno lavorati come il suggerimento. Grazie ancora
16.03.2016 - 23:48DROPS Design answered:
Buongiorno Barbara. Le m che aumenta ai lati delle maniche e Nel bordo a coste vanno lavorate ritorte. Le m gettate dei diagrammi non vanno lavorate ritorte in quanto devono formare i buchi del motivo. Ci riscriva se è ancora in difficoltà. Buon lavoro!
17.03.2016 - 06:42
![]() Barbara Martini wrote:
Barbara Martini wrote:
Buonasera, mi è sorto un dubbio, nei SUGGERIMENTO PER GLI AUMENTI (per i bordi a coste), cinsinonindicazioni per come lavorare la maglia gettata, ma non capisco che vale solo per il bordo a coste da fare dopo la confezione o sè tutte le maglie gettate (anche quelle del dietro e delle maniche) vanno lavorati come il suggerimento. Grazie ancora
16.03.2016 - 23:46DROPS Design answered:
Buongiorno Barbara. Le m che aumenta ai lati delle maniche e nel bordo a coste vanno lavorate ritorte. Le m gettate dei diagrammi non vanno lavorate ritorte in quanto devono formare i buchi del motivo. Ci riscriva se è ancora in difficoltà. Buon lavoro!
17.03.2016 - 06:42
![]() Morgana wrote:
Morgana wrote:
Ancora un dubbio: per il dietro, si inizia con due ferri a diritto, con il 3 ferro si inizia il diagramma A.1 a "maglia rasata", ma il 3 ferro è tutto un diritto o tutto rovescio?
14.03.2016 - 22:00DROPS Design answered:
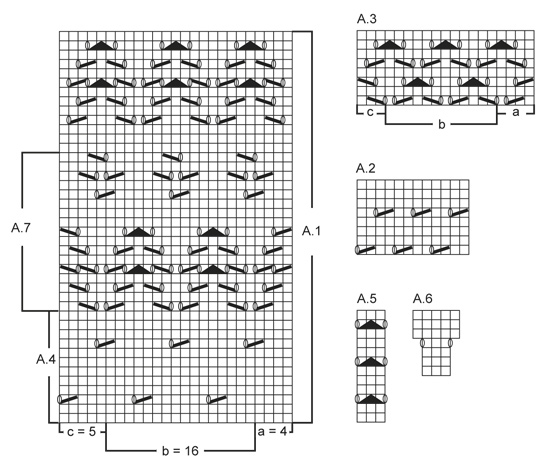
Buonasera Morgana, il 1° ferro del diagramma A.1 è un ferro dal diritto del lavoro, per cui lavorato a diritto. Si ricordi che i diagrammi si leggono dal basso verso l'alto e da destra verso sinistra. Buon lavoro!
14.03.2016 - 22:23
|
||||||||||||||||
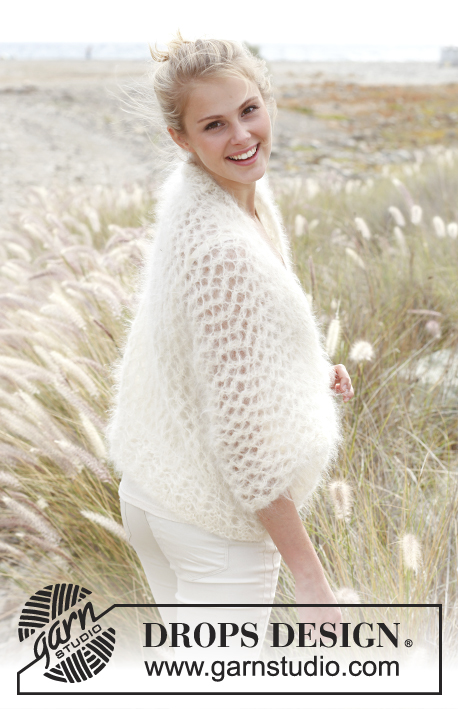
Midnight laces#midnightlacesbolero |
||||||||||||||||
 |
 |
|||||||||||||||
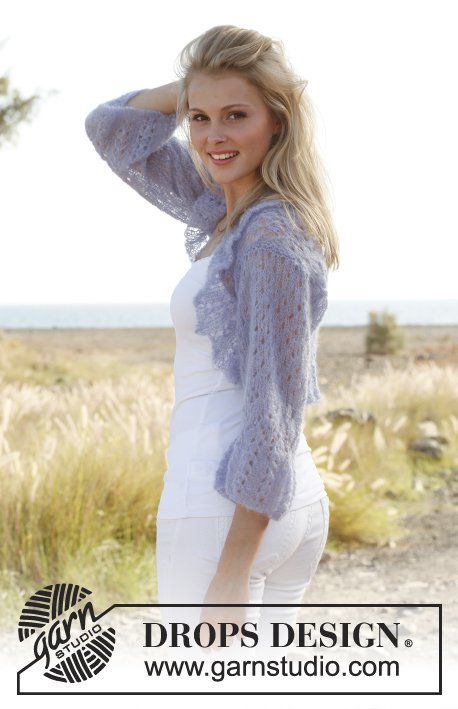
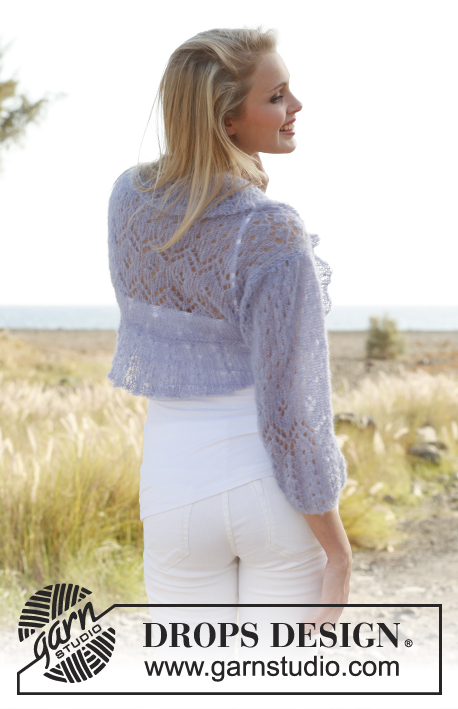
Knitted DROPS bolero with lace pattern in ”Vivaldi”. Size: S - XXXL.
DROPS 148-15 |
||||||||||||||||
|
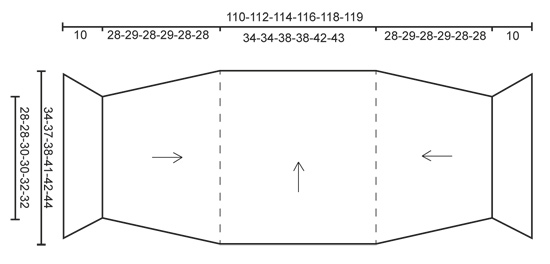
GARTER ST (back and forth on needle): K all rows. 1 ridge = 2 K rows. PATTERN: See diagrams A.1 to A.7. Diagrams show all rows in pattern seen from RS. INCREASE TIP (applies to edge in rib): Inc 1 st by making 1 YO. On next row work YO twisted to avoid holes. ---------------------------------------------------------- BOLERO: The piece is worked in several parts. BACK PIECE: Cast on 57-61-63-63-69-71 sts (includes 1 edge st each side) on 2 circular needles size 5 mm / US 8 with Vivaldi (to avoid a tight cast-on edge). Pull out one circular needle and work 1 ridge in GARTER ST - see explanation above (1st row = RS). Work next row as follows from RS: 1 edge st in garter st, 3-5-2-2-1-2 sts in stockinette st, work A.1a (= 4 sts), repeat A.1b (= 8 sts - diagram shows 2 repetitions) until 9-11-8-8-7-8 sts remain, finish with A.1c (= 5 sts), 3-5-2-2-1-2 sts in stockinette st and 1 edge st in garter st. Continue pattern like this. REMEMBER THE GAUGE! When A.1 has been worked vertically, work 4 rows in stockinette st (work edge st in garter st), then work next row as follows from RS: 1 edge st in garter st, 4-6-1-1-4-5 sts in stockinette st, work pattern according to A.2 (= 12 sts) until 4-6-1-1-4-5 sts remain, finish with 3-5-0-0-3-4 sts in stockinette st and 1 edge st in garter st. Continue pattern like this. When piece measures approx. 24-24-24-25-25-27 cm / 9½"-9½"-9½"-9¾"-9¾"-10½" - make sure that 3 rows in stockinette st have been worked after 1 row with holes, work 2 more rows in stockinette st. Then work next row as follows from RS: 1 edge st in garter st, 3-2-0-0-0-1 st in stockinette st, work A.3a (= 4 sts), repeat A.3b (= 6 sts - diagram shows 2 repetitions) until 7-6-4-4-4-5 sts remain, finish with A.3c (= 3 sts), 3-2-0-0-0-1 st in stockinette st and 1 edge st in garter st. Continue pattern like this until piece measures approx. 34-37-38-41-42-44 cm / 13½"-14½"-15"-16"-16½"-17¼" - make sure that last row in A.3 remains. K 1 row from WS, then very loosely bind off. SLEEVE: Cast on 58-65-65-72-72-79 sts (includes 1 edge st each side) on 2 circular needles size 5 mm / US 8 with Vivaldi (to avoid a tight cast-on edge). Pull out one of the needles and P 1 row from WS. Work next row as follows from RS: 1 edge st in garter st, * A.5 (= 3 sts), P 4 *, repeat from *-* and finish with 1 edge st in garter st. Continue pattern like this. When piece measures 8 cm / 3⅛", dec all 4 P sts to 3 P sts by P tog the first 2 sts in every P-section = 50-56-56-62-62-68 sts. When piece measures 10 cm / 4", P 1 row from WS while AT THE SAME TIME dec 3-9-5-11-9-15 sts evenly = 47-47-51-51-53-53 sts remain on needle. Work next row as follows from RS: 1 edge st in garter st, 2-2-0-0-1-1 st in stockinette st, work A.7a (= 4 sts), repeat A.7b (= 8 sts) until 8-8-6-6-7-7 sts remain, finish with A.7c (= 5 sts), 2-2-0-0-1-1 st in stockinette st and 1 edge st in garter st. Continue pattern like this. When A.7 has been worked vertically, work 5 rows in stockinette st, then work pattern according to A.2 until finished measurements. AT THE SAME TIME when piece measures 12 cm / 4¾", inc 1 st in each side. Repeat inc every 5½-4-4½-3½-3½-3 cm / 2¼"-1½"-1¾"-3¼"-3¼"-1⅛" 4-6-5-7-7-8 more times = 57-61-63-67-69-71 sts - NOTE: Work inc sts in stockinette st until they can be worked in pattern. When piece measures 38-39-38-39-38-38 cm / 15"-15¼"-15"-15¼"-15"-15", K 1 row from WS before very loosely casting/binding off with K from RS. Insert 1 marker at the top in each side on sleeve. Make another sleeve. ASSEMBLY: Sew 1 sleeve in each side on back piece – it is important to sew so that the edge is elastic and nice and even as the seam is both visible and very high up on sleeve (it is important that the garments is agile). Sew in front loop of sts in garter st on back piece and inside cast-off edge on sleeve – see our technique video – assembly – mattress stitches - on our home page. Fold the entire piece double in the middle so that the long sides of bolero is towards each other. Sew sleeve seams inside 1 edge st until markers (or desired length), repeat on the other sleeve. EDGE IN RIB: Pick up from RS approx. 100 to 140 sts around the entire opening of bolero on circular needle size 5 mm / US 8. Then work in the round on circular needle. P 1 round, then K 1 round while AT THE SAME TIME adjusting no of sts to 168-174-180-180-186-186 (divisible by 6). Work next round as follows: * A.5 (= 3 sts), P 3 *, repeat from *-* the entire round. Continue pattern like this. When edge measures 3 cm / 1⅛", inc all 3 P sts to 4 P sts - READ INCREASE TIP = 196-203-210-210-217-217 sts. When edge measures 6-6-7-7-8-8 cm / 2⅜"-2⅜"-2¾"-2¾"-3⅛"-3⅛" – make sure that after 1 round with holes in A.5, A.6 is worked instead of A.5 (P the other sts as before). When A.6 has been worked, there are 252-261-270-270-279-279 sts on needle. Loosely bind off with K over K and P over P. Fasten off. |
||||||||||||||||
Diagram explanations |
||||||||||||||||
|
||||||||||||||||
|
||||||||||||||||
|
||||||||||||||||
Have you finished this pattern?Tag your pictures with #dropspattern #midnightlacesbolero or submit them to the #dropsfan gallery. Do you need help with this pattern?You'll find 15 tutorial videos, a Comments/Questions area and more by visiting the pattern on garnstudio.com. © 1982-2025 DROPS Design A/S. We reserve all rights. This document, including all its sub-sections, has copyrights. Read more about what you can do with our patterns at the bottom of each pattern on our site. |
||||||||||||||||


With over 40 years in knitting and crochet design, DROPS Design offers one of the most extensive collections of free patterns on the internet - translated to 17 languages. As of today we count 314 catalogs and 11822 patterns - 11812 of which are translated into English (US/in).
We work hard to bring you the best knitting and crochet have to offer, inspiration and advice as well as great quality yarns at incredible prices! Would you like to use our patterns for other than personal use? You can read what you are allowed to do in the Copyright text at the bottom of all our patterns. Happy crafting!
Post a comment to pattern DROPS 148-15
We would love to hear what you have to say about this pattern!
If you want to leave a question, please make sure you select the correct category in the form below, to speed up the answering process. Required fields are marked *.