
Popular categories
Looking for a yarn?


Comments / Questions (35)
![]() Le Derf wrote:
Le Derf wrote:
Merci beaucoup pour votre réponse rapide. Pouvez-vous me donner plus de détails car je ne comprends toujours pas ce que je dois faire. D'avance merci. C'est mon premier empiècement jacquard. Excusez-moi de vous solliciter à nouveau.
05.10.2017 - 14:56DROPS Design answered:
Bonjour Mme Le Derf, vous allez tricoter A.1 ainsi: 1 m lis au point mousse, puis vous répétez A.1 en largeur jusqu'à ce qu'il reste 2 mailles, tricotez l'avant-dernière maille de A.1 (pour que le motif soit symétrique) et terminez par 1 maille lisière. Lisez A.1 en commençant en bas à droite et de droite à gauche sur l'endroit, et de gauche à droite sur l'envers (sur l'envers, commencez par 1 m lis au point mousse, la 1ère m de A.1 à droite, puis répétez A.1 en lisant de gauche à droite) et terminez par 1 m lis au point mousse. Bon tricot!
05.10.2017 - 16:10
![]() Le Derf Claudine wrote:
Le Derf Claudine wrote:
Bonjour, J'ai commencé ce joli modèle Sweet Scarborough taille M. J'ai 291 mailles. Je commence le diagramme A1 avec 1 m lisière de ch. côté au point mousse. Je ne comprends pas la suite : tricoter l'avant dernière m. du rang comme la 1ère m. de A-m mais ne pas faire de diminution sur cette maille. Pouvez-vous détailler ? D'avance merci
04.10.2017 - 19:35DROPS Design answered:
Bonjour Mme Le Derf, pour que le motif soit identique de chaque côté, vous tricotez la 1ère maille de A.1, mais sur les rangs de diminutions, tricotez bien 1 m end et pas 2 m ens à l'end, et vous terminez par 1 m lis. Bon tricot!
05.10.2017 - 09:05Diana wrote:
I am having the same problem as Linda brush, as noted in the comment section. I still don't understand what the pattern means. Can you explain in more detail or show in a video?
04.02.2017 - 06:13DROPS Design answered:
Dear Diana, you are working diagram repeating A.1 in width as many times as stated for your size, then finish with the 1st st shown in A.1 to make pattern symetrical on both sides inside the edge sts. When 1st st in A.1 is K2 tog, just work the last st from RS in the main colour of this row. Happy knitting!
06.02.2017 - 09:10
![]() Linda Brush wrote:
Linda Brush wrote:
I do not understand the line in the pattern that states: Continue with diagram A-1 with 1 edge st in each st in each side in garter st, work next to last st on row as first stitch in A-1 but do not decrease in this stitch. Is there another way to explain this please????
06.10.2016 - 20:33DROPS Design answered:
Dear Mrs Brush, you will repeat A.1 in width but to get similar pattern on each side on front piece, work the next to last st from RS (before edge st) as the 1st st in A.1. But when you have to dec work the 1st and 2nd st in A.1 tog, work this st K with the colour shown in diagram, without dec (dec will apply to repeats in width). Happy knitting!
07.10.2016 - 08:26Marit wrote:
Uansett saa er diagrammet feil. Etter en felling saa skal det bli en rute mindre i diagrammet i neste rad. Diagrammet skal illustrere det som skal strikkes i stedet for beskrivelse med ord.
16.03.2016 - 01:15Marit wrote:
Er det ikke en feil i mönsterdiagrammet i alle strörrelse. Etter nest siste felling er det igjen i en mönster-rapport 7 masker. Jeg mener det riktig antall maa bli 6 masker. Slik at en mönster-rapport slutter med 4 masker.
09.03.2016 - 18:55DROPS Design answered:
Hej Marit, Jag ser vad du menar, men m är borta Innan sista fellingen i båda diagrammen. Lycka till!
10.03.2016 - 10:20
![]() Sheila wrote:
Sheila wrote:
Hi. In the pattern I can't see when I should start to follow the diagram. Can you help please? thanks
08.03.2016 - 20:17DROPS Design answered:
Dear Sheila, diagram A.1 is worked on yoke after P1 from WS dec sts evenly + 2 more rows in stocking st. Happy knitting!
09.03.2016 - 08:34
![]() Agustina wrote:
Agustina wrote:
It is a great cardigan, but for size M you need more than 50gr. colour white, I needed 75grs,
23.03.2015 - 10:23
![]() Malin M. Motzfeldt Moen wrote:
Malin M. Motzfeldt Moen wrote:
Vil gjerne høre om noen har strikket denne, var det greit å følge oppskriften, er det noen feil i den? Syns den er flott og har lyst til å strikke den se.
12.06.2013 - 11:06DROPS Design answered:
Hej Malin. Der er ikke rapporteret nogen fejl paa denne populaere model, saa jeg tror du trygt kan begynde. Du kan evt kigge paa Ravelry hvis du vil se projekter fra andre. God fornöjelse.
20.06.2013 - 12:27
![]() Guay wrote:
Guay wrote:
Bonjour, Je suis en train de faire ce modèle en taille XL. Il me semble qu’une erreur au niveau du nombre de maille s’est glissée au niveau de l’empiècement. Vous dites : après insertion mailles bordure manches, vous êtes à 348 mailles ; ensuite, diminution de 9 mailles, vous êtes à 339 mailles.
13.03.2013 - 15:45DROPS Design answered:
Bonjour Madame Guay, 348-9 = 339 m, le nombre de mailles est juste : 1 m lis, 21 fois le diagramme A-1, la 1ère m de A-1 et 1 m lis = 339 m. Bon tricot !
13.03.2013 - 18:16
|
||||||||||||||||
Sweet Scarborough#sweetscarboroughcardigan |
||||||||||||||||
 |
 |
|||||||||||||||
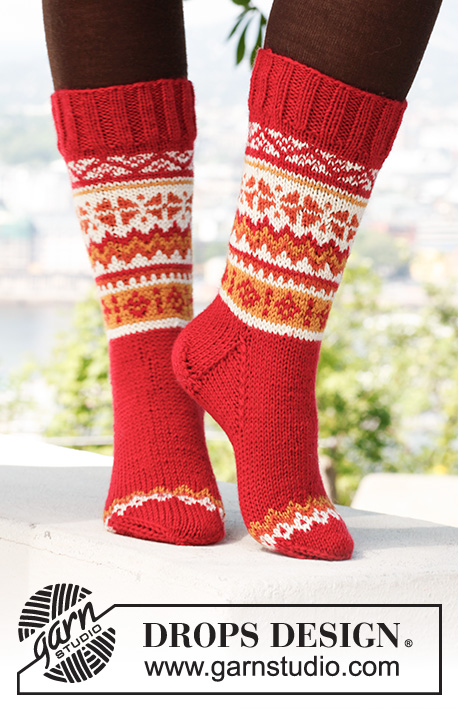
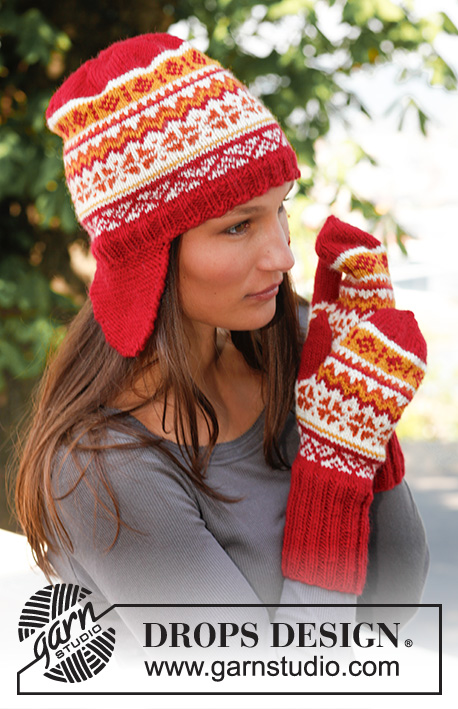
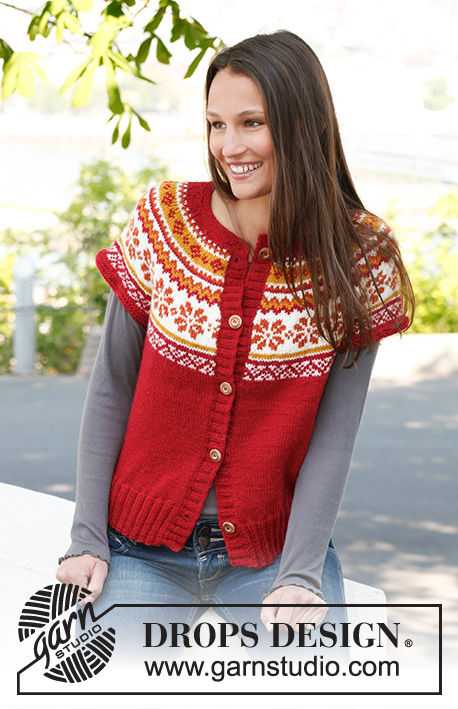
Knitted DROPS vest with round yoke and Norwegian pattern in ”Karisma”.
DROPS 140-10 |
||||||||||||||||
|
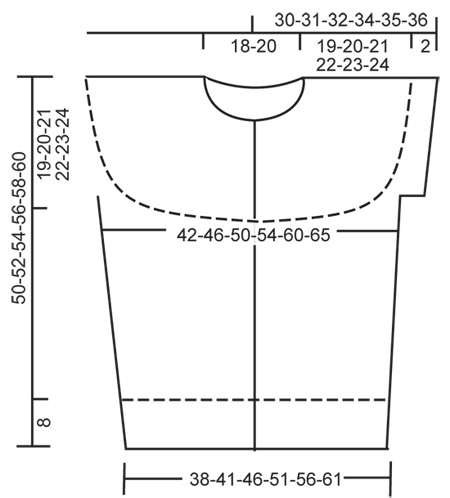
GARTER ST (back and forth on circular needle): K sts on all rows. PATTERN: See diagram A-1. Diagram is worked in stockinette st - 1st row = RS. ---------------------------------------------------------- BODY: Worked back and forth on circular needle from mid front. Cast on 184-200-220-240-268-292 sts on circular needle size 3 mm / US 2.5 with wine red. Work rib as follows (1st row = RS): 1 edge st in GARTER ST - see explanation above - * K 2/P 2 *, repeat from *-* until 3 sts remain, K 2 and 1 edge st in garter st. When piece measures 8 cm / 3⅛", switch to circular needle size 4 mm / US 6, work 1 row in stockinette st while at the same time dec 24-24-28-28-32-36 sts evenly = 160-176-192-212-236-256 sts. Insert 2 markers in the piece; 40-44-48-53-59-64 sts in from each side (= 80-88-96-106-118-128 sts between markers on back piece). Continue in stockinette st with 1 edge st in garter st in each side. REMEMBER THE GAUGE! When piece measures 10 cm / 4" in total, inc 1 st on each side of markers in the sides. Repeat inc every 5 cm / 2" 3 more times = 176-192-208-228-252-272 sts. When piece measures 31-32-33-34-35-36 cm / 12¼"-12½"-13"-13⅜"-13¾"-14¼", work next row as follows from RS: 39-43-47-52-58-63 sts (= right front piece), bind off 10 sts for armhole, work 78-86-94-104-116-126 sts (= back piece), bind off 10 sts for armhole, work the rest of row (= 39-43-47-52-58-63 sts on left front piece), do not cut the thread. Put piece aside and knit the sleeve edges. SLEEVE EDGE: Worked back and forth on circular needle size 3 mm / US 2.5. Cast on 70-72-76-80-84-88 sts with wine red. K 5 rows (1st row = WS), work next row as follows: bind off the first 5 sts, work 60-62-66-70-74-78 sts and bind off the last 5 sts, cut the thread. Put piece aside and knit another sleeve edge. YOKE: Slip sleeve edges on to same circular needle size 4 mm / US 6 as body = 276-296-320-348-380-408 sts (do not work them when slipping them on to needle). P 1 row from WS while at the same time dec 1-5-13-9-9-5 sts evenly = 275-291-307-339-371-403 sts. Work 0-2-4-0-2-4 more rows with wine red in stockinette st. Continue with diagram A-1 (see diagram for your size) with 1 edge st in each side in garter st, work next to last st on row as first st in A-1 but do not dec in this st. After all dec there are 88-93-98-108-118-128 sts on needle and piece measures approx. 50-52-54-56-58-60 cm / 19¾"-20½"-21¼"-22"-22¾"-23⅝" up to shoulder. Then work an elevation in the back of neck with wine red as follows (1st row = RS): K 51-54-56-61-66-71 sts, turn, P 14-15-14-14-14-14 sts, turn, K 21-22-21-21-21-21 sts, turn, P 28-29-28-28-28-28 sts, continue like this by working 7 sts more on every turn until a total of 70-71-70-84-84-84 sts have been worked, turn and work the rest of row, cut the thread. Put sts on a holder, neck edge is worked after the front bands are finished. LEFT BAND: Pick up approx. 105-125 sts inside 1 edge st along left front on circular needle size 3 mm / US 2.5 with wine red. K 1 row from WS, then K 1 row from RS while inc no of sts evenly to 128-132-136-140-144-148 sts. Work rib as follows (1st row = WS): 1 edge st in garter st, * P 2/K 2 *, repeat from *-* and finish with P 2 and 1 edge st in garter st. Continue with K over K and P over P until rib measures 3 cm / 1⅛", loosely bind off. RIGHT BAND: Work as left band but after 1 cm / ⅜", bind off for 5-5-6-6-6-6 buttonholes evenly (buttonholes are bind off in P-sections seen from RS). 1 BUTTONHOLE = P 2 tog and make 1 YO – top buttonhole should be in the first P-section from the top and bottom hole approx. 5-6 cm / 2"-2⅜" from bottom edge. NECK EDGE: The neck edge is worked with wine red on circular needle size 3 mm / US 2.5 as follows: Pick up 6 sts over right band (inside 1 edge st), work the 88-93-98-108-118-128 sts from stitch holder around the neck on to needle and pick up 6 sts over left band = 100-105-110-120-130-140 sts. K 1 row from WS while at the same time dec evenly to 90-94-98-102-106-110 sts. Continue with K 4 rows back and forth, then bind off. ASSEMBLY: Sew sleeve edges tog edge to edge in front loop of outermost sts. Sew tog the openings under the sleeves and sew on buttons. |
||||||||||||||||
Diagram explanations |
||||||||||||||||
|
||||||||||||||||
 |
||||||||||||||||
 |
||||||||||||||||
Have you finished this pattern?Tag your pictures with #dropspattern #sweetscarboroughcardigan or submit them to the #dropsfan gallery. Do you need help with this pattern?You'll find 13 tutorial videos, a Comments/Questions area and more by visiting the pattern on garnstudio.com. © 1982-2026 DROPS Design A/S. We reserve all rights. This document, including all its sub-sections, has copyrights. Read more about what you can do with our patterns at the bottom of each pattern on our site. |
||||||||||||||||


With over 40 years in knitting and crochet design, DROPS Design offers one of the most extensive collections of free patterns on the internet - translated to 17 languages. As of today we count 325 catalogs and 12298 patterns - 12288 of which are translated into English (US/in).
We work hard to bring you the best knitting and crochet have to offer, inspiration and advice as well as great quality yarns at incredible prices! Would you like to use our patterns for other than personal use? You can read what you are allowed to do in the Copyright text at the bottom of all our patterns. Happy crafting!
Post a comment to pattern DROPS 140-10
We would love to hear what you have to say about this pattern!
If you want to leave a question, please make sure you select the correct category in the form below, to speed up the answering process. Required fields are marked *.