
Popular categories
Looking for a yarn?


Comments / Questions (152)
![]() Elin wrote:
Elin wrote:
Jeg har kommet til M.1 på høyre arm, og har felt på pinne nr9. Strikker str L. Så står det at jeg skal felle på hver 3.pinne. Men hvordan beregner jeg da mønsteret? Da må jeg vel telle meg frem for å få rapportene til å passe?
28.11.2012 - 14:49DROPS Design answered:
Du har rett som du skriver, når du feller videre må du tilpasse mønsteret. Strikk de maskene i mønsteret du får plass til selv om de ikke blir komplette på alle pinnen. Ellers kan du også strikke de maskene som du ser kommer til å komme midt i en felling i glattstrikk. Lykk til videre med prosjektet ditt:)
28.11.2012 - 14:57
![]() Monica wrote:
Monica wrote:
Buongiorno, sto lavorando il bolero. Purtroppo non capisco la descrizione del diagramma M.4B. Sono indicati i ferri di andata o anche quelli di ritorno? Se al diritto questo simbolo "\" lo lavoro un'accavallata semplice trovo sempre un gettato da fare (per ritornare al giusto numero di maglie), sul rovescio del lavoro due maglie a rovescio insieme: riduco una maglia...possibile?
04.11.2012 - 13:48DROPS Design answered:
Chiedo scusa per la risposta solo ora. Ci è sfuggito :-( Nel diagramma vedi sia i ferri di andata (dir) e di ritorno (rov). M.4B 1°riga(=dir del lavoro): 2 m rov, 2 m ins a dir, 1 m gett tra l'ultima m e la successiva, 2 m dir, 2 m rov. 2° riga: 2 m dir, 2 m ins a rov, 1 gett tra 2 m, 2 rov, 2 dir. Non aumenti e diminuisci mai! E' chiaro ?
21.11.2012 - 15:31
![]() Majsan wrote:
Majsan wrote:
Cansar på att få ett rätt svar på frågan som Rebecka ställde. Hålmönstret är inga problem men hur ska jag minska i början av varv 13 när rapporten börjar med ett omslag och 2 m tillsammans? Och mönsterrapporten på 8 m på M.1 kan ju inte fortsätta vara 8m när minskningarna görs? Redan efter första minsningen stämmer ju inte 1 kantmaska i var sida och mönster M.1 på 8m.
22.10.2012 - 09:34DROPS Design answered:
När du minskar i M.1 fortsätter du utan omslag och intagning. Sedan stickar du bara varv 1-8 enligt beskrvningen.
15.11.2012 - 16:08
![]() Sandra wrote:
Sandra wrote:
Hallo, ich verstehe das Ende des Rückenteils nicht so ganz: "Mit dem Muster so weiterstricken, bis die Arbeit ca. 35cm misst - nach einem ganzen Rapport M4A abschließen". Heißt das, dass ich nach diesen 35cm Muster noch mal über die gesamte Breite nur M4A stricken soll? Das passt aber dann doch nicht mit der Maschenanzahl, da (bei L) 96 Maschen vorhanden sind, das Muster inkl. der Randmaschen aber nur auf 95 Maschen kommt... Über einen kleinen Tipp würde ich mich freuen :) Danke
14.09.2012 - 18:43DROPS Design answered:
Hallo, M4A soll in der Höhe komplett gestrickt werden (in der Kombination mit M4B gestrickt, siehe Anleitung), auch wenn das Strickstück dann evtl. 35,5 cm misst. Also nicht nach 35 cm einfach aufhören, auch wenn der Rapport in der Höhe noch nicht fertig ist. Wir orientieren uns an M4A, da der M4B Rapport viel kleiner ist.
17.09.2012 - 09:57
![]() Tina wrote:
Tina wrote:
Hej, Hittar inte någon video som visar hålmönster som ni referenar till nedan. Har också problem med M.4B!!!!
06.08.2012 - 12:17
![]() Sofia wrote:
Sofia wrote:
Har sådana problem med M4B och håller på attbli galen. Finns det någon instruktionsvideo hur jag gör?
06.08.2012 - 10:33
![]() Gabi wrote:
Gabi wrote:
Das Stricken war nicht so schwer, aber das mit dem Häkeln bekomme ich nicht hin, Bei mir werden das Bögen die nach unten hin weiter werden. Wie sticht man in die Maschen bei der Maschengruppe? In dem LM Bogen habe ich doch nur 2 Maschen steche ich da hinein? oder nutze ich den Bogen als solches? Wenn ich die 3te Runde wiederhole wird der Bogen immer größer :-( Gibt es eine alternatives Strickbündchen das ähnlich aussieht?
20.07.2012 - 17:13DROPS Design answered:
Bis 6 cm wird *2 Stb - 2 Lm - 2 Stb* gehäkelt, dann 3 Stb - 2 Lm - 3 Stb*. Das wird dann weiter und man braucht die Weite auch, da der Umfang grösser wird. Die Bögen weren aber nicht ständig weiter, sondern nur nach 6 cm. Am besten stechen Sie um den Lm Bogen (in das Loch unter den Lm).
09.08.2012 - 13:41
![]() Jacquemin wrote:
Jacquemin wrote:
Bonjour je suis sur le bolero et je ne comprend pas trés bien j'ai monté mes 80 mailles et j'ai fais les 3 fois M4A M4B on me dit aprés de refaire 1 fois M4A je ne comprend pas car le motif ne va pas jusqu'au bout car 6*13 =78 mais comme je dois mettre 2 point mousse a chaque extrémité il me manque 2 mailles idem pour la suite avec le point fantaisie Pouvez vous me l'expliquer Merci
29.06.2012 - 18:21DROPS Design answered:
Bonjour Jacquemin, vous tricotez ainsi : (M4A = 13 m + M4B = 8 m) = 21 m x 3 fois + 1 fois 13 m de M4A + 2 m au point mousse de chaque côté = 80 m. Bon tricot !
02.07.2012 - 10:22
![]() Rebecca Djurbäck wrote:
Rebecca Djurbäck wrote:
Hej igen! Jag var nog inte tydlig nog. Jag undrar hur jag ska lyckas med minskningen på M1 då det i början (där minskningen ska göras) på mönstret ska göras ett omslag för att sen två räta tillsammans (eller de två sista rm i M1 ska stickas tillsammans). Vilka fler rader i M1 ska det ske minskningar på förutom rad 9?
19.06.2012 - 19:25DROPS Design answered:
Hej igen, vi har intstruktionsvideos som visar hur man stickar hålmönster. Titta gärna där. Lycka till!
20.06.2012 - 14:31
![]() Pigny wrote:
Pigny wrote:
Bonjour.j ai commence ce modele et je ne comprends pas comment faire la manche droite.faire m2 e n hauteur faire comme le diagramme pouvez vous m aidez je ne comprends pas merci
19.06.2012 - 16:30DROPS Design answered:
Bonjour Pigny. Dans les diagrammes, 1 case = 1 m x 1 rang et la légende de symboles se trouve juste au-dessus des diagrammes. Pour tricoter M2 sur la manche droite, vous tricotez les 14 rangs de M2 sur toutes les mailles. Bon tricot !
19.06.2012 - 18:55
|
||||||||||||||||||||||
Akropolis#akropolisbolero |
||||||||||||||||||||||
 |
 |
|||||||||||||||||||||
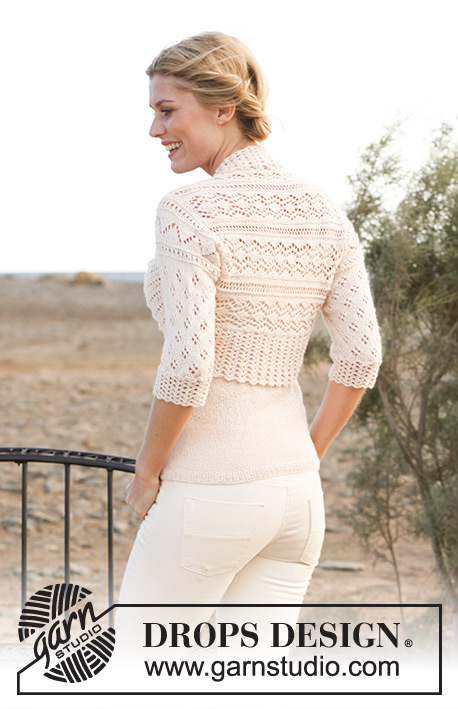
Knitted DROPS bolero with crochet edge in ”BabyAlpaca Silk”. Size: S - XXXL.
DROPS 139-5 |
||||||||||||||||||||||
|
TEMPORARY CAST ON EDGE: Crochet a row with ch - unravel this row afterwards to get the cast on sts on needle again. Cut the yarn - do not fasten. Use a new strand to pick up sts in ch-row. GARTER ST (back and forth on needle): K all rows. PATTERN: See diagrams M.1 to M.4B. The diagrams show the pattern from RS. DECREASE TIP: Dec 1 st in each side as follows: 1 edge st in garter st, work the next 2 sts tog, work until 3 sts remain on needle, work the next 2 sts tog, 1 edge st in garter st. Make sure that pattern in M.1 is correct when dec, adjust when there are fewer sts, i.e. sometimes there is no room to work pattern at beg and end of row. Make sure that pattern in the rest of diagram is correctly above each other as before. DC-GROUPS: 1 dc-group = 2 dc, ch 2, 2 dc in same ch-space. Replace 1st dc on round with ch 3, then work 1 dc-group in every ch-space, finish with 1 sl st in 3rd ch from beg of round, work sl st until next ch-space to beg next round. ---------------------------------------------------------- BOLERO: Worked back and forth on needle. Worked sideways, first from left shoulder to the bottom of right sleeve, and then from cast on edge to bottom of left sleeve. BACK PIECE: Crochet a TEMPORARY CAST ON EDGE - Read explanation above - with BabyAlpaca Silk on hook size 3.5 mm/E/4 as follows: Loosely ch 80-96-101, then use a new strand and needle size 3.5 mm / US 4 to pick up 1 st in every ch on ch-row = 80-96-101 sts (1st row = RS). Work next row from WS as follows: 2 edge sts in garter st, P until 2 sts remain and finish with 2 edge sts in garter st. REMEMBER THE GAUGE! SIZE S/M and XXL/XXXL: = 80-101 sts. On next row from RS work as follows: 2 edge sts in garter st, * diagram M.4A, diagram M.4B *, repeat from *-* a total of 3-4 times, then diagram M.4A 1 more time, finish with 2 edge sts in garter st. Continue in pattern with 2 sts in garter st in each side until piece measures approx. 32-39 cm / 12½"-15 ¼"" - finish after a full repeat of diagram M.4A - AT THE SAME TIME inc 0-1 st on last row = 80-102 sts. SIZE L/XL: = 96 sts. On next row from RS work as follows: 2 edge sts in garter st, * diagram M.4B, diagram M.4A *, repeat from *-* a total of 4 times, then diagram M.4B 1 more time, finish with 2 edge sts in garter st. Continue in pattern with 2 sts in garter st in each side until piece measures approx. 35 cm / 13 ¾", finish after a full repeat of diagram M.4A. RIGHT SLEEVE: = 80-96-102 sts. Then work diagram M.2 1 time vertically with 2 sts in garter st in each side - AT THE SAME TIME on last row in diagram M.2 adjust no of sts to 84-94-104. Then work diagram M.3 (= 8-9-10 repetitions of diagram M.3 with 2 sts in garter st in each side), and then diagram M.2 1 time vertically with 2 sts in garter st in each side. NOTE: On last row in the second repetition of diagram M.2 adjust no of sts to 82-98-106 (= 10-12-13 repetitions of diagram M.1 with 1 st in garter st in each side). Insert a marker in each side of piece (sleeve seam ends here). Then work diagram M.1 with 1 st in garter st in each side. When diagram M.1 has been worked 8 rows vertically, dec on next row (= 9th row in diagram M.1) 1 st inside 1 edge st in each side - Read DECREASE TIP above. Repeat dec on every 6th-3rd-3rd row a total of 8-16-16 times = 66-66-74 sts (= 8-8-9 repetitions of diagram M.1 with 1 st in garter st in each side). Work M.1 3 times vertically and then work rows 1-8 in M.1 1 more time (= 56 rows M.1 in total). Then work 2 rows in stockinette st before loosely casting/binding off all sts (piece measures approx. 61-64-68 cm / 24"-25¼"-26¾"" from cast on edge). LEFT SLEEVE: Worked back and forth on needle size 3.5 mm / US 4. Worked from left shoulder to the bottom of left sleeve. Unravel the ch-row on the temporary cast on edge and slip cast on sts back on needle = 80-96-101 sts. Then work diagram M.2, beg on 3rd row (instead of 1st row) in pattern - AT THE SAME TIME inc 0-0-1 st on same row = 80-96-102 sts. Then work as on right sleeve. ASSEMBLY: Fold the piece double so that the longest sides of the bolero (markers on each sleeve) are place towards each other. Sew the sleeve seams inside 1 edge st as follows: Beg at the bottom of sleeve, sew towards mid front until markers (or desired length), repeat on the other sleeve. CROCHET EDGE: Crochet from RS on hook size 3.5 mm/E/4 with BabyAlpaca Silk as follows: ROUND 1: Beg mid under one sleeve, crochet along the opening between the sleeves (approx. 15 sc on 5 cm / 2", or approx. 10 sc on every repetition of diagram M.4A, no of sts must be divisible by 5), finish round with 1 sl st in 1st sc. NOTE: Make sure to work enough sc to avoid a tight edge. ROUND 2: ch 1, in 1st sc work ch 3, 1 dc, ch 2 and 2 dc, * skip the next 4 sc, in next sc work 2 dc, ch 2 and 2 dc *, repeat from *-* the entire round, finish with 1 sl st in 3rd ch from beg of round. ROUND 3: Read DC-GROUPS above! In every ch-space on round work 1 dc-group. Repeat 3RD ROUND until edge measures approx. 6 cm / 2 ⅜". On next round work in every ch-space as follows: 3 dc, ch 2, 3 dc. Repeat this round until edge measures approx. 10-11-12 cm / 4"-4½"-4 ¾", fasten off. CROCHET EDGE - SLEEVE: Crochet an edge from RS at the bottom of sleeve on hook size 3.5 mm/E/4 with BabyAlpaca Silk as follows: ROUND 1: Beg mid under sleeve, work approx. 15 sc on 5 cm / 2" (no of sts must be divisible by 5), finish round with 1 sl st in 1st sc. NOTE: Make sure to work enough sc to avoid a tight edge. Then work ROUNDS 2 and 3 as on the bolero edge, repeat 3RD ROUND for approx. 6-7-8 cm / 2 ⅜"-2¾"-3 1/8, fasten off. Repeat on the edge of the other sleeve. |
||||||||||||||||||||||
Diagram explanations |
||||||||||||||||||||||
|
||||||||||||||||||||||
 |
||||||||||||||||||||||
 |
||||||||||||||||||||||
Have you finished this pattern?Tag your pictures with #dropspattern #akropolisbolero or submit them to the #dropsfan gallery. Do you need help with this pattern?You'll find 12 tutorial videos, a Comments/Questions area and more by visiting the pattern on garnstudio.com. © 1982-2026 DROPS Design A/S. We reserve all rights. This document, including all its sub-sections, has copyrights. Read more about what you can do with our patterns at the bottom of each pattern on our site. |
||||||||||||||||||||||


With over 40 years in knitting and crochet design, DROPS Design offers one of the most extensive collections of free patterns on the internet - translated to 17 languages. As of today we count 324 catalogs and 12290 patterns - 12280 of which are translated into English (US/in).
We work hard to bring you the best knitting and crochet have to offer, inspiration and advice as well as great quality yarns at incredible prices! Would you like to use our patterns for other than personal use? You can read what you are allowed to do in the Copyright text at the bottom of all our patterns. Happy crafting!
Post a comment to pattern DROPS 139-5
We would love to hear what you have to say about this pattern!
If you want to leave a question, please make sure you select the correct category in the form below, to speed up the answering process. Required fields are marked *.