
Popular categories
Looking for a yarn?


Comments / Questions (152)
![]() Ingrid wrote:
Ingrid wrote:
Bij het minderen in de mouw staat beschreven minder in 9e, 6e, 3e, 3e naald hetgeen een vermindering van 8 steken betekent. Ik houd dus 74 (82 - 8) over en niet de 66 die beschreven staan voor een maat S/M. Kan iemand me hiermee helpen?
02.05.2016 - 09:36DROPS Design answered:
Hoi Ingrid. Er staat in het patroon: Herhaal dit minderen elke 6e nld in totaal 8 keer. Je mindert aan iedere kant = 2 st minder per keer = 16 st = 66 st over.
10.05.2016 - 15:57
![]() Byn wrote:
Byn wrote:
Tusen tack! Då var det som jag antog men jag får lov att öva på att sticka snyggt! =0)
25.02.2016 - 18:43
![]() Nyn wrote:
Nyn wrote:
Hej! Tack, jag förstår hur varje enskilt diagram ska läsas. Frågan gäller hur dessa, dvs *M4.A, M.4B* som ska upprepas 3 ggr och sedan M4.A en gång till, ska kombineras när du har 80 maskor på Stickan. Video är bra men jag skulle verkligen uppskatta om ni kunde svara på frågan jag ställde! Tack så mycket!
24.02.2016 - 18:17DROPS Design answered:
Du stickar 2 kantm, M.4A(13m)+M.4B(8m) = 21m x 3 = 63m, sedan M.4A (13m), 2 kantm. 2+21+21+21+13+2 = 80 m.
25.02.2016 - 16:00
![]() Kelly wrote:
Kelly wrote:
Kan ik deze bolero ook met lange mouwen maken?
31.01.2016 - 23:55DROPS Design answered:
Hoi Kelly. Ja, dat lijkt me goed mogelijk. Ik zou dan het gedeelte met patroon M.1 langer breien.
01.02.2016 - 15:40Kristina Holmberg wrote:
Hej! Jag har nu stickat de första 35 cm på boleron och undrar... När ni skriver att jag ska göra en hel rapport M4A, hur menar ni då? Ska jag fortsätta med kantmaskorna och sedan endast sticka M4A resten av varven eller vaddå? Tacksam för svar! Kristina
20.12.2015 - 15:49DROPS Design answered:
Hej Kristina, Du stickar M.4A&B enligt mönstret, men du ser till att avsluta efter en hel rapport av M.4A i höjden. Lycka till!
25.01.2016 - 13:49
![]() Anke Schindler wrote:
Anke Schindler wrote:
Ich möchte Model Nr. 139-5 arbeiten. In den Strickmustern ist leider micjt angegeben, ob das Hin- und Rückreihe angezeigt sind oder nur Hinreihen. Mir scheint das unterschiedlich zu sein. Ich bitte um schnelle Rückmeldung. Danke
24.03.2015 - 18:54DROPS Design answered:
Liebe Anke, in den allermeisten unserer Diagramme sind alle R angegeben, also Hin- und Rück-R. So auch bei diesen Mustern. In M.4B wird in allen R gemustert, d.h Umschläge und Zusammenstricken werden sowohl in Hin- als auch in Rück-R gemacht. Sie lesen die Diagramme wie gewohnt, also die Hin-R von rechts nach links und die Rück-R von links nach rechts. Gutes Gelingen!
25.03.2015 - 11:35
![]() Signe Sporring wrote:
Signe Sporring wrote:
Jeg har netop bestilt garn her til. det til taler mig at den er i to dele og den er rigtig smuk bag fra. Den er stikket i let og blødt garn. Jeg glæder mig. Jeg har bestil den i grå/blå farve.
10.10.2014 - 13:15
![]() Annonymous wrote:
Annonymous wrote:
Hallo! Ich häkle nicht sehr oft und bin deshalb etwas verunsichert. Nachdem ich für den gestrickten Teil eine Nadel 4,0 genommen habe (hat mich nicht gewundert, ich brauche immer eine etwas dickere Nadel als angegeben), habe ich die Häkelmaschenprobe jetzt mit einer 2,0-Nadel gemacht. Kann das stimmen?
12.08.2014 - 09:01DROPS Design answered:
Ja, es kann durchaus sein, dass Sie mit einer anderen Festigkeit häkeln als stricken. Wenn Sie sehr locker häkeln, kann es sein, dass Sie eine sehr kleine Nadel benötigen. Zur Sicherheit häkeln Sie einfach am besten die Probe noch mal und vergewissern sich, dass 6 Stäbchengruppen (= 2 Stb, 2 Lm und 2 Stb) 10 cm in der Breite ergeben. Veranschlagen Sie für die Probe am besten eine Breite von ca. 20 cm, um das wirklich richtig abmessen zu können.
12.08.2014 - 09:13
![]() Lucie wrote:
Lucie wrote:
Dobrý den, ráda bych věděla, jak se tady u toho vzoru pletou rubové řady?
06.06.2014 - 23:22DROPS Design answered:
Dobrý den, Lucie, schéma je zakresleno tak, jak oka vypadají při pohledu na lícovou stranu pleteniny. Pokud je tedy v rubové řadě zakreslen bílý čtvereček = hladké oko, musíme je v rubu plést obrace - ve vysvětlivkách je u jednotlivých značek uvedeno, jak postupovat v rubu. Hodně zdaru! Hana
13.06.2014 - 20:40
![]() Maartje Boschma wrote:
Maartje Boschma wrote:
Hallo, Is het ook mogelijk om deze bolero te maken met de drops lace uni color garens? en wordt hij dan ook net iets fijner van uiterlijk? Ik wil deze bolero waarschijnlijk aan op een mooie chique jurkje voor een bruiloft, maar wil weten of hij dan ook net iets fijner van uiterlijk wordt, want te grof staat niet mooi op zo'n jurkje.
15.05.2014 - 17:33DROPS Design answered:
Hoi Maartje. Je zou het kunnen proberen. DROPS Lace is fijner dan BabyAlpaca Silk en geeft dus een veel fijner en lichte structuur. Maar brei eerst een proeflapje en zorg ervoor dat je stekenverhouding is correct. Veel breiplezier.
16.05.2014 - 13:48
|
||||||||||||||||||||||
Akropolis#akropolisbolero |
||||||||||||||||||||||
 |
 |
|||||||||||||||||||||
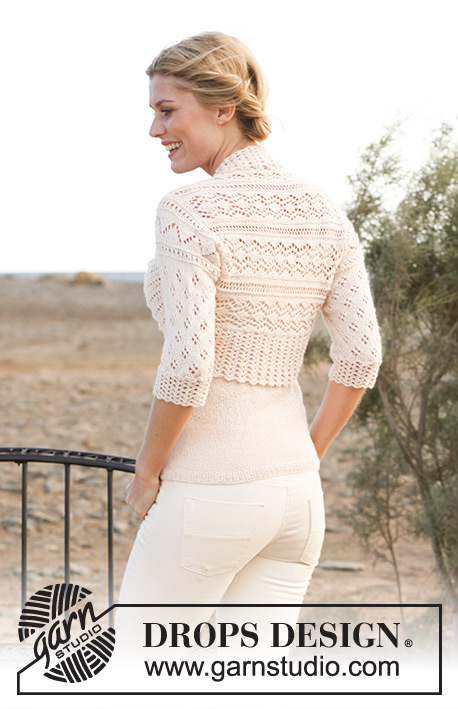
Knitted DROPS bolero with crochet edge in ”BabyAlpaca Silk”. Size: S - XXXL.
DROPS 139-5 |
||||||||||||||||||||||
|
TEMPORARY CAST ON EDGE: Crochet a row with ch - unravel this row afterwards to get the cast on sts on needle again. Cut the yarn - do not fasten. Use a new strand to pick up sts in ch-row. GARTER ST (back and forth on needle): K all rows. PATTERN: See diagrams M.1 to M.4B. The diagrams show the pattern from RS. DECREASE TIP: Dec 1 st in each side as follows: 1 edge st in garter st, work the next 2 sts tog, work until 3 sts remain on needle, work the next 2 sts tog, 1 edge st in garter st. Make sure that pattern in M.1 is correct when dec, adjust when there are fewer sts, i.e. sometimes there is no room to work pattern at beg and end of row. Make sure that pattern in the rest of diagram is correctly above each other as before. DC-GROUPS: 1 dc-group = 2 dc, ch 2, 2 dc in same ch-space. Replace 1st dc on round with ch 3, then work 1 dc-group in every ch-space, finish with 1 sl st in 3rd ch from beg of round, work sl st until next ch-space to beg next round. ---------------------------------------------------------- BOLERO: Worked back and forth on needle. Worked sideways, first from left shoulder to the bottom of right sleeve, and then from cast on edge to bottom of left sleeve. BACK PIECE: Crochet a TEMPORARY CAST ON EDGE - Read explanation above - with BabyAlpaca Silk on hook size 3.5 mm/E/4 as follows: Loosely ch 80-96-101, then use a new strand and needle size 3.5 mm / US 4 to pick up 1 st in every ch on ch-row = 80-96-101 sts (1st row = RS). Work next row from WS as follows: 2 edge sts in garter st, P until 2 sts remain and finish with 2 edge sts in garter st. REMEMBER THE GAUGE! SIZE S/M and XXL/XXXL: = 80-101 sts. On next row from RS work as follows: 2 edge sts in garter st, * diagram M.4A, diagram M.4B *, repeat from *-* a total of 3-4 times, then diagram M.4A 1 more time, finish with 2 edge sts in garter st. Continue in pattern with 2 sts in garter st in each side until piece measures approx. 32-39 cm / 12½"-15 ¼"" - finish after a full repeat of diagram M.4A - AT THE SAME TIME inc 0-1 st on last row = 80-102 sts. SIZE L/XL: = 96 sts. On next row from RS work as follows: 2 edge sts in garter st, * diagram M.4B, diagram M.4A *, repeat from *-* a total of 4 times, then diagram M.4B 1 more time, finish with 2 edge sts in garter st. Continue in pattern with 2 sts in garter st in each side until piece measures approx. 35 cm / 13 ¾", finish after a full repeat of diagram M.4A. RIGHT SLEEVE: = 80-96-102 sts. Then work diagram M.2 1 time vertically with 2 sts in garter st in each side - AT THE SAME TIME on last row in diagram M.2 adjust no of sts to 84-94-104. Then work diagram M.3 (= 8-9-10 repetitions of diagram M.3 with 2 sts in garter st in each side), and then diagram M.2 1 time vertically with 2 sts in garter st in each side. NOTE: On last row in the second repetition of diagram M.2 adjust no of sts to 82-98-106 (= 10-12-13 repetitions of diagram M.1 with 1 st in garter st in each side). Insert a marker in each side of piece (sleeve seam ends here). Then work diagram M.1 with 1 st in garter st in each side. When diagram M.1 has been worked 8 rows vertically, dec on next row (= 9th row in diagram M.1) 1 st inside 1 edge st in each side - Read DECREASE TIP above. Repeat dec on every 6th-3rd-3rd row a total of 8-16-16 times = 66-66-74 sts (= 8-8-9 repetitions of diagram M.1 with 1 st in garter st in each side). Work M.1 3 times vertically and then work rows 1-8 in M.1 1 more time (= 56 rows M.1 in total). Then work 2 rows in stockinette st before loosely casting/binding off all sts (piece measures approx. 61-64-68 cm / 24"-25¼"-26¾"" from cast on edge). LEFT SLEEVE: Worked back and forth on needle size 3.5 mm / US 4. Worked from left shoulder to the bottom of left sleeve. Unravel the ch-row on the temporary cast on edge and slip cast on sts back on needle = 80-96-101 sts. Then work diagram M.2, beg on 3rd row (instead of 1st row) in pattern - AT THE SAME TIME inc 0-0-1 st on same row = 80-96-102 sts. Then work as on right sleeve. ASSEMBLY: Fold the piece double so that the longest sides of the bolero (markers on each sleeve) are place towards each other. Sew the sleeve seams inside 1 edge st as follows: Beg at the bottom of sleeve, sew towards mid front until markers (or desired length), repeat on the other sleeve. CROCHET EDGE: Crochet from RS on hook size 3.5 mm/E/4 with BabyAlpaca Silk as follows: ROUND 1: Beg mid under one sleeve, crochet along the opening between the sleeves (approx. 15 sc on 5 cm / 2", or approx. 10 sc on every repetition of diagram M.4A, no of sts must be divisible by 5), finish round with 1 sl st in 1st sc. NOTE: Make sure to work enough sc to avoid a tight edge. ROUND 2: ch 1, in 1st sc work ch 3, 1 dc, ch 2 and 2 dc, * skip the next 4 sc, in next sc work 2 dc, ch 2 and 2 dc *, repeat from *-* the entire round, finish with 1 sl st in 3rd ch from beg of round. ROUND 3: Read DC-GROUPS above! In every ch-space on round work 1 dc-group. Repeat 3RD ROUND until edge measures approx. 6 cm / 2 ⅜". On next round work in every ch-space as follows: 3 dc, ch 2, 3 dc. Repeat this round until edge measures approx. 10-11-12 cm / 4"-4½"-4 ¾", fasten off. CROCHET EDGE - SLEEVE: Crochet an edge from RS at the bottom of sleeve on hook size 3.5 mm/E/4 with BabyAlpaca Silk as follows: ROUND 1: Beg mid under sleeve, work approx. 15 sc on 5 cm / 2" (no of sts must be divisible by 5), finish round with 1 sl st in 1st sc. NOTE: Make sure to work enough sc to avoid a tight edge. Then work ROUNDS 2 and 3 as on the bolero edge, repeat 3RD ROUND for approx. 6-7-8 cm / 2 ⅜"-2¾"-3 1/8, fasten off. Repeat on the edge of the other sleeve. |
||||||||||||||||||||||
Diagram explanations |
||||||||||||||||||||||
|
||||||||||||||||||||||
 |
||||||||||||||||||||||
 |
||||||||||||||||||||||
Have you finished this pattern?Tag your pictures with #dropspattern #akropolisbolero or submit them to the #dropsfan gallery. Do you need help with this pattern?You'll find 12 tutorial videos, a Comments/Questions area and more by visiting the pattern on garnstudio.com. © 1982-2026 DROPS Design A/S. We reserve all rights. This document, including all its sub-sections, has copyrights. Read more about what you can do with our patterns at the bottom of each pattern on our site. |
||||||||||||||||||||||


With over 40 years in knitting and crochet design, DROPS Design offers one of the most extensive collections of free patterns on the internet - translated to 17 languages. As of today we count 324 catalogs and 12290 patterns - 12280 of which are translated into English (US/in).
We work hard to bring you the best knitting and crochet have to offer, inspiration and advice as well as great quality yarns at incredible prices! Would you like to use our patterns for other than personal use? You can read what you are allowed to do in the Copyright text at the bottom of all our patterns. Happy crafting!
Post a comment to pattern DROPS 139-5
We would love to hear what you have to say about this pattern!
If you want to leave a question, please make sure you select the correct category in the form below, to speed up the answering process. Required fields are marked *.