
Popular categories
Looking for a yarn?


Comments / Questions (51)
![]() Agnieszka wrote:
Agnieszka wrote:
Tak faktycznie: w objaśnieniach do schematu na samym końcu brakuje 1 narzutu. Zaraz poprawię. Trochę przykro, że trzeba będzie pruć :-(
23.06.2012 - 20:42
![]() Izabela wrote:
Izabela wrote:
W schemacie M.1 w oznaczeniu "1 narzut, zdjąć 1 o. jak do przerobienia na prawo, 2 o. razem na prawo,przełożyć oczko zdjęte nad przerobionym oczkiem"brakuje 1 narzutu na końcu. Przód zwężał mi się systematycznie i na górze przodu brakowało mi 21 oczek. Ale sweterek bedzie sliczny. Zaczynam od nowa .Pozdrawiam. Izabela Galla
23.06.2012 - 16:10
![]() Simone wrote:
Simone wrote:
Bin gestern Abend fertig gewurden, sieht einfach toll aus!
18.06.2012 - 12:57
![]() Cindy wrote:
Cindy wrote:
Thanks for info on sleeve section.When repeating M.1B how do I split row 4?The stitch pattern is split between A and B and B and C
01.05.2012 - 03:00DROPS Design answered:
To explain in text I would write out 4th pattern row like this: K3, diagram M.1A (= K2, yo, 1 YO, slip 1 st as if to K, K 2 tog, psso, 1 YO), diagram M.1B until 5 sts remain (repeat *K3, 1 YO, slip 1 st as if to K, K 2 tog, psso, 1 YO*), diagram M.1C (=K2 rem sts in chart) and K3 sts.
04.05.2012 - 00:26
![]() Cindy Coyne wrote:
Cindy Coyne wrote:
Having problem with pattern! Drops design-W-431 Dewdrops cardigan. Working sleeve section. It says 3sts. In garter, diagram M.1A,diagramM.1B,until 6sts. Remain,diagram M.1C and 3sts. In garter.Do I alternate between A andB until last 6 sts,or do I work M1A and then M1B till last 6sts. Hope you can help! Thank you,Cindy
30.04.2012 - 14:25DROPS Design answered:
You repeat diagram M.1B until 6 sts remain.
01.05.2012 - 00:05
![]() MaFrançoise wrote:
MaFrançoise wrote:
Pays: Belgique Merci pour la réponse
16.04.2012 - 19:53MaFrançoise wrote:
Comment répéter le M1B du rang 7 du diagramme? le point ajouré sur 3m est décalé! voulez-vous m'aider, Merci
14.04.2012 - 17:45DROPS Design answered:
Bonjour Mafrançoise, le 7ème rang du diagramme va se tricoter comme indiqué pour "fermer" chaque motif, au dernier motif, il vous restera 2 m end avant la fin de M1C. Bon tricot !
16.04.2012 - 09:45
![]() Carla wrote:
Carla wrote:
Ik vind dit een prachtig patroon, maar weet niet wat bedoeld wordt met telpatroon M1 (M1a, M1b en M1c)`Kunt u mij verder helpen? Met vriendelijke groet, Carla Studulski
26.02.2012 - 12:49DROPS Design answered:
Hoi Carla. De teltekening M.1 vindt u onderaan dit patroon. Deze is verder opgedeeld in M.1a, M.1b en M.1c. Veel breiplezier.
02.03.2012 - 20:26
![]() Mathilde wrote:
Mathilde wrote:
Veldig fin:) Jeg lurer på om det er en feil i forklaring til diagram M.1. Nederst står det: 1 kast, ta 1 m løs, 2 r sm, løft den løse m over. Hvis man gjør det får man færre masker, så kanskje det skal være et kast til slutt? Ellers: er modellen strikket i large?
14.02.2012 - 23:19DROPS Design answered:
Det stemmer. Vi retter det med det samme.
15.02.2012 - 10:50
![]() Laetitia wrote:
Laetitia wrote:
Bonjour,vous dites commencer par 4m M1A et finir par 3m M1C alors que le diagramme M1A a 3 m et 4m pour le M1C. Sont ils inversés ou est une erreur dans les explications ? Merci Laeti
13.02.2012 - 09:58DROPS Design answered:
Bonjour Laetitia, le diagramme et sa légende ont été modifiés. Merci.
16.02.2012 - 09:40
|
|||||||||||||
Dewdrops#dewdropscardigan |
|||||||||||||
 |
 |
||||||||||||
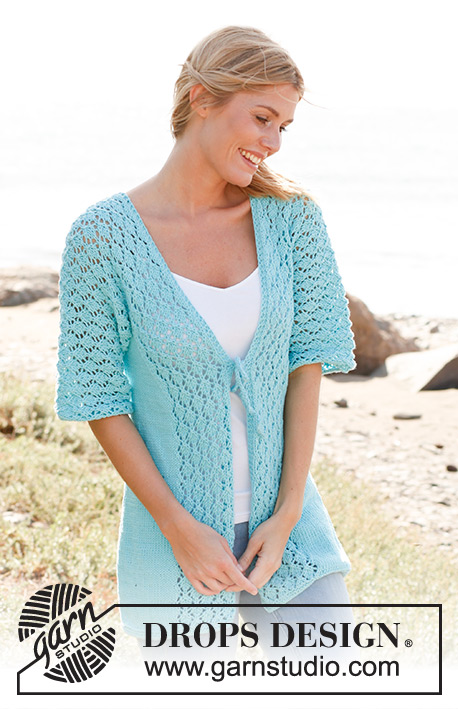
Knitted DROPS jacket with ½ sleeves and lace pattern in ”Paris”. Size: S - XXXL
DROPS 139-25 |
|||||||||||||
|
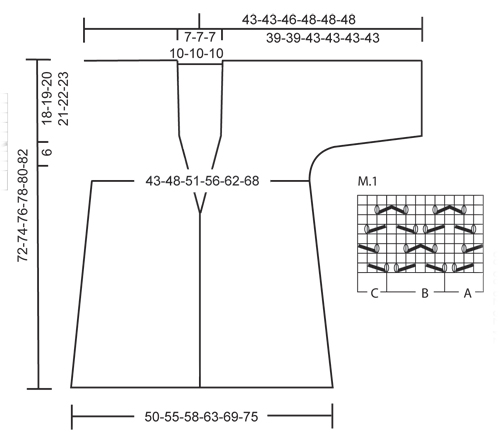
GARTER ST (back and forth on needle): K all rows. PATTERN: See diagram M.1, diagram shows pattern from RS. 1st row = RS. DECREASE TIP (applies to neck dec): Dec from RS inside 3 sts in garter st + all sts in diagram M.1. RIGHT FRONT PIECE: Dec as follows after diagram M.1: Slip 1 st as if to K, K 1, psso. LEFT FRONT PIECE: Dec as follows when 2 sts remain before diagram M.1: K 2 tog. -------------------------------------------------------- JACKET: First work right front piece and inc for sleeve, then work left front piece and sleeve, then slip these tog and work down back piece. Worked back and forth on a circular needle to make room for all the sts. RIGHT FRONT PIECE: Cast on 44-48-51-55-60-65 sts (includes 1 edge st in the side) on circular needle size 4 mm / US 6 with Paris. Work 6 rows in GARTER ST - see explanation above. Switch to circular needle size 5 mm / US 8 and work as follows (from RS): 3 sts in garter st, diagram M.1A (= 4 sts), diagram M.1B over the next 6-6-12-12-12-12 sts and diagram M.1C (= 3 sts), 27-31-28-32-37-42 sts in stockinette st and 1 edge st in garter st. REMEMBER THE GAUGE! When piece measures 13-14-15-16-17-18 cm / 5⅛"-5½"-6"-6¼"-6¾"-7", dec 1 st in the side. Repeat dec every 5 cm / 2" a total of 6 times = 38-42-45-49-54-59 sts. READ ALL OF THE FOLLOWING SECTION BEFORE CONTINUING! NECK DEC: When piece measures 43-44-45-47-48-49 cm / 17"-17¼"-17¾"-18½"-19"-19¼", dec 1 st for neck on next row from RS - see DECREASE TIP. Size S, M and L: Repeat dec on every 4th row a total of 6 times. Size XL, XXL and XXXL: Repeat dec on every other row a total of 9 times. SLEEVE INC: At the same time when piece measures 48-49-50-51-52-53 cm / 19"-19¼"-19¾"-20"-20½"-21", cast on new sts at the end of every row towards the side as follows: 2 sts 2-4-3-3-4-6 times, 4 sts 4-2-3-3-2-0 times and then 15-15-16-15-12-11 sts 1 time. Work the inc sts in stockinette st until all sts are inc. When all inc and neck dec are done, there are 67-67-73-73-73-73 sts on needle. Work as follows (seen from from RS): 3 sts in garter st, diagram M.1A, diagram M.1B until 6 sts remain, diagram M.1C and 3 sts in garter st. When piece measures 72-74-76-78-80-82 cm / 28⅜"-29⅛"-30"-30¾"-31½"-32¼", insert a marker = mid on top of shoulder. NOW MEASURE PIECE FROM HERE! Work for 2 cm / ¾", finish after 1 row from WS, put piece aside. LEFT FRONT PIECE: Work as right front piece but reversed. I.e. first row after rows in garter st is worked as follows from RS: 1 edge st in garter st, 27-31-28-32-37-42 sts in stockinette st, diagram M.1A, diagram M.1B over 6-6-12-12-12-12 sts, diagram M.1C and 3 sts in garter st towards mid front. Then work as right front piece – NOTE: Make sure to finish on the same row at the top of shoulder as on right front piece. BACK PIECE: Work sts from left front piece, cast on 11-11-11-17-17-17 sts (= back of neck) and work sts from right front piece on to needle = 145-145-157-163-163-163 sts. Work 4 rows in garter st over the middle 17-17-17-23-23-23 sts (work the other sts as before). Then work as follows: 3 sts in garter st, diagram M.1A one time, diagram M.1B until 6 sts remain, diagram M.1C one time and 3 sts in garter st. When piece measures approx. 18-19-20-21-22-23 cm / 7"-7½"-8"-8¼"-8¾"-9" from marker on shoulder (adjust after 1 whole repetition of diagram M.1), work in stockinette st and bind off sleeve sts at the beg of every row in each side as follows: 15-15-16-15-12-11 sts 1 time, 4 sts 4-2-3-3-2-0 times and 2 sts 2-4-3-3-4-6 times = 75-83-89-97-107-117 sts remain on needle. Continue in stockinette st with 1 edge st in garter st in each side. When piece measures 34-35-36-37-38-39 cm / 13⅜"-13¾"-14¼"-14½"-15"-15¼" from marker on shoulder, inc 1 st in each side. Repeat inc every 5 cm / 2" a total of 6 times = 87-95-101-109-119-129 sts. When piece measures approx. 70-72-74-76-78-80 cm / 27½"-28⅜"-29⅛"-30"-30¾"-31½, switch to needle size 4 mm / US 6. Work 6 rows in garter st, then LOOSELY bind off – use needle size 5 mm / US 8 when casting/binding off to avoid a tight bind off edge. ASSEMBLY: Fold the jacket double at the top by shoulders and sew sleeve and side seams in one, inside 1 edge st. TIES: Crochet on hook size 4 mm / G/6 and Paris as follows: * ch 2, 1 sc in the first of the 2 ch *, repeat from *-* until tie measures approx. 20 cm / 8". Crochet another tie the same way. Sew one tie in each side towards mid front where neck dec beg. |
|||||||||||||
Diagram explanations |
|||||||||||||
|
|||||||||||||
 |
|||||||||||||
Have you finished this pattern?Tag your pictures with #dropspattern #dewdropscardigan or submit them to the #dropsfan gallery. Do you need help with this pattern?You'll find 20 tutorial videos, a Comments/Questions area and more by visiting the pattern on garnstudio.com. © 1982-2026 DROPS Design A/S. We reserve all rights. This document, including all its sub-sections, has copyrights. Read more about what you can do with our patterns at the bottom of each pattern on our site. |
|||||||||||||


With over 40 years in knitting and crochet design, DROPS Design offers one of the most extensive collections of free patterns on the internet - translated to 17 languages. As of today we count 325 catalogs and 12298 patterns - 12288 of which are translated into English (US/in).
We work hard to bring you the best knitting and crochet have to offer, inspiration and advice as well as great quality yarns at incredible prices! Would you like to use our patterns for other than personal use? You can read what you are allowed to do in the Copyright text at the bottom of all our patterns. Happy crafting!
Post a comment to pattern DROPS 139-25
We would love to hear what you have to say about this pattern!
If you want to leave a question, please make sure you select the correct category in the form below, to speed up the answering process. Required fields are marked *.