
Popular categories
Looking for a yarn?


Comments / Questions (51)
![]() Lacourt wrote:
Lacourt wrote:
Je me demande s'il n'y aurait pas une erreur dans ce modèle : ne conviendrait-il pas de faire pour le devant droit M1A/M1B/M1C et pour le devant gauche M1C/M1B/M1A ? (ou l'inverse) sinon il va y avoir un problème de symétrie, non ? merci
19.03.2014 - 02:38DROPS Design answered:
Bonjour Mme Lacourt,le motif se tricote de la même façon pour les 2 devants, mais après 3 m point mousse sur l'endroit pour le devant droit, et après 1 m lis + les m en jersey pour le devant gauche. Bon tricot!
19.03.2014 - 09:26
![]() Silvia Kool wrote:
Silvia Kool wrote:
Graag had ik ook de achterkant van dit patroon gezien.
22.03.2013 - 13:04DROPS Design answered:
Ik heb helaas geen foto van de achterkant. Maar de bovenkant wordt in hetzelfde kantpatroon gebreid als op de mouwen en langs het middevoor. Na het afkanten van de mouwen brei je door in tricotst tot aan het eind. Ik hoop dat het zo wel duidelijker is. Veel breiplezier.
28.03.2013 - 14:07
![]() Malgorzatastarski wrote:
Malgorzatastarski wrote:
Ilove your patterns Iam hoping that you could send to me diamond pattern also in writting wolds that I follow better then picture Sincerely Malgorzata Starski
19.03.2013 - 16:00
![]() Vinassac wrote:
Vinassac wrote:
Merci beaucoup mais je ne comprend pas sur le model les manches sont ajourees si je fait comme vous me le conseiller j aurai du jerset sur le milieu des manches merci
20.02.2013 - 18:08DROPS Design answered:
Tout à fait Madame Vinassac, M1, c'est le point fantaisie, donc vous continuez le point fantaisie comme avant sur le devant et sur les mailles de la manche de la même façon, avec 3 m au point mousse au début et à la fin du rang (bordures de chaque côté). Bon tricot !
21.02.2013 - 11:53
![]() Vinassac wrote:
Vinassac wrote:
Bonjour, je voudrai comprendre apres toutes les augmentations pour la manche et les diminutions de l encolure faut il continuer avec le diagramme m1 sur toute la longeur merci d avance
20.02.2013 - 15:53DROPS Design answered:
Bonjour Madame Vinassac, à la fin du devant droit, quand les augm des manches et les dim de l'encolure sont faites, vous tricotez M1 avec 3 m point mousse de chaque côté. Bon tricot !
20.02.2013 - 16:38
![]() Kristen wrote:
Kristen wrote:
On the Decrease Tip for the neck dec, I am trouble understanding what the directions is calling for. Where is the decrease to take place and by what method (slip 1 as to knit, knit 1, psso?? k2tog??)
14.02.2013 - 15:55DROPS Design answered:
Dear Kristen, for front piece, you will dec for neck after 3 garter sts + M.1 (slip 1, K1, psso), for left front piece, you will dec before M.1 and 3 garter st starting when 2 sts remain (K2 tog). Happy Knitting!
14.02.2013 - 16:13
![]() Lurer wrote:
Lurer wrote:
Forstod ikke halsfellingen. På bildet ser det ikke ut til at den skal påvirket mønsteret?
27.09.2012 - 13:21DROPS Design answered:
Det gör den heller ikke. Se FELLETIPS (gjelder halsfellingen): Det felles fra retten på innsiden av 3 m riller + alle m i M.1. Dvs, du feller efter de 3 riller + M.1
14.11.2012 - 09:15
![]() Sabine wrote:
Sabine wrote:
Frage hat sich erledigt!!! Danke!
10.07.2012 - 19:21
![]() Sabine wrote:
Sabine wrote:
Ich komme mit dem Mustersatz M1B nicht klar, wenn ich diesen 2 mal, also über 12 Maschen stricken möchte. Wie geht das?
10.07.2012 - 17:51
![]() Paloma wrote:
Paloma wrote:
Bonjour, je voudrais savoir si ce modèle se tricote en rond ou en allers-retours (sauf point mousse où c'est précisé). Merci
01.07.2012 - 09:56DROPS Design answered:
Bonjour Paloma, le gilet se tricote en allers et retours sur aiguille circulaire pour avoir suffisamment de place pour y loger toutes les mailles. Bon tricot !
02.07.2012 - 10:14
|
|||||||||||||
Dewdrops#dewdropscardigan |
|||||||||||||
 |
 |
||||||||||||
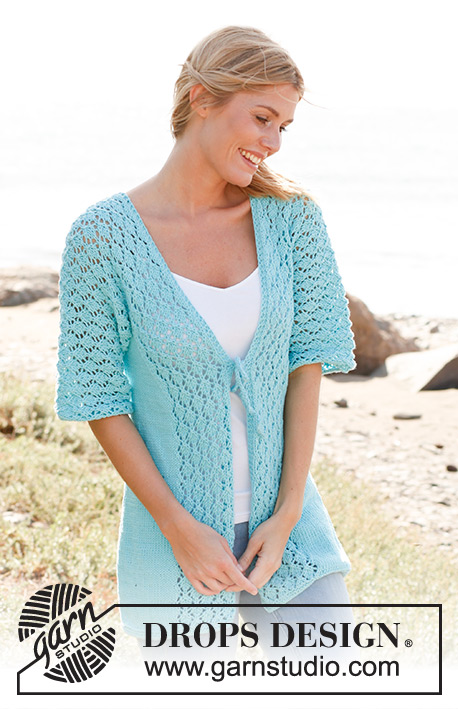
Knitted DROPS jacket with ½ sleeves and lace pattern in ”Paris”. Size: S - XXXL
DROPS 139-25 |
|||||||||||||
|
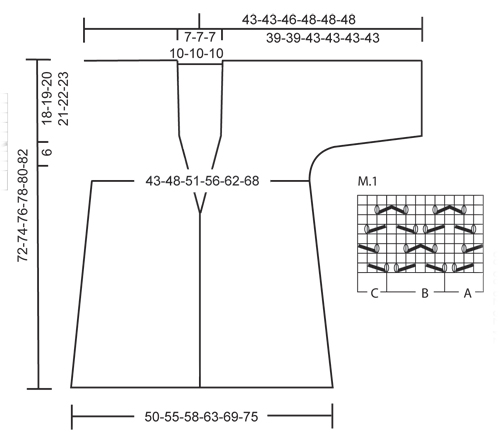
GARTER ST (back and forth on needle): K all rows. PATTERN: See diagram M.1, diagram shows pattern from RS. 1st row = RS. DECREASE TIP (applies to neck dec): Dec from RS inside 3 sts in garter st + all sts in diagram M.1. RIGHT FRONT PIECE: Dec as follows after diagram M.1: Slip 1 st as if to K, K 1, psso. LEFT FRONT PIECE: Dec as follows when 2 sts remain before diagram M.1: K 2 tog. -------------------------------------------------------- JACKET: First work right front piece and inc for sleeve, then work left front piece and sleeve, then slip these tog and work down back piece. Worked back and forth on a circular needle to make room for all the sts. RIGHT FRONT PIECE: Cast on 44-48-51-55-60-65 sts (includes 1 edge st in the side) on circular needle size 4 mm / US 6 with Paris. Work 6 rows in GARTER ST - see explanation above. Switch to circular needle size 5 mm / US 8 and work as follows (from RS): 3 sts in garter st, diagram M.1A (= 4 sts), diagram M.1B over the next 6-6-12-12-12-12 sts and diagram M.1C (= 3 sts), 27-31-28-32-37-42 sts in stockinette st and 1 edge st in garter st. REMEMBER THE GAUGE! When piece measures 13-14-15-16-17-18 cm / 5⅛"-5½"-6"-6¼"-6¾"-7", dec 1 st in the side. Repeat dec every 5 cm / 2" a total of 6 times = 38-42-45-49-54-59 sts. READ ALL OF THE FOLLOWING SECTION BEFORE CONTINUING! NECK DEC: When piece measures 43-44-45-47-48-49 cm / 17"-17¼"-17¾"-18½"-19"-19¼", dec 1 st for neck on next row from RS - see DECREASE TIP. Size S, M and L: Repeat dec on every 4th row a total of 6 times. Size XL, XXL and XXXL: Repeat dec on every other row a total of 9 times. SLEEVE INC: At the same time when piece measures 48-49-50-51-52-53 cm / 19"-19¼"-19¾"-20"-20½"-21", cast on new sts at the end of every row towards the side as follows: 2 sts 2-4-3-3-4-6 times, 4 sts 4-2-3-3-2-0 times and then 15-15-16-15-12-11 sts 1 time. Work the inc sts in stockinette st until all sts are inc. When all inc and neck dec are done, there are 67-67-73-73-73-73 sts on needle. Work as follows (seen from from RS): 3 sts in garter st, diagram M.1A, diagram M.1B until 6 sts remain, diagram M.1C and 3 sts in garter st. When piece measures 72-74-76-78-80-82 cm / 28⅜"-29⅛"-30"-30¾"-31½"-32¼", insert a marker = mid on top of shoulder. NOW MEASURE PIECE FROM HERE! Work for 2 cm / ¾", finish after 1 row from WS, put piece aside. LEFT FRONT PIECE: Work as right front piece but reversed. I.e. first row after rows in garter st is worked as follows from RS: 1 edge st in garter st, 27-31-28-32-37-42 sts in stockinette st, diagram M.1A, diagram M.1B over 6-6-12-12-12-12 sts, diagram M.1C and 3 sts in garter st towards mid front. Then work as right front piece – NOTE: Make sure to finish on the same row at the top of shoulder as on right front piece. BACK PIECE: Work sts from left front piece, cast on 11-11-11-17-17-17 sts (= back of neck) and work sts from right front piece on to needle = 145-145-157-163-163-163 sts. Work 4 rows in garter st over the middle 17-17-17-23-23-23 sts (work the other sts as before). Then work as follows: 3 sts in garter st, diagram M.1A one time, diagram M.1B until 6 sts remain, diagram M.1C one time and 3 sts in garter st. When piece measures approx. 18-19-20-21-22-23 cm / 7"-7½"-8"-8¼"-8¾"-9" from marker on shoulder (adjust after 1 whole repetition of diagram M.1), work in stockinette st and bind off sleeve sts at the beg of every row in each side as follows: 15-15-16-15-12-11 sts 1 time, 4 sts 4-2-3-3-2-0 times and 2 sts 2-4-3-3-4-6 times = 75-83-89-97-107-117 sts remain on needle. Continue in stockinette st with 1 edge st in garter st in each side. When piece measures 34-35-36-37-38-39 cm / 13⅜"-13¾"-14¼"-14½"-15"-15¼" from marker on shoulder, inc 1 st in each side. Repeat inc every 5 cm / 2" a total of 6 times = 87-95-101-109-119-129 sts. When piece measures approx. 70-72-74-76-78-80 cm / 27½"-28⅜"-29⅛"-30"-30¾"-31½, switch to needle size 4 mm / US 6. Work 6 rows in garter st, then LOOSELY bind off – use needle size 5 mm / US 8 when casting/binding off to avoid a tight bind off edge. ASSEMBLY: Fold the jacket double at the top by shoulders and sew sleeve and side seams in one, inside 1 edge st. TIES: Crochet on hook size 4 mm / G/6 and Paris as follows: * ch 2, 1 sc in the first of the 2 ch *, repeat from *-* until tie measures approx. 20 cm / 8". Crochet another tie the same way. Sew one tie in each side towards mid front where neck dec beg. |
|||||||||||||
Diagram explanations |
|||||||||||||
|
|||||||||||||
 |
|||||||||||||
Have you finished this pattern?Tag your pictures with #dropspattern #dewdropscardigan or submit them to the #dropsfan gallery. Do you need help with this pattern?You'll find 20 tutorial videos, a Comments/Questions area and more by visiting the pattern on garnstudio.com. © 1982-2026 DROPS Design A/S. We reserve all rights. This document, including all its sub-sections, has copyrights. Read more about what you can do with our patterns at the bottom of each pattern on our site. |
|||||||||||||


With over 40 years in knitting and crochet design, DROPS Design offers one of the most extensive collections of free patterns on the internet - translated to 17 languages. As of today we count 325 catalogs and 12298 patterns - 12288 of which are translated into English (US/in).
We work hard to bring you the best knitting and crochet have to offer, inspiration and advice as well as great quality yarns at incredible prices! Would you like to use our patterns for other than personal use? You can read what you are allowed to do in the Copyright text at the bottom of all our patterns. Happy crafting!
Post a comment to pattern DROPS 139-25
We would love to hear what you have to say about this pattern!
If you want to leave a question, please make sure you select the correct category in the form below, to speed up the answering process. Required fields are marked *.