
Popular categories
Looking for a yarn?


Comments / Questions (109)
![]() Ceci wrote:
Ceci wrote:
Hi I am still pretty beginners at knitting, sorry for asking some questions that might seem too silly! I've casted 100 stitches, changed to circular needles size 2.5 mm by knitting one round. but I am confused on the next few steps. Because I am using circular needle, does it mean now the next step is Purl one round while doing the increase? Or still knit one round then Purl? Are you supposed to increase while knitting or purling ? Many thanks Cecilia
18.03.2024 - 14:01DROPS Design answered:
Dear Cecilia, you first work each piece separately, back and forth on needle increasing on every row from right side 14 to 22 times; this means after you have cast on stitches, knit 1 row = this will be wrong side of piece, now turn and work back and forth, next row is from right side, now start increasing 2 sts at each marker (4 sts in total on every other row). Happy knitting!
18.03.2024 - 15:40
![]() Margi wrote:
Margi wrote:
Hallo, ich verstehe das mit den Markieren nicht. Heißt es, das ich bei 100 Maschen von rechts außen nach innen einen markierer in die 27.30.32. Masche setze und auf der anderen Seite in die 27.30.35. Masche einen Markierer setze? Wie kann ich dann 46 Maschen in der Mitte haben? Es sind nur 35. Bitte um Erklärung
13.06.2023 - 22:28DROPS Design answered:
Liebe Margi, diese Zahlen gelten je für die Größe, so in S und M sind es 100 Maschen und die beiden Markierungen setzen Sie so: 26 Maschen zählen, 1 Markierung in die nächste (die 27. Masche einsetzen); 46 Maschen zählen, 1 Markeirung in die nächste Masche einsetzen, 26 Maschen sind jetzt übrig (die Markierungen sind jeweils in die 27. Masche ab beiden Seite). Viel Spaß beim stricken!
14.06.2023 - 07:44
![]() Mieke Baras wrote:
Mieke Baras wrote:
Ik brei de kleinste maat.Ik ben aan het stuk gekomen dat je op 18 cm opnieuw 6x 4st meerdert. In totaal is dat dan toch terug 176 st (152 +24)? In de beschrijving zegt men 180st. Is het dan niet 7x meerderen in het totaal ipv 6x? Dank voor dit mooie topje. Prettig om te breien!
29.05.2023 - 09:57DROPS Design answered:
Dag Mieke,
Ja, je hebt gelijk! Dat zou weer op 176 steken uitkomen. Ik zal het doorgeven aan de ontwerpafdeling om na te kijken.
29.05.2023 - 15:53
![]() Réjeanne wrote:
Réjeanne wrote:
Bonjour, Vous n'auriez pas les explications pour faire ce modèle mais avec des aiguilles droites, je ne suis pas très "fan" du circulaire. Merci!
01.05.2023 - 05:23DROPS Design answered:
Bonjour Réjeanne, la partie du haut du top se tricote en allers et retours (on fait le dos et le devant séparément), mais pour le bas, après les emmanchures, ce sera plus simple en rond, car vous avez les motifs sur les côtés. Quoi qu'il en soit, retrouvez ici quelques pistes pour adapter un modèle sur aiguilles droites. Bon tricot!
02.05.2023 - 09:16
![]() Sophie Barbe wrote:
Sophie Barbe wrote:
Bonjour comment faut il augmenter deux mailles entre le marqueurs poules bretelles et le devant cordialement
24.03.2023 - 18:55DROPS Design answered:
Bonjour Mme Barbe, les augmentations des bretelles se font avec 1 jeté de chaque côté des mailles avec un marqueur ainsi: tricotez jusqu'à la maille avec 1 marqueur, faites 1 jeté, tricotez la maille avec le marqueur, faites 1 jeté. Bon tricot!
27.03.2023 - 10:08
![]() Mihaela wrote:
Mihaela wrote:
Hello, do you have a video on how to sew the shoulder seams and side seams edge to edge? Thank you
13.03.2023 - 22:03DROPS Design answered:
Hi Mihaela, Here is the link to a video showing how to sew invisible seams: https://www.garnstudio.com/video.php?id=47&lang=en Happy crafting!
14.03.2023 - 07:15
![]() Yvette wrote:
Yvette wrote:
Bonjour, je crois que je ne me suis pas fait comprendre. J'ai coupé le fil des bretelles comme indiqué mais maintenant il faut faire una augmentation au début du rang. Comment faire si ce sont des points en attente sans fil... je dois monter les points comme pour commencer un tricot et reprendre les points en attente après? Désolée je suis débutante et un peu perdue...
11.01.2023 - 17:12DROPS Design answered:
Bonjour Yvette, je pense avoir compris cette fois, désolée. Effectivement, lorsque vous avez rabattu les mailles des bretelles, vous coupez le fil. Vous allez maintenant monter les mailles des côtés: montez 7 à 24 mailles (cf taille) (montez ces mailles comme au début d'un ouvrage) - tricotez sur l'envers les mailles restantes sur l'aiguille, puis montez 7 à 24 m (comme dans cette vidéo autrement dit, à la fin du rang. Vous avez maintenant de nouvelles mailles de part et d'autres des - 76-97 m du top. Tricotez ces 90-145 m au point mousse. Bon tricot!
12.01.2023 - 09:19
![]() Yvette wrote:
Yvette wrote:
Bonjour, je suis au niveau de la bretelle où il faut augmenter des côtes sur le côté mais sur le vidéo qui fait référence le fil est sur le dernier point, ce qui n’est pas le cas ici. Il faut alors monter des points comme pour une première rangée? Ou bien je me suis trompé quelque part? Merci!
10.01.2023 - 21:19DROPS Design answered:
Bonjour Yvette, je ne suis pas bien sûre de pouvoir vous suivre, j'en suis désolée; les augmentations des bretelles se font de chaque côté de chacune des 2 mailles avec un marqueur ainsi: tricotez jusqu'à la maille avec un marqueur, faites 1 jeté, tricotez la maille avec le marqueur, faites 1 jeté; au rang suivant, tricotez les jetés à l'endroit, mais dans le brin arrière. Vous augmentez ainsi 4 m tous les rangs sur l'endroit (tous les 2 rangs). Bon tricot!
11.01.2023 - 09:41
![]() Berit wrote:
Berit wrote:
Jeg forstår ikke helt, man samler for- og bagstykke på een rundpind, men strikker stadigvæk frem og tilbage? Kan man ikke strikke den rundt? På forhånd tak.
16.06.2022 - 15:48DROPS Design answered:
Hej Berit, Når du har sat stykkerne samme fortsætter du rundt på rundpind nr 3. God fornøjelse!
17.06.2022 - 14:47
![]() Renate Matt wrote:
Renate Matt wrote:
Sehr geehrtes Drops Design Team Für das Modell E-179 habe ich ein Garn gewählt, das mit 2 1/2 gestrickt folgende Musterprobe ergibt. Krausrippen, 30M ×56R, für glatt rechts 30M×42R. An welcher Stelle des Tops beginnt die Strickanleitung? So könnte ich ermitteln, wieviele Maschen ich anschlagen muss. Vielen Dank für Ihre Hilfe, freundliche Grüsse, Renate Matt
12.06.2021 - 10:00DROPS Design answered:
Liebe Frau Matt, ider können wir jeder Anleitung nach jedem individuellen Frage anpassen und einzelne Modelle auf individuellen Wunsch hin umrechnen. Wenn sie Hilfe damit brauchen, wenden Sie sich bitte an dem Laden wo Sie die Wolle gekauft haben, dort hilft man Ihnen gerne weiter. Danke im voraus für Ihr Verständnis. Viel Spaß beim stricken!
14.06.2021 - 08:35
|
||||||||||||||||
Simply Summer#simplysummertop |
||||||||||||||||
 |
 |
|||||||||||||||
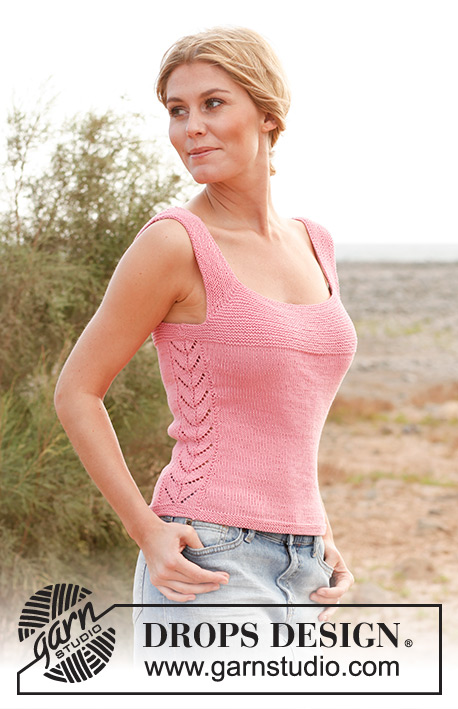
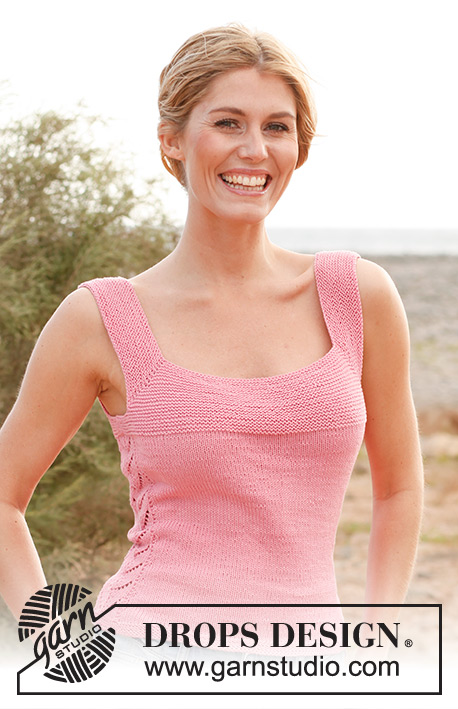
Knitted DROPS top in garter st and with lace pattern, worked top down in ”Safran”. Size: S - XXXL
DROPS 137-2 |
||||||||||||||||
|
GARTER ST (back and forth on needle): K all rows. 1 ridge = K 2 rows. GARTER ST (in the round on circular needle): * K 1 round and P 1 round *, repeat from *-*. PATTERN: See diagram M.1 – the diagram shows 1 repetition of the pattern. DECREASE TIP (applies to side dec): Dec as follows when 2 sts remain BEFORE diagram M.1: K 2 tog. Dec as follows AFTER diagram M.1: Slip 1 st as if to K, K 1, psso. INCREASE TIP (applies to side inc): Work until 1 st in stockinette st remains before diagram M.1, make 1 YO, 1 st in stockinette st, work diagram M.1 and 1 st in stockinette st, make 1 YO. On next round K YOs twisted (i.e. work in back loop of st instead of front) to avoid holes. -------------------------------------------------------- TOP: Worked top down. Front and back piece are worked separately, then put tog and worked in the round. FRONT PIECE: Worked back and forth on circular needle. Cast on 100-100-108-108-115-121 sts on circular needle size 3 mm / US 2or3 with Safran. Switch to circular needle size 2.5 mm / US 1or2. Insert a marker in the 27th-27th-30th-30th-32nd-35th st in from each side (= 46-46-48-48-51-51 sts between sts with markers). K 1 row from WS. Continue with K on all rows (= garter st). AT THE SAME TIME on next row, inc 1 st on each side of the 2 sts with markers – inc by making 1 YO, on next row K YOs twisted (i.e. work in back loop of st instead of front) to avoid holes. Repeat inc every other row a total of 14-17-17-19-19-22 times = 156-168-176-184-191-209 sts. K 1 row from WS after last inc. REMEMBER THE GAUGE! Now piece measures approx. 6-7-7-8-8-9 cm / 2⅜"-2¾"-2¾"-3⅛"-3⅛"-3½". Work next row as follows (from RS): Loosely bind off the first 40-43-46-48-50-56 sts (= strap), K the next 76-82-84-88-91-97 sts (the first of these sts is already on right needle), and loosely bind off the last 40-43-46-48-50-56 sts (= strap), cut the yarn. Work next row from WS as follows: Cast on 7-9-13-16-20-24 new sts at beg of row, work the 76-82-84-88-91-97 sts from needle and cast on 7-9-13-16-20-24 new sts at the end of row = 90-100-110-120-131-145 sts. Work in garter st back and forth for 3-3-3-4-4-4 cm / 1⅛"-1⅛"-1⅛"-1½"-1½"-1½" – AT THE SAME TIME after 2-2-2-3-3-3 cm / ¾"-¾"-¾"-1⅛"-1⅛"-1⅛", dec 1 st in each side by K tog the 2 second outermost sts from RS = 88-98-108-118-129-143 sts. Put piece aside. BACK PIECE: Cast on and work as front piece. BODY: Slip front and back piece on to same circular needle size 3 mm / US 2or3 = 176-196-216-236-258-286 sts. NOW MEASURE PIECE FROM HERE! Then work diagram M.1 over 16 sts in each side (i.e. 8 sts from back piece and 8 sts from front piece = mid under sleeve). Work the other sts in stockinette st. AT THE SAME TIME when piece measures 2 cm / ¾", dec 1 st on each side of diagram M.1 in each side - SEE DECREASE TIP! Repeat dec every 2½ cm / ⅞" a total of 6-6-6-6-5-5 times = 152-172-192-212-238-266 sts. When piece measures 18 cm / 7", inc 1 st on each side of diagram M.1 - SEE INCREASE TIP! Repeat inc every 2 cm / ¾" a total of 6 times = 176-196-216-236-262-290 sts. When piece measures approx. 30-31-32-32-33-33 cm / 11¾"-12¼"-12½"-12½"-13"-13" (50-52-54-56-58-60 cm / 19¾"-20½"-21¼"-22"-22¾"-23⅝" in total) - stop after 1 full repetition of diagram M.1, switch to circular needle size 2.5 mm / US 1or2. Work in GARTER ST in the round over all sts for 2 cm / ¾" - see explanation above! Then loosely bind off with K – use circular needle size 3 mm / US 2or3 when casting/binding off (it is very important that the bind off edge is not too tight). The top measures approx. 52-54-56-58-60-62 cm / 20½"-21¼"-22"-22¾"-23⅝"-24⅜" vertically. ASSEMBLY: Sew shoulder seams and side seams edge to edge in front loop of outermost st to avoid chunky and visible seams. |
||||||||||||||||
Diagram explanations |
||||||||||||||||
|
||||||||||||||||
 |
||||||||||||||||
 |
||||||||||||||||
Have you finished this pattern?Tag your pictures with #dropspattern #simplysummertop or submit them to the #dropsfan gallery. Do you need help with this pattern?You'll find 7 tutorial videos, a Comments/Questions area and more by visiting the pattern on garnstudio.com. © 1982-2026 DROPS Design A/S. We reserve all rights. This document, including all its sub-sections, has copyrights. Read more about what you can do with our patterns at the bottom of each pattern on our site. |
||||||||||||||||


With over 40 years in knitting and crochet design, DROPS Design offers one of the most extensive collections of free patterns on the internet - translated to 17 languages. As of today we count 324 catalogs and 12290 patterns - 12280 of which are translated into English (US/in).
We work hard to bring you the best knitting and crochet have to offer, inspiration and advice as well as great quality yarns at incredible prices! Would you like to use our patterns for other than personal use? You can read what you are allowed to do in the Copyright text at the bottom of all our patterns. Happy crafting!
Post a comment to pattern DROPS 137-2
We would love to hear what you have to say about this pattern!
If you want to leave a question, please make sure you select the correct category in the form below, to speed up the answering process. Required fields are marked *.