
Popular categories
Looking for a yarn?


Comments / Questions (243)
![]() Paola wrote:
Paola wrote:
Ho terminato le due parti dietro separate ed ho rimesso tutte le maglie sul ferro motivo contro motivo ma avendo finito, come da istruzioni l'ultimo ferro al dritto, mi trovo a fare il primo ferro al rovescio del lavoro e di conseguenza i motivi M3 ed M4 iniziano dal rovescio. Quindi non vale più il fatto che tutti i ferri dispari sono al dritto del lavoro? Ho sbagliato qualcosa? Grazie
29.11.2015 - 23:08DROPS Design answered:
Buongiorno Paola. Dopo aver messo le maglie tutte su un ferro, lavora, sul rovescio del lavoro, come indicato per il ferro 6 dei diagrammi M1 e M.2. A partire dal ferro successivo lavora i diagrammi M.3 ed M.4. In questo modo mantiene la distanza corretta tra un intreccio e l’altro. Buon lavoro!
02.12.2015 - 15:54
![]() Paola wrote:
Paola wrote:
Volevo sapere quante ripetizioni di M1 bisogna fare perché per arrivare a 44 m (misura mia) e con le diminuzioni ogni 3 cm., mi sembra che sono diverse le ripetizioni del diagramma. Altra cosa le noccioline si devono sovrapporre in altezza o spostarsi in obliquo perché dopo la prima diminuzione non ho più 16 maglie rovescie ma 15. Ho sbagliato qualcosa?
26.11.2015 - 17:57DROPS Design answered:
Buonasera Paola. Deve lavorare il diag. M1 3 volte per intero + ripetere le prime 5 righe e poi mette il lavoro in attesa. In questo modo ha aumentato 21 m, ma intanto ha anche diminuito 1 m ogni 3 cm per 5 volte alla fine del ferro. Quindi: 28 m iniziali + 21 – 5= 44 m. Le noccioline vanno sempre lavorate nelle stesse m: quindi prima e seconda m (sul ferro di ritorno) del diagramma M1. Buon lavoro!
27.11.2015 - 22:13
![]() Alexandra Ritch wrote:
Alexandra Ritch wrote:
Har dere noen steder jeg kan finne ut hvilke kroppsmål dere bruker som grunnlag for str i opppskriftene deres? Andre firmaer har det nedskrevet i hver eneste oppskrift. Jeg har leitet på siden deres, men kan ikke finne det noe sted.....
02.02.2015 - 15:54DROPS Design answered:
Hei Alexandra. Det staar nederst i mönstret. Her finder du en skemategning med alle maal i cm per störrelse :-)
02.02.2015 - 16:45
![]() Élisabeth wrote:
Élisabeth wrote:
Bonjour, je voudrais savoir si les 5 diminutions pour le dos côté gauche sont bien à faire à gauche - c'est-à-dire en fin de rang et en symétrique pour le dos droit. Merci de votre réponse et de vos magnifiques modèles.
15.09.2014 - 11:24DROPS Design answered:
Bonjour Élisabeth, c'est tout à fait exact, ces diminutions se font du côté couture au devant (= sur les côtés), soit en fin de rang sur l'end pour le côté gauche (et en symétrie pour le côté droit). Bon tricot!
15.09.2014 - 11:53
![]() Lucie wrote:
Lucie wrote:
Ce modèle est original. Je l'ai réalisé avec Alaska. J'ai transpiré pour le faire, mais le résultat est impeccable. J'attends l'hiver avec impatience pour la porter.
05.09.2014 - 23:21
![]() Theresia Wölke wrote:
Theresia Wölke wrote:
Auf der Anleitung (Bild) kann ich keine Noppen erkennen. Irgendwie komme ich mit dem Muster jetzt nicht klar. Kann es sei, das die Anleitung nicht stimmt. Ich warte auf schnellste Antwort danke m.f.g Theresia Wölke
23.08.2014 - 10:40DROPS Design answered:
Wir können leider nicht immer eine schnelle Antwort garantieren, tun aber unser Bestes. - Die Noppe findet sich nur am Ärmel (eine einzige), wenn Sie genau hinschauen, können Sie sie bei der Rückansicht des Modells am Ende des Musters am Ärmel erkennen. Die Anleitung müsste stimmen, wo genau haben Sie denn mit dem Muster ein Problem?
23.08.2014 - 11:45
![]() Zara Bergman wrote:
Zara Bergman wrote:
Thanks, Then on the return WS row do I P into the YO (as the st st) or do I count this as the first st of M.6?
01.07.2014 - 18:21DROPS Design answered:
Dear Mrs Bergman, the YOs in M6 should be worked as shown in diagram, ie K from WS. Happy knitting!
01.07.2014 - 18:52
![]() Zara Bergman wrote:
Zara Bergman wrote:
Left front. When I start M.6 I just can't move it correctly, It wants to move 2 sts every WS row because of the YO. I P into the back of this as when working the back peices but I don't get the YO holes going diaganally. Is it possible to get the first few rows of the pattern in words please as the diagram is just confusing me. Been stuck on this for weeks. Thanks
01.07.2014 - 08:42DROPS Design answered:
Dear Mrs Bergman, M.6 starts with K2 tog and ends with a YO, this is how the pattern will be moved 1 st towards the side on every other row (you will have less stocking st on the right side, ie before M6, and more sts in stocking st on the left side, ie after M6). Happy knitting!
01.07.2014 - 09:24
![]() Hanne Hammersholt wrote:
Hanne Hammersholt wrote:
Forsættelse til mit første spørgsmål.Hvis jeg tager en maske ud i siden, som jeg skal, bliver snoningen jo rykket længere ind mod midten, der kommer flere masker inden snoningen. Skal de strikkes ret? Eller strikker jeg stadig 1 kantmaske, 3 retstrik, M1?
09.06.2014 - 23:42DROPS Design answered:
Hej Hanne. Jeg vil mene du skal blive ved med at forskyde M.6 indtil du er faerdig med din udtagning. Og först derefter strikker du videre med M.1 saa der kun er 1 kantmaske + 3 m
27.06.2014 - 12:44
![]() Hanne Hammersholt wrote:
Hanne Hammersholt wrote:
Jeg har lidt problemer med opskriften. Der står at når m.6 på forstykket har forskudt sig helt hen til siden, forsættes der med 1 kantmaske, 3 retstrik og M.1. Men der skal jo stadig tages ud i siden, mangler stadig at tage nogen masker ud, hvad så ? Skal jeg blive ved med at strikke 1 kantmaske,3 retstrik og M.1 på hver retsidepind! så snoningen ligger helt ud til siden? Eller?
09.06.2014 - 23:33DROPS Design answered:
Hej Hanne. Se mit svar over. Undskyld forsinkelsen i svar. God fornöjelse med den videre.
27.06.2014 - 12:44
|
||||||||||||||||||||||||||||||||||
Sweet Erica#sweetericacardigan |
||||||||||||||||||||||||||||||||||
|
|
||||||||||||||||||||||||||||||||||
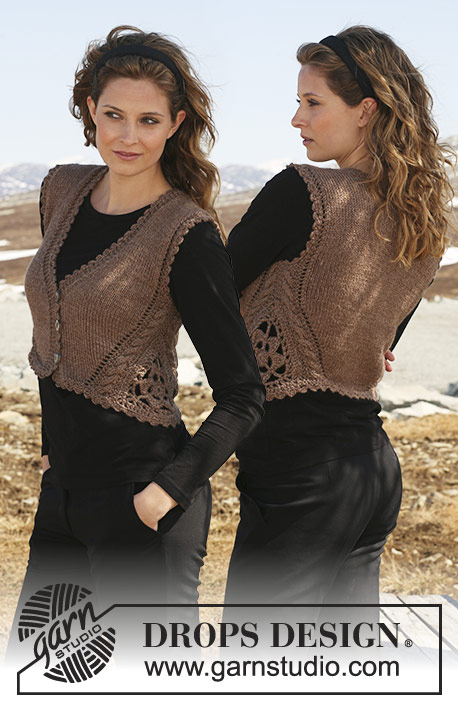
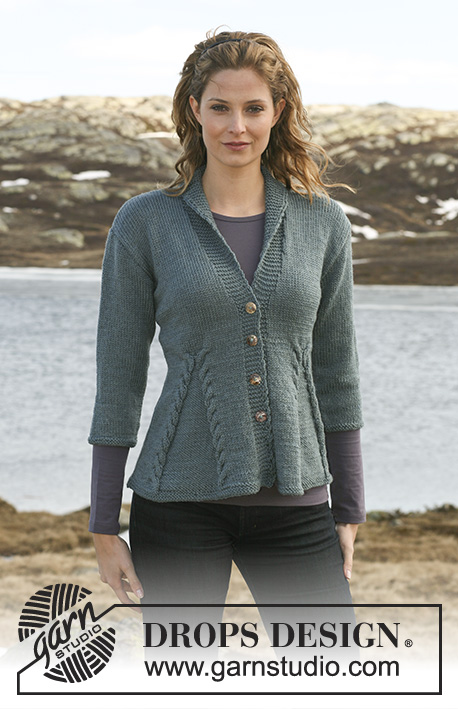
DROPS Jacket in 2 threads ”Alpaca” with cable and lace pattern and crochet triangle on back piece. Size S to XXXL
DROPS 117-1 |
||||||||||||||||||||||||||||||||||
|
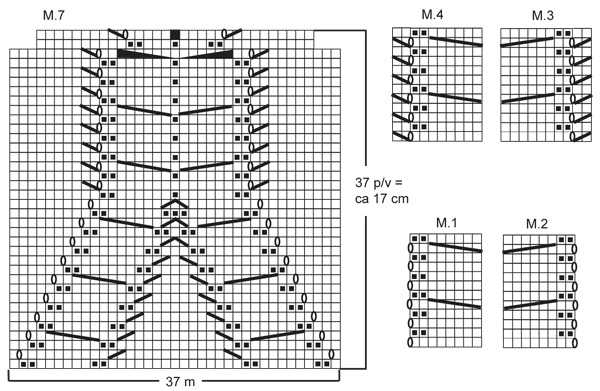
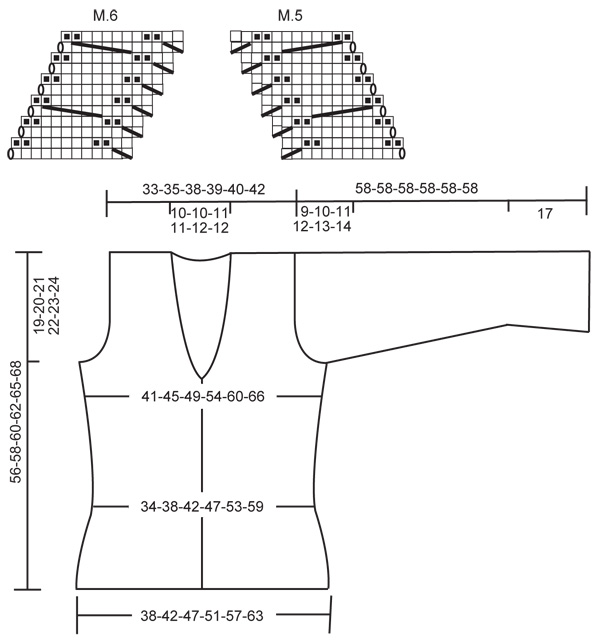
TRIPPLE TREBLE CROCHET (ttr): Make 4 YO, insert hook in st below, pull thread through st (= 6 loops on hook) , * YO round hook, pull thread through 2 loops *, repeat from *-* a total of 5 times = 1 st left on hook. PATTERN: See diagram M.1 to M.7 – diagrams are seen from RS and show 1 pattern repeat. GARTER ST (back and forth on needle): K all rows. DECREASING TIP (neckline): Make all dec from RS. Dec as follows before all garter sts: K2 tog. Dec as follows after all garter sts: slip 1 st as if to K, K1, psso. BUTTONHOLES: Make buttonholes on right front band by K tog 3rd and 4th st from mid front and make 1 YO. Make buttonholes when piece measures: SIZE S: 6, 11, 17, 22, 27 and 32 cm / 2 3/8,4 3/8,6 3/4,8 3/4, 10 5/8 and 12½ inch. SIZE M: 6, 12, 17, 22, 28 and 33 cm / 2 3/8,4 3/4,6 3/4,8 3/4,11 and 13 inch. SIZE L: 6, 12, 18, 23, 29 and 34 cm / 2 3/8,4 3/4,7,9,11 3/8 and 13 3/8 inch. SIZE XL: 6, 12, 18, 24, 30 and 35 cm / 2 3/8,4 3/4,7,9½,11 3/4 and 13 3/4 inch. SIZE XXL: 6, 13, 19, 25, 31 and 37 cm / 2 3/8,5 1/8,7½,9 3/4,12 1/4 and 14½ inch. SIZE XXXL: 6, 13, 19, 26, 32 and 39 cm / 2 3/8,5 1/8,7½,10 1/4,12½ and 15 1/4 inch. ---------------------------------------------------------- ---------------------------------------------------------- BACK PIECE: Worked back and forth on needle with an opening mid back for the crochet triangle. Crochet the triangle first and then work back piece in 2 pieces until after the opening for triangle. CROCHET TRIANGLE: Crochet 6 ch with 2 threads Alpaca on hook size 4.5 mm/US 7 and form a ring with 1 sl st in first ch. ROUND 1: 3 ch (= 1 dc), 11 dc in ring, finish with 1 sl st in 3rd ch from beg of round (= 12 dc). ROUND 2: 3 ch (= 1 dc), * 5 ch, skip 1 dc, 1 dc in next dc *, repeat from *-* a total of 5 times and finish with 5 ch and 1 sl st in 3rd ch from beg of round (= 6 ch-loops on round). ROUND 3: Crochet as follows in each ch-loop: 1 sc, 1 ch, 1 dc, 1 ch, 1 tr, 1 ch, 2 dtr, 1 ch, 1 tr, 1 ch, 1 dc, 1 ch and 1 sc. Finish with 1 sl st in first sc from beg of round (= 6 leaves). ROUND 4: 6 ch (= 1 tripple-tr = corner), 8 ch, 1 sc at the top of first leaf (between the 2 dtr), 9 ch, 1 sc at the top of next leaf, 8 ch, 1 TRIPPLE-TR – see above - between the 2 sc between the next 2 leaves, * 7 ch, 1 sc at the top of next leaf (between the 2 dtr), 8 ch, 1 sc at the top of next leaf, 7 ch, 1 tripple-tr between the 2 sc between the next 2 leaves *, repeat from *-* 1 more time along the last side, but finish with 1 sl st in 6th ch from beg of round (instead of 1 tripple-tr between 2 leaves) = 9 ch-loops round the flower with 1 tripple-tr in each corner - the one side (= towards bottom edge) is a little longer than the 2 other sides. ROUND 5: Crochet as follows in tripple-tr in corner: 4 ch (= 1 tr), 2 ch, 1 dtr, 2 ch and 1 tr. In each of the 3 ch-loops along the first side crochet as follows: 1 ch, 1 tr, 1 ch, 1 tr, 1 ch, 1 tr, 1 ch, 1 tr, (= 4 tr in each loop), * in tripple-tr in corner crochet as follows: 1 ch, 1 tr, 2 ch, 1 dtr, 2 ch and 1 tr, and then crochet as follows in each of the 3 ch-loops along the next side: 1 ch, 1 tr, 1 ch, 1 tr, 1 ch, 1 tr (= a total of 3 tr in each loop) *, repeat from *-* 1 more time along the last side, and finish with 1 ch and 1 sl st in 4th ch from beg of round. ROUND 6: 4 ch, 1 tr in first ch-loop, in dtr in each corner crochet as follows: 1 tr, 2 ch, 1 dtr, 2 ch and 1 tr, then crochet 1 tr in each tr and 1 tr in each ch-loop from previous round. Finish round with 1 sl st in 4th ch from beg of round. Along one side there are now 31 tr (= towards bottom edge) and along the 2 other sides there are 25 tr. Fasten off. Triangle measures approx 23 cm / 9" along the longest side and 20 cm / 8" along the 2 other sides. BACK PIECE – LEFT SIDE: Cast on 17-20-24-28-33-38 sts (includes 1 edge st at the side) with 2 threads Alpaca on needle size 5 mm / US 8. Work 2 rows GARTER ST – see above. Work next row as follows from RS: 2-2-2-3-3-3 garter sts, M.1 (= 8 sts), 6-9-13-16-21-26 stockinette sts and 1 edge st in garter st. Continue like this – work inc st in M.1 in stockinette st. AT THE SAME TIME when piece measures 3 cm / 1⅛" dec 1 st at the side (from RS) by K2 tog inside 1 edge st, and repeat the dec on every 3 cm / 1⅛" a total of 5 times. When you have inc a total of 21 sts in M.1 put piece aside - finish after 1 row from RS. Piece now measures approx 20 cm / 8" and there are 33-36-40-44-49-54 sts on needle. BACK PIECE – RIGHT SIDE: Cast on 17-20-24-28-33-38 sts (includes 1 edge st at the side) with 2 threads Alpaca on needle size 5 mm / US 8. Work 2 rows garter st. Work next row as follows from RS: 1 edge st in garter st, 6-9-13-16-21-26 stockinette sts, M.2 (= 8 sts) and 2-2-2-3-3-3 garter sts. Continue like this – work inc sts in M.2 in stockinette st. AT THE SAME TIME when piece measures 3 cm / 1⅛" dec at the side as described for left side – but K tog into back of loop the 2nd and 3rd st on row. When there are as many sts and as many rows as on left side put piece aside. BACK PIECE: Slip the 2 back pieces on the same needle with pattern towards pattern = 66-72-80-88-98-108 sts. Continue as follows: 1 edge st in garter st, 20-23-27-30-35-40 stockinette sts, M.3 (make sure to have the same number of rows between each cable row throughout), 4-4-4-6-6-6 garter sts, M.4, 20-23-27-30-35-40 stockinette sts and 1 edge st in garter st. Continue like this. AT THE SAME TIME when piece measures 22 cm / 8¾" from cast on row inc 1 st each side by K 2 sts in the last but one st, and repeat the inc on every 2-2.5-2.5-2.5-3-3 cm / ¾"-⅞"-⅞"-⅞"-1⅛"-1⅛" a total of 6 times = 78-84-92-100-110-120 sts. When piece measures 37-38-39-40-42-44 cm / 14½"-15"-15¼"-15¾"-16½"-17¼" bind off for armhole each side at the beg of every row: 3 sts 1-1-1-1-2-2 times, 2 sts 1-1-2-3-4-5 times and 1 st 3-4-4-5-4-5 times = 62-66-70-72-74-78 sts. When piece measures 54-56-58-60-63-66 cm / 21¼"-22"-22¾"-23⅝"-24¾"-26" K2 tog on the 6 sts on each cable = 56-60-64-66-68-72 sts. On next row bind off the middle 16-16-18-18-20-20 sts for neck = 20-22-23-24-24-26 sts left on each shoulder. Complete each shoulder separately and bind off when piece measures 56-58-60-62-65-68 cm / 22"-22¾"-23⅝"-24⅜"-25½"-26¾". Sew the crochet triangle to the opening at bottom of back piece – make sure to have the longer side towards bottom edge. Sew edge to edge and make sure the seam is even. LEFT FRONT PIECE: Cast on 41-45-49-53-57-63 sts (includes 1 edge st at the side and 6 front band sts towards mid front) with 2 threads Alpaca on needle size 5 mm / US 8. Work 2 rows garter st. READ ALL OF THE FOLLOWING SECTION BEFORE CONTINUING! PATTERN: Continue as follows from RS: 1 edge st in garter st, 22-26-30-34-38-44 stockinette sts, 2 garter sts, M.4 (= 10 sts) and 6 front band sts in garter st. Continue like this until piece measures approx 12-10-8-6-5-3 cm / 4¾"-4"-3⅛"-2⅜"-2"-1⅛" (adjust to after 1 row from WS after 1 cable-row). Continue as follows: 1 edge st in garter st, stockinette st until 20 sts remain, M.6 (= 12 sts), 2 stockinette sts, and 6 front band sts in garter st. Continue like this – M.6 will shift 1 st towards the side on every other row (i.e. there will gradually be less stockinette sts on right side of piece and more stockinette sts on left side of piece). DECREASES AND INCREASES: At the same time when piece measures 3 cm / 1⅛" dec at the side as described for back piece and when piece measures 22 cm / 8¾" inc at the side as described for back piece. When all dec and inc are complete there are 42-46-50-54-58-64 sts on needle. COLLAR: When piece measures 32-33-34-35-37-39 cm / 12½"-13"-13⅜"-13¾"-14½"-15¼" work 2 rows garter st on the 6 front band sts only (to make neckline neater). On next row inc 1 st for collar towards mid front by making 1 YO inside the first front band st, on next row work YO into back of loop to avoid a hole. Repeat the inc on every other row a total of 12 times = 18 garter sts incl front band-sts towards mid front. DEC FOR NECK: When piece measures 34-35-36-37-39-41 cm / 13⅜"-13¾"-14¼"-14½"-15¼"-16⅛" dec 1 st for neck inside front band sts + inc sts for collar – SEE DECREASING TIP! Repeat the dec on every other row a total of 6-7-7-7-7-8 times and then on every 4th row a total of 5-5-6-6-6-6 times. PATTERN: When M.6 has shifted all the way to the side (only 1 edge st left) continue as follows: 1 edge st in garter st, 3 garter sts, M.1 (but without the YO – make sure to have the same number of rows between each cable-row), then stockinette st and garter st on remaining sts as before. When piece measures 36-37-38-39-41-43 cm / 14¼"-14½"-15"-15¼"-16⅛"-17" K2 tog on the 6 sts on cable. Continue in stockinette st over stockinette st and garter st over garter st. ARMHOLE: When piece measures 37-38-39-40-42-44 cm / 14½"-15"-15¼"-15¾"-16½"-17¼" bind off for armhole at the beg of every row from the side as described for back piece. When all dec for armhole and neck and inc for collar are complete there are 32-34-35-36-36-38 sts on needle – continue in stockinette st and garter st as before. When piece measures 56-58-60-62-65-68 cm / 22"-22¾"-23⅝"-24⅜"-25½"-26¾" bind off 20-22-23-24-24-26 sts from shoulder towards neckline = 12 collar sts left on needle. Continue on these as follows (beg from WS): * 2 rows garter st on all sts, 2 rows garter st on the 8 sts towards mid front only *, repeat from *-* until collar measures 5-5-5.5-5.5-6-6 cm / 2"-2"-2¼"-2¼"-2⅜"-2⅜" (measured where shortest) and bind off loosely. RIGHT FRONT PIECE: Like left front piece, but after the first 2 rows garter st continue as follows: 6 front band sts in garter st, M.3, 2 garter sts, 22-26-30-34-38-44 stockinette sts and 1 edge st in garter st. Then work M.5 instead of M.6 and M.2 instead of M.1. AT THE SAME TIME when piece measures 6 cm / 2⅜" make BUTTONHOLES on front band – see above! SLEEVE: Worked back and forth on needle. Cast on 57-59-61-63-65-67 sts (includes 1 edge st each side) with 2 threads Alpaca on needle size 5 mm / US 8. K 1 row from RS and continue as follows from WS: 1 edge st in garter st, 9-10-11-12-13-14 stockinette sts, M.7 (= 37 sts), 9-10-11-12-13-14 stockinette sts and 1 edge st in garter st. AT THE SAME TIME when piece measures 2 cm / ¾" dec 1 st each side, repeat the dec on every 3 cm / 1⅛" a total of 5 times. When M.7 and dec at the sides are complete there are 41-43-45-47-49-51 sts on needle and piece measures approx 17 cm / 6¾". Continue in stockinette st on all sts. When piece measures 19 cm / 7½" inc 1 st each side, and repeat the inc on every 3.5-3-2.5-2-2-1.5 cm / 1¼"-1⅛"-⅞"-¾"-¾"-½" a total of 9-10-11-12-13-14 times = 59-63-67-71-75-79 sts. When piece measures 49-48-47-46-45-44 cm / 19¼"-19"-18½"-18"-17¾"-17¼" (less for the larger sizes because of longer sleeve cap and wider shoulder) bind off for sleeve cap each side at the beg of every row: 4 sts 1 time, 2 sts 2 times and 1 st 4-5-6-7-8-9 times, then 2 sts each side until piece measures 57 cm / 22½", now bind off 3 sts 1 time each side. Bind off remaining sts, piece measures approx 58 cm / 22¾". ASSEMBLY: Sew shoulder seams. Sew collar tog mid back, edge to edge, and sew to neckline. Set in sleeves and sew side and sleeve seams inside 1 edge st. Crochet a border round the whole opening with crochet hook size 4.5 mm/US 7 and 2 threads Alpaca – beg mid back, continue down along collar, left front band, along bottom edge, up along right front band, collar and finish mid back. Crochet as follows: 1 sc in first st, * 4 ch, 1 dc in the first ch (= 1 picot), skip approx 1.5 cm / ½", 1 sc in next st *, repeat from *-*. Crochet a similar border round sleeve edges. Sew on buttons. |
||||||||||||||||||||||||||||||||||
Diagram explanations |
||||||||||||||||||||||||||||||||||
|
||||||||||||||||||||||||||||||||||
 |
||||||||||||||||||||||||||||||||||
 |
||||||||||||||||||||||||||||||||||
Have you finished this pattern?Tag your pictures with #dropspattern #sweetericacardigan or submit them to the #dropsfan gallery. Do you need help with this pattern?You'll find 33 tutorial videos, a Comments/Questions area and more by visiting the pattern on garnstudio.com. © 1982-2026 DROPS Design A/S. We reserve all rights. This document, including all its sub-sections, has copyrights. Read more about what you can do with our patterns at the bottom of each pattern on our site. |
||||||||||||||||||||||||||||||||||


With over 40 years in knitting and crochet design, DROPS Design offers one of the most extensive collections of free patterns on the internet - translated to 17 languages. As of today we count 324 catalogs and 12290 patterns - 12280 of which are translated into English (US/in).
We work hard to bring you the best knitting and crochet have to offer, inspiration and advice as well as great quality yarns at incredible prices! Would you like to use our patterns for other than personal use? You can read what you are allowed to do in the Copyright text at the bottom of all our patterns. Happy crafting!
Post a comment to pattern DROPS 117-1
We would love to hear what you have to say about this pattern!
If you want to leave a question, please make sure you select the correct category in the form below, to speed up the answering process. Required fields are marked *.