
Popular categories
Looking for a yarn?


|
||||||||||||||||||||||||||||||||||
Sweet Erica |
||||||||||||||||||||||||||||||||||
|
|
||||||||||||||||||||||||||||||||||
DROPS Jacket in 2 threads ”Alpaca” with cable and lace pattern and crochet triangle on back piece. Size S to XXXL
DROPS 117-1 |
||||||||||||||||||||||||||||||||||
|
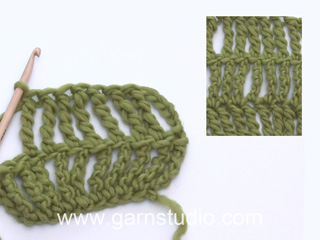
TRIPPLE TREBLE CROCHET (ttr): Make 4 YO, insert hook in st below, pull thread through st (= 6 loops on hook) , * YO round hook, pull thread through 2 loops *, repeat from *-* a total of 5 times = 1 st left on hook. PATTERN: See diagram M.1 to M.7 – diagrams are seen from RS and show 1 pattern repeat. GARTER ST (back and forth on needle): K all rows. DECREASING TIP (neckline): Make all dec from RS. Dec as follows before all garter sts: K2 tog. Dec as follows after all garter sts: slip 1 st as if to K, K1, psso. BUTTONHOLES: Make buttonholes on right front band by K tog 3rd and 4th st from mid front and make 1 YO. Make buttonholes when piece measures: SIZE S: 6, 11, 17, 22, 27 and 32 cm / 2 3/8,4 3/8,6 3/4,8 3/4, 10 5/8 and 12½ inch. SIZE M: 6, 12, 17, 22, 28 and 33 cm / 2 3/8,4 3/4,6 3/4,8 3/4,11 and 13 inch. SIZE L: 6, 12, 18, 23, 29 and 34 cm / 2 3/8,4 3/4,7,9,11 3/8 and 13 3/8 inch. SIZE XL: 6, 12, 18, 24, 30 and 35 cm / 2 3/8,4 3/4,7,9½,11 3/4 and 13 3/4 inch. SIZE XXL: 6, 13, 19, 25, 31 and 37 cm / 2 3/8,5 1/8,7½,9 3/4,12 1/4 and 14½ inch. SIZE XXXL: 6, 13, 19, 26, 32 and 39 cm / 2 3/8,5 1/8,7½,10 1/4,12½ and 15 1/4 inch. ---------------------------------------------------------- ---------------------------------------------------------- BACK PIECE: Worked back and forth on needle with an opening mid back for the crochet triangle. Crochet the triangle first and then work back piece in 2 pieces until after the opening for triangle. CROCHET TRIANGLE: Crochet 6 ch with 2 threads Alpaca on hook size 4.5 mm/US 7 and form a ring with 1 sl st in first ch. ROUND 1: 3 ch (= 1 dc), 11 dc in ring, finish with 1 sl st in 3rd ch from beg of round (= 12 dc). ROUND 2: 3 ch (= 1 dc), * 5 ch, skip 1 dc, 1 dc in next dc *, repeat from *-* a total of 5 times and finish with 5 ch and 1 sl st in 3rd ch from beg of round (= 6 ch-loops on round). ROUND 3: Crochet as follows in each ch-loop: 1 sc, 1 ch, 1 dc, 1 ch, 1 tr, 1 ch, 2 dtr, 1 ch, 1 tr, 1 ch, 1 dc, 1 ch and 1 sc. Finish with 1 sl st in first sc from beg of round (= 6 leaves). ROUND 4: 6 ch (= 1 tripple-tr = corner), 8 ch, 1 sc at the top of first leaf (between the 2 dtr), 9 ch, 1 sc at the top of next leaf, 8 ch, 1 TRIPPLE-TR – see above - between the 2 sc between the next 2 leaves, * 7 ch, 1 sc at the top of next leaf (between the 2 dtr), 8 ch, 1 sc at the top of next leaf, 7 ch, 1 tripple-tr between the 2 sc between the next 2 leaves *, repeat from *-* 1 more time along the last side, but finish with 1 sl st in 6th ch from beg of round (instead of 1 tripple-tr between 2 leaves) = 9 ch-loops round the flower with 1 tripple-tr in each corner - the one side (= towards bottom edge) is a little longer than the 2 other sides. ROUND 5: Crochet as follows in tripple-tr in corner: 4 ch (= 1 tr), 2 ch, 1 dtr, 2 ch and 1 tr. In each of the 3 ch-loops along the first side crochet as follows: 1 ch, 1 tr, 1 ch, 1 tr, 1 ch, 1 tr, 1 ch, 1 tr, (= 4 tr in each loop), * in tripple-tr in corner crochet as follows: 1 ch, 1 tr, 2 ch, 1 dtr, 2 ch and 1 tr, and then crochet as follows in each of the 3 ch-loops along the next side: 1 ch, 1 tr, 1 ch, 1 tr, 1 ch, 1 tr (= a total of 3 tr in each loop) *, repeat from *-* 1 more time along the last side, and finish with 1 ch and 1 sl st in 4th ch from beg of round. ROUND 6: 4 ch, 1 tr in first ch-loop, in dtr in each corner crochet as follows: 1 tr, 2 ch, 1 dtr, 2 ch and 1 tr, then crochet 1 tr in each tr and 1 tr in each ch-loop from previous round. Finish round with 1 sl st in 4th ch from beg of round. Along one side there are now 31 tr (= towards bottom edge) and along the 2 other sides there are 25 tr. Fasten off. Triangle measures approx 23 cm / 9" along the longest side and 20 cm / 8" along the 2 other sides. BACK PIECE – LEFT SIDE: Cast on 17-20-24-28-33-38 sts (includes 1 edge st at the side) with 2 threads Alpaca on needle size 5 mm / US 8. Work 2 rows GARTER ST – see above. Work next row as follows from RS: 2-2-2-3-3-3 garter sts, M.1 (= 8 sts), 6-9-13-16-21-26 stockinette sts and 1 edge st in garter st. Continue like this – work inc st in M.1 in stockinette st. AT THE SAME TIME when piece measures 3 cm / 1⅛" dec 1 st at the side (from RS) by K2 tog inside 1 edge st, and repeat the dec on every 3 cm / 1⅛" a total of 5 times. When you have inc a total of 21 sts in M.1 put piece aside - finish after 1 row from RS. Piece now measures approx 20 cm / 8" and there are 33-36-40-44-49-54 sts on needle. BACK PIECE – RIGHT SIDE: Cast on 17-20-24-28-33-38 sts (includes 1 edge st at the side) with 2 threads Alpaca on needle size 5 mm / US 8. Work 2 rows garter st. Work next row as follows from RS: 1 edge st in garter st, 6-9-13-16-21-26 stockinette sts, M.2 (= 8 sts) and 2-2-2-3-3-3 garter sts. Continue like this – work inc sts in M.2 in stockinette st. AT THE SAME TIME when piece measures 3 cm / 1⅛" dec at the side as described for left side – but K tog into back of loop the 2nd and 3rd st on row. When there are as many sts and as many rows as on left side put piece aside. BACK PIECE: Slip the 2 back pieces on the same needle with pattern towards pattern = 66-72-80-88-98-108 sts. Continue as follows: 1 edge st in garter st, 20-23-27-30-35-40 stockinette sts, M.3 (make sure to have the same number of rows between each cable row throughout), 4-4-4-6-6-6 garter sts, M.4, 20-23-27-30-35-40 stockinette sts and 1 edge st in garter st. Continue like this. AT THE SAME TIME when piece measures 22 cm / 8¾" from cast on row inc 1 st each side by K 2 sts in the last but one st, and repeat the inc on every 2-2.5-2.5-2.5-3-3 cm / ¾"-⅞"-⅞"-⅞"-1⅛"-1⅛" a total of 6 times = 78-84-92-100-110-120 sts. When piece measures 37-38-39-40-42-44 cm / 14½"-15"-15¼"-15¾"-16½"-17¼" bind off for armhole each side at the beg of every row: 3 sts 1-1-1-1-2-2 times, 2 sts 1-1-2-3-4-5 times and 1 st 3-4-4-5-4-5 times = 62-66-70-72-74-78 sts. When piece measures 54-56-58-60-63-66 cm / 21¼"-22"-22¾"-23⅝"-24¾"-26" K2 tog on the 6 sts on each cable = 56-60-64-66-68-72 sts. On next row bind off the middle 16-16-18-18-20-20 sts for neck = 20-22-23-24-24-26 sts left on each shoulder. Complete each shoulder separately and bind off when piece measures 56-58-60-62-65-68 cm / 22"-22¾"-23⅝"-24⅜"-25½"-26¾". Sew the crochet triangle to the opening at bottom of back piece – make sure to have the longer side towards bottom edge. Sew edge to edge and make sure the seam is even. LEFT FRONT PIECE: Cast on 41-45-49-53-57-63 sts (includes 1 edge st at the side and 6 front band sts towards mid front) with 2 threads Alpaca on needle size 5 mm / US 8. Work 2 rows garter st. READ ALL OF THE FOLLOWING SECTION BEFORE CONTINUING! PATTERN: Continue as follows from RS: 1 edge st in garter st, 22-26-30-34-38-44 stockinette sts, 2 garter sts, M.4 (= 10 sts) and 6 front band sts in garter st. Continue like this until piece measures approx 12-10-8-6-5-3 cm / 4¾"-4"-3⅛"-2⅜"-2"-1⅛" (adjust to after 1 row from WS after 1 cable-row). Continue as follows: 1 edge st in garter st, stockinette st until 20 sts remain, M.6 (= 12 sts), 2 stockinette sts, and 6 front band sts in garter st. Continue like this – M.6 will shift 1 st towards the side on every other row (i.e. there will gradually be less stockinette sts on right side of piece and more stockinette sts on left side of piece). DECREASES AND INCREASES: At the same time when piece measures 3 cm / 1⅛" dec at the side as described for back piece and when piece measures 22 cm / 8¾" inc at the side as described for back piece. When all dec and inc are complete there are 42-46-50-54-58-64 sts on needle. COLLAR: When piece measures 32-33-34-35-37-39 cm / 12½"-13"-13⅜"-13¾"-14½"-15¼" work 2 rows garter st on the 6 front band sts only (to make neckline neater). On next row inc 1 st for collar towards mid front by making 1 YO inside the first front band st, on next row work YO into back of loop to avoid a hole. Repeat the inc on every other row a total of 12 times = 18 garter sts incl front band-sts towards mid front. DEC FOR NECK: When piece measures 34-35-36-37-39-41 cm / 13⅜"-13¾"-14¼"-14½"-15¼"-16⅛" dec 1 st for neck inside front band sts + inc sts for collar – SEE DECREASING TIP! Repeat the dec on every other row a total of 6-7-7-7-7-8 times and then on every 4th row a total of 5-5-6-6-6-6 times. PATTERN: When M.6 has shifted all the way to the side (only 1 edge st left) continue as follows: 1 edge st in garter st, 3 garter sts, M.1 (but without the YO – make sure to have the same number of rows between each cable-row), then stockinette st and garter st on remaining sts as before. When piece measures 36-37-38-39-41-43 cm / 14¼"-14½"-15"-15¼"-16⅛"-17" K2 tog on the 6 sts on cable. Continue in stockinette st over stockinette st and garter st over garter st. ARMHOLE: When piece measures 37-38-39-40-42-44 cm / 14½"-15"-15¼"-15¾"-16½"-17¼" bind off for armhole at the beg of every row from the side as described for back piece. When all dec for armhole and neck and inc for collar are complete there are 32-34-35-36-36-38 sts on needle – continue in stockinette st and garter st as before. When piece measures 56-58-60-62-65-68 cm / 22"-22¾"-23⅝"-24⅜"-25½"-26¾" bind off 20-22-23-24-24-26 sts from shoulder towards neckline = 12 collar sts left on needle. Continue on these as follows (beg from WS): * 2 rows garter st on all sts, 2 rows garter st on the 8 sts towards mid front only *, repeat from *-* until collar measures 5-5-5.5-5.5-6-6 cm / 2"-2"-2¼"-2¼"-2⅜"-2⅜" (measured where shortest) and bind off loosely. RIGHT FRONT PIECE: Like left front piece, but after the first 2 rows garter st continue as follows: 6 front band sts in garter st, M.3, 2 garter sts, 22-26-30-34-38-44 stockinette sts and 1 edge st in garter st. Then work M.5 instead of M.6 and M.2 instead of M.1. AT THE SAME TIME when piece measures 6 cm / 2⅜" make BUTTONHOLES on front band – see above! SLEEVE: Worked back and forth on needle. Cast on 57-59-61-63-65-67 sts (includes 1 edge st each side) with 2 threads Alpaca on needle size 5 mm / US 8. K 1 row from RS and continue as follows from WS: 1 edge st in garter st, 9-10-11-12-13-14 stockinette sts, M.7 (= 37 sts), 9-10-11-12-13-14 stockinette sts and 1 edge st in garter st. AT THE SAME TIME when piece measures 2 cm / ¾" dec 1 st each side, repeat the dec on every 3 cm / 1⅛" a total of 5 times. When M.7 and dec at the sides are complete there are 41-43-45-47-49-51 sts on needle and piece measures approx 17 cm / 6¾". Continue in stockinette st on all sts. When piece measures 19 cm / 7½" inc 1 st each side, and repeat the inc on every 3.5-3-2.5-2-2-1.5 cm / 1¼"-1⅛"-⅞"-¾"-¾"-½" a total of 9-10-11-12-13-14 times = 59-63-67-71-75-79 sts. When piece measures 49-48-47-46-45-44 cm / 19¼"-19"-18½"-18"-17¾"-17¼" (less for the larger sizes because of longer sleeve cap and wider shoulder) bind off for sleeve cap each side at the beg of every row: 4 sts 1 time, 2 sts 2 times and 1 st 4-5-6-7-8-9 times, then 2 sts each side until piece measures 57 cm / 22½", now bind off 3 sts 1 time each side. Bind off remaining sts, piece measures approx 58 cm / 22¾". ASSEMBLY: Sew shoulder seams. Sew collar tog mid back, edge to edge, and sew to neckline. Set in sleeves and sew side and sleeve seams inside 1 edge st. Crochet a border round the whole opening with crochet hook size 4.5 mm/US 7 and 2 threads Alpaca – beg mid back, continue down along collar, left front band, along bottom edge, up along right front band, collar and finish mid back. Crochet as follows: 1 sc in first st, * 4 ch, 1 dc in the first ch (= 1 picot), skip approx 1.5 cm / ½", 1 sc in next st *, repeat from *-*. Crochet a similar border round sleeve edges. Sew on buttons. |
||||||||||||||||||||||||||||||||||
Diagram explanations |
||||||||||||||||||||||||||||||||||
|
||||||||||||||||||||||||||||||||||

|
||||||||||||||||||||||||||||||||||

|
||||||||||||||||||||||||||||||||||
|
Have you made this or any other of our designs? Tag your pictures in social media with #dropsdesign so we can see them! Do you need help with this pattern?You'll find tutorial videos, a Comments/Questions area and more by visiting the pattern on garnstudio.com. © 1982-2024 DROPS Design A/S. We reserve all rights. This document, including all its sub-sections, has copyrights. Read more about what you can do with our patterns at the bottom of each pattern on our site. |
||||||||||||||||||||||||||||||||||


With over 40 years in knitting and crochet design, DROPS Design offers one of the most extensive collections of free patterns on the internet - translated to 17 languages. As of today we count 304 catalogs and 11422 patterns - 11417 of which are translated into English (US/in).
We work hard to bring you the best knitting and crochet have to offer, inspiration and advice as well as great quality yarns at incredible prices! Would you like to use our patterns for other than personal use? You can read what you are allowed to do in the Copyright text at the bottom of all our patterns. Happy crafting!
Comments / Questions (244)
Hi this is both a comment and a question. I am doing the sleeve of Sweet Erika and followed the instructions without reading and understanding it first. for example, CO57 sts, do pattern, dec each side a total of 5 times = 41 sts NO it doesn't. 57-10 = 47. The rest of the pattern is out by 6 sts. The question is should the CO be 51 or is the rest out by 6 stitches? or should the dec be 8? Sorry to point this out.
30.11.2023 - 11:11Bedankt voor de snelle reactie. Dan houd ik het bij de aanbevolen naalddikte.
22.08.2023 - 11:39Bij het proeflapje klopt mijn steekverhpuding niet. De steekverhouding zou 17 steken en 22 naalden = 10x10 cm moeten zijn, maar ik heb 10 cm breed x 9 cm hoog. Het model wordt dan te kort. Bij een grotere naald komt de lengte goed, maar wordt het te wijd. Hoe kan ik dit oplossen?
19.08.2023 - 19:39DROPS Design answered:
Dag Sacha,
De stekenverhouding in de breedte is het belangrijkst. Voor de hoogte kun je de aangegeven centimeters aanhouden.
20.08.2023 - 15:27Bonjour je fais le croquis n°6 du model 117 mais le rendu n'est pas pareil que sur la photo pouvez-vous m'aider merci d'avance
12.07.2022 - 11:59DROPS Design answered:
Bonjour Mme Fachat, lorsque vous tricotez M.6 pour le devant gauche, vous devez décaler la torsade vers la droite, autrement dit, commencez le diagramme 1 maille plus tôt tous les 2 rangs et faites 1 diminution et terminez le diagramme par 1 jeté = le nombre de mailles avant M.6 diminue et celui après M.6 augmente tous les 2 rangs. Le nombre de mailles total reste le même, mais la torsade va s'incliner vers la droite. Bon tricot!
12.07.2022 - 14:07Hola. Quiero saber si envían llamas a Santiago de Chile, cual es el costo del envío y cuanto se demora en llegar. Gracias
21.02.2022 - 02:43DROPS Design answered:
Hola Clara, puedes consultar en el siguiente enlace aquellas tiendas DROPS con envío a Chile: https://www.garnstudio.com/findastore.php?id=19&w=1&cid=19
27.02.2022 - 18:09Hallo. Ich komme mit dem Muster M7 nicht klar. In der Reihe 9 geht der Mustersatz nicht auf. Ich soll zwischen den beiden Zöpfen 11 M rechts stricken habe aber nur noch 9 M dazwischen. Bitte helfen sie mir!
29.10.2021 - 10:26DROPS Design answered:
Liebe Nicole, leider ist Ihr Problem nicht ganz deutlich. M7 stricken Sie ja am Ärmel. Die Reihe teilen Sie ja schon zu Beginn ein, d.h. die je 11 Maschen glatt rechts werden am Anfang und am Ende gestrickt und dazwischen M7. Wenn M7 bis zur Reihe 9 gepasst hat, müsste M7 auch in Reihe 9 passen. Zählen Sie noch einmal genau nach, ob Sie irgendwo zu viel abgenommen haben. Am besten ziehen Sie vor und nach M7 einen Markierungsfaden ein, dann wissen Sie immer, wo der Mustersatz beginnt und endet. Gutes Gelingen!
29.10.2021 - 11:11Hej, jeg kan se flere spørge på dette fine mønster. Jeg kommer desværre ikke i mål med jeres tidligere svar. Nu spørger jeg om M6 og M5 skal være det samme som bunden af M7 ? Så kan jeg måske få det til at passe. Jeg afventer i spænding - tak.
27.06.2021 - 10:31DROPS Design answered:
Hej Bettina, jeg kan ikke regne ud hvor du er i opskriften. Hvad jeg kan se så skal du kun strikke M.7 på ærmerne....
30.06.2021 - 13:28Hartelijk danik kom niet uit de gehaakte drie toer 4 wilt u het mischien uit teken voor mij hartelijk dank fransca rutten
15.09.2020 - 16:13DROPS Design answered:
Dag Fransca,
In onderstaande video kun je zien hoe je een picotrand haakt. In de video worden 3 lossen gehaakt, maar in dit patroon moet je steeds 4 lossen haken.
18.11.2020 - 20:19Bonjour, pour les emmanchures vous dites à 39 cm de hauteur totale mais si on regarde le schéma ,elles viennent après les augmentations donc la hauteur proposée n'est pas bonne. Pouvez vous m'aider ? je vous remercie
05.04.2019 - 11:04DROPS Design answered:
Bonjour Janick, en taille L, on rabat pour les emmanchures à 39 cm de hauteur totale, les augmentations des côtés doivent être terminées - on a ensuite 21 cm de hauteur d'emmanchure soit 39+21 = 60 cm de hauteur totale. Bon tricot!
05.04.2019 - 12:16I can’t figure out where the decreases are in the back pieces that I am supposed to do “at the same time” as the increases in M1 & M2 when piece measures 1 1/8 “ and so on. Are they at the beginning or at the end of the rows at every 1 1/8 inch?
06.12.2018 - 02:33DROPS Design answered:
Dear Ginette, on the left side of back piece you will decrease at the end of the row from RS (side = towards seam with front piece), and on the right side of back piece you will decrease at the beginning of the row from RS (= side = towards seam with front piece). You will decrease the 6-9-13-16-21-26 sts in stocking stitch (at the beg of this section on left back piece / at the end of this section on right back piece). Happy knitting!
06.12.2018 - 10:02