
Popular categories
Looking for a yarn?


Comments / Questions (243)
![]() Janick wrote:
Janick wrote:
Bonjour, pour les emmanchures vous dites à 39 cm de hauteur totale mais si on regarde le schéma ,elles viennent après les augmentations donc la hauteur proposée n'est pas bonne. Pouvez vous m'aider ? je vous remercie
05.04.2019 - 11:04DROPS Design answered:
Bonjour Janick, en taille L, on rabat pour les emmanchures à 39 cm de hauteur totale, les augmentations des côtés doivent être terminées - on a ensuite 21 cm de hauteur d'emmanchure soit 39+21 = 60 cm de hauteur totale. Bon tricot!
05.04.2019 - 12:16
![]() Ginette wrote:
Ginette wrote:
I can’t figure out where the decreases are in the back pieces that I am supposed to do “at the same time” as the increases in M1 & M2 when piece measures 1 1/8 “ and so on. Are they at the beginning or at the end of the rows at every 1 1/8 inch?
06.12.2018 - 02:33DROPS Design answered:
Dear Ginette, on the left side of back piece you will decrease at the end of the row from RS (side = towards seam with front piece), and on the right side of back piece you will decrease at the beginning of the row from RS (= side = towards seam with front piece). You will decrease the 6-9-13-16-21-26 sts in stocking stitch (at the beg of this section on left back piece / at the end of this section on right back piece). Happy knitting!
06.12.2018 - 10:02
![]() Hedwig wrote:
Hedwig wrote:
Ohhhh zo nou snap ik m! Bedankt hoor!
29.08.2018 - 16:31
![]() Hedwig Schaafsma wrote:
Hedwig Schaafsma wrote:
Meerder TEGELIJKERTIJD bij een hoogte van 22 cm vanaf de opzetnld 1 st aan iedere kant door 2 st recht te breien in de een na laatste st en herhaal dit meerderen elke 2-2.5-2.5-2.5-3-3 cm in totaal 6 keer = 78-84-92-100-110-120 st. Kant bij een hoogte Dit begrijp ik niet meerderen door 2 steken recht te breien? Dit is Sweet Erica patroon achterland.
29.08.2018 - 10:35DROPS Design answered:
Dag Hedwig, Je breit 2 steken recht in de een na laatste steek, zodat je 2 steken van 1 steek maakt.
29.08.2018 - 11:08Margit wrote:
Very pretty pattern. I did mine over-head and a simple V-neck, front cables all the way up to shoulders. Would do the waist part a bit longer, so the back flower motive fits better with body shape.
12.04.2017 - 11:30
![]() Susan Sangster wrote:
Susan Sangster wrote:
I agree rows 1 & 2 are correct. I refer to rows 5 & 11.
24.03.2017 - 21:41
![]() Susan Sangster wrote:
Susan Sangster wrote:
On the Ravely.com link to this pattern the charts for M.5 and M.6 are incorrect. The cable rows should read on M6: sl1, K1, PSSO, K2, cable 6, K2, YO. It reads on the website: sl1,K1,PSSO, K3, cable 6, K1, YO Same issue on M.5 Drove me crazy for a day.
24.03.2017 - 14:02DROPS Design answered:
Dear Mrs Sangster, diagrams are correct, in M.6 you will work on row 1: slip 1, k1, psso, K10 (= K2, K6 for cable, K2), YO, then on next row (from WS), the K2 will be worked K so that you will have on row 2: K2, P6, K2, P2. Happy knitting!
24.03.2017 - 14:35
![]() Ilvajoh wrote:
Ilvajoh wrote:
Hartelijk dank, ik snap het helemaal!
21.11.2016 - 16:51DROPS Design answered:
Mooi! Veel breiplezier verder
22.11.2016 - 10:17
![]() Ilvajoh wrote:
Ilvajoh wrote:
Bedankt voor de snelle reactie. ik vroeg mij alleen af of ik dit moet bekijken vanaf de goede kant dus van rechts naar links eerst 1kant steek dan kabel, dan de trico steken dan 1 steek in ribbel steek en hier meerderen met een omslag? is dit correct? het gekke is dat ik dit patroon twee jaar geleden heb gebreid zonder problemen en nu hang ik vast!!!
21.11.2016 - 15:39DROPS Design answered:
Hoi Ilvajoh. Nee, je meerdert in de voorbies (= middenvoor) van 6 st ribbelst. Dus brei je van de goede kant (linker voorpand) dan brei je eerst de overige st tot M.6, dan 2 tricotst, 5 voorbiesst in ribbelst en nu heb je 1 st over op de nld. Hier maak je de omslag, en breit de laatste st.
21.11.2016 - 15:46
![]() Ilvajoh wrote:
Ilvajoh wrote:
Hallo Ik heb een vraag over het meerderen voor de kraag. moet ik meerderen voor de kraag aan de goede kant en aan de kant van patroon M6? of moet ik meerderen bij de ene laatste steek? Alvast bedankt.
19.11.2016 - 17:44DROPS Design answered:
Hoi Ilvajoh. "Meerder in de volgende nld 1 st voor de kraag middenvoor door 1 omsl te maken naast de eerste voorbies st" = je meerdert door 1 omslag te maken na de eerste st middenvoor (in ribbelsteken)
21.11.2016 - 14:45
|
||||||||||||||||||||||||||||||||||
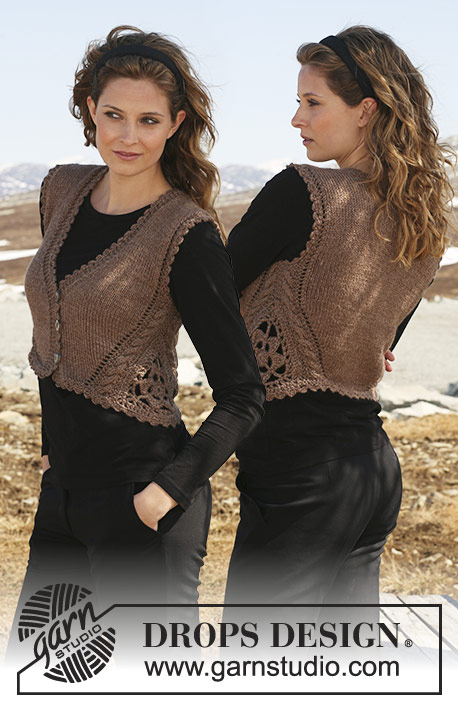
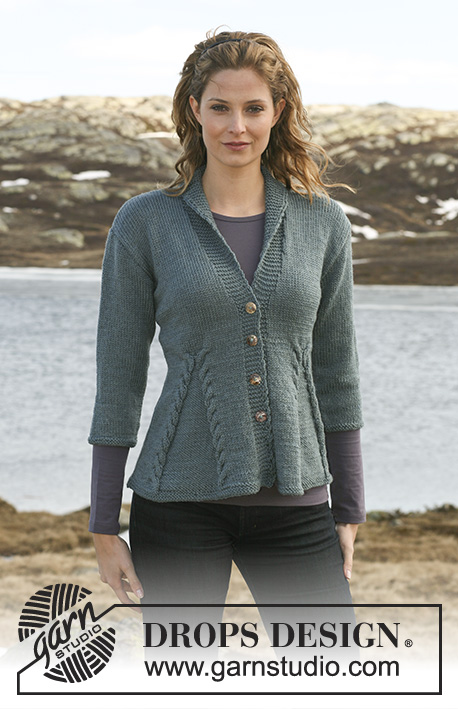
Sweet Erica#sweetericacardigan |
||||||||||||||||||||||||||||||||||
|
|
||||||||||||||||||||||||||||||||||
DROPS Jacket in 2 threads ”Alpaca” with cable and lace pattern and crochet triangle on back piece. Size S to XXXL
DROPS 117-1 |
||||||||||||||||||||||||||||||||||
|
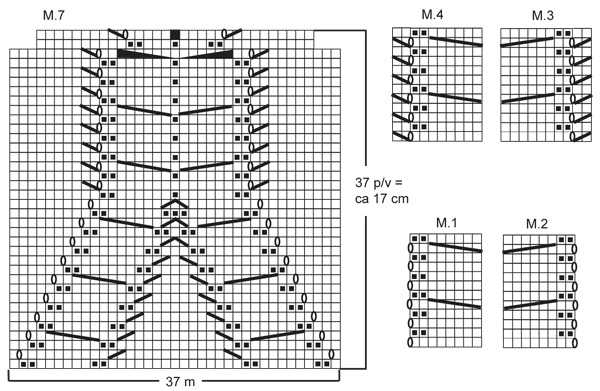
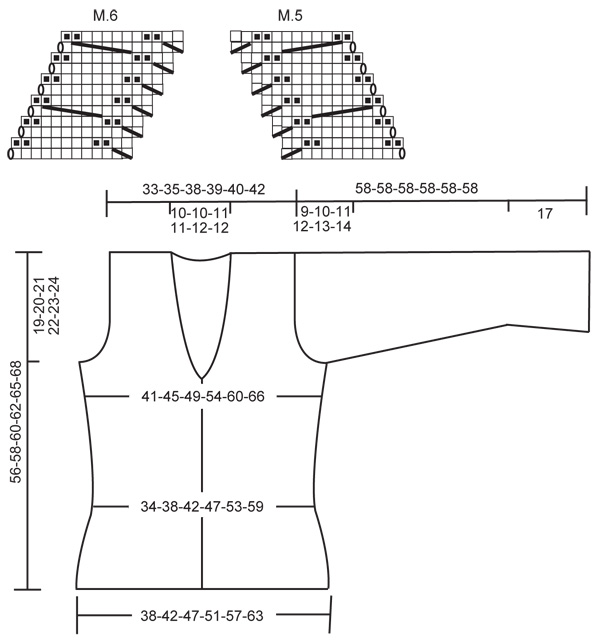
TRIPPLE TREBLE CROCHET (ttr): Make 4 YO, insert hook in st below, pull thread through st (= 6 loops on hook) , * YO round hook, pull thread through 2 loops *, repeat from *-* a total of 5 times = 1 st left on hook. PATTERN: See diagram M.1 to M.7 – diagrams are seen from RS and show 1 pattern repeat. GARTER ST (back and forth on needle): K all rows. DECREASING TIP (neckline): Make all dec from RS. Dec as follows before all garter sts: K2 tog. Dec as follows after all garter sts: slip 1 st as if to K, K1, psso. BUTTONHOLES: Make buttonholes on right front band by K tog 3rd and 4th st from mid front and make 1 YO. Make buttonholes when piece measures: SIZE S: 6, 11, 17, 22, 27 and 32 cm / 2 3/8,4 3/8,6 3/4,8 3/4, 10 5/8 and 12½ inch. SIZE M: 6, 12, 17, 22, 28 and 33 cm / 2 3/8,4 3/4,6 3/4,8 3/4,11 and 13 inch. SIZE L: 6, 12, 18, 23, 29 and 34 cm / 2 3/8,4 3/4,7,9,11 3/8 and 13 3/8 inch. SIZE XL: 6, 12, 18, 24, 30 and 35 cm / 2 3/8,4 3/4,7,9½,11 3/4 and 13 3/4 inch. SIZE XXL: 6, 13, 19, 25, 31 and 37 cm / 2 3/8,5 1/8,7½,9 3/4,12 1/4 and 14½ inch. SIZE XXXL: 6, 13, 19, 26, 32 and 39 cm / 2 3/8,5 1/8,7½,10 1/4,12½ and 15 1/4 inch. ---------------------------------------------------------- ---------------------------------------------------------- BACK PIECE: Worked back and forth on needle with an opening mid back for the crochet triangle. Crochet the triangle first and then work back piece in 2 pieces until after the opening for triangle. CROCHET TRIANGLE: Crochet 6 ch with 2 threads Alpaca on hook size 4.5 mm/US 7 and form a ring with 1 sl st in first ch. ROUND 1: 3 ch (= 1 dc), 11 dc in ring, finish with 1 sl st in 3rd ch from beg of round (= 12 dc). ROUND 2: 3 ch (= 1 dc), * 5 ch, skip 1 dc, 1 dc in next dc *, repeat from *-* a total of 5 times and finish with 5 ch and 1 sl st in 3rd ch from beg of round (= 6 ch-loops on round). ROUND 3: Crochet as follows in each ch-loop: 1 sc, 1 ch, 1 dc, 1 ch, 1 tr, 1 ch, 2 dtr, 1 ch, 1 tr, 1 ch, 1 dc, 1 ch and 1 sc. Finish with 1 sl st in first sc from beg of round (= 6 leaves). ROUND 4: 6 ch (= 1 tripple-tr = corner), 8 ch, 1 sc at the top of first leaf (between the 2 dtr), 9 ch, 1 sc at the top of next leaf, 8 ch, 1 TRIPPLE-TR – see above - between the 2 sc between the next 2 leaves, * 7 ch, 1 sc at the top of next leaf (between the 2 dtr), 8 ch, 1 sc at the top of next leaf, 7 ch, 1 tripple-tr between the 2 sc between the next 2 leaves *, repeat from *-* 1 more time along the last side, but finish with 1 sl st in 6th ch from beg of round (instead of 1 tripple-tr between 2 leaves) = 9 ch-loops round the flower with 1 tripple-tr in each corner - the one side (= towards bottom edge) is a little longer than the 2 other sides. ROUND 5: Crochet as follows in tripple-tr in corner: 4 ch (= 1 tr), 2 ch, 1 dtr, 2 ch and 1 tr. In each of the 3 ch-loops along the first side crochet as follows: 1 ch, 1 tr, 1 ch, 1 tr, 1 ch, 1 tr, 1 ch, 1 tr, (= 4 tr in each loop), * in tripple-tr in corner crochet as follows: 1 ch, 1 tr, 2 ch, 1 dtr, 2 ch and 1 tr, and then crochet as follows in each of the 3 ch-loops along the next side: 1 ch, 1 tr, 1 ch, 1 tr, 1 ch, 1 tr (= a total of 3 tr in each loop) *, repeat from *-* 1 more time along the last side, and finish with 1 ch and 1 sl st in 4th ch from beg of round. ROUND 6: 4 ch, 1 tr in first ch-loop, in dtr in each corner crochet as follows: 1 tr, 2 ch, 1 dtr, 2 ch and 1 tr, then crochet 1 tr in each tr and 1 tr in each ch-loop from previous round. Finish round with 1 sl st in 4th ch from beg of round. Along one side there are now 31 tr (= towards bottom edge) and along the 2 other sides there are 25 tr. Fasten off. Triangle measures approx 23 cm / 9" along the longest side and 20 cm / 8" along the 2 other sides. BACK PIECE – LEFT SIDE: Cast on 17-20-24-28-33-38 sts (includes 1 edge st at the side) with 2 threads Alpaca on needle size 5 mm / US 8. Work 2 rows GARTER ST – see above. Work next row as follows from RS: 2-2-2-3-3-3 garter sts, M.1 (= 8 sts), 6-9-13-16-21-26 stockinette sts and 1 edge st in garter st. Continue like this – work inc st in M.1 in stockinette st. AT THE SAME TIME when piece measures 3 cm / 1⅛" dec 1 st at the side (from RS) by K2 tog inside 1 edge st, and repeat the dec on every 3 cm / 1⅛" a total of 5 times. When you have inc a total of 21 sts in M.1 put piece aside - finish after 1 row from RS. Piece now measures approx 20 cm / 8" and there are 33-36-40-44-49-54 sts on needle. BACK PIECE – RIGHT SIDE: Cast on 17-20-24-28-33-38 sts (includes 1 edge st at the side) with 2 threads Alpaca on needle size 5 mm / US 8. Work 2 rows garter st. Work next row as follows from RS: 1 edge st in garter st, 6-9-13-16-21-26 stockinette sts, M.2 (= 8 sts) and 2-2-2-3-3-3 garter sts. Continue like this – work inc sts in M.2 in stockinette st. AT THE SAME TIME when piece measures 3 cm / 1⅛" dec at the side as described for left side – but K tog into back of loop the 2nd and 3rd st on row. When there are as many sts and as many rows as on left side put piece aside. BACK PIECE: Slip the 2 back pieces on the same needle with pattern towards pattern = 66-72-80-88-98-108 sts. Continue as follows: 1 edge st in garter st, 20-23-27-30-35-40 stockinette sts, M.3 (make sure to have the same number of rows between each cable row throughout), 4-4-4-6-6-6 garter sts, M.4, 20-23-27-30-35-40 stockinette sts and 1 edge st in garter st. Continue like this. AT THE SAME TIME when piece measures 22 cm / 8¾" from cast on row inc 1 st each side by K 2 sts in the last but one st, and repeat the inc on every 2-2.5-2.5-2.5-3-3 cm / ¾"-⅞"-⅞"-⅞"-1⅛"-1⅛" a total of 6 times = 78-84-92-100-110-120 sts. When piece measures 37-38-39-40-42-44 cm / 14½"-15"-15¼"-15¾"-16½"-17¼" bind off for armhole each side at the beg of every row: 3 sts 1-1-1-1-2-2 times, 2 sts 1-1-2-3-4-5 times and 1 st 3-4-4-5-4-5 times = 62-66-70-72-74-78 sts. When piece measures 54-56-58-60-63-66 cm / 21¼"-22"-22¾"-23⅝"-24¾"-26" K2 tog on the 6 sts on each cable = 56-60-64-66-68-72 sts. On next row bind off the middle 16-16-18-18-20-20 sts for neck = 20-22-23-24-24-26 sts left on each shoulder. Complete each shoulder separately and bind off when piece measures 56-58-60-62-65-68 cm / 22"-22¾"-23⅝"-24⅜"-25½"-26¾". Sew the crochet triangle to the opening at bottom of back piece – make sure to have the longer side towards bottom edge. Sew edge to edge and make sure the seam is even. LEFT FRONT PIECE: Cast on 41-45-49-53-57-63 sts (includes 1 edge st at the side and 6 front band sts towards mid front) with 2 threads Alpaca on needle size 5 mm / US 8. Work 2 rows garter st. READ ALL OF THE FOLLOWING SECTION BEFORE CONTINUING! PATTERN: Continue as follows from RS: 1 edge st in garter st, 22-26-30-34-38-44 stockinette sts, 2 garter sts, M.4 (= 10 sts) and 6 front band sts in garter st. Continue like this until piece measures approx 12-10-8-6-5-3 cm / 4¾"-4"-3⅛"-2⅜"-2"-1⅛" (adjust to after 1 row from WS after 1 cable-row). Continue as follows: 1 edge st in garter st, stockinette st until 20 sts remain, M.6 (= 12 sts), 2 stockinette sts, and 6 front band sts in garter st. Continue like this – M.6 will shift 1 st towards the side on every other row (i.e. there will gradually be less stockinette sts on right side of piece and more stockinette sts on left side of piece). DECREASES AND INCREASES: At the same time when piece measures 3 cm / 1⅛" dec at the side as described for back piece and when piece measures 22 cm / 8¾" inc at the side as described for back piece. When all dec and inc are complete there are 42-46-50-54-58-64 sts on needle. COLLAR: When piece measures 32-33-34-35-37-39 cm / 12½"-13"-13⅜"-13¾"-14½"-15¼" work 2 rows garter st on the 6 front band sts only (to make neckline neater). On next row inc 1 st for collar towards mid front by making 1 YO inside the first front band st, on next row work YO into back of loop to avoid a hole. Repeat the inc on every other row a total of 12 times = 18 garter sts incl front band-sts towards mid front. DEC FOR NECK: When piece measures 34-35-36-37-39-41 cm / 13⅜"-13¾"-14¼"-14½"-15¼"-16⅛" dec 1 st for neck inside front band sts + inc sts for collar – SEE DECREASING TIP! Repeat the dec on every other row a total of 6-7-7-7-7-8 times and then on every 4th row a total of 5-5-6-6-6-6 times. PATTERN: When M.6 has shifted all the way to the side (only 1 edge st left) continue as follows: 1 edge st in garter st, 3 garter sts, M.1 (but without the YO – make sure to have the same number of rows between each cable-row), then stockinette st and garter st on remaining sts as before. When piece measures 36-37-38-39-41-43 cm / 14¼"-14½"-15"-15¼"-16⅛"-17" K2 tog on the 6 sts on cable. Continue in stockinette st over stockinette st and garter st over garter st. ARMHOLE: When piece measures 37-38-39-40-42-44 cm / 14½"-15"-15¼"-15¾"-16½"-17¼" bind off for armhole at the beg of every row from the side as described for back piece. When all dec for armhole and neck and inc for collar are complete there are 32-34-35-36-36-38 sts on needle – continue in stockinette st and garter st as before. When piece measures 56-58-60-62-65-68 cm / 22"-22¾"-23⅝"-24⅜"-25½"-26¾" bind off 20-22-23-24-24-26 sts from shoulder towards neckline = 12 collar sts left on needle. Continue on these as follows (beg from WS): * 2 rows garter st on all sts, 2 rows garter st on the 8 sts towards mid front only *, repeat from *-* until collar measures 5-5-5.5-5.5-6-6 cm / 2"-2"-2¼"-2¼"-2⅜"-2⅜" (measured where shortest) and bind off loosely. RIGHT FRONT PIECE: Like left front piece, but after the first 2 rows garter st continue as follows: 6 front band sts in garter st, M.3, 2 garter sts, 22-26-30-34-38-44 stockinette sts and 1 edge st in garter st. Then work M.5 instead of M.6 and M.2 instead of M.1. AT THE SAME TIME when piece measures 6 cm / 2⅜" make BUTTONHOLES on front band – see above! SLEEVE: Worked back and forth on needle. Cast on 57-59-61-63-65-67 sts (includes 1 edge st each side) with 2 threads Alpaca on needle size 5 mm / US 8. K 1 row from RS and continue as follows from WS: 1 edge st in garter st, 9-10-11-12-13-14 stockinette sts, M.7 (= 37 sts), 9-10-11-12-13-14 stockinette sts and 1 edge st in garter st. AT THE SAME TIME when piece measures 2 cm / ¾" dec 1 st each side, repeat the dec on every 3 cm / 1⅛" a total of 5 times. When M.7 and dec at the sides are complete there are 41-43-45-47-49-51 sts on needle and piece measures approx 17 cm / 6¾". Continue in stockinette st on all sts. When piece measures 19 cm / 7½" inc 1 st each side, and repeat the inc on every 3.5-3-2.5-2-2-1.5 cm / 1¼"-1⅛"-⅞"-¾"-¾"-½" a total of 9-10-11-12-13-14 times = 59-63-67-71-75-79 sts. When piece measures 49-48-47-46-45-44 cm / 19¼"-19"-18½"-18"-17¾"-17¼" (less for the larger sizes because of longer sleeve cap and wider shoulder) bind off for sleeve cap each side at the beg of every row: 4 sts 1 time, 2 sts 2 times and 1 st 4-5-6-7-8-9 times, then 2 sts each side until piece measures 57 cm / 22½", now bind off 3 sts 1 time each side. Bind off remaining sts, piece measures approx 58 cm / 22¾". ASSEMBLY: Sew shoulder seams. Sew collar tog mid back, edge to edge, and sew to neckline. Set in sleeves and sew side and sleeve seams inside 1 edge st. Crochet a border round the whole opening with crochet hook size 4.5 mm/US 7 and 2 threads Alpaca – beg mid back, continue down along collar, left front band, along bottom edge, up along right front band, collar and finish mid back. Crochet as follows: 1 sc in first st, * 4 ch, 1 dc in the first ch (= 1 picot), skip approx 1.5 cm / ½", 1 sc in next st *, repeat from *-*. Crochet a similar border round sleeve edges. Sew on buttons. |
||||||||||||||||||||||||||||||||||
Diagram explanations |
||||||||||||||||||||||||||||||||||
|
||||||||||||||||||||||||||||||||||
 |
||||||||||||||||||||||||||||||||||
 |
||||||||||||||||||||||||||||||||||
Have you finished this pattern?Tag your pictures with #dropspattern #sweetericacardigan or submit them to the #dropsfan gallery. Do you need help with this pattern?You'll find 33 tutorial videos, a Comments/Questions area and more by visiting the pattern on garnstudio.com. © 1982-2026 DROPS Design A/S. We reserve all rights. This document, including all its sub-sections, has copyrights. Read more about what you can do with our patterns at the bottom of each pattern on our site. |
||||||||||||||||||||||||||||||||||


With over 40 years in knitting and crochet design, DROPS Design offers one of the most extensive collections of free patterns on the internet - translated to 17 languages. As of today we count 324 catalogs and 12290 patterns - 12280 of which are translated into English (US/in).
We work hard to bring you the best knitting and crochet have to offer, inspiration and advice as well as great quality yarns at incredible prices! Would you like to use our patterns for other than personal use? You can read what you are allowed to do in the Copyright text at the bottom of all our patterns. Happy crafting!
Post a comment to pattern DROPS 117-1
We would love to hear what you have to say about this pattern!
If you want to leave a question, please make sure you select the correct category in the form below, to speed up the answering process. Required fields are marked *.