
Popular categories
Looking for a yarn?


Comments / Questions (41)
![]() Martina wrote:
Martina wrote:
Liebes Drops-Team! Ich hänge an der Stelle der Anleitung, wo die erhöhte Nackenpartie beschrieben wird. Wenn ich die verkürzten Reihen nach Anleitung gestrickt habe, stricke ich in die entgegengesetzte Richtung als ganz zum Beginn des Strickstücks - ist das richtig so? Und was ist mit "1 R. über alle M. stricken und danach rund weiterstricken." gemeint? 1 Reihe, 1 Runde? Wenn ich über alle M. stricke, stricke ich doch eine Runde, oder nicht? Martina
19.04.2015 - 09:40DROPS Design answered:
Sie beginnen die verkürzten R mit einer Hin-R ab Rd-Beginn, dieser ist ja an der rechten Seite. Wenn Sie dann in einer Hin-R die M stricken, stricken Sie genau über die Hälfte aller M, d.h. über das Rückenteil. Dann wenden, wieder bis zum Markierer stricken (= Rück-R), also wieder über alle Rückenteil-M. Die nächste R, in der Sie 43-45-47-49-49 M stricken, ist eine Hin-R, die nächste (48-... M) eine Rück-R usw. Die letzte R (64-... M) ist eine Rück-R. Dann wenden Sie wieder und stricken einmal rundum bis zum Markierer (also an sich eine Runde, wie von Ihnen vermutet). Dann geht es ab da wieder ganz normal in Runden weiter.
23.04.2015 - 23:50
![]() MAR wrote:
MAR wrote:
Soy yo de nuevo... Indagando, ¿puede ser que las de doble punta sean recomendadas para la parte del cuello por ser éste más pequeño? Siento las dudas. Es mi primer trabajo en este tipo de agujas.
10.02.2015 - 15:33
![]() MAR wrote:
MAR wrote:
Buenos días, Tengo duda sobre qué agujas usar. En la explicación ponéis "Tejer la pieza en redondo en ag. circular.", pero luego pone montar los puntos en ag de doble punta. ¿No es muy grande este modelo para hacerlo en doble punta? ¿Se elige el que más nos guste? Muchas gracias!! Enhorabuena por todo: las lanas, los patrones, los vídeos... Todo un descubrimiento!! :)
09.02.2015 - 13:23DROPS Design answered:
Hola Mar. La prenda se trabaja con ambas agujas. La ag de doble punta se utiliza cuando hay pocos pts y no es cómodo trabajar con ag circular (por ejémplo los puños).
11.02.2015 - 23:11
![]() Gisele wrote:
Gisele wrote:
Lovely!
03.10.2014 - 09:26
![]() Karin Klein wrote:
Karin Klein wrote:
Hej. Jeg har strikket denne flotte bluse. Der er fejl i materiale mængden. Jeg har strikket i Garnet Paris str. 7/8 her har jeg brugt 200 g i bundfarvens og ikke 350 g, som der står. Desuden har jeg brugt 100 g mosgrøn og ikke kun 50 g, som der står. Jeg har holdt strikkefastheden.
31.08.2014 - 14:43
![]() Veronika wrote:
Veronika wrote:
Hallo, Wenn ich diesen Pulli in Big Delight stricken moechte, Groesse 140, wieviel Wolle benotige ich dann? Vielen Dank, Veronika
11.12.2013 - 11:28DROPS Design answered:
Liebe Veronika, Sie brauchen sicher maximal 5 Knäuel. Bei Paris ist ein Verbrauch von 650 g angegeben, aber bei Streifenmuster braucht man immer etwas mehr. Leider habe ich den Pullover nicht mehr zum Wiegen da, da es ein älteres Modell ist. Rein rechnerisch sind es 975 m Paris (650 g = 13 kn. 13 x 75 m = 975 m) Das entspricht 5,1 Knäuel Big Delight mit einer Lauflänge von 190 m/100g.
12.12.2013 - 08:21
![]() Birthe Møller wrote:
Birthe Møller wrote:
Har aldrig oplevet en opskrift hvor garnmængden er så forkert. mangler 50g mosgrøn og har 200 g grå i overskud.
25.10.2012 - 09:22
![]() Vivianne wrote:
Vivianne wrote:
Die angegebenen Garnmengen stimmen überhaupt nicht. Ich habe das angegebene Garn für die Grösse 7/8 Jahre bestellt und habe jetzt zuwenig moosgrün und viel zu viel grau. Ich habe bei einem anderen Design auch zuwenig Wolle von einer Farbe und zuviel von der anderen gehabt und musste nachbestellen. Das ist sehr ärgerlich!
14.09.2012 - 17:37
![]() DROPS Design wrote:
DROPS Design wrote:
Til Cathrine og Marie: Nå er diagrammet på plass.
09.02.2012 - 08:41
![]() Cathrine wrote:
Cathrine wrote:
Mulig jeg er dum, men jeg kan ikke finne diagrammet i oppskriften. Hvor er det?
08.02.2012 - 20:44
|
||||||||||||||||
Seashore Stripes#seashorestripessweater |
||||||||||||||||
|
|
||||||||||||||||
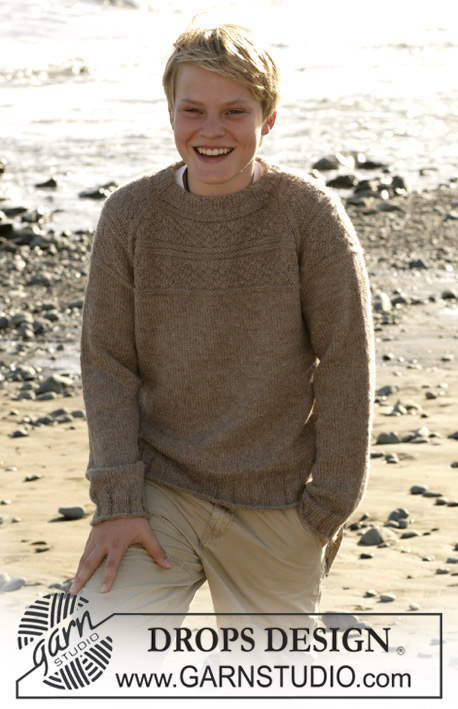
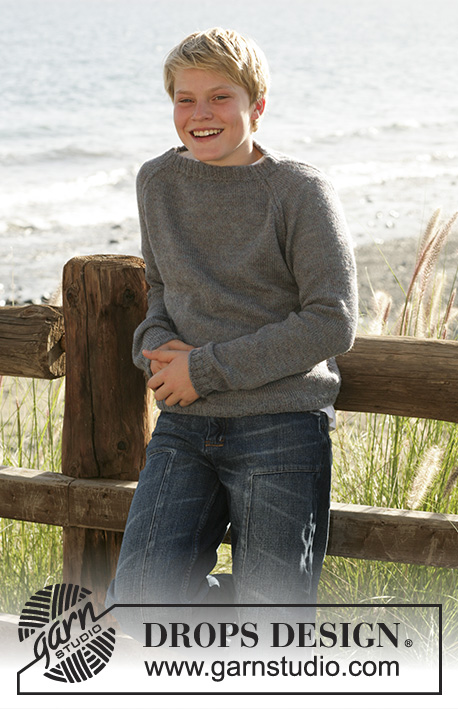
Knitted sweater with stripes and raglan in DROPS Paris. Size children 5 to 14 years.
DROPS Children 15-14 |
||||||||||||||||
|
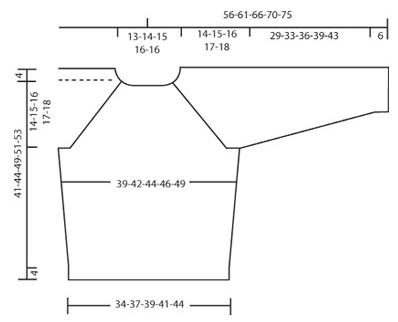
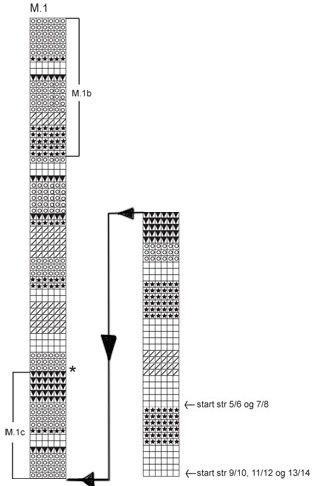
Pattern: See diagram M.1. Diagram shows all rows in pattern seen from RS. Stripes: Work stripes after diagram M.1. Work as follows: Yoke: See start of diagram M.1. Back and front pieces: Continue with diagram M.1. After M.1 repeat M.1b until finished measurement. Sleeve: Work diagram M.1 like back and front pieces until * in diagram. Work M.1c 1 time in height. Continue with M.1 from * in diagram. After M.1 repeat M.1b until finished measurement. Knitting tip (applies to neck): To avoid holes when turning piece slip 1st st as if to knit when knitting back and tighten yarn slightly. Increasing tip (applies to raglan): Inc as follows from RS: Start 2 sts from marking threads: Yo, K4 (marking thread is placed in middle between these sts), yo. On next row K into back of yo (i.e. knit into back of sts in stead of into front of sts) to avoid creating hole when increasing. ------------------------------------------------------------------------------------------------- YOKE Work piece in round on circular needle. The sweater is worked top down so the length is easily adjust according to requirement. Cast on 76-80-84-88-88 sts on double pointed needles size 4.5 mm / US 7 with petrol. Work Rib K2 / P2 until piece measures 3 cm / 1⅛". Insert a marker at beginning of round (= right side). Continue with a rise on back of neck (to ensure neck will fit neatly). Continue in Rib K2/ P2 and work back and forth as follows: Work 38-40-42-44-44 sts, turn piece – read Knitting tip – and work back to marker. Turn piece. Work 43-45-47-49-49 sts. Turn piece. Work 48-50-52-54-54 sts back. Turn piece. Work 56-58-60-62-62 sts. Turn piece. Work 64-66-68-70-70 sts back. Turn piece. Work 1 round over all sts and continue to marker. Continue in stockinette in the round. K1 round with petrol at the same time inc 12-10-8-12-12 sts evenly = 88-90-92-100-100 sts. Continue 8 sts past marker (move the beginning of the round). Insert 4 new markers into piece as follows: 1st marker in beginning of round (= 1st transition between right arm and back piece ), 2nd marker after 28-29-30-34-34 sts (= back piece), 3rd marker after 44-45-46-50-50 sts (= left sleeve), 4th marker after 72-74-76-84-84 sts (= front piece). Sts between 4th and 1st marker = right sleeve. Continuing in stockinette st and stripes after diagram M.1- see explanation above – until completed measurement. At the same time inc for raglan: Inc 1 sts on each side of 4 markers (= 8 inc) – read Increasing tips. Inc on each round 2-4-6-3-7 times and then on every other round 15-15-15-18-17 times. After all inc for raglan there are 224-242-260-268-292 sts on needle. On next round slip 50-54-58-58-64 sts on each side (between 2nd and 3rd markers and between 4th and 1st marker) on stitch holders for sleeves. At the same time cast on 8 new sts each side over the sts that are being put on holders = 140-150-160-168-180 sts on needle. Back and front pieces: Continue in stockinette sts and stripes after M.1 – see explanation above. On 1st round insert 1 marker in each side of piece under arms (i.e. 4 new sts on each side of markers). At the same time when piece measures 4 cm / 1½" from markers in sides dec 1 sts on each side of marker, repeat dec on every 5-6-5.5-6-6 cm / 2"-2⅜"-2¼"-2⅜"-2⅜" a total of 4-4-5-5-5 times = 124-134-140-148-160 sts. Continue until piece measures 41-44-49-51-53 cm / 16⅛"-17¼"-19¼"-20"-21" from shoulder. If extra length is required continue working stripes from M.1. Now continue in Rib K2 / P2 with light gray. NOTE: Size 7/8 years: Before starting Rib K1 round and dec 2 sts evenly = 132 sts.) Continue like this until Rib measures approx 4 cm / 1½". Bind off loosely with K over K and P over P. Piece measures approx 45-48-53-55-57 cm / 17¾"-19"-21"-21⅝"-22½" from shoulder. Sleeve: Slip sts from stitch holder (= 50-54-58-58-64 sts) on to double pointed needles size 4.5 mm / US 7. Continue in stockinette sts and stripes from M.1 – see explanation above. At the same time on 1st round cast on 8 new sts under sleeve = 58-62-66-66-72 sts. Insert a marker mid under sleeve (i.e. 4 new sts on each side of marker). When piece measures 4-4-3-3-3 cm / 1½"-1½"-1"-1"-1" from marker mid under sleeve dec 1 sts on each side of marker, repeat dec on every 3.5-3-3-4-3.5 cm / 1¼"-1⅛"-1⅛"-1½"-1¼" a total of 7-9-11-9-12 times = 44-44-44-48-48 sts. Continue until piece measures 29-33-36-39-43 cm / 11⅜"-13"-14¼"-15¼"-17" from marker mid under sleeve, and now change to light gray. Continue with Rib K2/ P2 for 6 cm / 2⅜", and then bind off loosely with K over K and P over P. Assembly: Sew openings under arms. |
||||||||||||||||
Diagram explanations |
||||||||||||||||
|
||||||||||||||||
 |
||||||||||||||||
 |
||||||||||||||||
Have you finished this pattern?Tag your pictures with #dropspattern #seashorestripessweater or submit them to the #dropsfan gallery. Do you need help with this pattern?You'll find 20 tutorial videos, a Comments/Questions area and more by visiting the pattern on garnstudio.com. © 1982-2026 DROPS Design A/S. We reserve all rights. This document, including all its sub-sections, has copyrights. Read more about what you can do with our patterns at the bottom of each pattern on our site. |
||||||||||||||||


With over 40 years in knitting and crochet design, DROPS Design offers one of the most extensive collections of free patterns on the internet - translated to 17 languages. As of today we count 325 catalogs and 12298 patterns - 12288 of which are translated into English (US/in).
We work hard to bring you the best knitting and crochet have to offer, inspiration and advice as well as great quality yarns at incredible prices! Would you like to use our patterns for other than personal use? You can read what you are allowed to do in the Copyright text at the bottom of all our patterns. Happy crafting!
Post a comment to pattern DROPS Children 15-14
We would love to hear what you have to say about this pattern!
If you want to leave a question, please make sure you select the correct category in the form below, to speed up the answering process. Required fields are marked *.