
Popular categories
Looking for a yarn?


Comments / Questions (41)
![]() Johanna De Boer wrote:
Johanna De Boer wrote:
Deze trui heb ik gebreid in de maat 9/10 jaar. Van de kleur lichtgrijs Drops 23 heb ik 4x 50 gr = 200 gr over. En van de kleur wit Drops 16 kwam ik tekort. Wilt u daarom bij alle maten de aanbevolen hoeveelheden nakijken en aanpassen?
06.05.2026 - 19:30
![]() JZ wrote:
JZ wrote:
Thanks for your answer relating to knitting short rows once knitting in rounds! You sent me a video how to do this. I suggest to include this video in your instructions.
28.03.2023 - 16:09
![]() JZ wrote:
JZ wrote:
Increase decription asks for knitting two rows: first row with increase by Yo and second to knit over the Yo. I assume that increaing every row means that I need to increase by first knitting over Yo from previous row and then immediatly make Yo. Is it a correct assumtion? I.e Yo every single row.
28.03.2023 - 15:59DROPS Design answered:
Dear JZ, correct, remember the increases should be always worked as explained under Increasing tip (applies to raglan):, ie work until 2 sts remain before marker, YO, K4 (marker is in the middle of these 4 sts), YO; and repeat at each marker. Happy knitting!
29.03.2023 - 09:23
![]() Laura wrote:
Laura wrote:
In the raglan directions, so to be more clear, "every other row" does NOT mean alternating rows, it means every subsequent row, therefore each of the next 17 rows, inc 8 in each row. Correct?
23.02.2023 - 14:06DROPS Design answered:
Dear Laura, when you have to increase 7 times on every round, increase on each of the next 7 rounds; when you have to increase on every other round a total of 17 times work as follows *work 1 round without increase, work 1 roudn with increases* work these 2 rounds a total of 17 times (= a total of 34 rounds will have been worked). Happy knitting!
23.02.2023 - 14:49
![]() Laura wrote:
Laura wrote:
I am having trouble with the raglan part of this pattern. I am making the size 14. I started with 100 stitches on, then inc 8 sts for each of the 7 rows gave me 156 sts, BUT, if I were to add 8 inc per every other row for the next 17 rows, I only have 220 sts - NOT 292. Should I inc 8 sts per row for each of the 17 next rows instead? Help! I look forward to finishing this project!
22.02.2023 - 23:52DROPS Design answered:
Dear Laura, in size 13/14 years you first increase on every round for raglan a total of 7 times then you increase a total of 17 times on every other round, you will have then: 100 + (7x8) + (17x8) = 292 sts. Happy knitting!
23.02.2023 - 13:48
![]() Timo wrote:
Timo wrote:
Erre a részre gondoltam: "Folytassuk2 S / 2 F bordás mintával. Oda-vissza haladva kötünk:..."
02.05.2021 - 19:13
![]() Timo wrote:
Timo wrote:
Köszönöm szépen a gyors választ! Megint elakadtam. Ha a nyakánál kötöm az oda-vissza sorokat, utána elcsúsztatom a kezdést 8 szemmel akkor nekem a legkeskenyebb résznél lesz az új kör kezdete. Annak nem az elejének kellene lennie?
02.05.2021 - 12:55DROPS Design answered:
Kedves Timo, ha a pulóvert körben kötjük (tehát nem kardigánunk van) a sor/kör kezdete gyakran esik a háta és az egyik ujja közé. Sikeres kézimunkáázást!
02.05.2021 - 17:17
![]() Timo wrote:
Timo wrote:
Sziasztok! Segítségeteket szeretném kérni abban, hogy ha a vállrészt folyamatosan a színén kötöm, mivel körkötőtűvel készítem a minta szerint, akkor is minden sorban kell szaporitani? Nem csak minden másodikban? A másik kérdésem az lenne, hogy a mintaív szerint a színét mutatja a mintának. A körkötés miatt ezt is ugye úgy kell érteni, hogy duplázódik a sorszám? Válaszotokat előre is köszönöm
26.04.2021 - 07:56DROPS Design answered:
Kedves Timo, nem kell duplázni a sorokat a körkötés miatt. Vagyis a vállrész szaporítása, ahogy a leírásban is van : Szap minden körben 2-4-6-3-7 alkalommal majd minden 2. körben 15-15-15-18-17 alkalommal. Ezzel a raglánvonal egészen enyhén íves lesz. A minta kötésénél is MINDEN sort lát a diagramban, de minden sort úgy, ahogy azok a SZO felől látszanak (vagyis S szemkén, tehát a bord mintás szegélyeken kívül a pulóvert végig harisnyakötéssel kell kötni). Sikeres Kézimunkázást!
26.04.2021 - 10:23
![]() Sabine Kastrop wrote:
Sabine Kastrop wrote:
Ik meerder aan weerszijde van de merkdraden 1 steek. Voor de raglan, dat snap ik. Daarna staat er” Meerder 2-4-6 keer in elke naald ? ( waar in de naald?) en vervolgen 15 in elke tweede naald? ??? Snap echt niet hoe er gemeerderd moet worden. Dan staat er als de meerderingen voltooid zijn. Hoeveel naalden gaat dit over? Ik hoop dat u mij kunt helpen
20.07.2020 - 23:00DROPS Design answered:
Dag Sabine,
Je meerdert eerst in elke naald en dit doe je voor maat 5/6 2 keer, voor maat 7/8 doe je dit 4 keer, enzooort. Vervolgens meeder je op elke tweede naald dus om de naald. En dit doe je in totaal 15 keer.
23.07.2020 - 11:37
![]() Elsebeth Jungsled wrote:
Elsebeth Jungsled wrote:
Hej Jeg forstår ikke helt, at der står man skal strikke rundt og at man slår op på strømpepinde. Kan man bruge rundpinde ? Vh Elsebeth
10.06.2020 - 14:58DROPS Design answered:
Hej Elsebeth, Ja hvis der er masker nok så de når rundt på en rundpind, så kan du vælge det istedet for strømpepinde. God fornøjelse!
10.06.2020 - 15:04
|
||||||||||||||||
Seashore Stripes#seashorestripessweater |
||||||||||||||||
|
|
||||||||||||||||
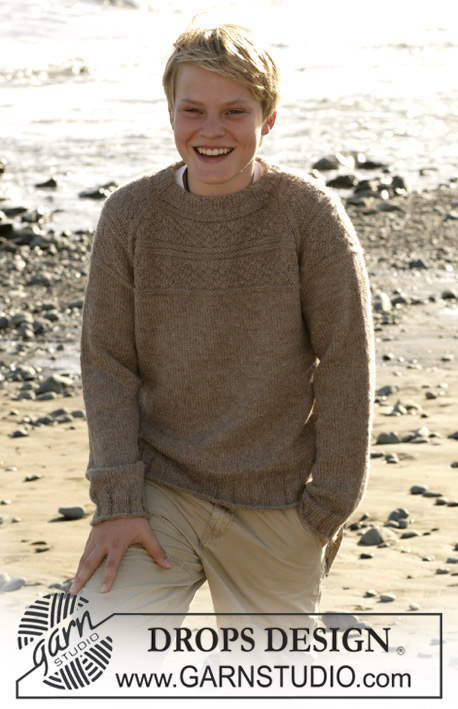
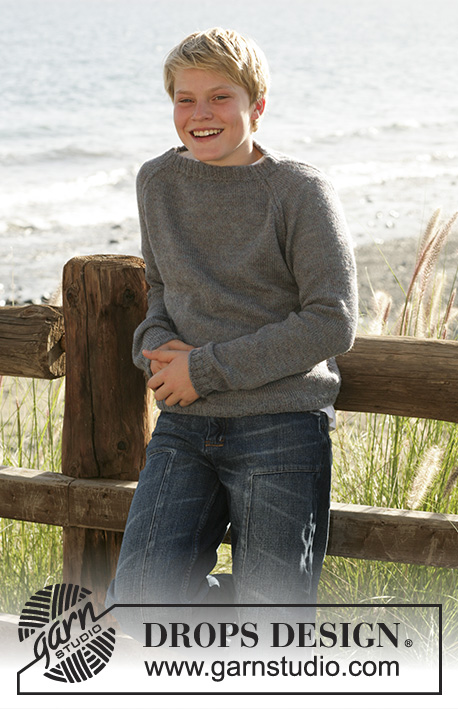
Knitted sweater with stripes and raglan in DROPS Paris. Size children 5 to 14 years.
DROPS Children 15-14 |
||||||||||||||||
|
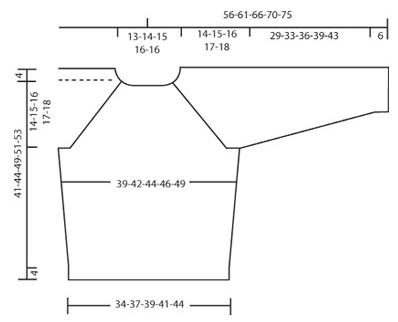
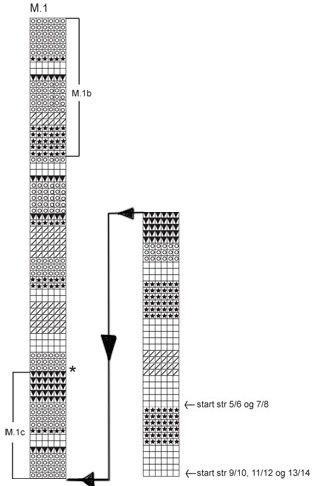
Pattern: See diagram M.1. Diagram shows all rows in pattern seen from RS. Stripes: Work stripes after diagram M.1. Work as follows: Yoke: See start of diagram M.1. Back and front pieces: Continue with diagram M.1. After M.1 repeat M.1b until finished measurement. Sleeve: Work diagram M.1 like back and front pieces until * in diagram. Work M.1c 1 time in height. Continue with M.1 from * in diagram. After M.1 repeat M.1b until finished measurement. Knitting tip (applies to neck): To avoid holes when turning piece slip 1st st as if to knit when knitting back and tighten yarn slightly. Increasing tip (applies to raglan): Inc as follows from RS: Start 2 sts from marking threads: Yo, K4 (marking thread is placed in middle between these sts), yo. On next row K into back of yo (i.e. knit into back of sts in stead of into front of sts) to avoid creating hole when increasing. ------------------------------------------------------------------------------------------------- YOKE Work piece in round on circular needle. The sweater is worked top down so the length is easily adjust according to requirement. Cast on 76-80-84-88-88 sts on double pointed needles size 4.5 mm / US 7 with petrol. Work Rib K2 / P2 until piece measures 3 cm / 1⅛". Insert a marker at beginning of round (= right side). Continue with a rise on back of neck (to ensure neck will fit neatly). Continue in Rib K2/ P2 and work back and forth as follows: Work 38-40-42-44-44 sts, turn piece – read Knitting tip – and work back to marker. Turn piece. Work 43-45-47-49-49 sts. Turn piece. Work 48-50-52-54-54 sts back. Turn piece. Work 56-58-60-62-62 sts. Turn piece. Work 64-66-68-70-70 sts back. Turn piece. Work 1 round over all sts and continue to marker. Continue in stockinette in the round. K1 round with petrol at the same time inc 12-10-8-12-12 sts evenly = 88-90-92-100-100 sts. Continue 8 sts past marker (move the beginning of the round). Insert 4 new markers into piece as follows: 1st marker in beginning of round (= 1st transition between right arm and back piece ), 2nd marker after 28-29-30-34-34 sts (= back piece), 3rd marker after 44-45-46-50-50 sts (= left sleeve), 4th marker after 72-74-76-84-84 sts (= front piece). Sts between 4th and 1st marker = right sleeve. Continuing in stockinette st and stripes after diagram M.1- see explanation above – until completed measurement. At the same time inc for raglan: Inc 1 sts on each side of 4 markers (= 8 inc) – read Increasing tips. Inc on each round 2-4-6-3-7 times and then on every other round 15-15-15-18-17 times. After all inc for raglan there are 224-242-260-268-292 sts on needle. On next round slip 50-54-58-58-64 sts on each side (between 2nd and 3rd markers and between 4th and 1st marker) on stitch holders for sleeves. At the same time cast on 8 new sts each side over the sts that are being put on holders = 140-150-160-168-180 sts on needle. Back and front pieces: Continue in stockinette sts and stripes after M.1 – see explanation above. On 1st round insert 1 marker in each side of piece under arms (i.e. 4 new sts on each side of markers). At the same time when piece measures 4 cm / 1½" from markers in sides dec 1 sts on each side of marker, repeat dec on every 5-6-5.5-6-6 cm / 2"-2⅜"-2¼"-2⅜"-2⅜" a total of 4-4-5-5-5 times = 124-134-140-148-160 sts. Continue until piece measures 41-44-49-51-53 cm / 16⅛"-17¼"-19¼"-20"-21" from shoulder. If extra length is required continue working stripes from M.1. Now continue in Rib K2 / P2 with light gray. NOTE: Size 7/8 years: Before starting Rib K1 round and dec 2 sts evenly = 132 sts.) Continue like this until Rib measures approx 4 cm / 1½". Bind off loosely with K over K and P over P. Piece measures approx 45-48-53-55-57 cm / 17¾"-19"-21"-21⅝"-22½" from shoulder. Sleeve: Slip sts from stitch holder (= 50-54-58-58-64 sts) on to double pointed needles size 4.5 mm / US 7. Continue in stockinette sts and stripes from M.1 – see explanation above. At the same time on 1st round cast on 8 new sts under sleeve = 58-62-66-66-72 sts. Insert a marker mid under sleeve (i.e. 4 new sts on each side of marker). When piece measures 4-4-3-3-3 cm / 1½"-1½"-1"-1"-1" from marker mid under sleeve dec 1 sts on each side of marker, repeat dec on every 3.5-3-3-4-3.5 cm / 1¼"-1⅛"-1⅛"-1½"-1¼" a total of 7-9-11-9-12 times = 44-44-44-48-48 sts. Continue until piece measures 29-33-36-39-43 cm / 11⅜"-13"-14¼"-15¼"-17" from marker mid under sleeve, and now change to light gray. Continue with Rib K2/ P2 for 6 cm / 2⅜", and then bind off loosely with K over K and P over P. Assembly: Sew openings under arms. |
||||||||||||||||
Diagram explanations |
||||||||||||||||
|
||||||||||||||||
 |
||||||||||||||||
 |
||||||||||||||||
Have you finished this pattern?Tag your pictures with #dropspattern #seashorestripessweater or submit them to the #dropsfan gallery. Do you need help with this pattern?You'll find 20 tutorial videos, a Comments/Questions area and more by visiting the pattern on garnstudio.com. © 1982-2026 DROPS Design A/S. We reserve all rights. This document, including all its sub-sections, has copyrights. Read more about what you can do with our patterns at the bottom of each pattern on our site. |
||||||||||||||||


With over 40 years in knitting and crochet design, DROPS Design offers one of the most extensive collections of free patterns on the internet - translated to 17 languages. As of today we count 325 catalogs and 12298 patterns - 12288 of which are translated into English (US/in).
We work hard to bring you the best knitting and crochet have to offer, inspiration and advice as well as great quality yarns at incredible prices! Would you like to use our patterns for other than personal use? You can read what you are allowed to do in the Copyright text at the bottom of all our patterns. Happy crafting!
Post a comment to pattern DROPS Children 15-14
We would love to hear what you have to say about this pattern!
If you want to leave a question, please make sure you select the correct category in the form below, to speed up the answering process. Required fields are marked *.